2004 BMW 525I SEDAN tow
[x] Cancel search: towPage 111 of 220
Driving tips
109Reference
At a glance
Controls
Communications
Navigation
Entertainment
Mobility
Stowing cargo
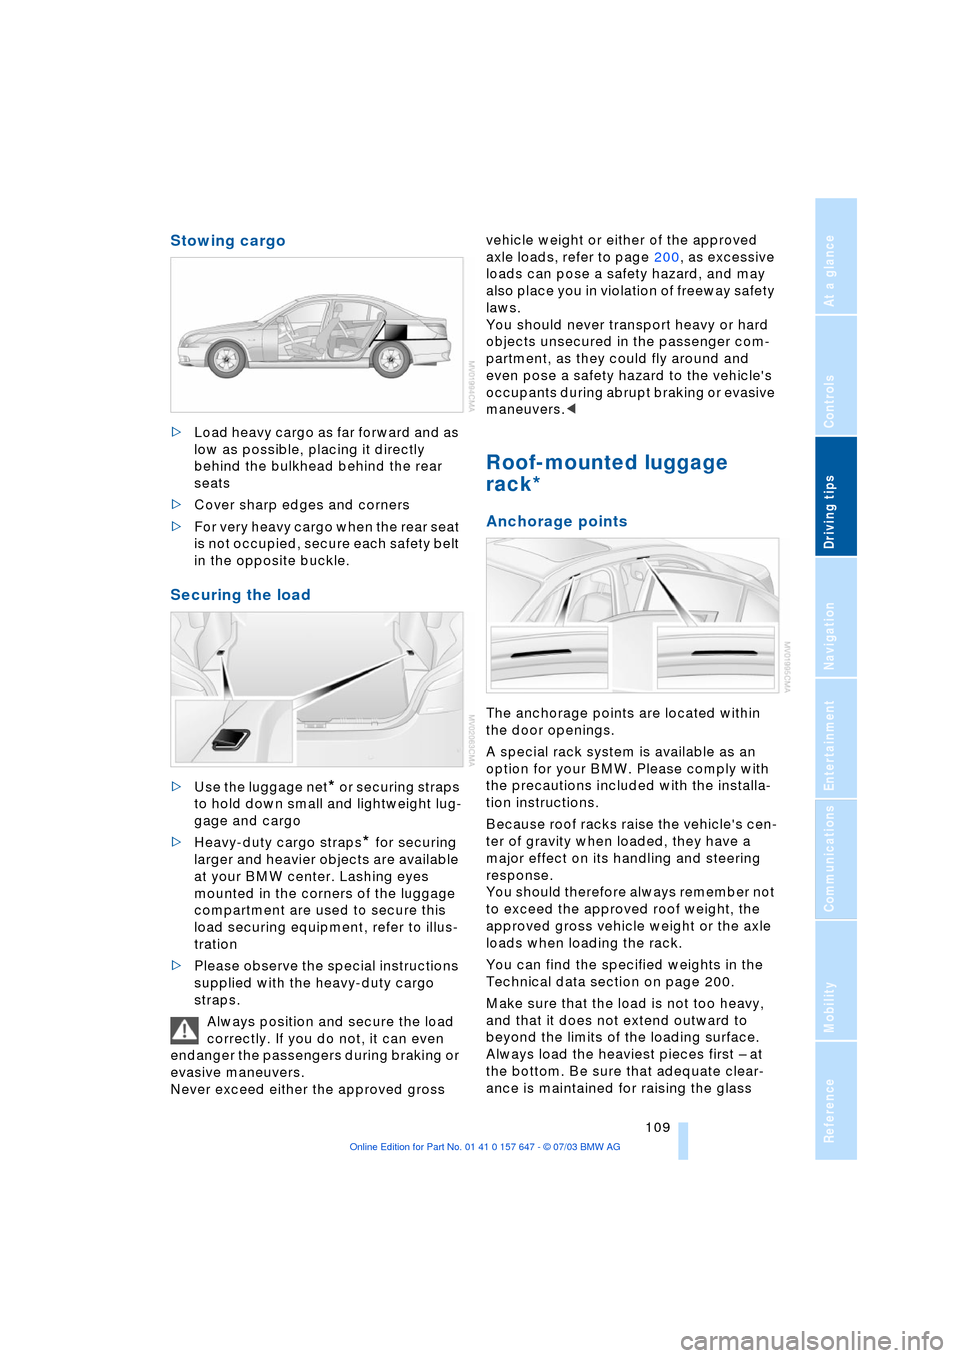
>Load heavy cargo as far forward and as
low as possible, placing it directly
behind the bulkhead behind the rear
seats
>Cover sharp edges and corners
>For very heavy cargo when the rear seat
is not occupied, secure each safety belt
in the opposite buckle.
Securing the load
>Use the luggage net* or securing straps
to hold down small and lightweight lug-
gage and cargo
>Heavy-duty cargo straps
* for securing
larger and heavier objects are available
at your BMW center. Lashing eyes
mounted in the corners of the luggage
compartment are used to secure this
load securing equipment, refer to illus-
tration
>Please observe the special instructions
supplied with the heavy-duty cargo
straps.
Always position and secure the load
correctly. If you do not, it can even
endanger the passengers during braking or
evasive maneuvers.
Never exceed either the approved gross vehicle weight or either of the approved
axle loads, refer to page 200, as excessive
loads can pose a safety hazard, and may
also place you in violation of freeway safety
laws.
You should never transport heavy or hard
objects unsecured in the passenger com-
partment, as they could fly around and
even pose a safety hazard to the vehicle's
occupants during abrupt braking or evasive
maneuvers.<
Roof-mounted luggage
rack*
Anchorage points
The anchorage points are located within
the door openings.
A special rack system is available as an
option for your BMW. Please comply with
the precautions included with the installa-
tion instructions.
Because roof racks raise the vehicle's cen-
ter of gravity when loaded, they have a
major effect on its handling and steering
response.
You should therefore always remember not
to exceed the approved roof weight, the
approved gross vehicle weight or the axle
loads when loading the rack.
You can find the specified weights in the
Technical data section on page 200.
Make sure that the load is not too heavy,
and that it does not extend outward to
beyond the limits of the loading surface.
Always load the heaviest pieces first Ð at
the bottom. Be sure that adequate clear-
ance is maintained for raising the glass
Page 117 of 220
Navigation
Driving tips
115Reference
At a glance
Controls
Communications
Entertainment
Mobility
Display in assistance
window
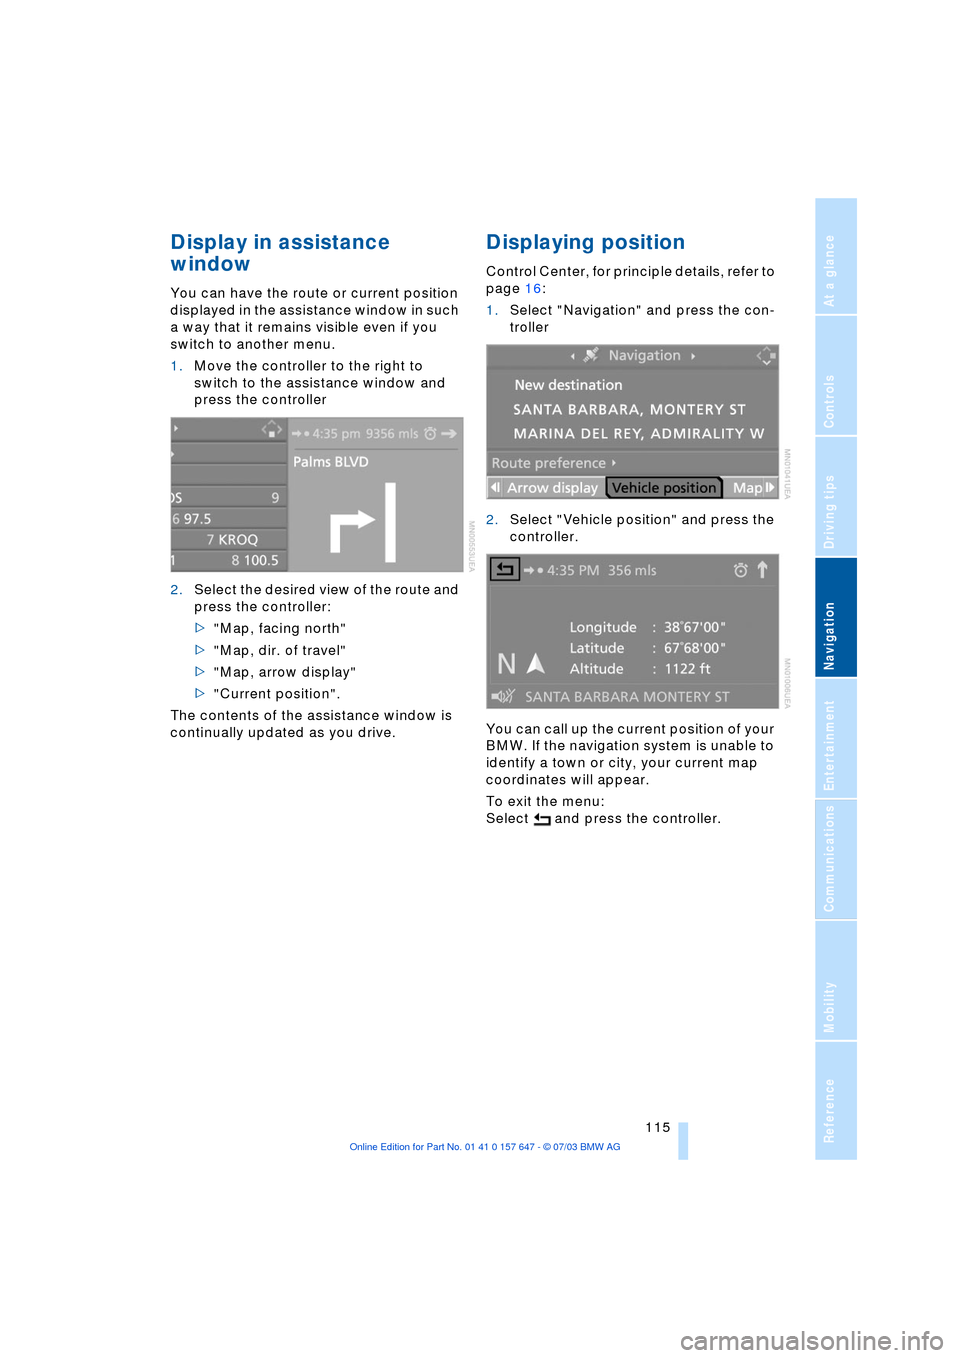
You can have the route or current position
displayed in the assistance window in such
a way that it remains visible even if you
switch to another menu.
1.Move the controller to the right to
switch to the assistance window and
press the controller
2.Select the desired view of the route and
press the controller:
>"Map, facing north"
>"Map, dir. of travel"
>"Map, arrow display"
>"Current position".
The contents of the assistance window is
continually updated as you drive.
Displaying position
Control Center, for principle details, refer to
page 16:
1.Select "Navigation" and press the con-
troller
2.Select "Vehicle position" and press the
controller.
You can call up the current position of your
BMW. If the navigation system is unable to
identify a town or city, your current map
coordinates will appear.
To exit the menu:
Select and press the controller.
Page 118 of 220
Destination entry
116
Destination entry
In entering your destination you can select
from among the following options:
>Entering a destination manually, see
below
>Selecting destination via information,
refer to page 118
>Selecting from among recent destina-
tions, refer to page 119
>Selecting destination from address
book, refer to page 120.
After selecting your destination you can
proceed to start the destination guidance
system, refer to page 123.
Enter data only when the vehicle is
stationary, and always obey the traffic
regulations and road signs in the event of
any contradiction between traffic and road
conditions and the instructions issued by
the navigation system. If you do not
observe this precaution, you may be in vio-
lation of the law, and can endanger vehicle
occupants and other road users.<
Entering a destination
manually
The system supports the wordmatch prin-
ciple to make it easier for you to enter the
names of streets or towns. This enables
input of different spellings and supple-
ments your input automatically so that
stored names can be adopted as destina-
tions as quickly as possible, refer to
page 122.
Control Center, for principle details, refer to
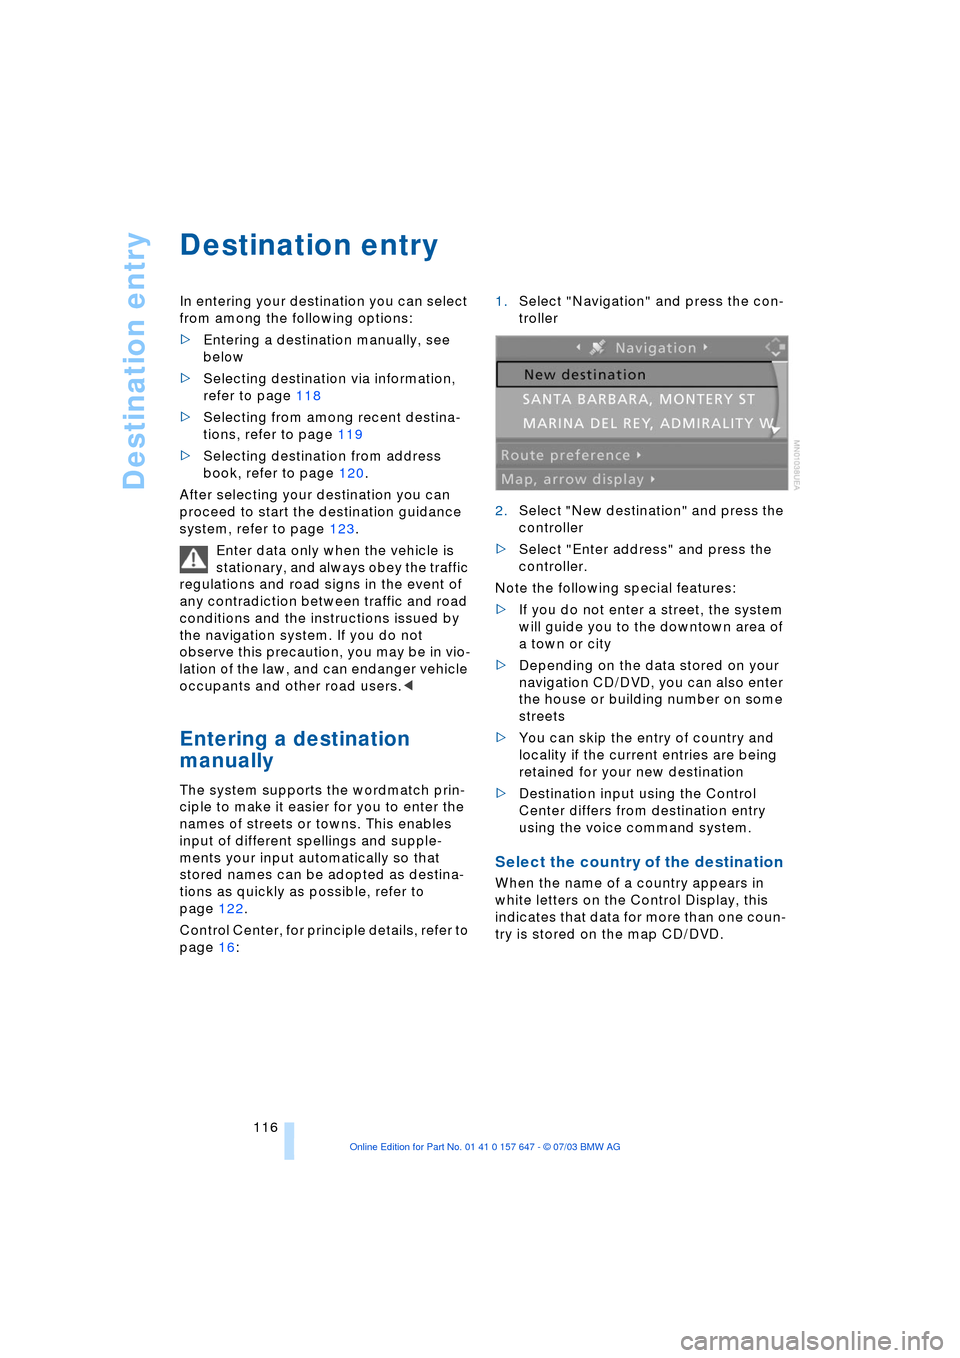
page 16: 1.Select "Navigation" and press the con-
troller
2.Select "New destination" and press the
controller
>Select "Enter address" and press the
controller.
Note the following special features:
>If you do not enter a street, the system
will guide you to the downtown area of
a town or city
>Depending on the data stored on your
navigation CD/DVD, you can also enter
the house or building number on some
streets
>You can skip the entry of country and
locality if the current entries are being
retained for your new destination
>Destination input using the Control
Center differs from destination entry
using the voice command system.
Select the country of the destination
When the name of a country appears in
white letters on the Control Display, this
indicates that data for more than one coun-
try is stored on the map CD/DVD.
Page 119 of 220
Navigation
Driving tips
117Reference
At a glance
Controls
Communications
Entertainment
Mobility
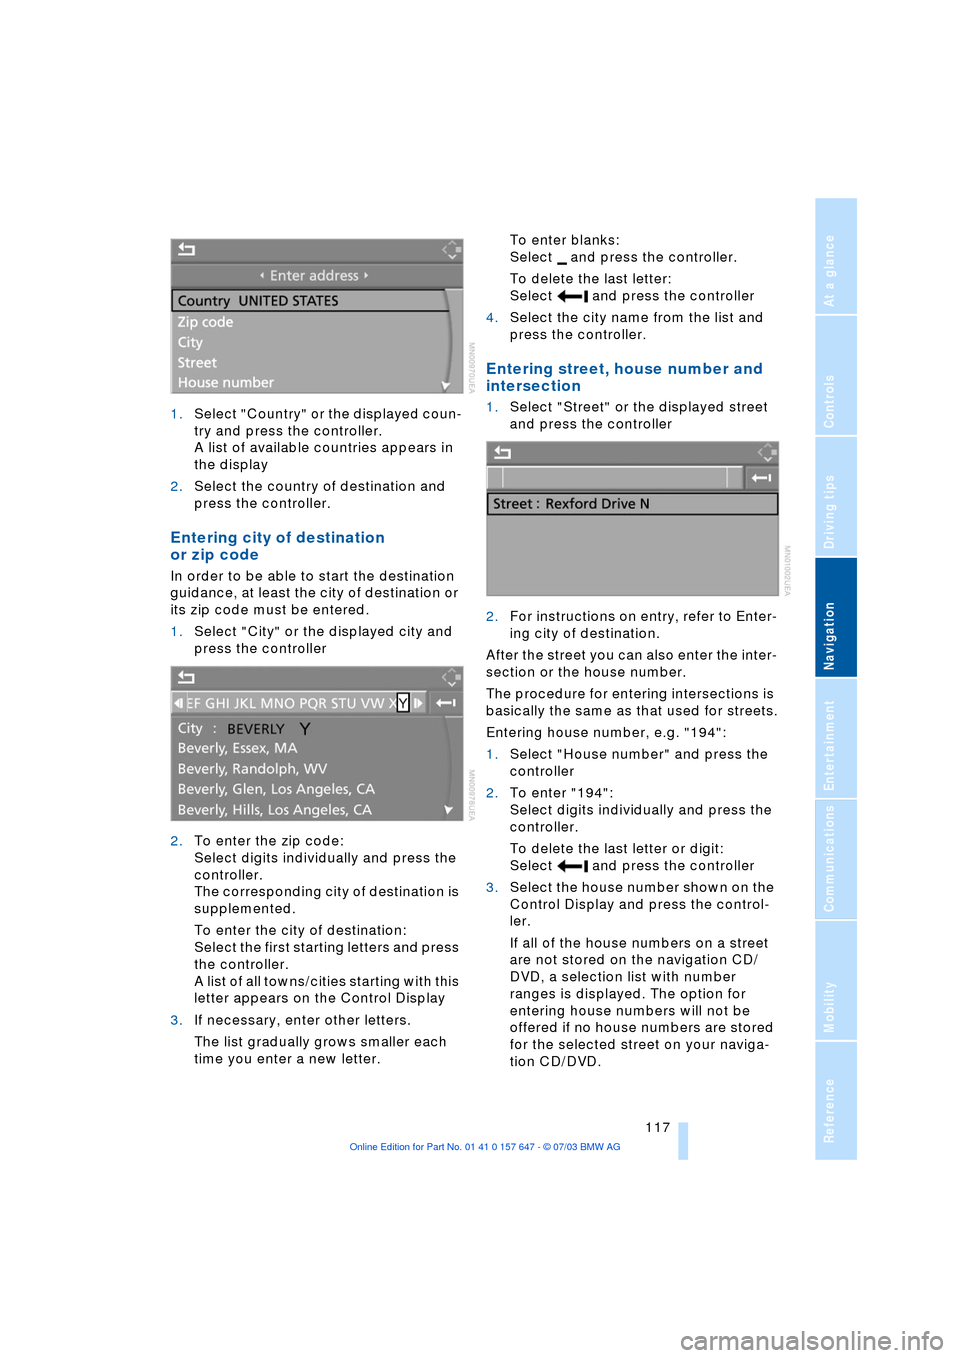
1.Select "Country" or the displayed coun-
try and press the controller.
A list of available countries appears in
the display
2.Select the country of destination and
press the controller.
Entering city of destination
or zip code
In order to be able to start the destination
guidance, at least the city of destination or
its zip code must be entered.
1.Select "City" or the displayed city and
press the controller
2.To enter the zip code:
Select digits individually and press the
controller.
The corresponding city of destination is
supplemented.
To enter the city of destination:
Select the first starting letters and press
the controller.
A list of all towns/cities starting with this
letter appears on the Control Display
3.If necessary, enter other letters.
The list gradually grows smaller each
time you enter a new letter.To enter blanks:
Select and press the controller.
To delete the last letter:
Select and press the controller
4.Select the city name from the list and
press the controller.
Entering street, house number and
intersection
1.Select "Street" or the displayed street
and press the controller
2.For instructions on entry, refer to Enter-
ing city of destination.
After the street you can also enter the inter-
section or the house number.
The procedure for entering intersections is
basically the same as that used for streets.
Entering house number, e.g. "194":
1.Select "House number" and press the
controller
2.To enter "194":
Select digits individually and press the
controller.
To delete the last letter or digit:
Select and press the controller
3.Select the house number shown on the
Control Display and press the control-
ler.
If all of the house numbers on a street
are not stored on the navigation CD/
DVD, a selection list with number
ranges is displayed. The option for
entering house numbers will not be
offered if no house numbers are stored
for the selected street on your naviga-
tion CD/DVD.
Page 124 of 220
Destination entry
122 You can change the selected route as often
as you like, both when entering your desti-
nation and at any time while the system is
guiding you to it Ð the system revises its
travel recommendations accordingly.
Wordmatch principle
The system supports the wordmatch prin-
ciple to make it easier for you to enter the
names of streets or towns. The system runs
ongoing checks, comparing your destina-
tion entries with the data stored on the nav-
igation CD/DVD as the basis for instant
response. The user benefits include:
>Names of specific locations can also
vary from the official versions provided
that the spelling of the entry corre-
sponds to a standard form used in
another country
Example:
Instead of 'MŸnchen', you can also
enter the English spelling 'Munich' or
the Italian spelling 'Monaco'
>When you are entering the names of
towns and streets the system will com-
plete them automatically as soon as
enough letters are available to ensure
unambiguous identification
>The system only accepts name entries
beginning with letters that are stored on
the navigation CD/DVD. The system will
not accept nonexistent names and
addresses.
Page 126 of 220
Destination guidance
124
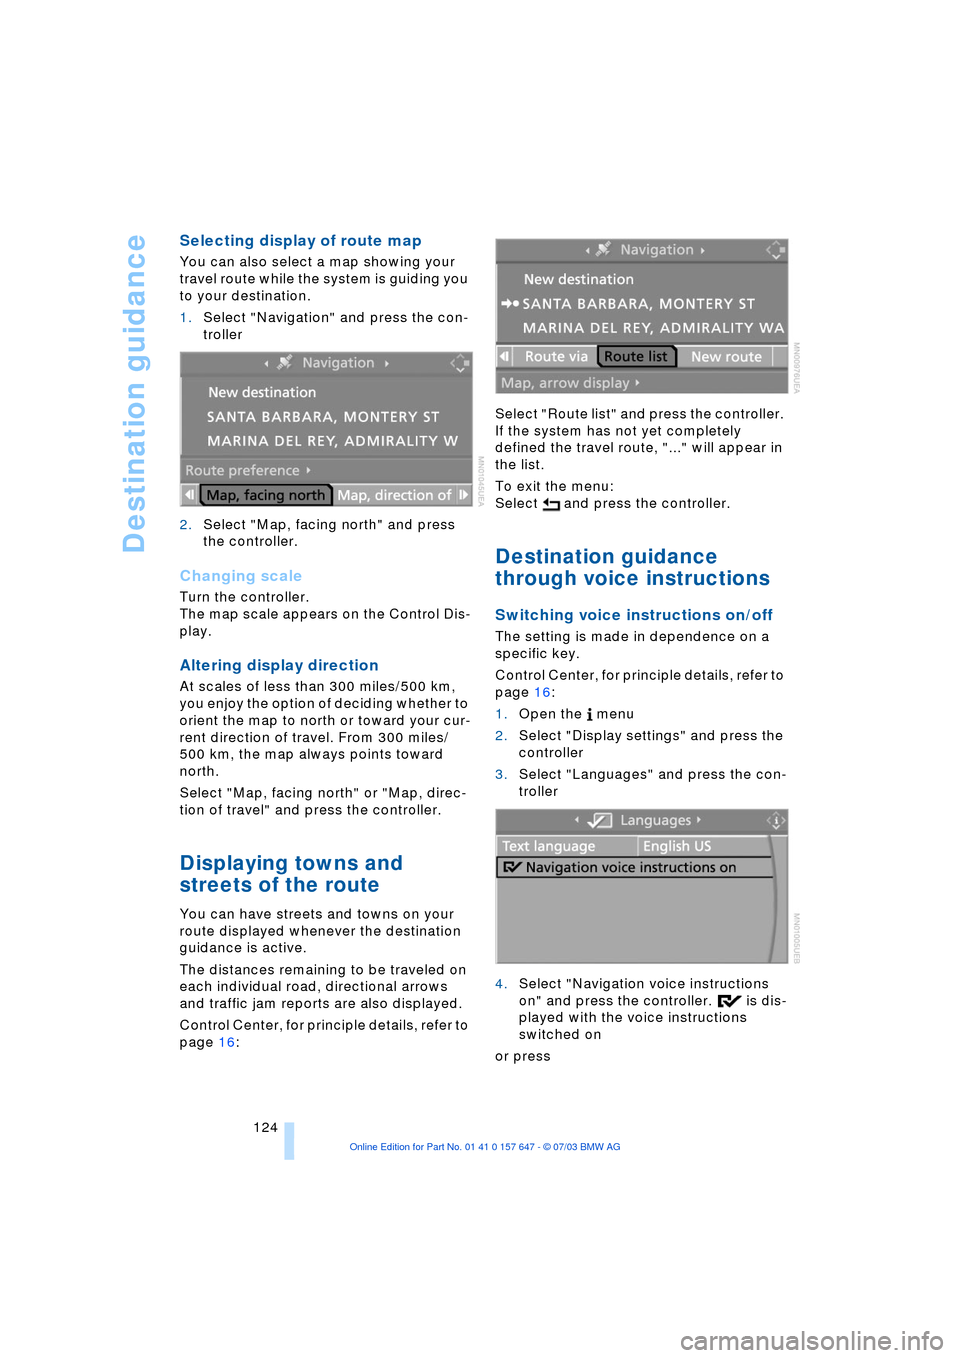
Selecting display of route map
You can also select a map showing your
travel route while the system is guiding you
to your destination.
1.Select "Navigation" and press the con-
troller
2.Select "Map, facing north" and press
the controller.
Changing scale
Turn the controller.
The map scale appears on the Control Dis-
play.
Altering display direction
At scales of less than 300 miles/500 km,
you enjoy the option of deciding whether to
orient the map to north or toward your cur-
rent direction of travel. From 300 miles/
500 km, the map always points toward
north.
Select "Map, facing north" or "Map, direc-
tion of travel" and press the controller.
Displaying towns and
streets of the route
You can have streets and towns on your
route displayed whenever the destination
guidance is active.
The distances remaining to be traveled on
each individual road, directional arrows
and traffic jam reports are also displayed.
Control Center, for principle details, refer to
page 16: Select "Route list" and press the controller.
If the system has not yet completely
defined the travel route, "..." will appear in
the list.
To exit the menu:
Select and press the controller.
Destination guidance
through voice instructions
Switching voice instructions on/off
The setting is made in dependence on a
specific key.
Control Center, for principle details, refer to
page 16:
1.Open the menu
2.Select "Display settings" and press the
controller
3.Select "Languages" and press the con-
troller
4.Select "Navigation voice instructions
on" and press the controller. is dis-
played with the voice instructions
switched on
or press
Page 129 of 220
Navigation
Driving tips
127Reference
At a glance
Controls
Communications
Entertainment
Mobility
What to do if É
What to do if É
>you request the current position of your
vehicle, but do not receive a precise
display?
The system is unable to receive enough
GPS signals at your current position
owing to obstructions, your position is
not yet available on your navigation CD/
DVD, or the system is in the process of
calculating your position. As a rule, por-
table communications GSM / GPS
reception is guaranteed under a clear
sky
>the destination guidance does not
adopt a destination?
The data of the destination is not stored
on the navigation CD/DVD that is
loaded. Select a destination that is as
close as possible to the original
>the destination guidance does not
adopt an address without the street
name?
On the navigation CD/DVD, no down-
town area can be determined for the
city or town entered. Enter any street,
or a destination such as the railway sta-
tion etc., then start the destination guid-
ance
>you want to enter a destination for the
destination guidance system, but it is
not possible to select the letters for
your desired entry?
The destination data is not recorded on
the navigation CD/DVD that is loaded.
In this case, the system will not offer
you any letters to choose from. Select a
destination that is as close as possible
to the original
>the system stops furnishing directions
on which way to turn as you approach
intersections?
You are driving in an area that has not
yet been completely recorded on the
navigation CD/DVD. Instead of an arrow
indicating a turn, you will see an arrow
which indicates the general direction of your planned route. Or you have left the
recommended route and the system
requires a few seconds to calculate a
new recommended route
>the battery has been disconnected?
It will take approx. 15 minutes for the
system to resume operation.
Page 146 of 220
CD changer
144
CD changer
CD magazine
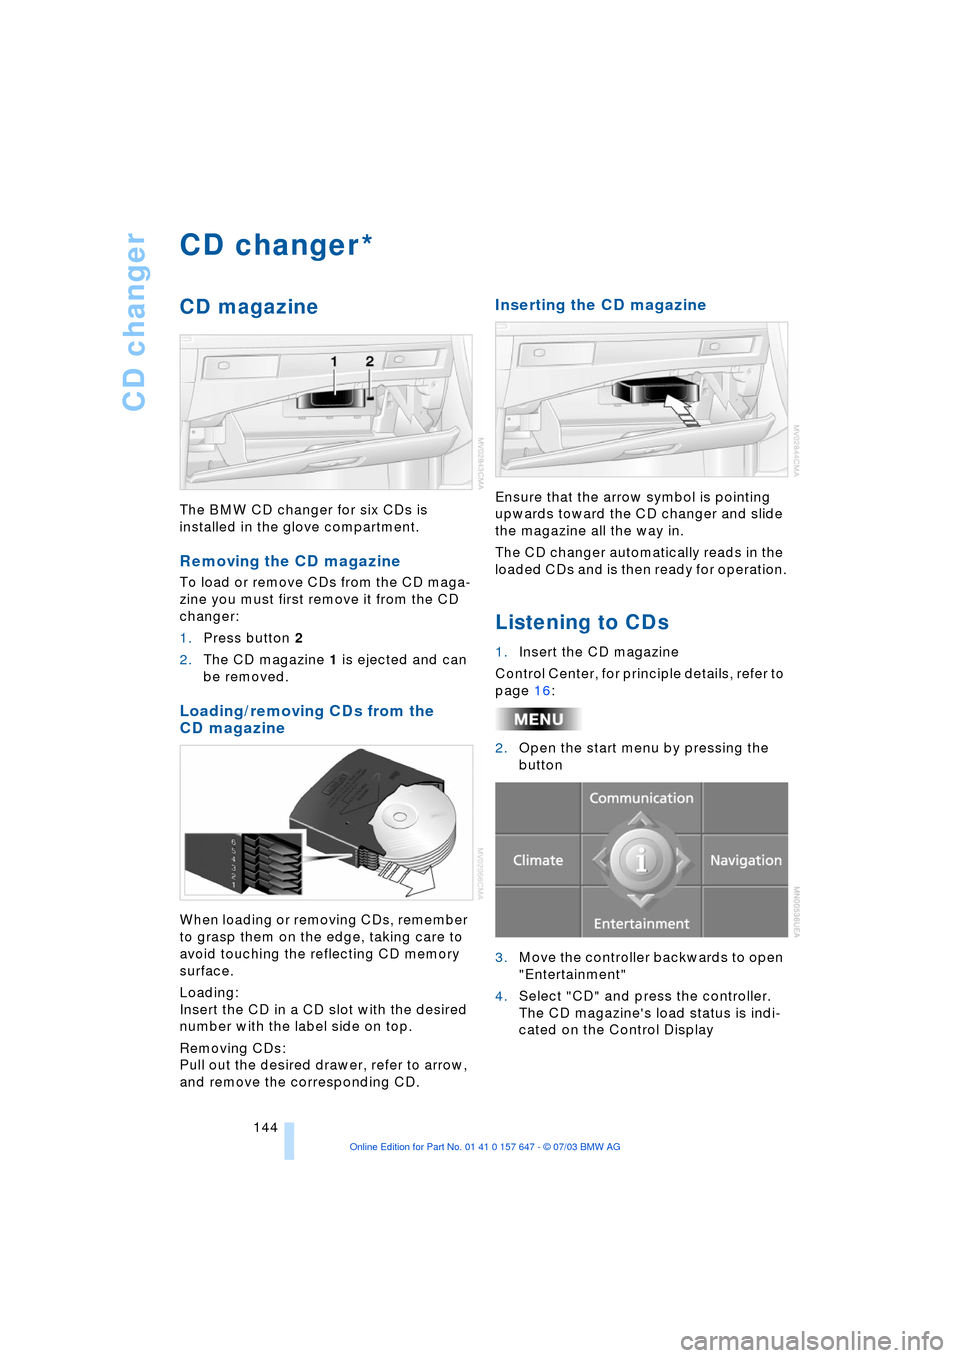
The BMW CD changer for six CDs is
installed in the glove compartment.
Removing the CD magazine
To load or remove CDs from the CD maga-
zine you must first remove it from the CD
changer:
1.Press button 2
2.The CD magazine 1 is ejected and can
be removed.
Loading/removing CDs from the
CD magazine
When loading or removing CDs, remember
to grasp them on the edge, taking care to
avoid touching the reflecting CD memory
surface.
Loading:
Insert the CD in a CD slot with the desired
number with the label side on top.
Removing CDs:
Pull out the desired drawer, refer to arrow,
and remove the corresponding CD.
Inserting the CD magazine
Ensure that the arrow symbol is pointing
upwards toward the CD changer and slide
the magazine all the way in.
The CD changer automatically reads in the
loaded CDs and is then ready for operation.
Listening to CDs
1.Insert the CD magazine
Control Center, for principle details, refer to
page 16:
2.Open the start menu by pressing the
button
3.Move the controller backwards to open
"Entertainment"
4.Select "CD" and press the controller.
The CD magazine's load status is indi-
cated on the Control Display
*