2004 BMW 525I SEDAN towing
[x] Cancel search: towingPage 55 of 220
Controls
53Reference
At a glance
Driving tips
Communications
Navigation
Entertainment
Mobility
towards D or change the current gear using
the shift paddles or selector lever.
Gear changes
Using selector lever
>To shift up, briefly press the selector
lever towards +
>To shift down, briefly press towards Ñ.
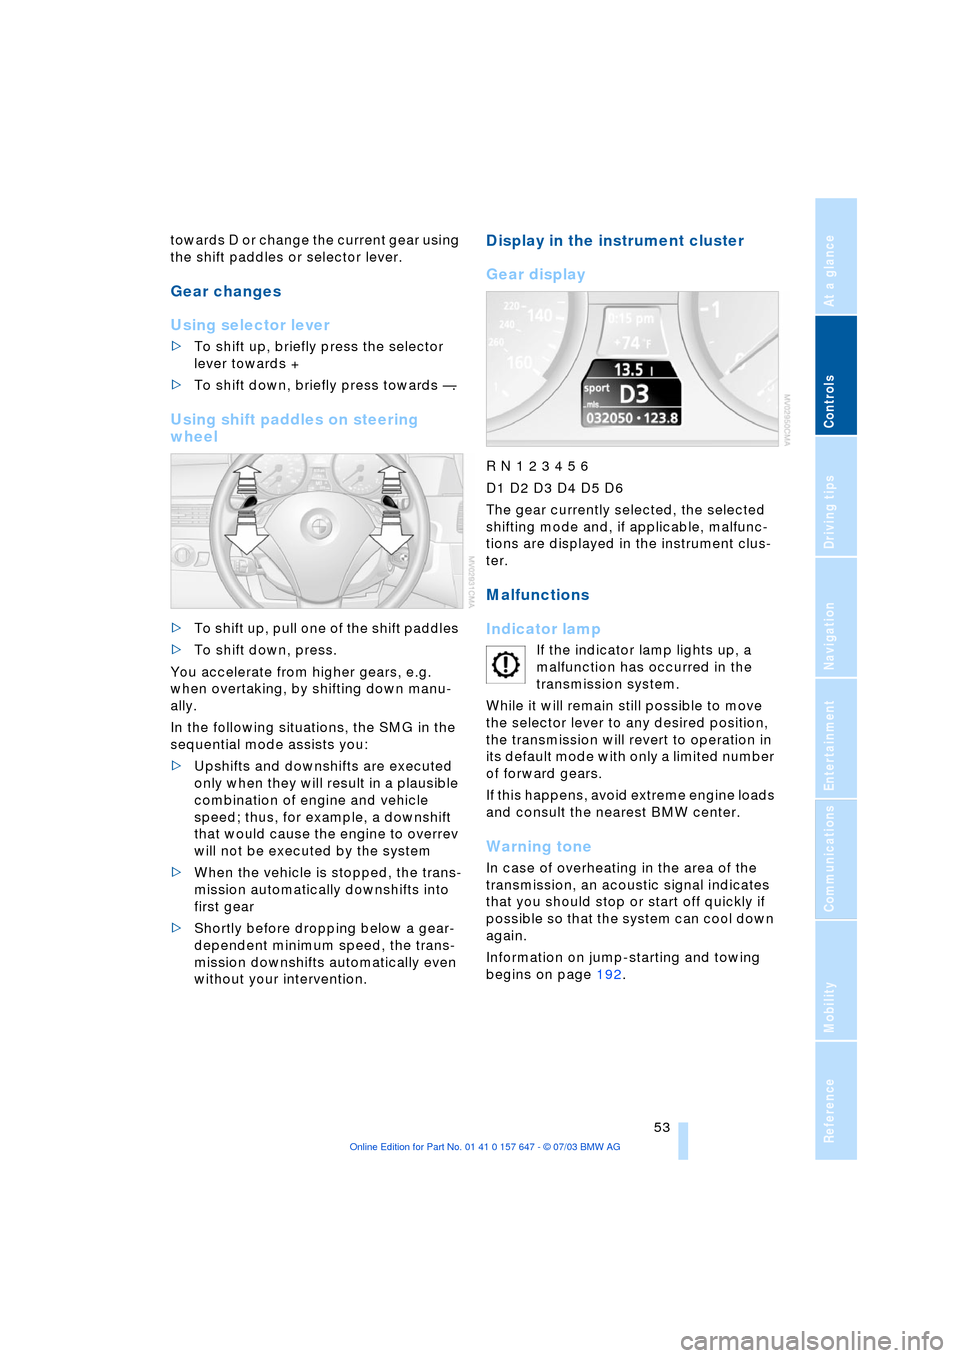
Using shift paddles on steering
wheel
>To shift up, pull one of the shift paddles
>To shift down, press.
You accelerate from higher gears, e.g.
when overtaking, by shifting down manu-
ally.
In the following situations, the SMG in the
sequential mode assists you:
>Upshifts and downshifts are executed
only when they will result in a plausible
combination of engine and vehicle
speed; thus, for example, a downshift
that would cause the engine to overrev
will not be executed by the system
>When the vehicle is stopped, the trans-
mission automatically downshifts into
first gear
>Shortly before dropping below a gear-
dependent minimum speed, the trans-
mission downshifts automatically even
without your intervention.
Display in the instrument cluster
Gear display
R N 1 2 3 4 5 6
D1 D2 D3 D4 D5 D6
The gear currently selected, the selected
shifting mode and, if applicable, malfunc-
tions are displayed in the instrument clus-
ter.
Malfunctions
Indicator lamp
If the indicator lamp lights up, a
malfunction has occurred in the
transmission system.
While it will remain still possible to move
the selector lever to any desired position,
the transmission will revert to operation in
its default mode with only a limited number
of forward gears.
If this happens, avoid extreme engine loads
and consult the nearest BMW center.
Warning tone
In case of overheating in the area of the
transmission, an acoustic signal indicates
that you should stop or start off quickly if
possible so that the system can cool down
again.
Information on jump-starting and towing
begins on page 192.
Page 56 of 220
Driving
54
Dynamic Driving Control
With Dynamic Driving Control, you can
choose between a standard and a sport
program.
Sport program
>The engine responds more spontane-
ously to accelerator pedal movements
>The steering becomes more direct and
provides even better road contact.
In addition, with SMG and an automatic
transmission:
>The shifting times are shorter
>The engine speed range is used opti-
mally in the Drive mode.
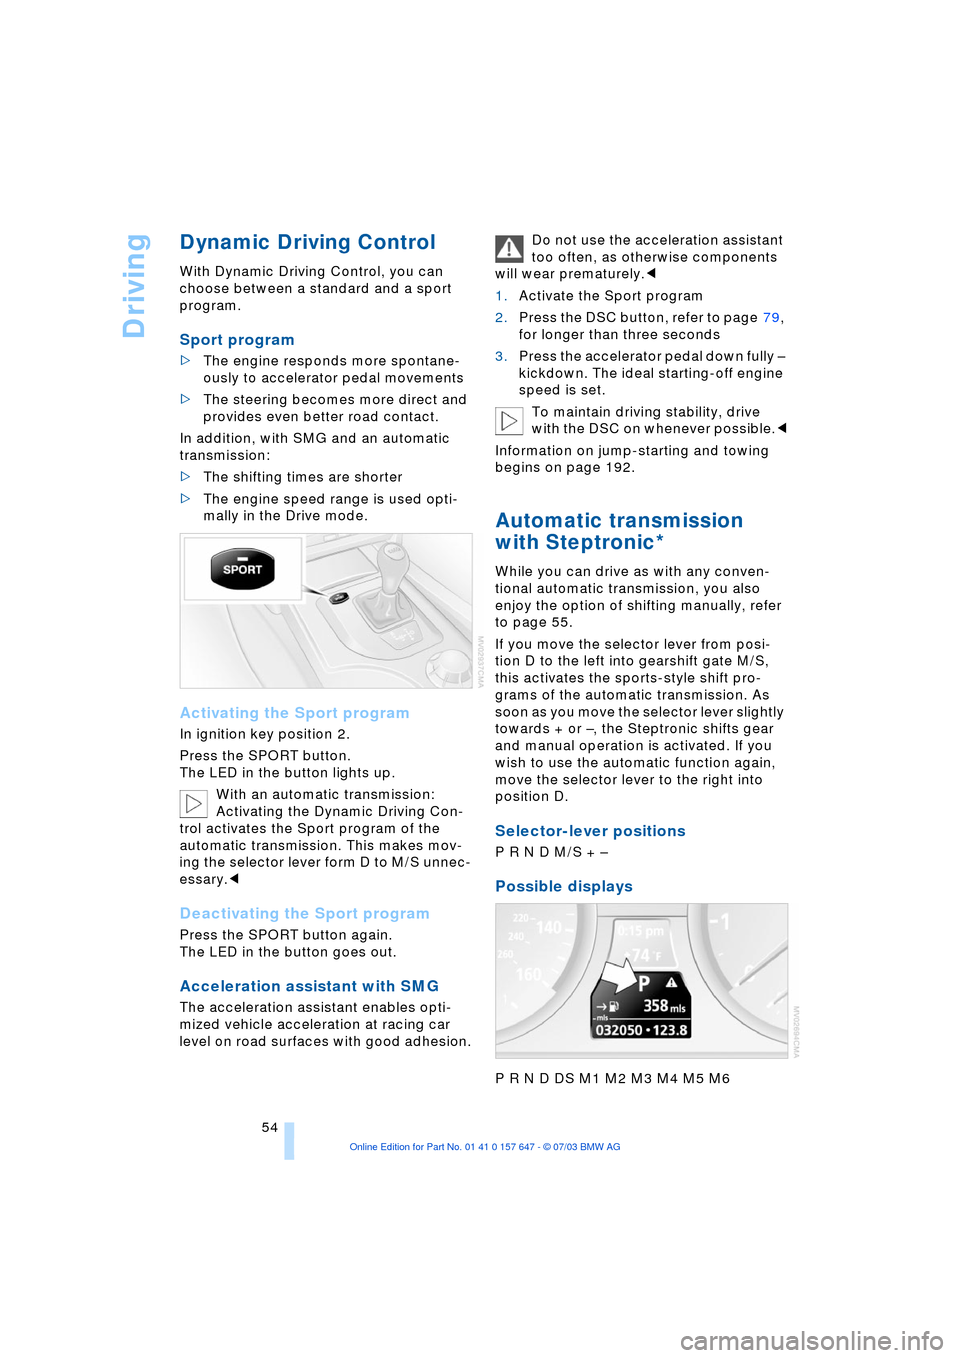
Activating the Sport program
In ignition key position 2.
Press the SPORT button.
The LED in the button lights up.
With an automatic transmission:
Activating the Dynamic Driving Con-
trol activates the Sport program of the
automatic transmission. This makes mov-
ing the selector lever form D to M/S unnec-
essary.<
Deactivating the Sport program
Press the SPORT button again.
The LED in the button goes out.
Acceleration assistant with SMG
The acceleration assistant enables opti-
mized vehicle acceleration at racing car
level on road surfaces with good adhesion.Do not use the acceleration assistant
too often, as otherwise components
will wear prematurely.<
1.Activate the Sport program
2.Press the DSC button, refer to page 79,
for longer than three seconds
3.Press the accelerator pedal down fully Ð
kickdown. The ideal starting-off engine
speed is set.
To maintain driving stability, drive
with the DSC on whenever possible.<
Information on jump-starting and towing
begins on page 192.
Automatic transmission
with Steptronic*
While you can drive as with any conven-
tional automatic transmission, you also
enjoy the option of shifting manually, refer
to page 55.
If you move the selector lever from posi-
tion D to the left into gearshift gate M/S,
this activates the sports-style shift pro-
grams of the automatic transmission. As
soon as you move the selector lever slightly
towards + or Ð, the Steptronic shifts gear
and manual operation is activated. If you
wish to use the automatic function again,
move the selector lever to the right into
position D.
Selector-lever positions
P R N D M/S + Ð
Possible displays
P R N D DS M1 M2 M3 M4 M5 M6
Page 58 of 220
Driving
56 Shifting from M/S to the selector-lever
positions P, R and N is only possible by
going through D.
Malfunctions
Indicator lamp
If the indicator lamp lights up, a
malfunction has occurred in the
transmission system.
While it will remain still possible to move
the selector lever to any desired position,
the transmission will revert to operation in
its default mode with only a limited number
of forward gears.
If this happens, avoid extreme engine loads
and consult the nearest BMW center.
Information on jump-starting and towing
begins on page 192.
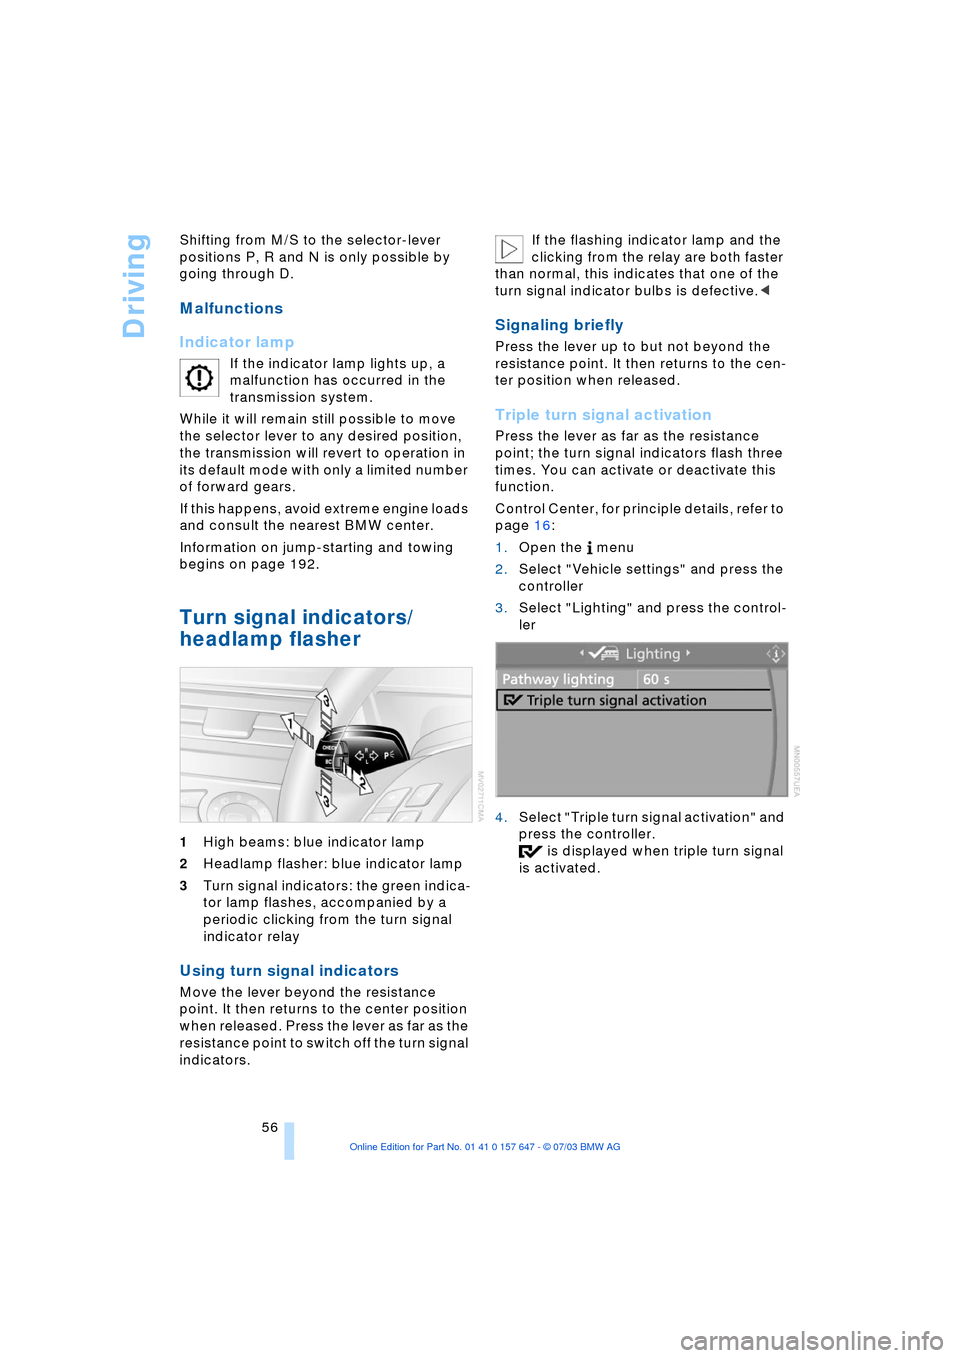
Turn signal indicators/
headlamp flasher
1High beams: blue indicator lamp
2Headlamp flasher: blue indicator lamp
3Turn signal indicators: the green indica-
tor lamp flashes, accompanied by a
periodic clicking from the turn signal
indicator relay
Using turn signal indicators
Move the lever beyond the resistance
point. It then returns to the center position
when released. Press the lever as far as the
resistance point to switch off the turn signal
indicators. If the flashing indicator lamp and the
clicking from the relay are both faster
than normal, this indicates that one of the
turn signal indicator bulbs is defective.<
Signaling briefly
Press the lever up to but not beyond the
resistance point. It then returns to the cen-
ter position when released.
Triple turn signal activation
Press the lever as far as the resistance
point; the turn signal indicators flash three
times. You can activate or deactivate this
function.
Control Center, for principle details, refer to
page 16:
1.Open the menu
2.Select "Vehicle settings" and press the
controller
3.Select "Lighting" and press the control-
ler
4.Select "Triple turn signal activation" and
press the controller.
is displayed when triple turn signal
is activated.
Page 110 of 220
Things to remember when driving
108 For your own safety: use only brake
pads that BMW has approved for your
particular vehicle model. As BMW cannot
assess the suitability of other brake pads
for use on your vehicle, we are unable to
assume continued responsibility for the
vehicle's operating safety if non-approved
pads are installed.<
Mobile communication in the vehicle
BMW recommends using mobile communi-
cation devices, e.g. portable phones, in the
interior of the vehicle with a suitable exter-
nal antenna. Otherwise, the vehicle elec-
tronics and mobile communication device
can influence one another.
Loading
To avoid loading the tires beyond
their approved carrying capacity,
never overload the vehicle. Overloading
can lead to overheating and increases the
rate at which damage develops inside the
tires. The ultimate result can assume the
form of a sudden air loss.<
Determining loading limit
1.Locate the following statement on the
driver's door pillar
*:
The combined weight of occu-
pants and cargo should never
exceed XXX kg or YYY lbs, as otherwise
the vehicle may be damaged and unsta-
ble driving conditions may result.<
2.Determine the combined weight of the
driver and passengers that will be riding
in your vehicle 3.Subtract the combined weight of the
driver and passengers from XXX kilo-
grams or YYY pounds
4.The resulting figure equals the available
amount of cargo and luggage load
capacity.
For example, if the XXX amount equals
1,400 lbs. and there will be five 150-lbs.
passengers in your vehicle, the amount
of available cargo and luggage load
capacity is 650 lbs.:
1,400 lbs. minus 750 lbs. = 650 lbs.
5.Determine the combined weight of lug-
gage and cargo being loaded on the
vehicle. That weight must not exceed
the available cargo and luggage load
capacity calculated in step 4
6.If your vehicle will be towing a trailer,
part of the load from your trailer will be
transferred to your vehicle. Consult the
manual for transporting a trailer to
determine how this may reduce the
available cargo and luggage load
capacity of your vehicle.
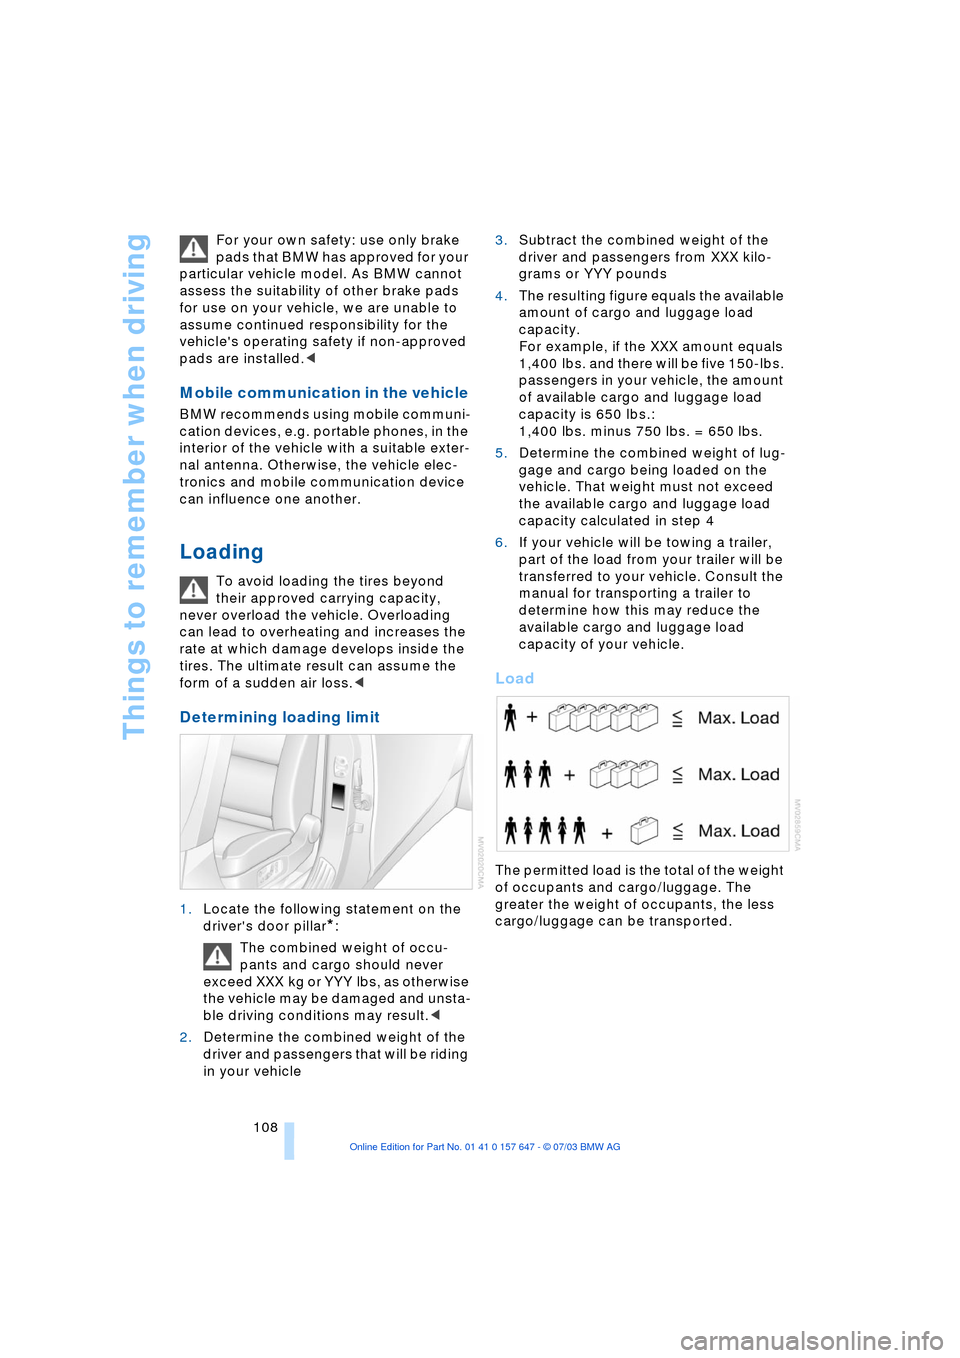
Load
The permitted load is the total of the weight
of occupants and cargo/luggage. The
greater the weight of occupants, the less
cargo/luggage can be transported.
Page 111 of 220
Driving tips
109Reference
At a glance
Controls
Communications
Navigation
Entertainment
Mobility
Stowing cargo
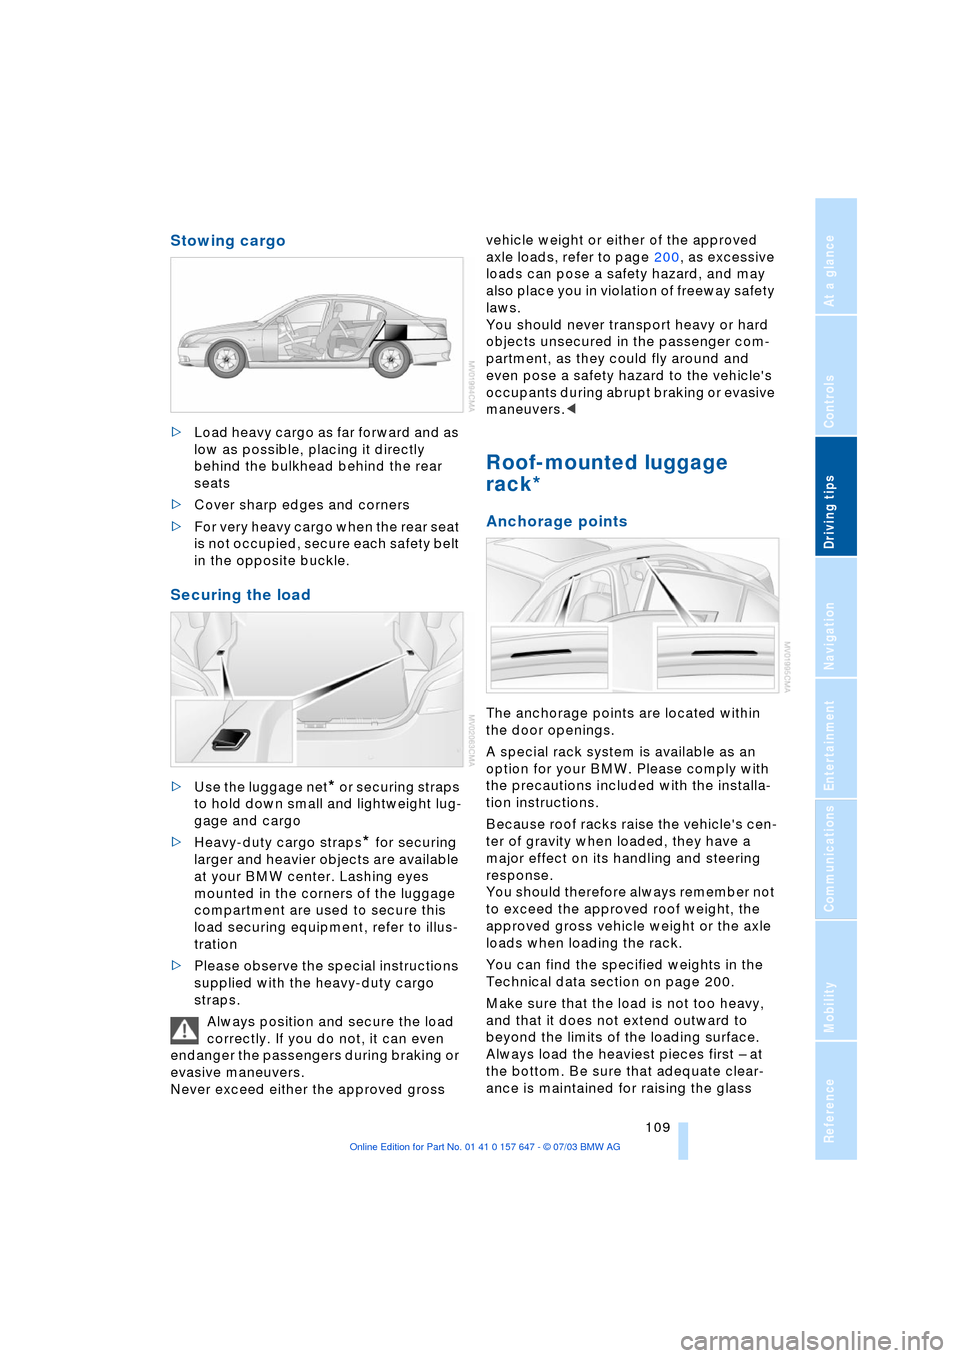
>Load heavy cargo as far forward and as
low as possible, placing it directly
behind the bulkhead behind the rear
seats
>Cover sharp edges and corners
>For very heavy cargo when the rear seat
is not occupied, secure each safety belt
in the opposite buckle.
Securing the load
>Use the luggage net* or securing straps
to hold down small and lightweight lug-
gage and cargo
>Heavy-duty cargo straps
* for securing
larger and heavier objects are available
at your BMW center. Lashing eyes
mounted in the corners of the luggage
compartment are used to secure this
load securing equipment, refer to illus-
tration
>Please observe the special instructions
supplied with the heavy-duty cargo
straps.
Always position and secure the load
correctly. If you do not, it can even
endanger the passengers during braking or
evasive maneuvers.
Never exceed either the approved gross vehicle weight or either of the approved
axle loads, refer to page 200, as excessive
loads can pose a safety hazard, and may
also place you in violation of freeway safety
laws.
You should never transport heavy or hard
objects unsecured in the passenger com-
partment, as they could fly around and
even pose a safety hazard to the vehicle's
occupants during abrupt braking or evasive
maneuvers.<
Roof-mounted luggage
rack*
Anchorage points
The anchorage points are located within
the door openings.
A special rack system is available as an
option for your BMW. Please comply with
the precautions included with the installa-
tion instructions.
Because roof racks raise the vehicle's cen-
ter of gravity when loaded, they have a
major effect on its handling and steering
response.
You should therefore always remember not
to exceed the approved roof weight, the
approved gross vehicle weight or the axle
loads when loading the rack.
You can find the specified weights in the
Technical data section on page 200.
Make sure that the load is not too heavy,
and that it does not extend outward to
beyond the limits of the loading surface.
Always load the heaviest pieces first Ð at
the bottom. Be sure that adequate clear-
ance is maintained for raising the glass
Page 195 of 220
Mobility
193Reference
At a glance
Controls
Driving tips
Communications
Navigation
Entertainment
5.Attach the second end of the cable to
the negative terminal of the battery or to
the engine or body ground of the vehi-
cle to be started.
Starting the engine
1.Start the engine on the support vehicle
and allow it to run for several minutes at
a fast idle
2.Start the engine on the other vehicle in
the usual way.
If the first start attempt is not success-
ful, wait a few minutes before another
attempt in order to allow the discharged
battery to recharge
3.Let the engines run for a few minutes
4.Disconnect the jumper cables by
reversing the connection sequence.
If required, have the battery inspected and
recharged at your BMW center.
Never use spray fluids to start the
engine.<
Towing
Always observe all applicable towing
laws and regulations.<
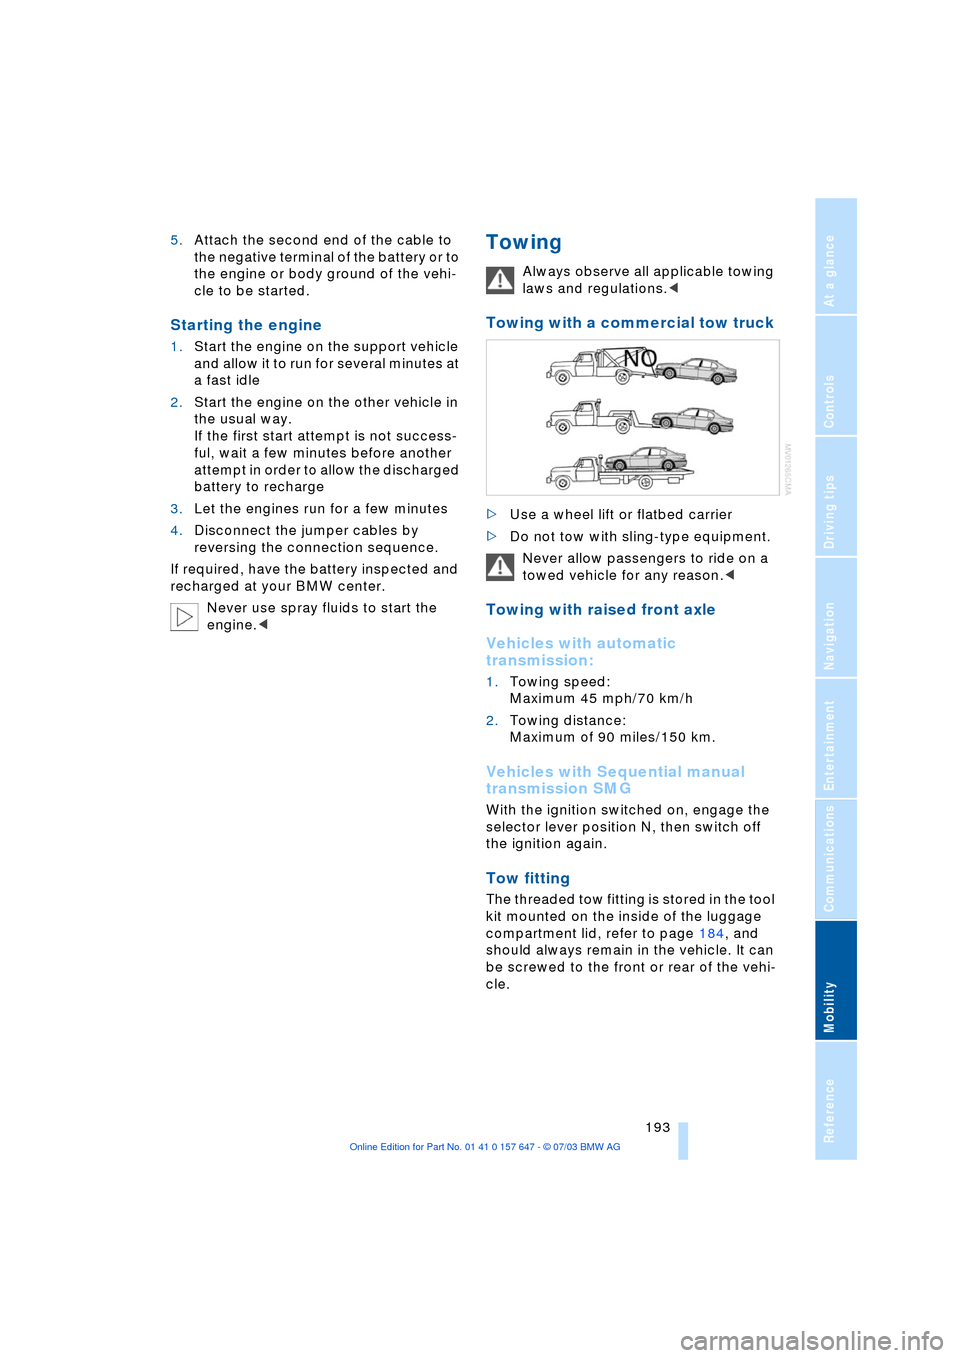
Towing with a commercial tow truck
>Use a wheel lift or flatbed carrier
>Do not tow with sling-type equipment.
Never allow passengers to ride on a
towed vehicle for any reason.<
Towing with raised front axle
Vehicles with automatic
transmission:
1.Towing speed:
Maximum 45 mph/70 km/h
2.Towing distance:
Maximum of 90 miles/150 km.
Vehicles with Sequential manual
transmission SMG
With the ignition switched on, engage the
selector lever position N, then switch off
the ignition again.
Tow fitting
The threaded tow fitting is stored in the tool
kit mounted on the inside of the luggage
compartment lid, refer to page 184, and
should always remain in the vehicle. It can
be screwed to the front or rear of the vehi-
cle.
Page 196 of 220
Giving and receiving assistance
194
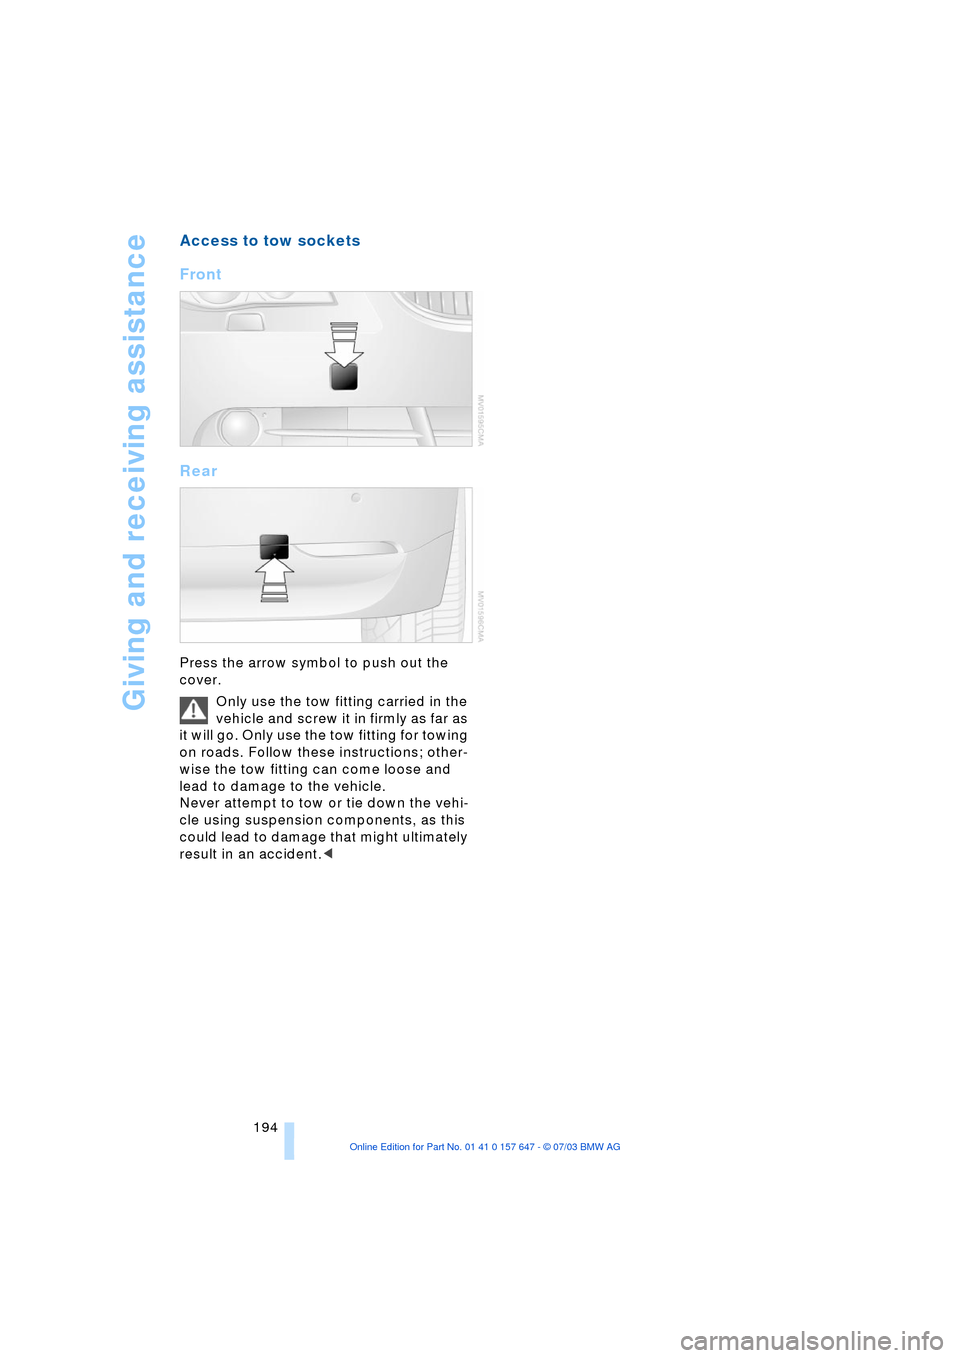
Access to tow sockets
Front
Rear
Press the arrow symbol to push out the
cover.
Only use the tow fitting carried in the
vehicle and screw it in firmly as far as
it will go. Only use the tow fitting for towing
on roads. Follow these instructions; other-
wise the tow fitting can come loose and
lead to damage to the vehicle.
Never attempt to tow or tie down the vehi-
cle using suspension components, as this
could lead to damage that might ultimately
result in an accident.<
Page 205 of 220
Reference 203
At a glance
Controls
Driving tips
Communications
Navigation
Entertainment
Mobility
Automatic transmission
with Steptronic 54
Ð indicator lamp 56
Ð interlock 49
Ð selector lever interlock 55
Ð shiftlock 55
Ð sport program 55
Ð starting the engine 50
Ð towing 193
AUTO program, refer to
Automatic air distribution
and volume 91
"Autostore" on the
radio 136
"AUTO" with automatic
climate control 93
Average fuel
consumption 70
Ð setting the units 74
Average speed 70
"Avoid ferries" for
navigation 121
"Avoid freeways / tolls" for
navigation 121
Avoiding unintentional
alarms 33
"Avoid tollroads" for
navigation 121
Axle loads, refer to
Weights 200
"A - Z" 154
B
Backrests, refer to
Seats 36
Backrest width
adjustment 37
Backup lamps, refer to
Reverse gear 51
Ð replacing the bulbs 186
"Balance", audio
system 132
Balance, refer to Tone
control 131
"Bass", audio system 132
Bass, refer to Tone
control 131
Battery 188
Ð in the remote control 26
Ð jump-starting 192Belts, refer to Safety
belts 36, 40
Beverage holders 99
Black ice, refer to Ice
warning 65
Blocking sections of a route
for navigation 125
Blower, refer to Air
volume 91
BMW Assist 161
Ð enabling 161
Ð services offered 162
"BMW Info" 163
BMW Maintenance
System 181
"BMW Service
settings" 161
Bore, refer to Engine
data 198
Bottle holder, refer to
Beverage holders 99
Brake Assistant, refer to
DBC Dynamic Braking
Control 79
Brake fluid 180
Ð indicator lamp 180
Ð level 180
Ð replacing 180
Brake force display 82
Brake hydraulic
systems 180
Brake lamps, replacing the
bulbs 186
Brake pads 107
Ð breaking-in
procedure 106
Brake pedal, refer to
Brakes 107
Brake rotors 107
Brakes 107
Ð ABS 77
Ð brake fluid 180
Ð breaking-in
procedure 106
Ð handbrake 50Brake system 106
Ð brake-fluid level 180
Ð brake pads 107
Ð breaking-in
procedure 106
Ð disc brakes 107
Ð indicator lamp 13, 107
Breakdown services, refer
to Roadside
Assistance 191
Break-in procedures 106
Ð brakes 106
Ð clutch 106
Ð differential 106
Ð engine 106
Brightness on the Control
Display 73
Bulbs and lamps
Ð replacing the bulbs 184
Buttons on steering
wheel 11
C
California Proposition
65 Warning 183
"Call" 154
Call
Ð accepting 153
Ð display accepted 154
Ð ending 154
Ð in absence 154
Ð starting 153
Calling
Ð from phone book 154
Ð from the Top 8 list 154
Ð redialing 154
Calling up traffic
information 126
"Call sender" 156
"Call Sirius" 138
Can holder, refer to
Beverage holders 99
Capacities 201
Car battery, refer to
Battery 188
Car care, refer to Caring for
your vehicle brochure
Car-care products, refer to
Caring for your vehicle
brochure