2004 BMW 525I SEDAN load capacity
[x] Cancel search: load capacityPage 103 of 220
Controls
101Reference
At a glance
Driving tips
Communications
Navigation
Entertainment
Mobility
Rear center armrest
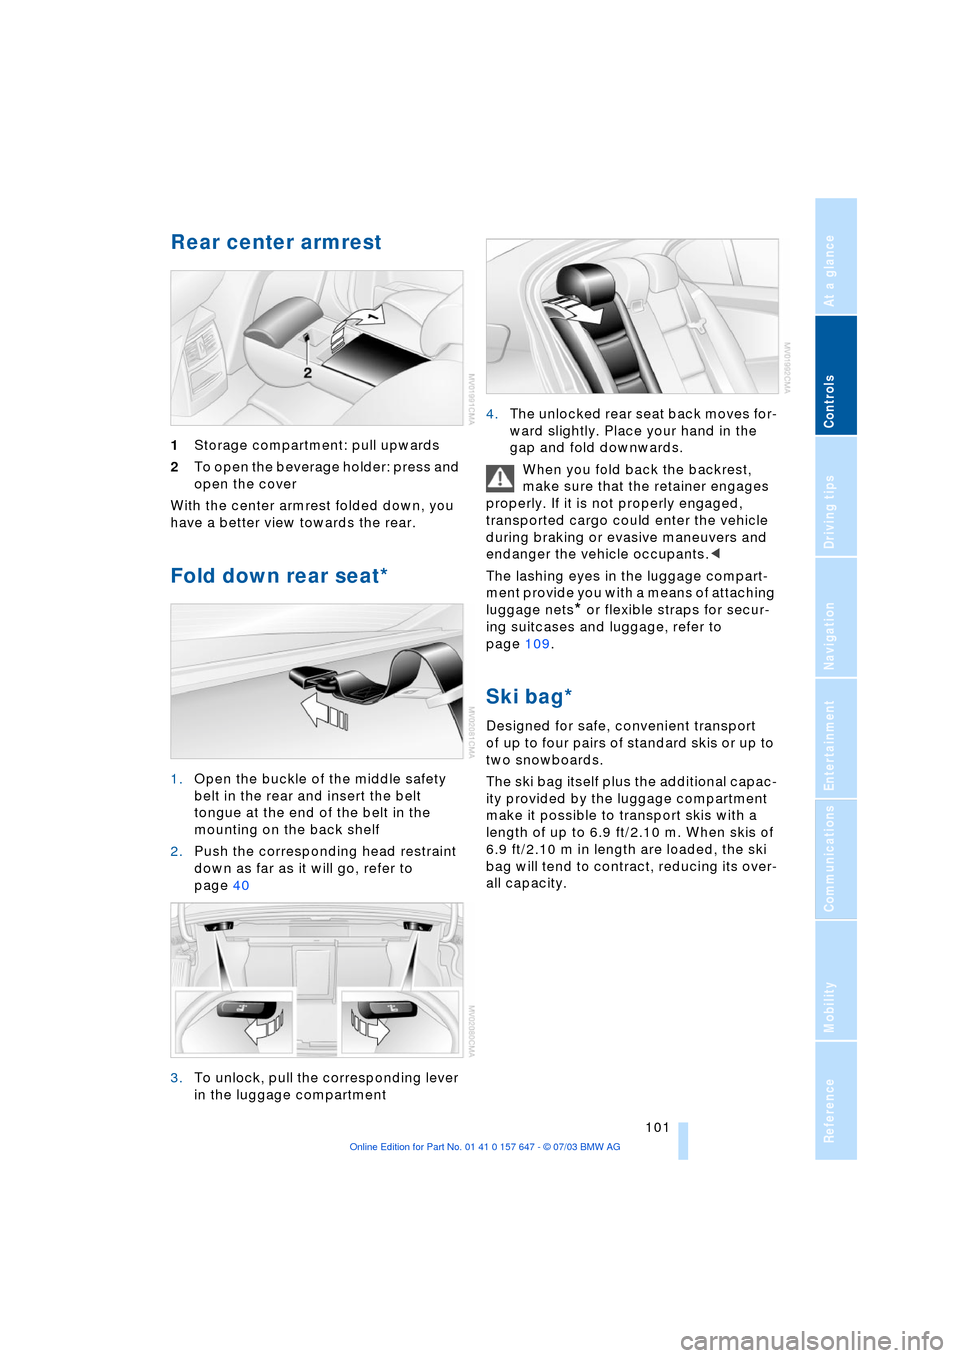
1Storage compartment: pull upwards
2To open the beverage holder: press and
open the cover
With the center armrest folded down, you
have a better view towards the rear.
Fold down rear seat*
1.Open the buckle of the middle safety
belt in the rear and insert the belt
tongue at the end of the belt in the
mounting on the back shelf
2.Push the corresponding head restraint
down as far as it will go, refer to
page 40
3.To unlock, pull the corresponding lever
in the luggage compartment 4.The unlocked rear seat back moves for-
ward slightly. Place your hand in the
gap and fold downwards.
When you fold back the backrest,
make sure that the retainer engages
properly. If it is not properly engaged,
transported cargo could enter the vehicle
during braking or evasive maneuvers and
endanger the vehicle occupants.<
The lashing eyes in the luggage compart-
ment provide you with a means of attaching
luggage nets
* or flexible straps for secur-
ing suitcases and luggage, refer to
page 109.
Ski bag*
Designed for safe, convenient transport
of up to four pairs of standard skis or up to
two snowboards.
The ski bag itself plus the additional capac-
ity provided by the luggage compartment
make it possible to transport skis with a
length of up to 6.9 ft/2.10 m. When skis of
6.9 ft/2.10 m in length are loaded, the ski
bag will tend to contract, reducing its over-
all capacity.
Page 110 of 220
Things to remember when driving
108 For your own safety: use only brake
pads that BMW has approved for your
particular vehicle model. As BMW cannot
assess the suitability of other brake pads
for use on your vehicle, we are unable to
assume continued responsibility for the
vehicle's operating safety if non-approved
pads are installed.<
Mobile communication in the vehicle
BMW recommends using mobile communi-
cation devices, e.g. portable phones, in the
interior of the vehicle with a suitable exter-
nal antenna. Otherwise, the vehicle elec-
tronics and mobile communication device
can influence one another.
Loading
To avoid loading the tires beyond
their approved carrying capacity,
never overload the vehicle. Overloading
can lead to overheating and increases the
rate at which damage develops inside the
tires. The ultimate result can assume the
form of a sudden air loss.<
Determining loading limit
1.Locate the following statement on the
driver's door pillar
*:
The combined weight of occu-
pants and cargo should never
exceed XXX kg or YYY lbs, as otherwise
the vehicle may be damaged and unsta-
ble driving conditions may result.<
2.Determine the combined weight of the
driver and passengers that will be riding
in your vehicle 3.Subtract the combined weight of the
driver and passengers from XXX kilo-
grams or YYY pounds
4.The resulting figure equals the available
amount of cargo and luggage load
capacity.
For example, if the XXX amount equals
1,400 lbs. and there will be five 150-lbs.
passengers in your vehicle, the amount
of available cargo and luggage load
capacity is 650 lbs.:
1,400 lbs. minus 750 lbs. = 650 lbs.
5.Determine the combined weight of lug-
gage and cargo being loaded on the
vehicle. That weight must not exceed
the available cargo and luggage load
capacity calculated in step 4
6.If your vehicle will be towing a trailer,
part of the load from your trailer will be
transferred to your vehicle. Consult the
manual for transporting a trailer to
determine how this may reduce the
available cargo and luggage load
capacity of your vehicle.
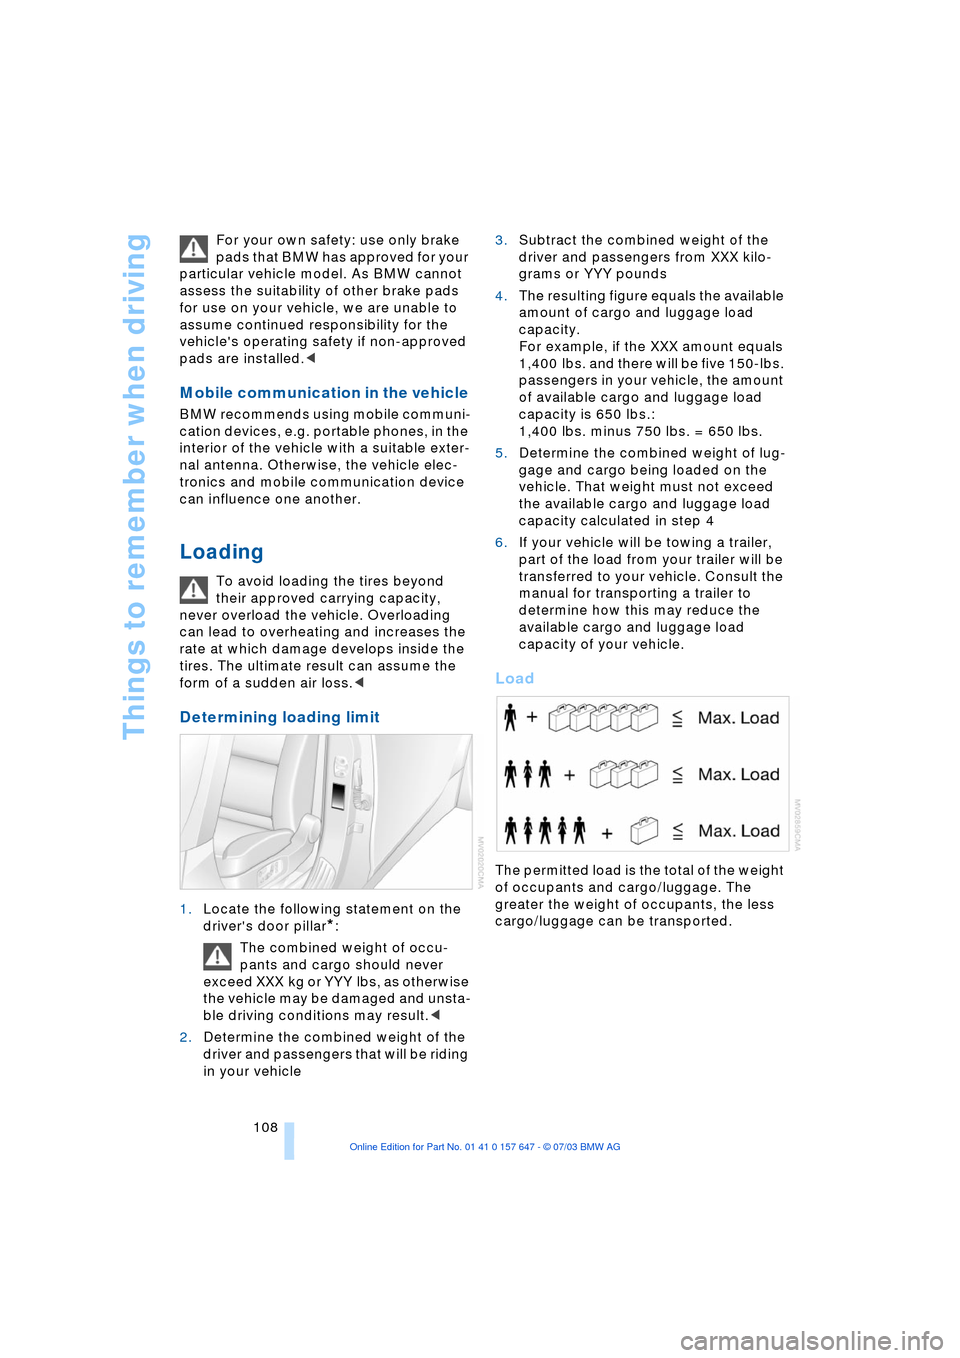
Load
The permitted load is the total of the weight
of occupants and cargo/luggage. The
greater the weight of occupants, the less
cargo/luggage can be transported.
Page 189 of 220
Mobility
187Reference
At a glance
Controls
Driving tips
Communications
Navigation
Entertainment
Changing a wheel
Safety measures in the event of a
breakdown or wheel change:
Park the vehicle as far away as possible
from moving traffic and on firm ground.
Switch on the hazard warning flashers.
Lock the steering wheel in straight-ahead
setting of the wheels. Apply the handbrake
and engage first gear, reverse gear or
selector lever to position P.
Have all vehicle occupants get out of the
vehicle and ensure that they remain outside
the immediate area in a safe place, such as
behind a guardrail.
If a warning triangle or portable hazard
warning lamp is required, set it up on the
roadside at an appropriate distance from
the rear of the vehicle.
Comply with all safety guidelines and regu-
lations.
Change the wheel only on a level, firm sur-
face which is not slippery.
The vehicle or the jack could slip to the side
if you attempt to raise the vehicle on a soft
or slippery surface such as snow, ice, tiles,
etc.
Position the jack on a firm support surface.
Do not use a wooden block or similar
object as a support base for the jack, as
this would prevent it from extending to its
full support height and reduce its load-car-
rying capacity.
To avoid serious or fatal injury: never lie
under the vehicle, and never start the
engine while it is supported by the jack.<
What you will need
To avoid rattling noises later on, note the
positions of the tools before removing
them, then return them to their initial posi-
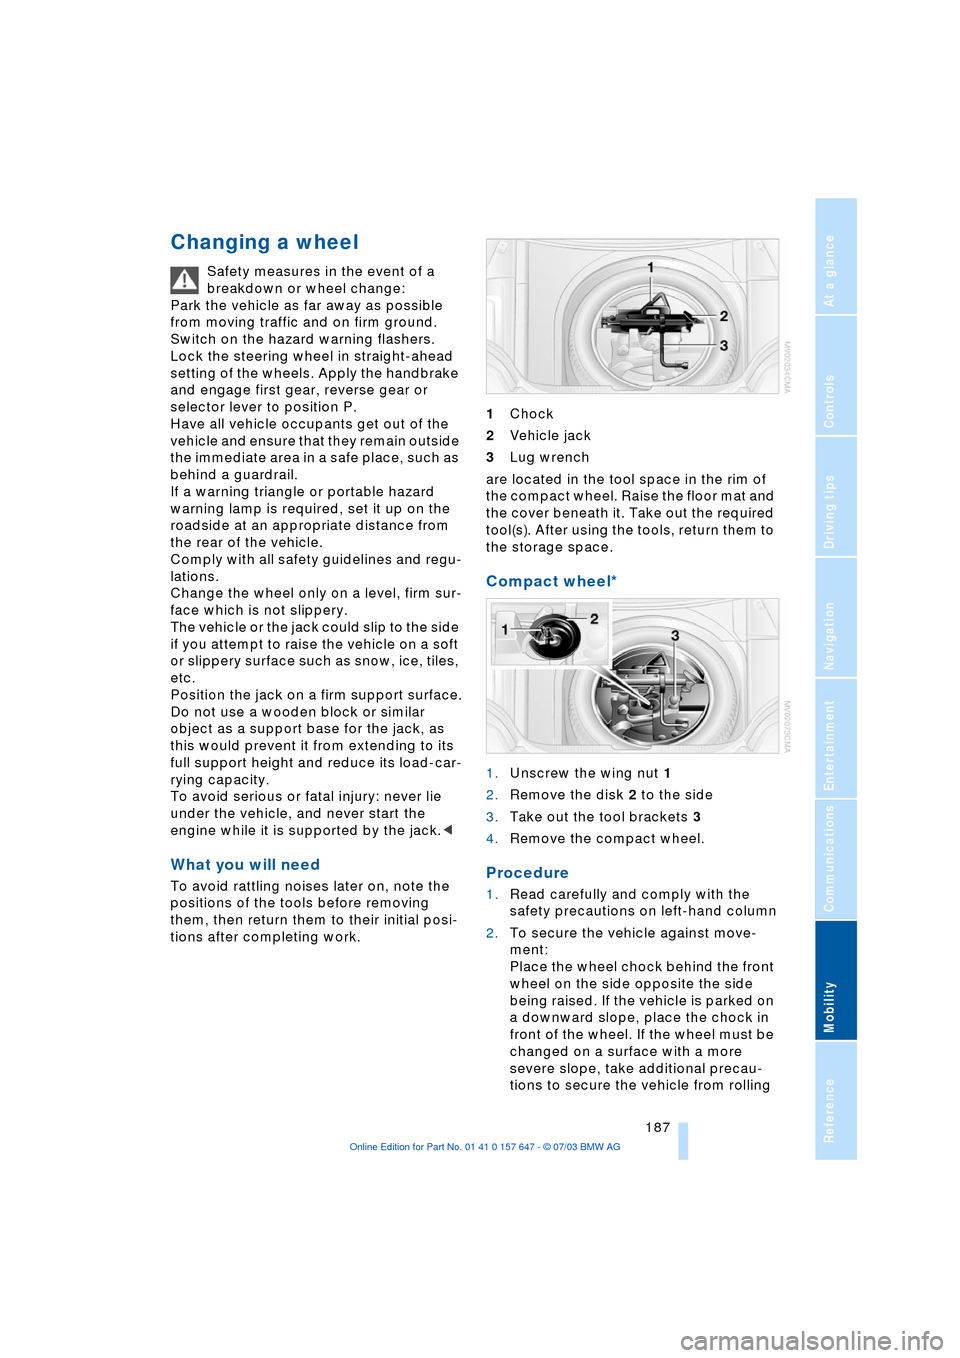
tions after completing work.1Chock
2Vehicle jack
3Lug wrench
are located in the tool space in the rim of
the compact wheel. Raise the floor mat and
the cover beneath it. Take out the required
tool(s). After using the tools, return them to
the storage space.
Compact wheel*
1.Unscrew the wing nut 1
2.Remove the disk 2 to the side
3.Take out the tool brackets 3
4.Remove the compact wheel.
Procedure
1.Read carefully and comply with the
safety precautions on left-hand column
2.To secure the vehicle against move-
ment:
Place the wheel chock behind the front
wheel on the side opposite the side
being raised. If the vehicle is parked on
a downward slope, place the chock in
front of the wheel. If the wheel must be
changed on a surface with a more
severe slope, take additional precau-
tions to secure the vehicle from rolling
Page 202 of 220
Technical data
200
Weights
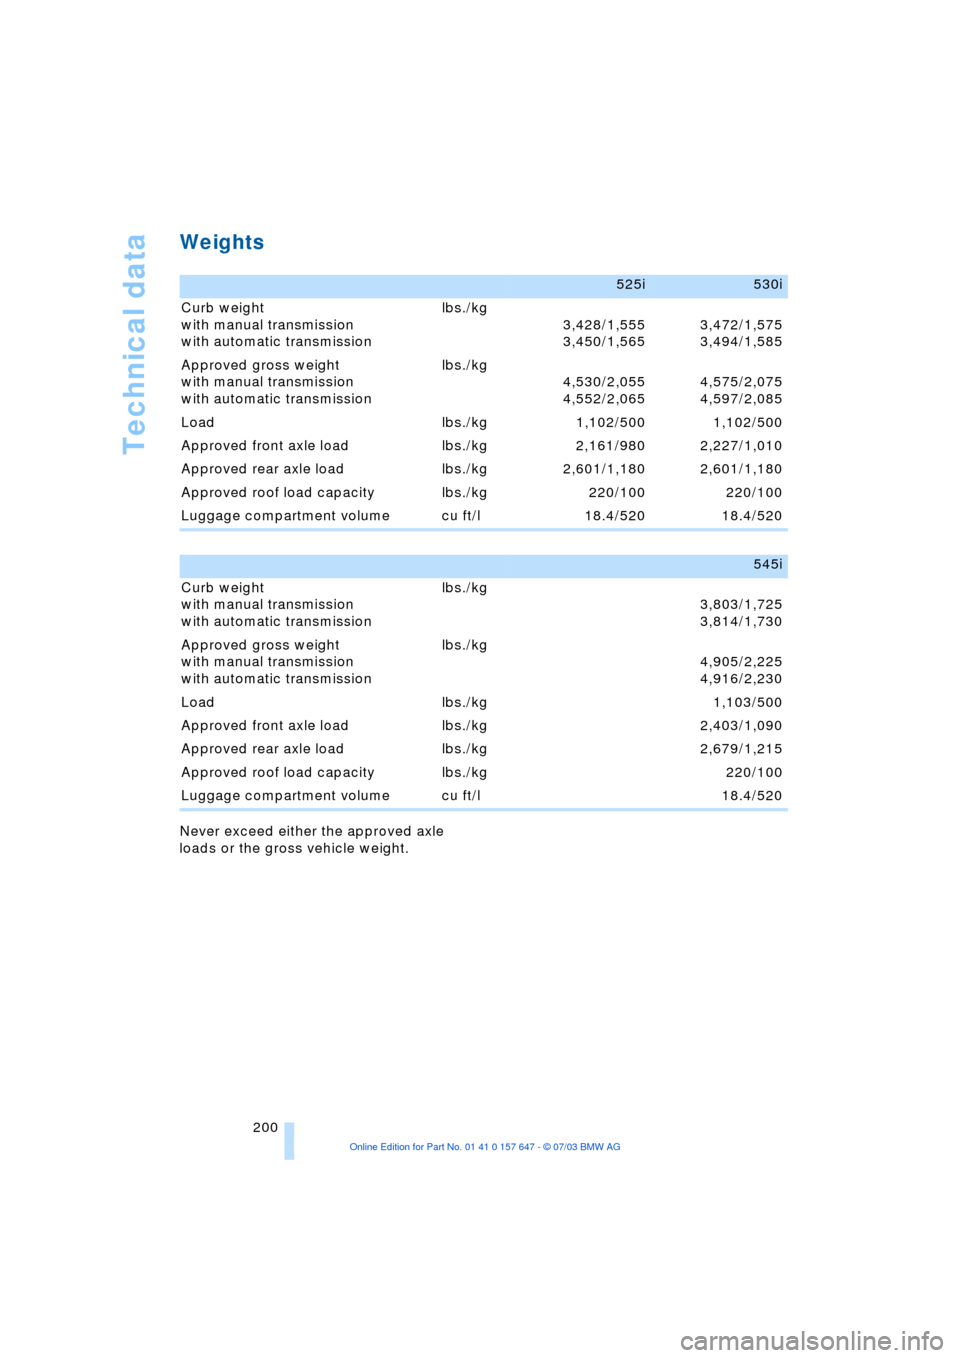
Never exceed either the approved axle
loads or the gross vehicle weight.
525i530i
Curb weight
with manual transmission
with automatic transmission lbs./kg
3,428/1,555
3,450/1,5653,472/1,575
3,494/1,585
Approved gross weight
with manual transmission
with automatic transmissionlbs./kg
4,530/2,055
4,552/2,0654,575/2,075
4,597/2,085
Load lbs./kg 1,102/500 1,102/500
Approved front axle load lbs./kg 2,161/980 2,227/1,010
Approved rear axle load lbs./kg 2,601/1,180 2,601/1,180
Approved roof load capacity lbs./kg 220/100 220/100
Luggage compartment volume cu ft/l 18.4/520 18.4/520
545i
Curb weight
with manual transmission
with automatic transmissionlbs./kg
3,803/1,725
3,814/1,730
Approved gross weight
with manual transmission
with automatic transmissionlbs./kg
4,905/2,225
4,916/2,230
Load lbs./kg 1,103/500
Approved front axle load lbs./kg 2,403/1,090
Approved rear axle load lbs./kg 2,679/1,215
Approved roof load capacity lbs./kg 220/100
Luggage compartment volume cu ft/l 18.4/520
Page 211 of 220
Reference 209
At a glance
Controls
Driving tips
Communications
Navigation
Entertainment
Mobility
Lighting
Ð instruments 88
Ð of the vehicle, refer to
Lamps 87
Lighting of the instruments,
refer to Instrument
lighting 88
Lights, refer to Parking
lamps/low beams 87
Lights on warning 87
Light switch 87
Limit speed, refer to
Limit 72
Loading
Ð securing the load 109
Ð stowing cargo 109
Ð vehicle 108
"Lock after driving off" 30
"Lock button" 28
Locking
Ð from inside 30
Ð from outside 28
Locking and unlocking
doors
Ð from inside 30
Ð from outside 27
Ð setting confirmation
signals 28
"LOGIC7", audio
systems 132
Low beams 87
Ð automatic 87
Ð replacing the bulbs 185
Lower back support, refer
to Lumbar support 38
Lug bolts 188
Ð wrench 187
Luggage compartment 31
Ð capacity 200
Ð locking separately 31
Ð opening/closing, refer to
Luggage compartment
lid 31
Ð opening from the
inside 31
Ð opening from the
outside 31
Ð opening with remote
control 28
Ð socket 100
Ð volume 200Luggage compartment
lid 31
Ð emergency release from
inside luggage
compartment 32
Ð locking separately 31
Ð manual operation 31
Ð opening from the
inside 31
Ð opening from the
outside 31
Ð opening with remote
control 28
Ð unlocking manually 31
Luggage rack, refer to
Roof-mounted luggage
rack 109
Lumbar support 38
LW, waveband 134
M
M+S tires, refer to Winter
tires 175
Maintenance, refer also to
Service and Warranty
Information Booklet for
US models or Warranty
and Service Guide
Booklet for Canadian
models
Maintenance system 181
Malfunction
Ð automatic
transmission 56
Ð Sequential manual
transmission SMG 53
Malfunction warnings, refer
to Check Control 68
Manually controlled
recirculated air 91
"Manual" on the radio 135
Manual operation
Ð door lock 29
Ð fuel filler door 168
Ð glass roof 35
Ð luggage compartment
lid 31
Manual operation with
automatic
transmission 55Manual release, refer to
Manual operation
Manual station tuning 135
Manual transmission 51
"Map, arrow display" 123
"Map, direction of
travel" 124
"Map, facing north" 124
Maximum cooling 91
Maximum roof weight 200
Maximum speed
Ð for winter tires 175
Ð with compact wheel 188
Memory
Ð refer to Key Memory 26
Ð refer to Seat, mirror and
steering wheel
memory 38
Menus, refer to Control
Center 16
Message list of traffic
information 126
Microphone for hands-free
system 151
Mirrors 42
Ð automatic curb
monitor 39
Ð dimming feature 43
Ð heating 43
Ð memory, refer to Seat,
mirror and steering wheel
memory 38
"Missed calls" 155
Missed calls 154
Mobile communications in
the vehicle 108
Mobile Service, refer to
Roadside Assistance 191
Monitor, refer to Control
Center 16
"Monitor display on" 77
Monitoring inflation
pressure, refer to Flat Tire
Monitor 80
Multifunction switch
Ð refer to Turn signal
indicators/headlamp
flasher 56
Ð refer to Wiper/washer
system 57