Page 56 of 119

482003 MY COROLLA MATRIX (OM12774U)
This system uses the maps of DENSO
based on NavTech maps and GDT maps.
This product contains proprietary and
confidential property")
Corolla_MATRIX_Navi_U (L/O 0208)
482003 MY COROLLA MATRIX (OM12774U)
This system uses the maps of DENSO
based on NavTech maps and GDT maps.
This product contains proprietary and
confidential property of Geographic
Data Technology, Inc. Unauthorized use,
including duplication of this product is
expressly prohibited.
In order to provide you with accurate map
information as much as possible, we are
always gathering information such as road
repairs and doing site investigation. How-
ever, the names of roads, streets, facili-
ties, and their locations are often
changed. In some places, construction on
roads may be in progress. For that rea-
son, information on some areas in this
system might be different from the actual
location.
The map database is normally updated
once a year. Contact your dealer for up-
dating a map database.
INFORMATION
For the up�dated map DVD�ROM, con-
tact your Toyota dealer.
1NAN113
“DVD”: To determine which version of the
database is currently in your vehicle, se-
lect the
“DVD” switch on the “Menu”
screen. The “DVD information” screen ap-
pears and displays the map database ver-
sion. Contact your dealer to find out if
there is a more recent update released.
Map database information and
updates
Page 60 of 119
Corolla_MATRIX_Navi_U (L/O 0208)
522003 MY COROLLA MATRIX (OM12774U)
2NAN008
Operate the select and scroll lever, so
that the direction is facing to your de-
sired direction.
Push the
“ENT” button and the map
screen returns. Once a marked point is registered, you
can edit the icon, name or telephone
number.
1. Push the
“MENU” button to dis-
play the “Menu” screen and select
the
“Marked points” switch.
2NAN009
2. Select the “Edit” switch of the
“Marked Points”.
2NAN010
The screen lists the marked points.
Sort by “Icon”: Select this switch to list
the marked points in order of the type of
icon.
Sort by “Date”: Select this switch to list
the marked points in order of the regis-
tered date.
Sort by “Name”: Select this switch to list
the marked points in alphabetical order.
Select
switch of the desired marked
point to display the “Edit marked point”
screen.
(b) Editing marked points
Page 61 of 119
Corolla_MATRIX_Navi_U (L/O 0208)
532003 MY COROLLA MATRIX (OM12774U)
2NAN011
3. Select the “Change” switch which
you want to edit.
�Changing an “Icon”
2NAN012
Select your desired icon.
�Changing a “Name”
2NAN013
Select alphabet or numeral keys to in-
put the name.
After you finish your entry, select the
“OK” switch on the screen.
The previous screen will be displayed.
�Changing a “Phone number” (tele-
phone number)
2NAN014
Select numeral keys.
After you finish your entry, select the
“OK” switch on the screen.
The previous screen will be displayed.
Page 62 of 119

542003 MY COROLLA MATRIX (OM12774U)
�Editing a “Location” (position/map
location).
2NAN015
Operate the select and scroll lever to
move the cursor
to the desired")
Corolla_MATRIX_Navi_U (L/O 0208)
542003 MY COROLLA MATRIX (OM12774U)
�Editing a “Location” (position/map
location).
2NAN015
Operate the select and scroll lever to
move the cursor
to the desired
point on the map.
Push the
“ENT” button when the cursor is your desired point.
The previous screen will be displayed.
�“Show name”
You can set the name of marked point
either to show or not on the screen.
To show the name, select the
“On”
switch. Not to show it, select the
“Off” switch. 1. Push the
“MENU” button to dis-
play the “Menu” screen and select
the
“Marked points” switch.
2NAN016
2. Select the “Delete” switch of the
“Marked Points”.
2NAN017
3. Select switch of the marked
point to delete. If you want to delete
all of the marked points, select the
“Del. All” switch.
To delete only specified marked points,
use the sort by
“Icon”, “Date” or
“Name” switch to display the screen,
so that you can easily find the marked
points.
Messages appear depending on the type
of deletion. If you want to delete, select
the
“Yes” switch. To cancel the deletion,
select the
“No” switch.
(c) Deleting marked points
Page 63 of 119
Corolla_MATRIX_Navi_U (L/O 0208)
552003 MY COROLLA MATRIX (OM12774U)
You can register your current position
or any points (See “Screen scrolling”on
page 43.) from the map screen.1. Move the cursor
to the desired
point, and if you wish to register
that point, push the
“ENT” button.
2NAN018
2. Select the “Mark” switch.
2NAN019
When you select the “Mark” switch, the
above screen appears for a few seconds,
and then the map screen will be dis-
played.
To change the icon or name, etc., see “(b)
Editing marked points”.
2NAN020
You can register up to 100 marked points.
If you attempt to register more than 100,
a message appears for confirmation.
If you want to register a new point, push
the
“MENU” button to display the
“Menu” screen and select the
“Marked
points”
switch. Delete several old
points by following the “(c) Deleting
marked points”.
(d) Quick marked point
registration
Page 66 of 119

582003 MY COROLLA MATRIX (OM12774U)
2NAN028
3. Select the preset destination thatyou want to delete and select the
switch.
Messages appear depending on the type
of de")
Corolla_MATRIX_Navi_U (L/O 0208)
582003 MY COROLLA MATRIX (OM12774U)
2NAN028
3. Select the preset destination thatyou want to delete and select the
switch.
Messages appear depending on the type
of deletion. If you want to delete, select
the
“Yes” switch. To cancel the deletion,
select the
“No” switch. Any areas you want to avoid due to
traffic jams, construction work or other
reasons can be registered as avoid
areas.
Push the
“MENU” button to display
the “Menu” screen and then select the
“Marked points” switch to display
the following screen.
2NAN029
INFORMATION
If the route calculation cannot be
made without running through the
area to avoid, a route passing
through the area to avoid may be
shown.
1. Select the “Register” switch of
the “Areas to avoid”.
2NAN070
2. Enter the location in the same way
as you input any destination or dis-
play the map of the area you want
to avoid. (See pages 8 through 23.)
INFORMATION
Only 10 points can be registered as
point to avoid. If there are 10 points
already registered, the message “Un-
able to register additional points. Per-
form operation again after deleting
unnecessary points.” appears on the
screen.
Area to avoid (a) Registering area to avoid
Page 67 of 119

592003 MY COROLLA MATRIX (OM12774U)
2NAN031
3. When any of the “detour gauge” atthe left side of the screen is se-
lected, a box appears around the
cursor
. This")
Corolla_MATRIX_Navi_U (L/O 0208)
592003 MY COROLLA MATRIX (OM12774U)
2NAN031
3. When any of the “detour gauge” atthe left side of the screen is se-
lected, a box appears around the
cursor
. This is to determine the
area to avoid. Select the “detour
gauge” you desire.
When you push the
“ENT” button, the
message appears.
INFORMATION
When the above screen is displayed,
if the map scale is larger than 1/2
mile, the message “Position cannot
be specified in this scale. Switch to
more detailed map.” appears on the
screen. Set the map scale, so that it
is more detailed than 1/2 mile.
1. Select the “Edit” switch of the
“Areas to avoid” to display the “Edit
area to avoid” screen.
2NAN032
2. Select the area to avoid switch
you want to edit.
2NAN033
3. Select the “Name”, “Location” or “Change area size” on this screen.
�Changing a “Name”
2NAN034
Select alphabet or numeral keys to in-
put the name.
After you finish your entry, select the
“OK” switch on the screen.
The previous screen will be displayed.
(b) Editing area to avoid
Page 68 of 119
Corolla_MATRIX_Navi_U (L/O 0208)
602003 MY COROLLA MATRIX (OM12774U)
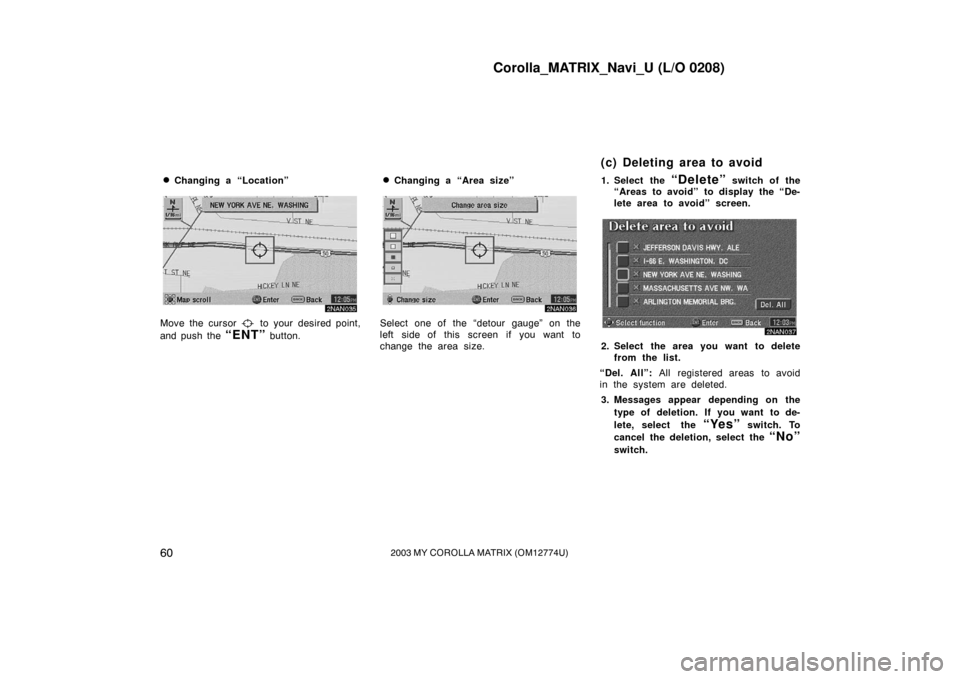
�Changing a “Location”
2NAN035
Move the cursor to your desired point,
and push the
“ENT” button.
�Changing a “Area size”
2NAN036
Select one of the “detour gauge” on the
left side of this screen if you want to
change the area size. 1. Select the
“Delete” switch of the
“Areas to avoid” to display the “De-
lete area to avoid” screen.
2NAN037
2. Select the area you want to delete
from the list.
“Del. All”: All registered areas to avoid
in the system are deleted.
3. Messages appear depending on the type of deletion. If you want to de-
lete, select the
“Yes” switch. To
cancel the deletion, select the
“No”
switch.
(c) Deleting area to avoid

522003 MY COROLLA MATRIX (OM12774U)
2NAN008
Operate the select and scroll lever, so
that the direction is facing to your de-
sired direction.
Push the
“ENT” butto")


552003 MY COROLLA MATRIX (OM12774U)
You can register your current position
or any points (See “Screen scrolling”on
page 43.) from the map screen.1. Move the cursor")