Page 157 of 2234
022KW±01
02±54
±
PREPARATION WIPER & WASHER
AVENSIS REPAIR MANUAL (RM1018E)
WIPER & WASHER
PREPARATION
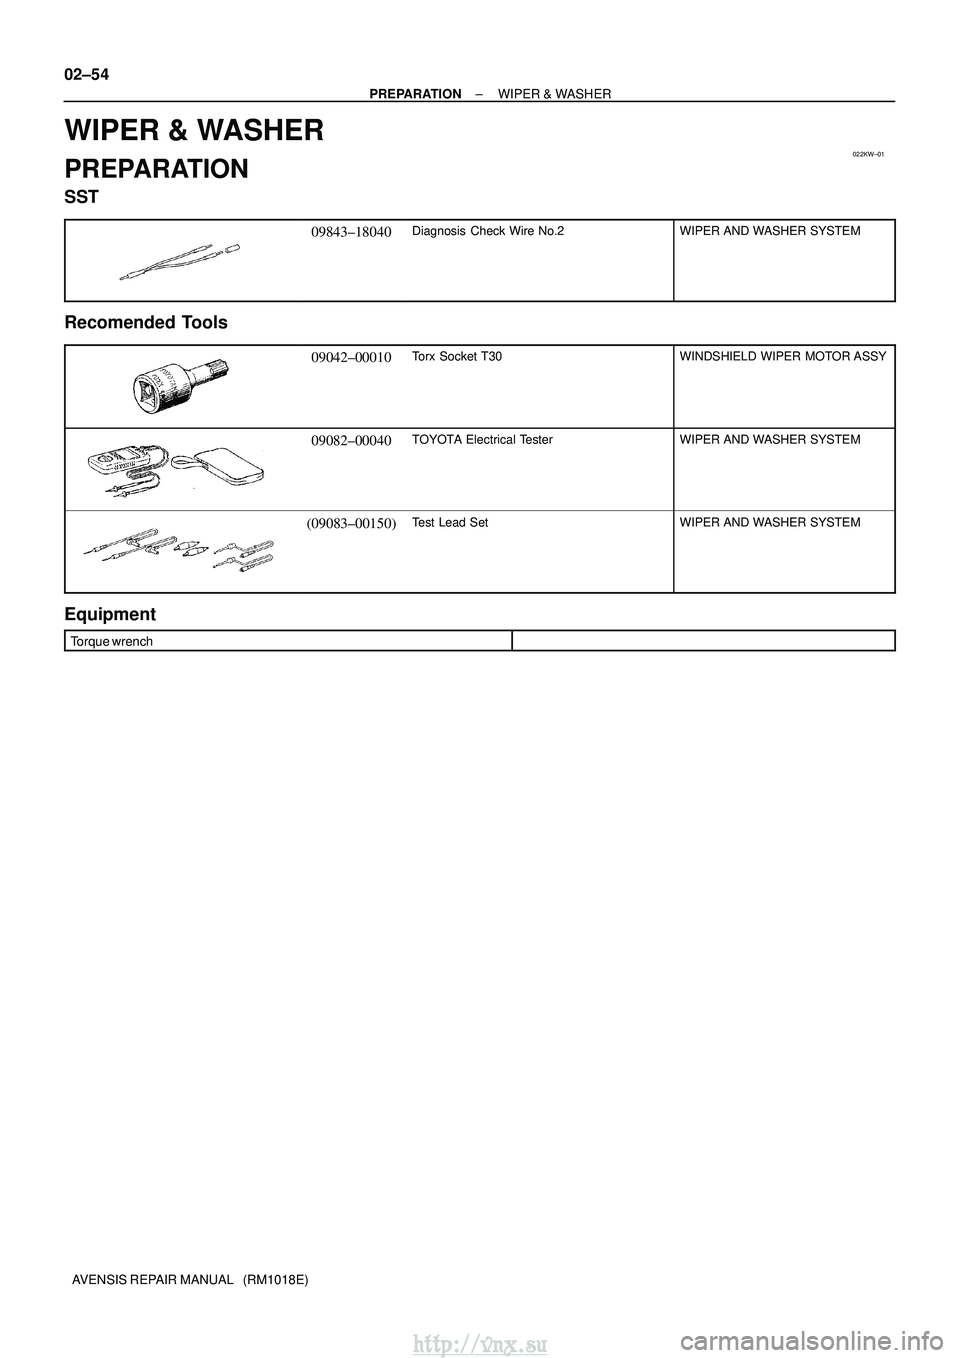
SST
09843±18040Diagnosis Check Wire No.2WIPER AND WASHER SYSTEM
Recomended Tools
09042±00010Torx Socket T30WINDSHIELD WIPER MOTOR ASSY
09082±00040TOYOTA Electrical TesterWIPER AND WASHER SYSTEM
(09083±00150)Test Lead SetWIPER AND WASHER SYSTEM
Equipment
Torque wrench
http://vnx.su
Page 1525 of 2234
660CN±01
I35256
I352578Clips
I35258
±
WIPER & WASHER WINDSHIELD WIPER MOTOR ASSY
66±13
AVENSIS REPAIR MANUAL (RM1018E)
WINDSHIELD WIPER MOTOR ASSY
REPLACEMENT
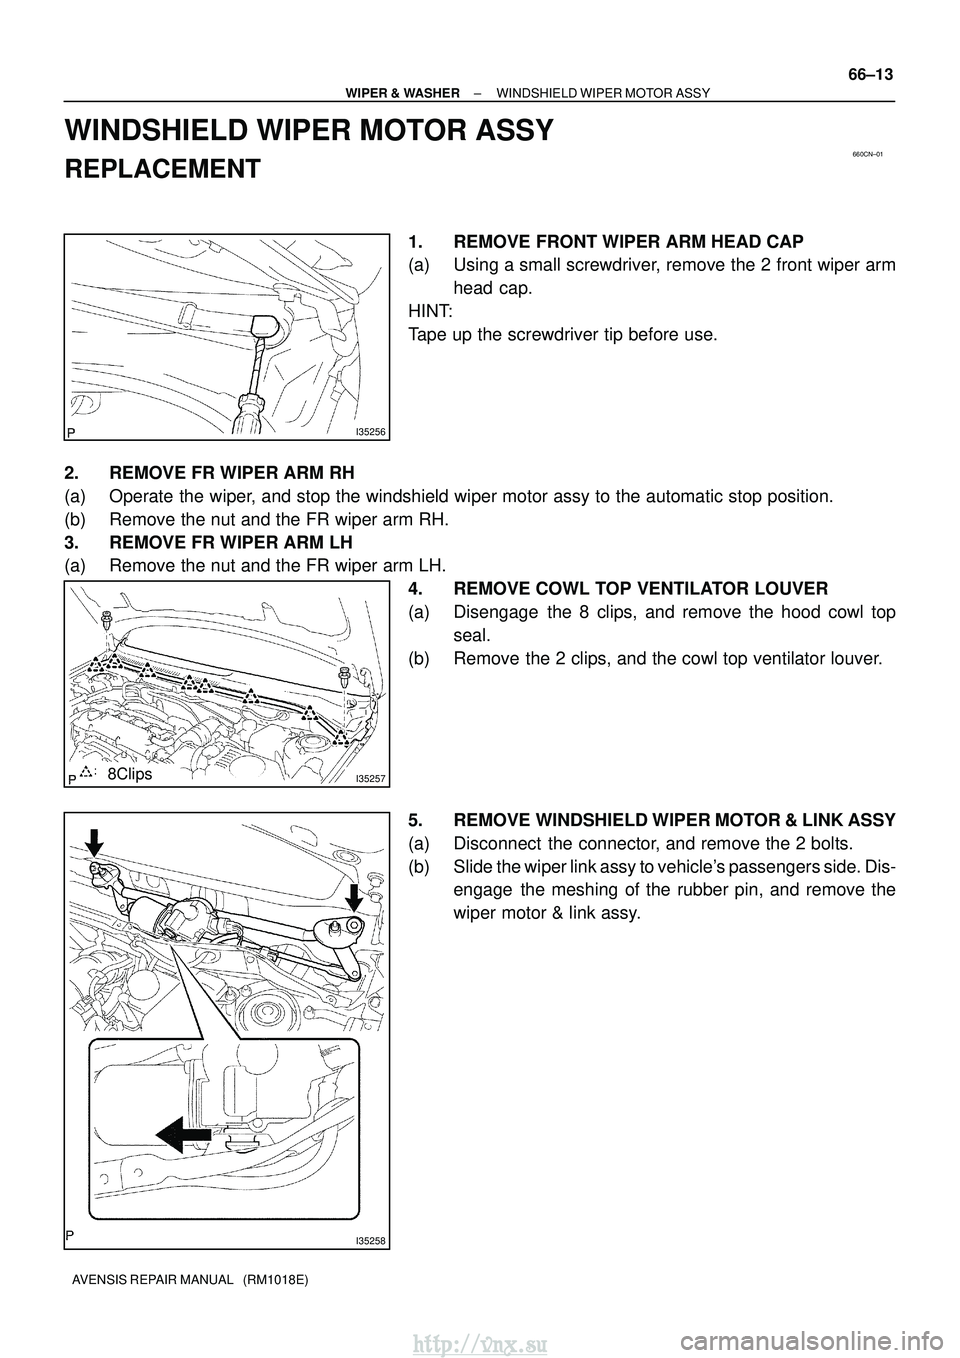
1. REMOVE FRONT WIPER ARM HEAD CAP
(a) Using a small screwdriver, remove the 2 front wiper arm
head cap.
HINT:
Tape up the screwdriver tip before use.
2. REMOVE FR WIPER ARM RH
(a) Operate the wiper, and stop the windshield wiper motor assy to the automatic stop positio\
n.
(b) Remove the nut and the FR wiper arm RH.
3. REMOVE FR WIPER ARM LH
(a) Remove the nut and the FR wiper arm LH. 4. REMOVE COWL TOP VENTILATOR LOUVER
(a) Disengage the 8 clips, and remove the hood cowl topseal.
(b) Remove the 2 clips, and the cowl top ventilator louver.
5. REMOVE WINDSHIELD WIPER MOTOR & LINK ASSY
(a) Disconnect the connector, and remove the 2 bolts.
(b) Slide the wiper link assy to vehicle's passengers side. Dis- engage the meshing of the rubber pin, and remove the
wiper motor & link assy.
http://vnx.su
Page 1526 of 2234
E65848
E65849
E65850
E65850
66±14
±
WIPER & WASHER WINDSHIELD WIPER MOTOR ASSY
AVENSIS REPAIR MANUAL (RM1018E)
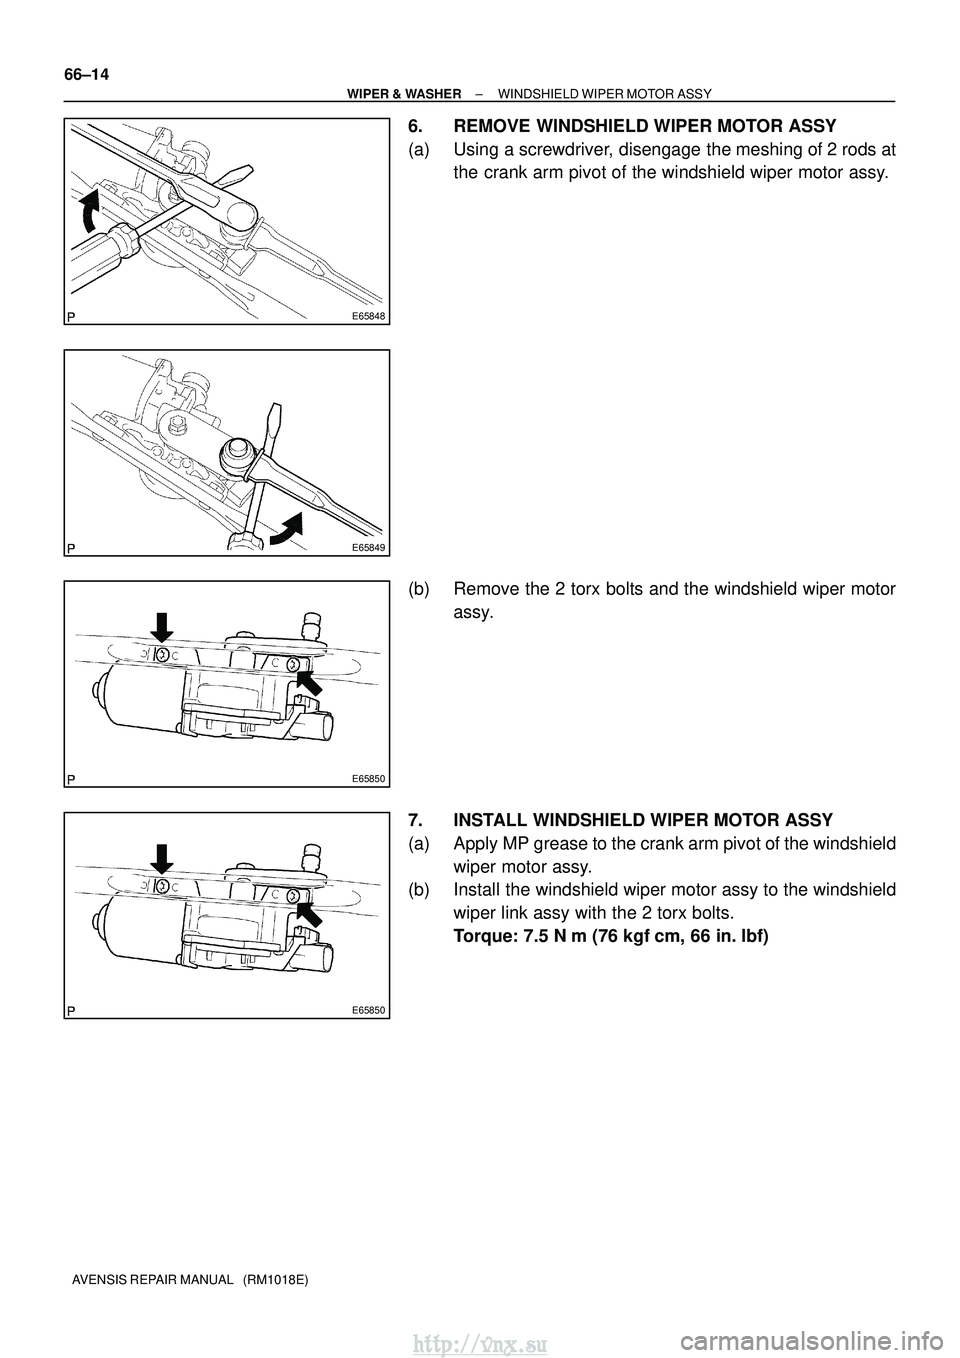
6. REMOVE WINDSHIELD WIPER MOTOR ASSY
(a) Using a screwdriver, disengage the meshing of 2 rods at the crank arm pivot of the windshield wiper motor assy.
(b) Remove the 2 torx bolts and the windshield wiper motor assy.
7. INSTALL WINDSHIELD WIPER MOTOR ASSY
(a) Apply MP grease to the crank arm pivot of the windshield wiper motor assy.
(b) Install the windshield wiper motor assy to the windshield
wiper link assy with the 2 torx bolts.
Torque: 7.5 N �m (76 kgf �cm, 66 in. �lbf)
http://vnx.su
Page 1527 of 2234
I35259
E58837
Wiper Arm SerrationWiper Pivot Serration
Wire Brush
I3445517.5 ± 32.5 mm
(0.69 ± 1.28 in.)
Cowl top ventilator louver
±
WIPER & WASHER WINDSHIELD WIPER MOTOR ASSY
66±15
AVENSIS REPAIR MANUAL (RM1018E)
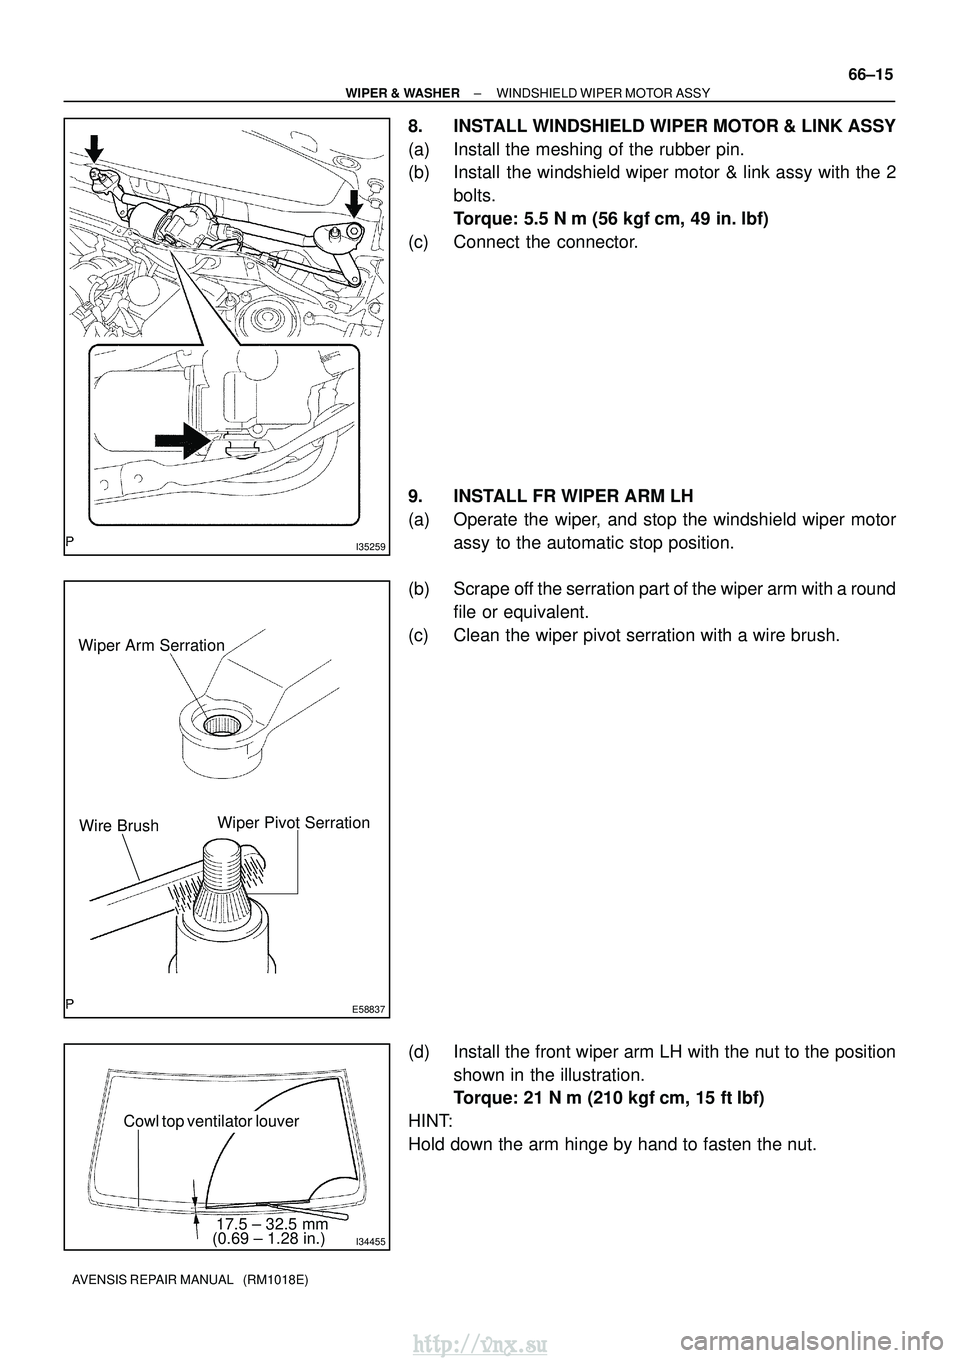
8. INSTALL WINDSHIELD WIPER MOTOR & LINK ASSY
(a) Install the meshing of the rubber pin.
(b) Install the windshield wiper motor & link assy with the 2
bolts.
Torque: 5.5 N� m (56 kgf�cm, 49 in. �lbf)
(c) Connect the connector.
9. INSTALL FR WIPER ARM LH
(a) Operate the wiper, and stop the windshield wiper motor assy to the automatic stop position.
(b) Scrape off the serration part of the wiper arm with a round file or equivalent.
(c) Clean the wiper pivot serration with a wire brush.
(d) Install the front wiper arm LH with the nut to the position shown in the illustration.
Torque: 21 N �m (210 kgf� cm, 15 ft�lbf)
HINT:
Hold down the arm hinge by hand to fasten the nut.
http://vnx.su
Page 1528 of 2234
I34456
17.5 ± 32.5 mm
(0.69 ± 1.28 in.)
Cowl top ventilator louver
66±16
±
WIPER & WASHER WINDSHIELD WIPER MOTOR ASSY
AVENSIS REPAIR MANUAL (RM1018E)
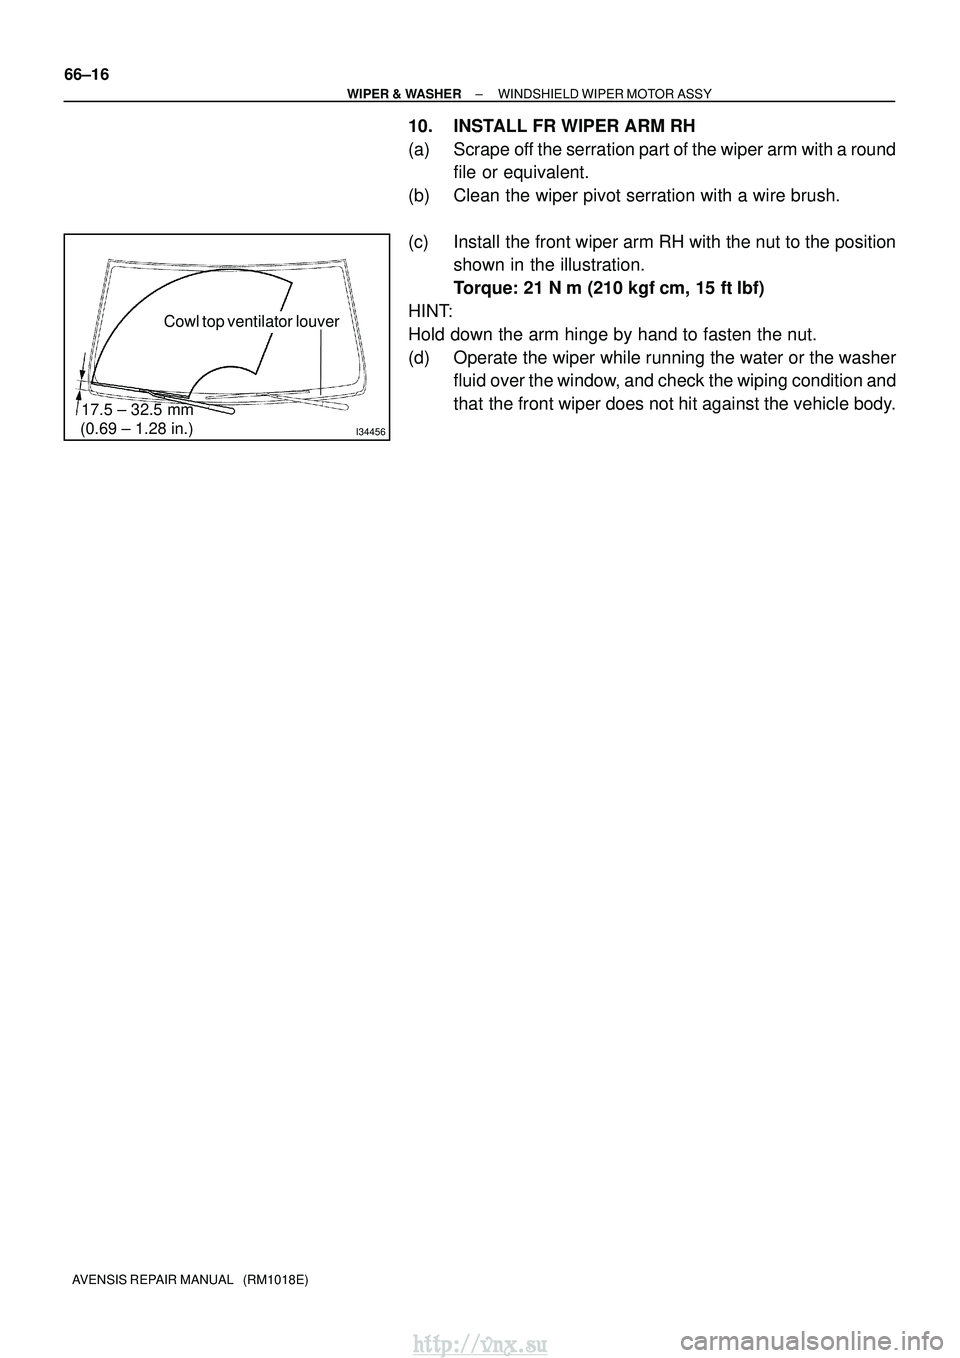
10. INSTALL FR WIPER ARM RH
(a) Scrape off the serration part of the wiper arm with a round file or equivalent.
(b) Clean the wiper pivot serration with a wire brush.
(c) Install the front wiper arm RH with the nut to the position shown in the illustration.
Torque: 21 N �m (210 kgf� cm, 15 ft�lbf)
HINT:
Hold down the arm hinge by hand to fasten the nut.
(d) Operate the wiper while running the water or the washer fluid over the window, and check the wiping condition and
that the front wiper does not hit against the vehicle body.
http://vnx.su
Page 1531 of 2234
660CK±01
66±2
±
WIPER & WASHERWIPER AND WASHER SYSTEM
AVENSIS REPAIR MANUAL (RM1018E)
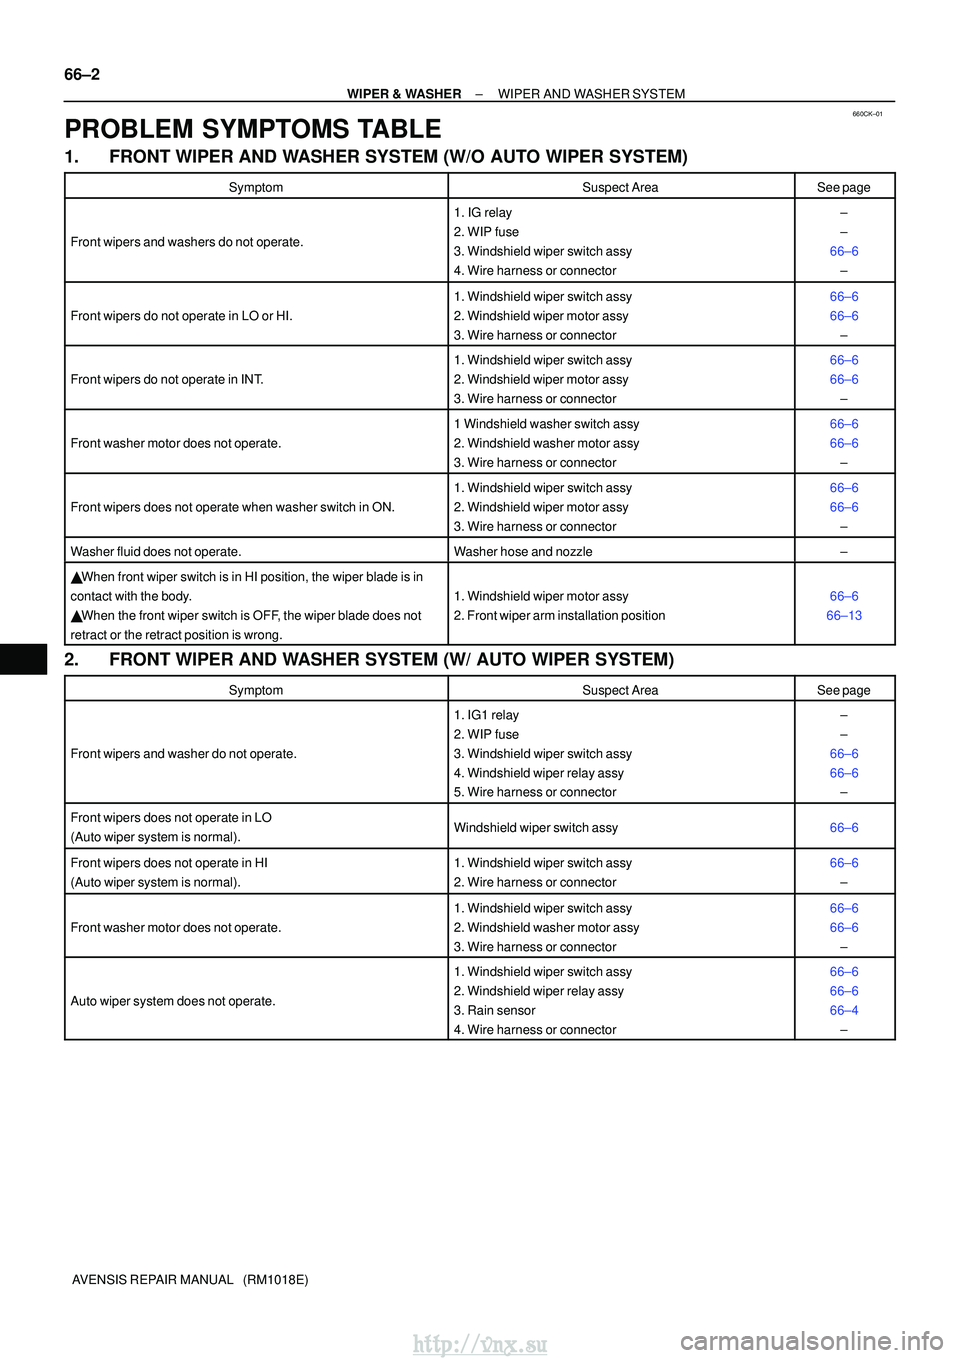
PROBLEM SYMPTOMS TABLE
1.FRONT WIPER AND WASHER SYSTEM (W/O AUTO WIPER SYSTEM)
SymptomSuspect AreaSee page
Front wipers and washers do not operate.
1. IG relay
2. WIP fuse
3. Windshield wiper switch assy
4. Wire harness or connector±
±
66±6 ±
Front wipers do not operate in LO or HI.
1. Windshield wiper switch assy
2. Windshield wiper motor assy
3. Wire harness or connector66±6
66±6±
Front wipers do not operate in INT.
1. Windshield wiper switch assy
2. Windshield wiper motor assy
3. Wire harness or connector66±6
66±6±
Front washer motor does not operate.
1 Windshield washer switch assy
2. Windshield washer motor assy
3. Wire harness or connector66±6
66±6±
Front wipers does not operate when washer switch in ON.
1. Windshield wiper switch assy
2. Windshield wiper motor assy
3. Wire harness or connector66±6
66±6±
Washer fluid does not operate.Washer hose and nozzle±
� When front wiper switch is in HI position, the wiper blade is in
contact with the body.
� When the front wiper switch is OFF, the wiper blade does not
retract or the retract position is wrong.
1. Windshield wiper motor assy
2. Front wiper arm installation position66±6
66±13
2. FRONT WIPER AND WASHER SYSTEM (W/ AUTO WIPER SYSTEM)
SymptomSuspect AreaSee page
Front wipers and washer do not operate.
1. IG1 relay
2. WIP fuse
3. Windshield wiper switch assy
4. Windshield wiper relay assy
5. Wire harness or connector±
±
66±6
66±6 ±
Front wipers does not operate in LO
(Auto wiper system is normal).Windshield wiper switch assy66±6
Front wipers does not operate in HI
(Auto wiper system is normal).1. Windshield wiper switch assy
2. Wire harness or connector66±6
±
Front washer motor does not operate.
1. Windshield wiper switch assy
2. Windshield washer motor assy
3. Wire harness or connector66±6
66±6±
Auto wiper system does not operate.
1. Windshield wiper switch assy
2. Windshield wiper relay assy
3. Rain sensor
4. Wire harness or connector66±6
66±6
66±4±
http://vnx.su
Page 1532 of 2234
±
WIPER & WASHER WIPER AND WASHER SYSTEM
66±3
AVENSIS REPAIR MANUAL (RM1018E)
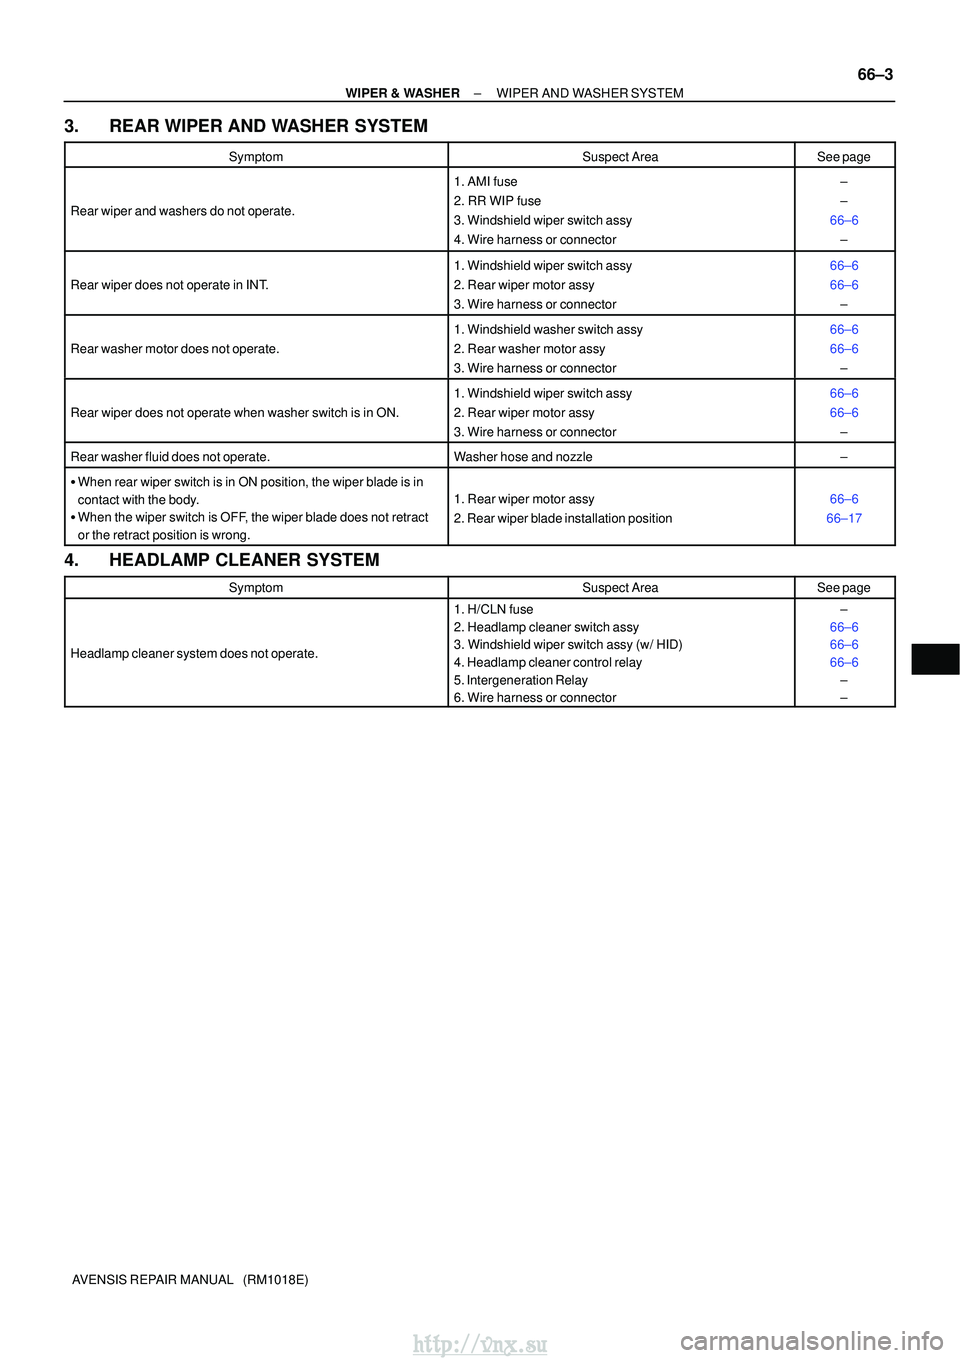
3. REAR WIPER AND WASHER SYSTEM
SymptomSuspect AreaSee page
Rear wiper and washers do not operate.
1. AMI fuse
2. RR WIP fuse
3. Windshield wiper switch assy
4. Wire harness or connector±
±
66±6 ±
Rear wiper does not operate in INT.
1. Windshield wiper switch assy
2. Rear wiper motor assy
3. Wire harness or connector66±6
66±6±
Rear washer motor does not operate.
1. Windshield washer switch assy
2. Rear washer motor assy
3. Wire harness or connector66±6
66±6±
Rear wiper does not operate when washer switch is in ON.
1. Windshield wiper switch assy
2. Rear wiper motor assy
3. Wire harness or connector66±6
66±6±
Rear washer fluid does not operate.Washer hose and nozzle±
�When rear wiper switch is in ON position, the wiper blade is in
contact with the body.
� When the wiper switch is OFF, the wiper blade does not retract
or the retract position is wrong.
1. Rear wiper motor assy
2. Rear wiper blade installation position66±6
66±17
4. HEADLAMP CLEANER SYSTEM
SymptomSuspect AreaSee page
Headlamp cleaner system does not operate.
1. H/CLN fuse
2. Headlamp cleaner switch assy
3. Windshield wiper switch assy (w/ HID)
4. Headlamp cleaner control relay
5. Intergeneration Relay
6. Wire harness or connector±
66±6
66±6
66±6 ±
±
http://vnx.su
Page 1533 of 2234
660CL±01
E67356
E67356
E67352
E68115
66±4
±
WIPER & WASHER WIPER AND WASHER SYSTEM
AVENSIS REPAIR MANUAL (RM1018E)
ON±VEHICLE INSPECTION
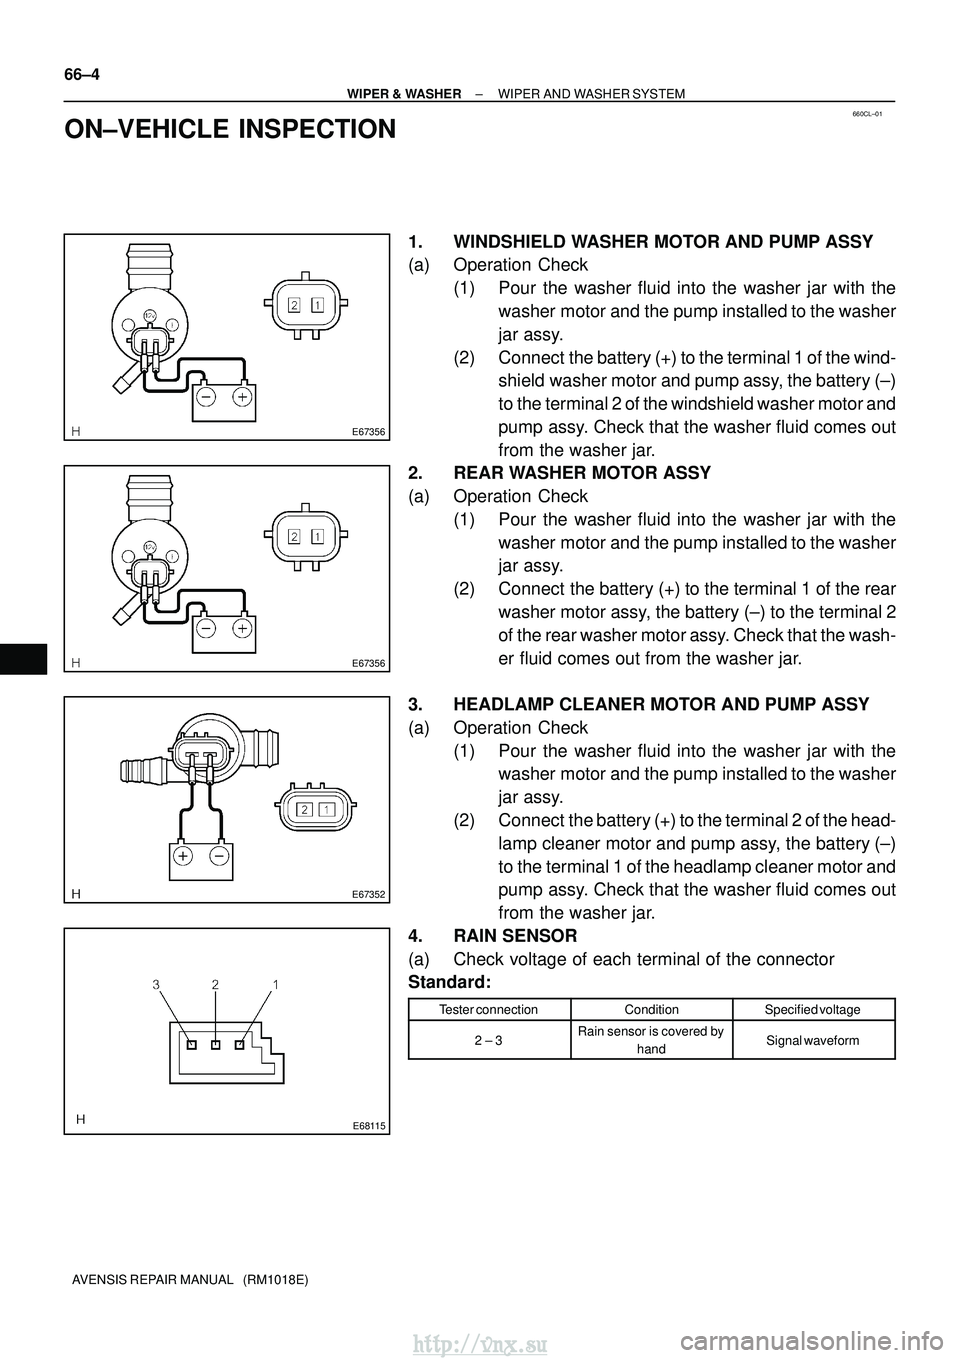
1. WINDSHIELD WASHER MOTOR AND PUMP ASSY
(a) Operation Check (1) Pour the washer fluid into the washer jar with thewasher motor and the pump installed to the washer
jar assy.
(2) Connect the battery (+) to the terminal 1 of the wind- shield washer motor and pump assy, the battery (±)
to the terminal 2 of the windshield washer motor and
pump assy. Check that the washer fluid comes out
from the washer jar.
2. REAR WASHER MOTOR ASSY
(a) Operation Check
(1) Pour the washer fluid into the washer jar with thewasher motor and the pump installed to the washer
jar assy.
(2) Connect the battery (+) to the terminal 1 of the rear washer motor assy, the battery (±) to the terminal 2
of the rear washer motor assy. Check that the wash-
er fluid comes out from the washer jar.
3. HEADLAMP CLEANER MOTOR AND PUMP ASSY
(a) Operation Check (1) Pour the washer fluid into the washer jar with thewasher motor and the pump installed to the washer
jar assy.
(2) Connect the battery (+) to the terminal 2 of the head- lamp cleaner motor and pump assy, the battery (±)
to the terminal 1 of the headlamp cleaner motor and
pump assy. Check that the washer fluid comes out
from the washer jar.
4. RAIN SENSOR
(a) Check voltage of each terminal of the connector
Standard:
Tester connectionConditionSpecified voltage
2 ± 3Rain sensor is covered by
handSignal waveform
http://vnx.su