Page 1528 of 2234
I34456
17.5 ± 32.5 mm
(0.69 ± 1.28 in.)
Cowl top ventilator louver
66±16
±
WIPER & WASHER WINDSHIELD WIPER MOTOR ASSY
AVENSIS REPAIR MANUAL (RM1018E)
10. INSTALL FR WIPER ARM RH
(a) Scrape off the serration part of the wiper arm with a round file or equivalent.
(b) Clean the wiper pivot serration with a wire brush.
(c) Install the front wiper arm RH with the nut to the position shown in the illustration.
Torque: 21 N �m (210 kgf� cm, 15 ft�lbf)
HINT:
Hold down the arm hinge by hand to fasten the nut.
(d) Operate the wiper while running the water or the washer fluid over the window, and check the wiping condition and
that the front wiper does not hit against the vehicle body.
http://vnx.su
Page 1561 of 2234
670S8±01
������I35168
������I35169
(2)
(1)
(3)
H02440
Riveter
Mandrel
67±10
±
AUDIO & VISUAL SYSTEM FRONT NO.1 SPEAKER ASSY
AVENSIS REPAIR MANUAL (RM1018E)
FRONT NO.1 SPEAKER ASSY
REPLACEMENT
1. REMOVE REAR DOOR WINDOW REGULATOR HANDLE ASSY (W/O POWER WINDOW) (See page 75±8)
2.REMOVE FRONT DOOR LOWER FRAME BRACKET GARNISH LH (See page 75±8)
3.REMOVE FRONT DOOR TRIM BASE LH (See page 75±8)
4.REMOVE FUEL LID OPENER SWITCH (See page 75±8)
5. REMOVE POWER WINDOW REGULATOR SWITCH ASSY (W/ POWER WINDOW) (See page 75±8)
6.REMOVE FRONT DOOR TRIM BOARD SUB±ASSY LH (See page 75±8)
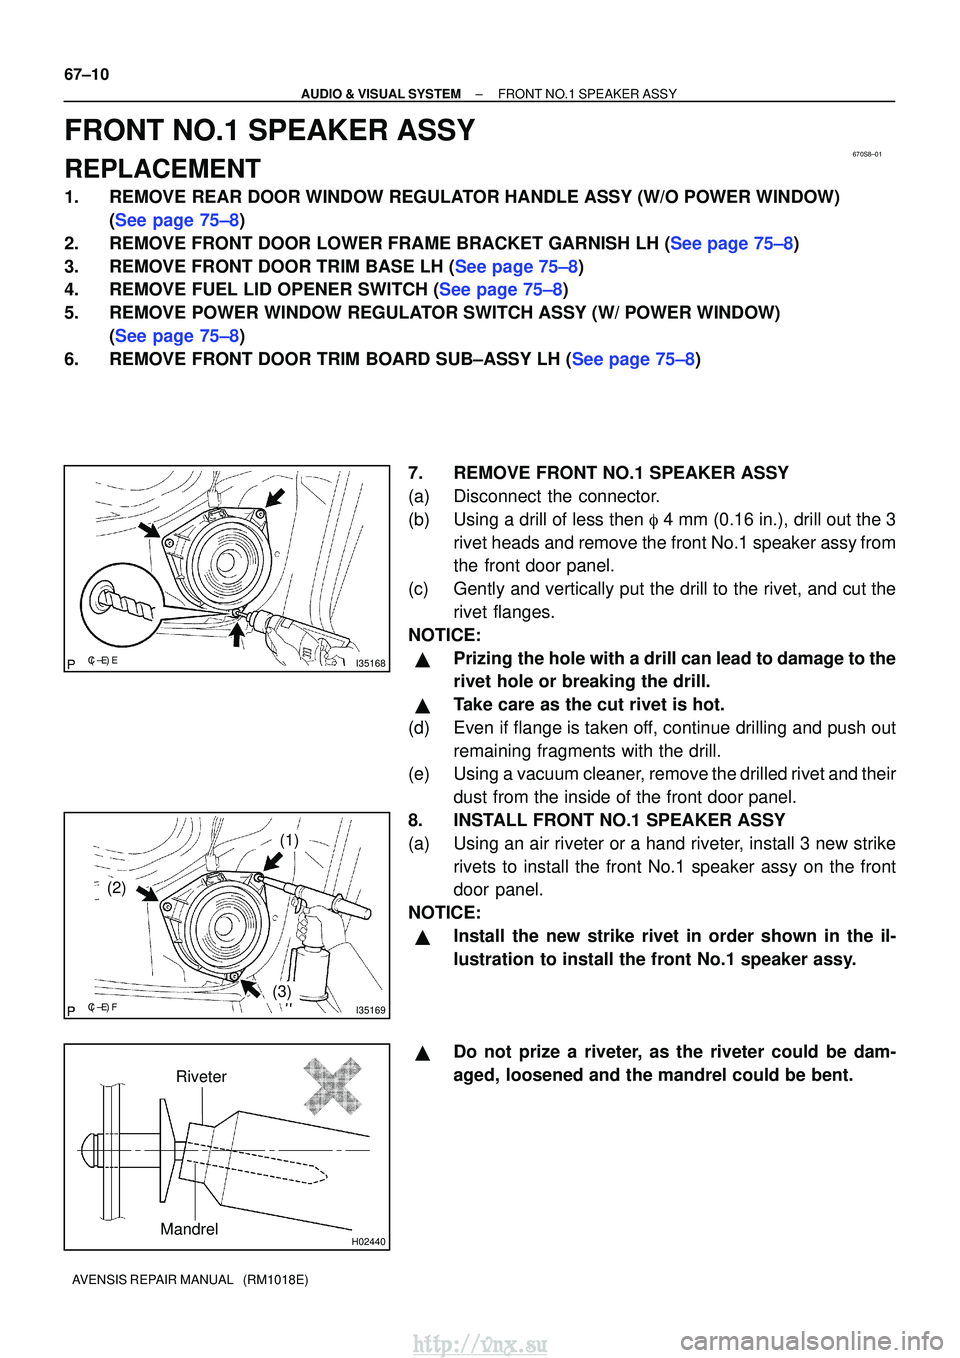
7. REMOVE FRONT NO.1 SPEAKER ASSY
(a) Disconnect the connector.
(b) Using a drill of less then � 4 mm (0.16 in.), drill out the 3
rivet heads and remove the front No.1 speaker assy from
the front door panel.
(c) Gently and vertically put the drill to the rivet, and cut the rivet flanges.
NOTICE:
�Prizing the hole with a drill can lead to damage to the
rivet hole or breaking the drill.
�Take care as the cut rivet is hot.
(d) Even if flange is taken off, continue drilling and push out remaining fragments with the drill.
(e) Using a vacuum cleaner, remove the drilled rivet and their
dust from the inside of the front door panel.
8. INSTALL FRONT NO.1 SPEAKER ASSY
(a) Using an air riveter or a hand riveter, install 3 new strike rivets to install the front No.1 speaker assy on the front
door panel.
NOTICE:
�Install the new strike rivet in order shown in the il-
lustration to install the front No.1 speaker assy.
�Do not prize a riveter, as the riveter could be dam-
aged, loosened and the mandrel could be bent.
http://vnx.su
Page 1572 of 2234
670SA±01
������I35188
������I35189
(2)
(1)
(3)
H02440
Riveter
Mandrel
±
AUDIO & VISUAL SYSTEM REAR SPEAKER ASSY
67±13
AVENSIS REPAIR MANUAL (RM1018E)
REAR SPEAKER ASSY
REPLACEMENT
1.REMOVE REAR DOOR WINDOW REGULATOR HANDLE ASSY (See page 75±22)
2.REMOVE REAR DOOR TRIM BASE LH (See page 75±22)
3. REMOVE POWER WINDOW REGULATOR SWITCH ASSY REAR (W/ POWER WINDOW)
(See page 75±22)
4.REMOVE REAR DOOR TRIM BOARD SUB±ASSY LH (See page 75±22)
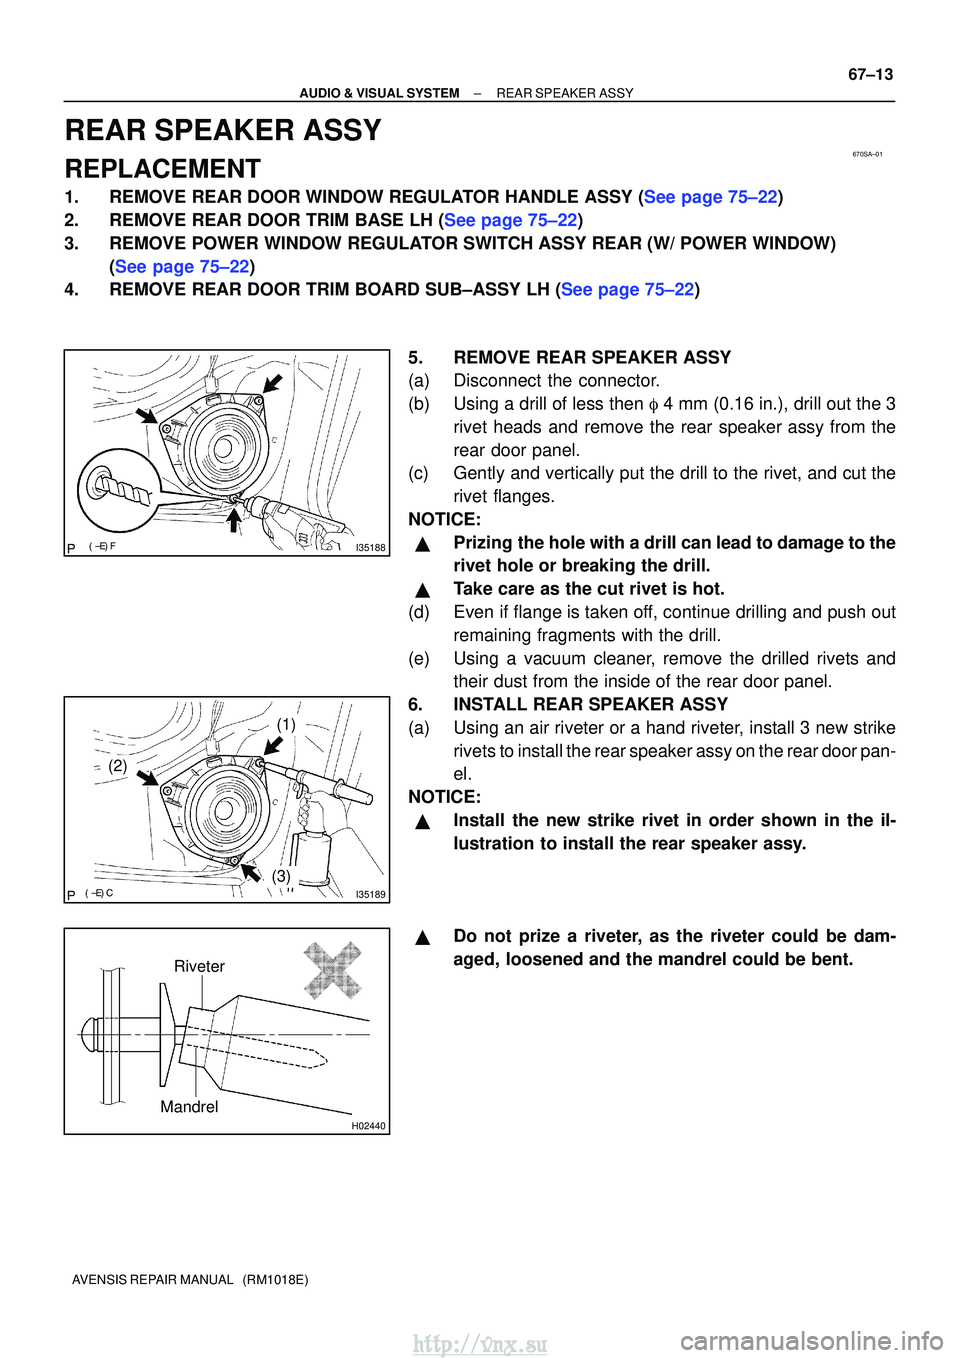
5. REMOVE REAR SPEAKER ASSY
(a) Disconnect the connector.
(b) Using a drill of less then � 4 mm (0.16 in.), drill out the 3
rivet heads and remove the rear speaker assy from the
rear door panel.
(c) Gently and vertically put the drill to the rivet, and cut the
rivet flanges.
NOTICE:
�Prizing the hole with a drill can lead to damage to the
rivet hole or breaking the drill.
�Take care as the cut rivet is hot.
(d) Even if flange is taken off, continue drilling and push out remaining fragments with the drill.
(e) Using a vacuum cleaner, remove the drilled rivets and their dust from the inside of the rear door panel.
6. INSTALL REAR SPEAKER ASSY
(a) Using an air riveter or a hand riveter, install 3 new strike rivets to install the rear speaker assy on the rear door pan-
el.
NOTICE:
�Install the new strike rivet in order shown in the il-
lustration to install the rear speaker assy.
�Do not prize a riveter, as the riveter could be dam-
aged, loosened and the mandrel could be bent.
http://vnx.su
Page 1574 of 2234
670SB±01
I36707
±
AUDIO & VISUAL SYSTEM REAR SPEAKER ASSY NO.2
67±15
AVENSIS REPAIR MANUAL (RM1018E)
REAR SPEAKER ASSY NO.2
REPLACEMENT
1. REMOVE REAR DOOR WINDOW REGULATOR HANDLE ASSY (W/O POWER WINDOW)
(See page 75±22)
2. REMOVE POWER WINDOW REGULATOR SWITCH ASSY REAR (W/ POWER WINDOW) (See page 75±22)
3.REMOVE REAR DOOR TRIM BASE LH (See page 75±22)
4.REMOVE REAR DOOR TRIM BOARD SUB±ASSY LH (See page 75±22)
5. REMOVE REAR SPEAKER ASSY NO.2
(a) Disconnect the connector.
(b) Remove the screw and the rear No.2 speaker assy.
http://vnx.su
Page 1575 of 2234
670SL±01
BE4029
Tester ProbeTin FoilHeat Wire
E32576
BE0150
Repair Point
Masking Tape Broken
Wire
BE0151
Repair PointFine Tip Brush
Glass
±
AUDIO & VISUAL SYSTEM WINDOW GLASS (ANTENNA WIRE)
67±33
AVENSIS REPAIR MANUAL (RM1018E)
WINDOW GLASS (ANTENNA WIRE)
REPAIR
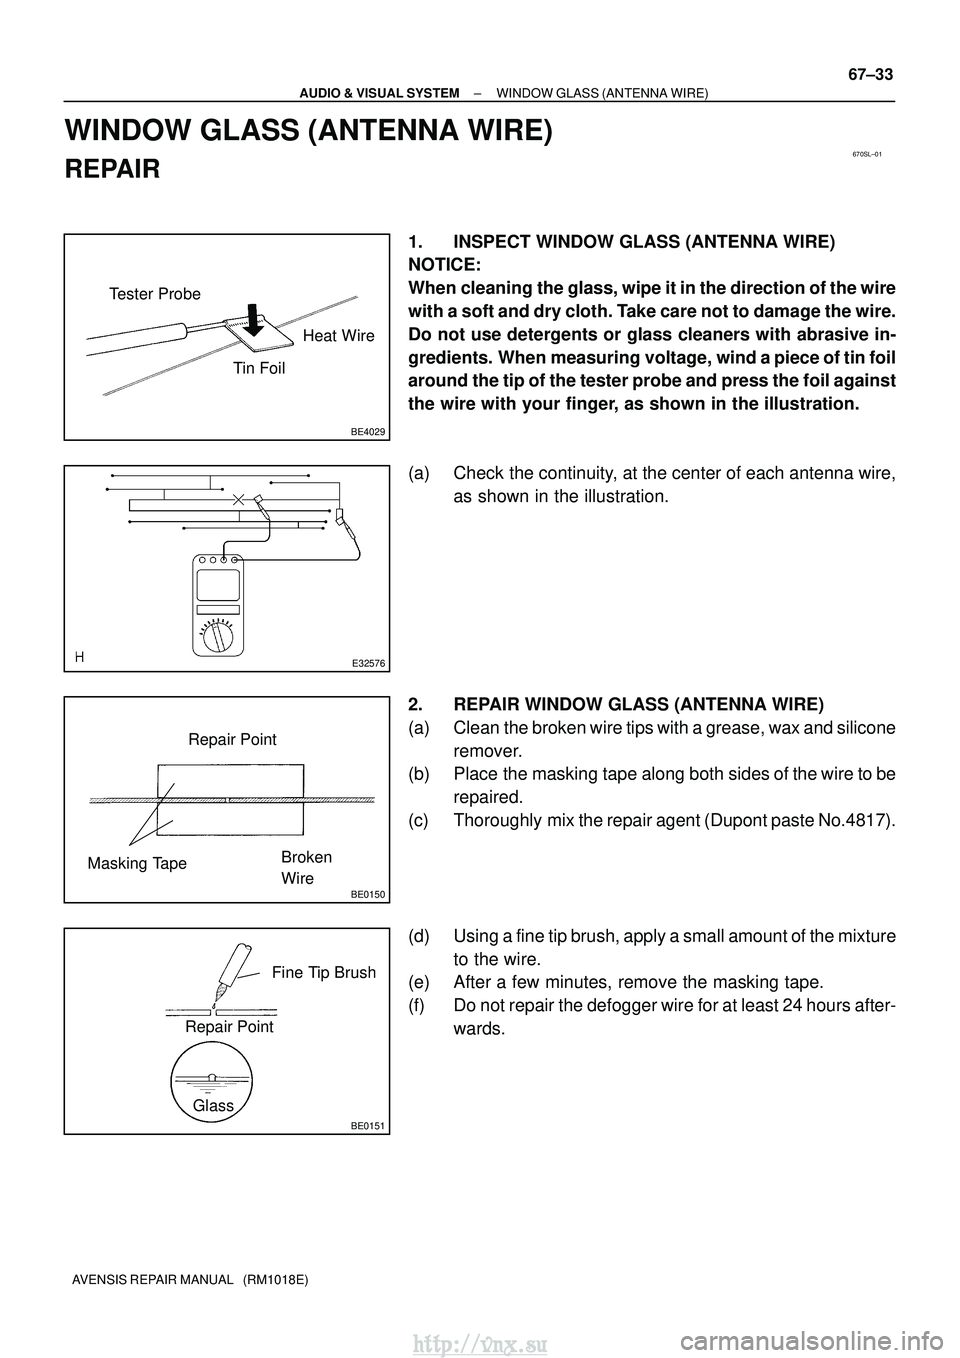
1. INSPECT WINDOW GLASS (ANTENNA WIRE)
NOTICE:
When cleaning the glass, wipe it in the direction of the wire
with a soft and dry cloth. Take care not to damage the wire.
Do not use detergents or glass cleaners with abrasive in-
gredients. When measuring voltage, wind a piece of tin foil
around the tip of the tester probe and press the foil against
the wire with your finger, as shown in the illustration.
(a) Check the continuity, at the center of each antenna wire,
as shown in the illustration.
2. REPAIR WINDOW GLASS (ANTENNA WIRE)
(a) Clean the broken wire tips with a grease, wax and silicone remover.
(b) Place the masking tape along both sides of the wire to be
repaired.
(c) Thoroughly mix the repair agent (Dupont paste No.4817).
(d) Using a fine tip brush, apply a small amount of the mixture to the wire.
(e) After a few minutes, remove the masking tape.
(f) Do not repair the defogger wire for at least 24 hours after-
wards.
http://vnx.su
Page 1588 of 2234
700T7±01
B67059
Back Door Side Garnish RHCenter Stop Lamp AssyBack Door Trim Board
Back Door Side Garnish LH
Back Door Trim
Panel Assy Upper
Wiper Arm Head Cap
Rear Wiper Arm Assy
Wiper Motor Assy �
Back Door Glass
: Specified torque
N �m (kgf� cm, ft�lbf)
� Non±reusable part
5.5 (56, 49 in.� lbf)5.5 (56, 49 in.�lbf)
5.5 (56, 49 in. �lbf)
70±34
±
WINDSHIELD/WINDOWGLASS/MIRROR BACK DOOR GLASS (LIFTBACK MODELS)
AVENSIS REPAIR MANUAL (RM1018E)
BACK DOOR GLASS (LIFTBACK MODELS)
COMPONENTS
http://vnx.su
Page 1589 of 2234
700T8±01
B68025
Piano Wire
Clip
B69235
Protective Tape
±
WINDSHIELD/WINDOWGLASS/MIRROR BACK DOOR GLASS (LIFTBACK MODELS)
70±35
AVENSIS REPAIR MANUAL (RM1018E)
REPLACEMENT
HINT:
The installation is in the reverse order of the removal. However, when there is a special point concerning
the installation, it is indicated.
1.REMOVE BACK DOOR TRIM BOARD ASSY (See page 75±40)
(a) Remove the back door trim panel assy upper.
(b) Remove the back door side garnish LH.
(c) Remove the back door side garnish RH.
(d) Remove the back door trim board.
2.REMOVE CENTER STOP LAMP ASSY (See page 65±26)
3.REMOVE REAR WIPER MOTOR ASSY (See page 66±17
)
(a) Remove the wiper arm head cap.
(b) Remove the rear wiper arm.
(c) Remove the wiper motor.
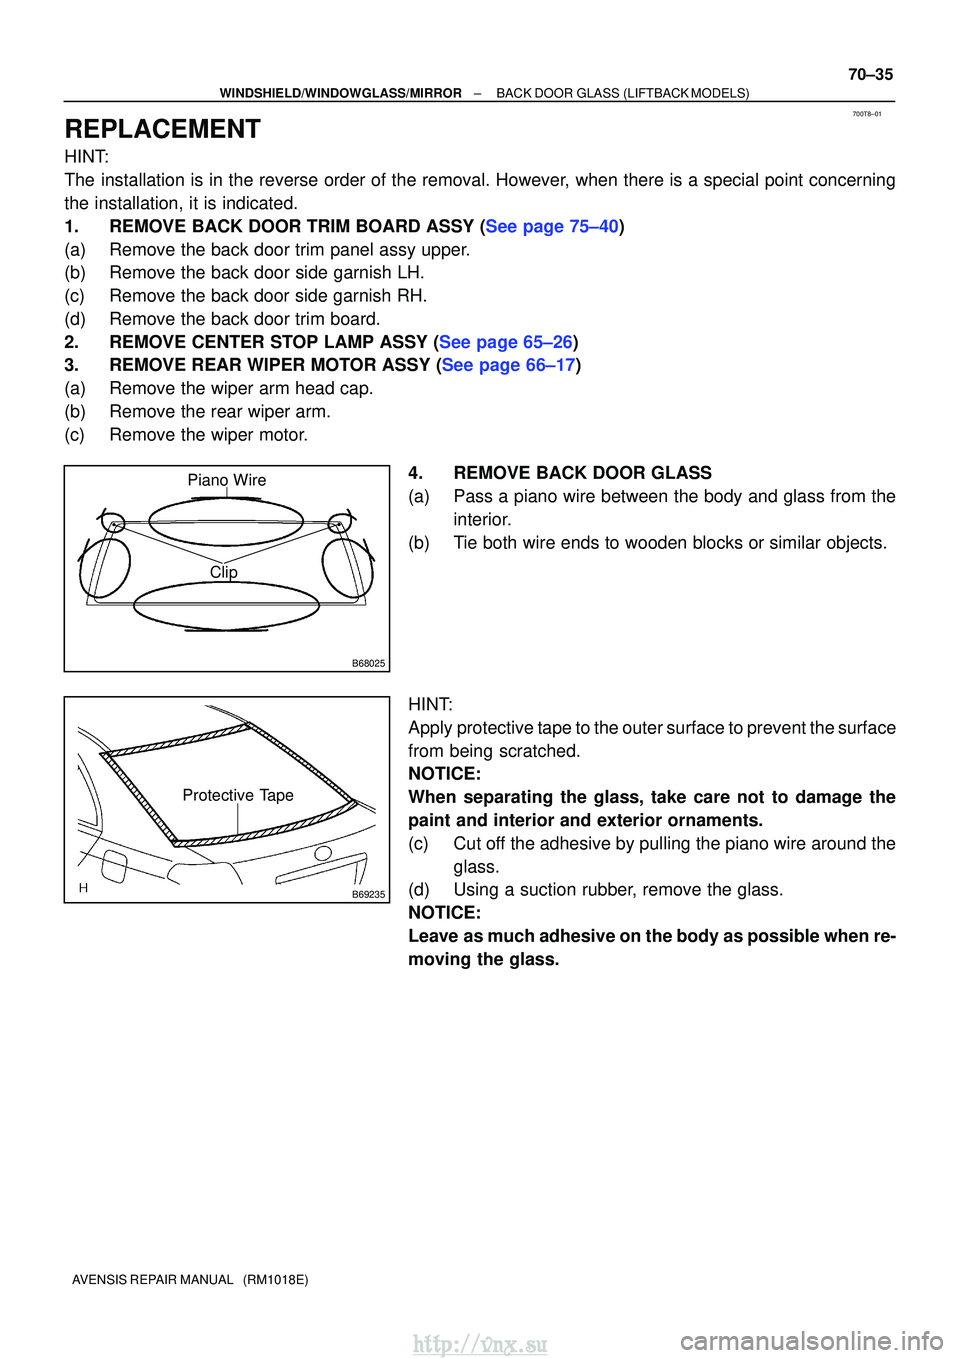
4. REMOVE BACK DOOR GLASS
(a) Pass a piano wire between the body and glass from theinterior.
(b) Tie both wire ends to wooden blocks or similar objects.
HINT:
Apply protective tape to the outer surface to prevent the surface
from being scratched.
NOTICE:
When separating the glass, take care not to damage the
paint and interior and exterior ornaments.
(c) Cut off the adhesive by pulling the piano wire around the glass.
(d) Using a suction rubber, remove the glass.
NOTICE:
Leave as much adhesive on the body as possible when re-
moving the glass.
http://vnx.su
Page 1590 of 2234
BO4421
Adhesive
Adhesive
BO4420Body
B67821
Primer M
Primer M
AdhesiveCORRECT
WRONG
: Primer M
70±36
±
WINDSHIELD/WINDOWGLASS/MIRROR BACK DOOR GLASS (LIFTBACK MODELS)
AVENSIS REPAIR MANUAL (RM1018E)
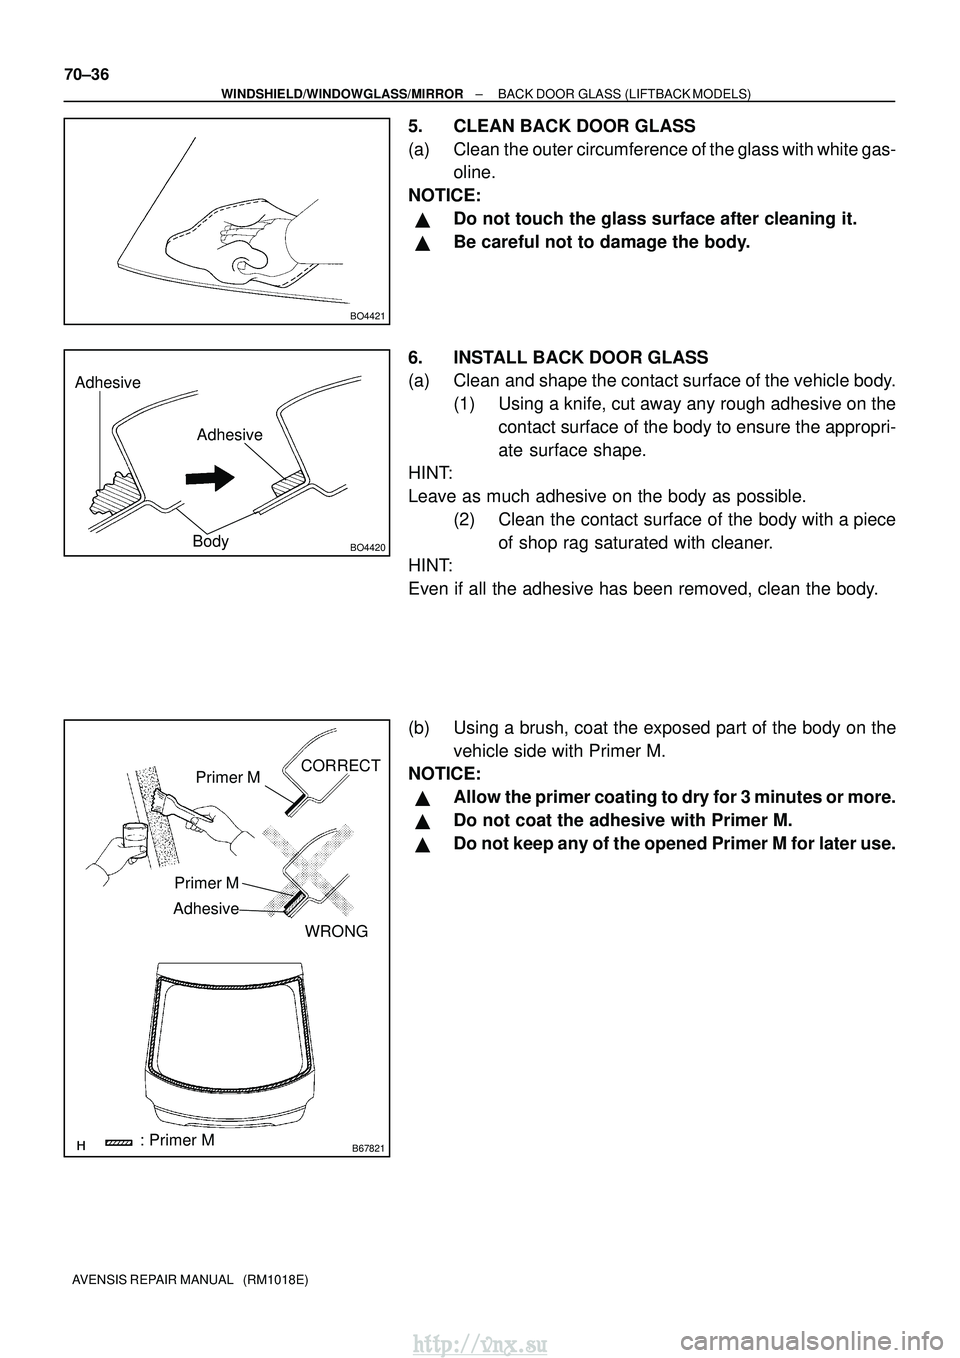
5. CLEAN BACK DOOR GLASS
(a) Clean the outer circumference of the glass with white gas- oline.
NOTICE:
�Do not touch the glass surface after cleaning it.
�Be careful not to damage the body.
6. INSTALL BACK DOOR GLASS
(a) Clean and shape the contact surface of the vehicle body. (1) Using a knife, cut away any rough adhesive on thecontact surface of the body to ensure the appropri-
ate surface shape.
HINT:
Leave as much adhesive on the body as possible.
(2) Clean the contact surface of the body with a pieceof shop rag saturated with cleaner.
HINT:
Even if all the adhesive has been removed, clean the body.
(b) Using a brush, coat the exposed part of the body on the
vehicle side with Primer M.
NOTICE:
�Allow the primer coating to dry for 3 minutes or more.
�Do not coat the adhesive with Primer M.
�Do not keep any of the opened Primer M for later use.
http://vnx.su