2003 PONTIAC GRAND PRIX window
[x] Cancel search: windowPage 2 of 378

The 2003 Pontiac Grand Prix Owner Manual a
Seats and Restpaint Systems ........................... ? -1
Front Seats ............................................... 1-2
Safety Belts
.............................................. 1-7
Child Restraints
....................................... 1-29
Supplemental Restraint System
(SRS) ......... 1-51
Restraint System Check
............................ 1-58
Keys
........................................................ 2-3
Doors and Locks
....................................... 2-8
Windows
................................................. 2-1 3
Theft-Deterrent Systems
............................ 2-1 5
Starting and Operating Your Vehicle
........... 2-19
Mirrors
.................................................... 2-33
Onstar@ System
...................................... 2-38
Storage Areas
......................................... 2-40
Sunroof
.................................................. 2-42
Vehicle Personalization
............................. 2-43
Instrument Panel Overview
.......................... 3-2
Climate Controls
...................................... 3-20
Warning Lights, Gages and Indicators
......... 3-23
Driver Information Center (DIC)
.................. 3-38
Trip Computer
......................................... 3-40
Audio System(s)
....................................... 3-44
Features and Controls ..................................... 2-1
Instrument Panel ............................................. 3-1
~rivingi yoerr Vehicle ....................................... 4-1
Your Driving, the Road, and Your Vehicle
..... 4-2
Towing
................................................... 4-33
Service
..................................................... 5-3
Fuel
......................................................... 5-5
Checking Things Under the Hood
............... 5-10
Headlamp Aiming
..................................... 5-59
Bulb Replacement
.................................... 5-60
Windshield Wiper Blade Replacement
......... 5-67
Tires
...................................................... 5-68
Appearance Care
..................................... 5-88
Vehicle Identification
................................. 5-96
Electrical System
...................................... 5-97
Capacities and Specifications
................... 5-1 02
Normal Maintenance Replacement Parts .... 5-1 04
Maintenance Schedule ........................... ,6-1 ..
Maintenance Schedule ................................ 6-2
Customer Assistance Information .................... 7-1
Customer Assistance Information
.................. 7-2
Service and Appearance Care .......................... 5-1
Reporting Safety Defects
......................... 7-9
Index ........................................ ..... 1
Page 6 of 378

These are some examples of vehicle symbols you may find on your vehicle:
POSSlBLE A
CAUTION
INJURY
PROTECT EYES BY
SHIELDING
CAUSTIC
BAlTERY
4CID COULD CAUSE
BURNS
AVO1
D
SPARKS OR
FLAMES
SPARK OR FLAME
\\I/'
COULD
EXPLODE BAlTERY LATCH BOTH LAP AND
SHOULDER BELTS
TO
PROTECT OCCUPANT 4
DO NOT TWIST SAFETY
BELT WHEN AlTACHING
FASTEN SEAT
BELTS
MOVE SEAT FULLY
\!$%
REARWARD* /z
SECURE
CHILD SEAT
PULL BELT
COMPLETELY
THEN SECURE CHILD SEAT
TI POWER
WINDOW DO NOT INSTALL
A REAR-FACING
CHILD RESTRAINT IN THIS SEATING POSITION
DO NOT INSTALL A
'ORWARD-FACING CHILD RESTRAINT IN THIS SEATING
POSITION
DOOR LOCK
UNLOCK
L
LlGHTlNG - MASTER SWITCH e- / ,
SIGNALS TURN
PARKING
pf
LAMPS
RUNNING LAMPS
LAMPS
so
ENGINE
COOLANT TEMP
CHARGING BAlTERY
SYSTEM
COOLANT
d
ENGINE OIL PRESSURE
Wb
ANTI-LOCK (@)
BRAKES ENGINE
COOLANT FAN
OWNERS MANUAL
SERVICE
MANUAL
Page 30 of 378

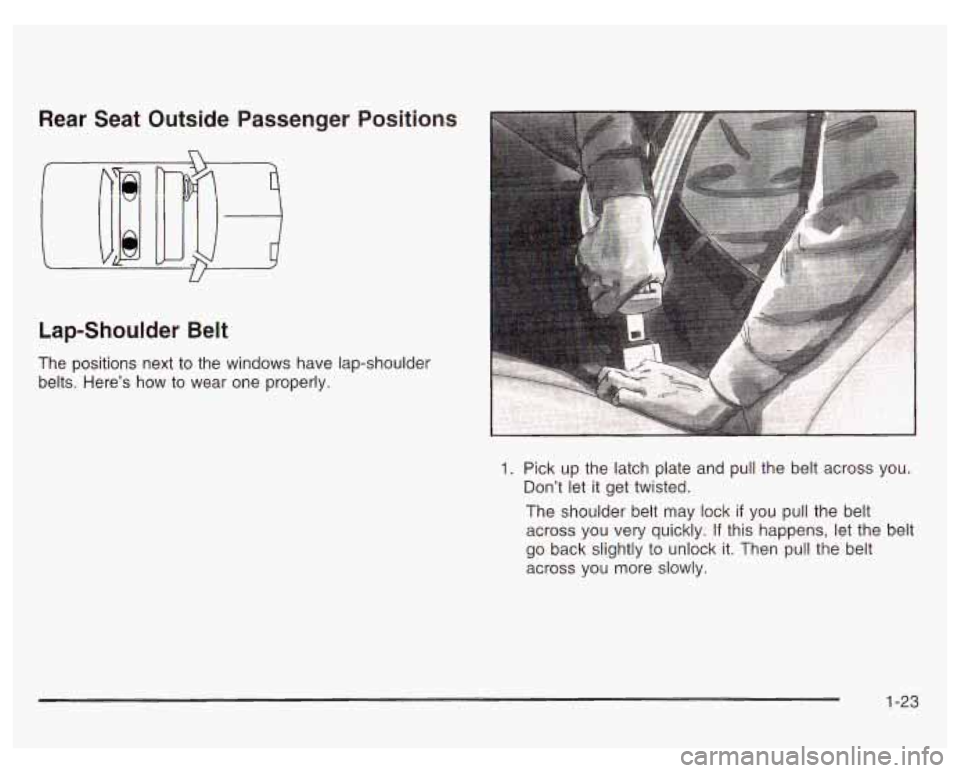
Rear Seat Outside Passenger
Lap-Shoulder Belt Positions
The positions next
to the windows have lap-shoulder
belts. Here’s
how to wear one properly.
Pick up the latch plate and pull the belt across you.
Don’t let it get twisted.
The shoulder belt may lock
if you pull the belt
across you very quickly.
If this happens, let the belt
go back slightly to unlock it. Then pull the belt
across you more slowly.
1-23
Page 36 of 378

Child Restraints
Older Children
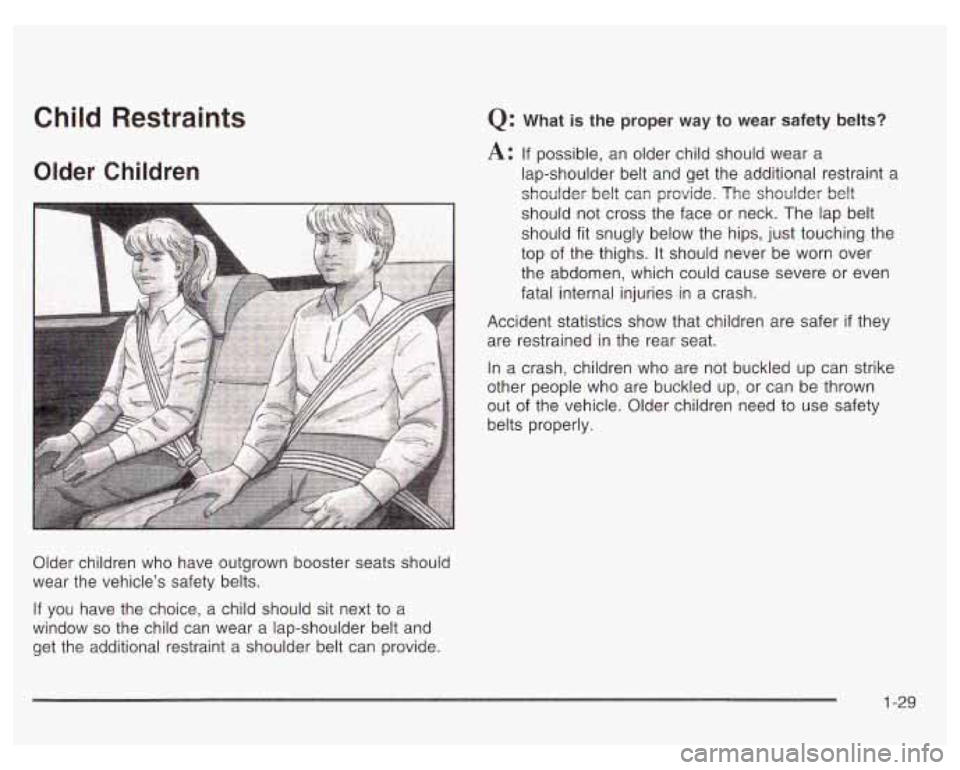
Older children who have outgrown booster seats should
wear the vehicle’s safety belts.
If you have the choice, a child should sit next to a
window
so the child can wear a lap-shoulder belt and
get the additional restraint a shoulder belt can provide.
Q: What is the proper way to wear safety belts?
A: If possible, an older child should wear a
lap-shoulder belt and get the additional restraint a
shoulder belt can provide. The shoulder
belt
should not cross the face or neck. The lap belt
should fit snugly below the hips, just touching the
top of the thighs. It should never be worn over
the abdomen, which could cause severe or even
fatal internal injuries in a crash.
Accident statistics show that children are safer
if they
are restrained in the rear seat.
In a crash, children who are not buckled up can strike
other people who are buckled up, or can be thrown
out of the vehicle. Older children need to use safety
belts properly.
1-29
Page 44 of 378

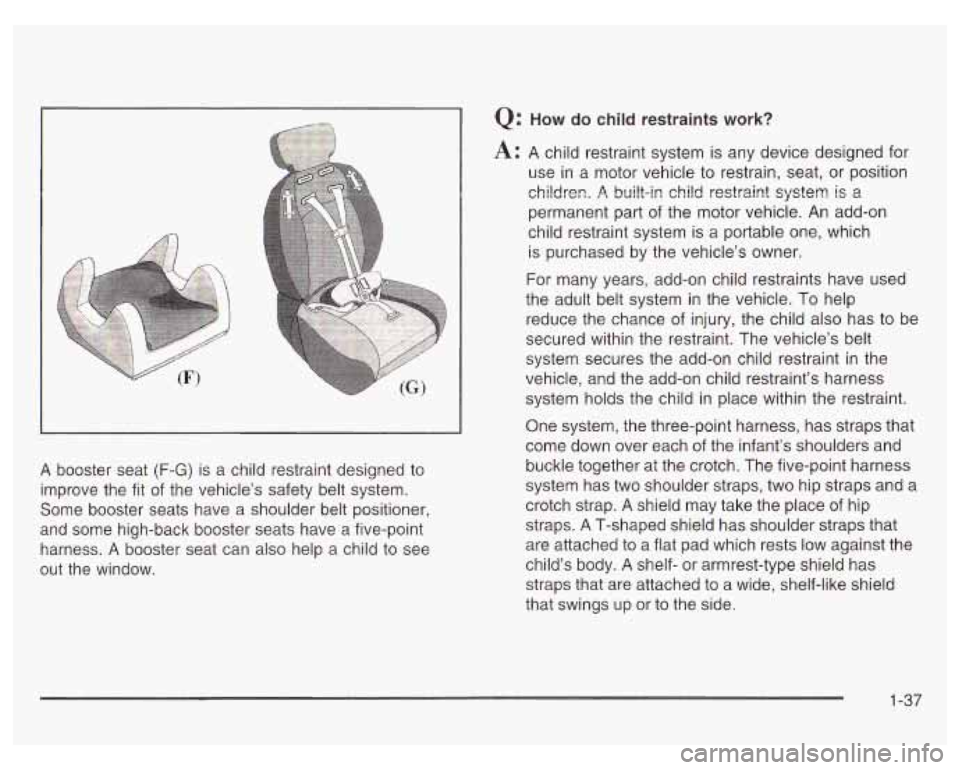
A booster seat (F-G) is a child restraint designed to
improve the fit
of the vehicle’s safety belt system.
Some booster seats have a shoulder belt positioner,
and some high-back booster seats have a five-point
harness.
A booster seat can also help a child to see
out the window.
Q: How do child restraints work?
A: A child restraint system is any device designed for
use in a motor vehicle to restrain, seat, or position
children.
R built-in child restraint system is i!
permanent part of the motor vehicle. An add-on
child restraint system is a portable one, which
is purchased by the vehicle’s owner.
For many years, add-on child restraints have used
the adult belt system in the vehicle. To help
reduce the chance of injury, the child also has to be
secured within the restraint. The vehicle’s belt
system secures the add-on child restraint in the
vehicle, and the add-on child restraint’s harness
system holds the child in place within the restraint.
One system, the three-point harness, has straps that
come down over each of the infant’s shoulders and
buckle together at the crotch. The five-point harness
system has two shoulder straps, two hip straps and a
crotch strap.
A shield may take the place of hip
straps.
A T-shaped shield has shoulder straps that
are attached to a flat pad which rests
low against the
child’s body.
A shelf- or armrest-type shield has
straps that are attached to a wide, shelf-like shield
that swings up or to the side.
1-37
Page 63 of 378

What Will You See After an Air Bag
Inflates?
After an air bag inflates, it quickly deflates, so quickly that
some people may not even realize the air bag inflated.
Some components of the air bag module -the steering
wheel hub for the driver’s air bag or the instrument panel
for the right front passenger’s bag
- will be hot for a
short time. The parts of the bag that come into contact
with you may be warm, but not too hot to touch. There will
be some smoke and dust coming from the vents in the
deflated air bags. Air bag inflation doesn’t prevent the
driver from seeing or being able to steer the vehicle,
no- ”oes it sto- Teople from leaving the vehicle
When an air
,,g inflates, there is dust i.. khe
air. This dust could cause breathing problems
for people with a history of asthma or other breathing trouble.
To avoid this, everyone in
the vehicle should get out as soon as it is safe
CAUTION: (Continued) to do
so. If you hawe breath ...d prob.,.ns
butcan’t get out of the vehicle after an air bag
inflates, then get fresh air by opening a
window or a door. If you experience breathing
problems following an air bag deployment,
you should seek medical attention.
In many crashes severe enough to inflate an air bag,
windshields are broken by vehicle deformation.
Additional windshield breakage may also occur from the
right front passenger air bag.
0 Air bags are designed to inflate only once. After an
air bag inflates, you’ll need some new parts for
your air bag system. If you don’t get them, the air
bag system won’t be there to help protect you
in another crash.
A new system will include air bag
modules and possibly other parts. The service
manual for your vehicle covers the need to replace
other parts.
I
1-56
Page 68 of 378

Section 2 Features and Controls
Keys ............................................................... 2.3
Remote Keyless Entry System
......................... 2.4
Remote Keyless Entry System Operation ........... 2.5
Doors and Locks ............................................. 2-8
Door Locks
.................................................... 2-8
Power Door Locks
.......................................... 2-9
Last Door Closed Locking
................................ 2-9
Programmable Automatic Door Locks
.............. 2-10
Lockout Protection
........................................ 2-10
Leaving Your Vehicle
.................................... 2-1 1
Trunk
.......................................................... 2-1 1
Windows ........................................................ 2.13
Power Windows
............................................ 2-14
Sun Visors
................................................... 2.14
Theft-Deterrent Systems .................................. 2.15
Content Theft-Deterrent
................................. 2.15
PASS-Key@
Ill .......................................... 2.16
PASS-Key@
Ill Operation ........................... 2-17
Starting and Operating Your Vehicle ............... -2-1 9
New Vehicle Break-In
.................................... 2-19
Ignition Positions
.......................................... 2.19
Starting Your Engine
..................................... 2-20
Engine Coolant Heater
.................................. 2-23
Automatic Transaxle Operation
....................... 2.24 Shifting Into
Park
(P) ..................................... 2-28
Parking Over Things That Burn
....................... 2-30
Shifting
Out
of Park (PI ................................. 2-30
Engine Exhaust ............................................ 2-31
Running Your Engine While You Are Parked
.... 2-32
Mirrors ........................................................... 2-33
Manual Rearview Mirror
................................ -2-33
Automatic Dimming Rearview Mirror with
Onstar@, Compass and Temperature
Automatic Dimming Rearview Mirror with
Compass and Temperature Display
.............. 2-34
Outside Power Mirrors
................................... 2-37
Outside Convex Mirror
................................... 2-37
OnStar@ System ............................................. 2-38
Storage Areas .... -2-40
Glove Box
................................................... 2-40
Overhead Console
........................................ 2-40
Center Console Storage Area
......................... 2-40
Assist Handles
............................................. 2-41
Purse or Litter Bag Holder
............................. 2-41
Rear Storage Area
........................................ 2-41
Convenience Net
.......................................... 2-41
Trunk Access Panel
...................................... 2-41
Display
.................................................... 2-33
....................................
Parking Brake .............................................. 2-27 Sunroof .................. ........... ............. 2.42
2-1
Page 78 of 378

Leaving Your Vehicle
If you are leaving the vehicle, take your keys, open your 1
door and set the locks from inside. Then get out and
dose the door.
ur ’
It can be dangerous to drive with the trunk lid
open because carbon monoxide
(CO) gas can
come into your vehicle. You can’t see or
smell
CO. It can cause unconsciousness and
even death.
CAUTION: (Continued) if you must drive with the trunk
lid aen or if
electrical wiring or other cable connections
must pass through the seal between the body
and the trunk lid:
0 Make sure all other windows are shut.
0 Turn the fan on your heating or cooling system to its highest speed and select the
control setting that will force outside air into your vehicle. See “Climate Controls”
in the Index.
instrument panel, open them all the way.
If you have air outlets on or under the
See “Engine Exhaust” in the Index.
Trunk Lock
To unlock the trunk from the outside, insert the key into
the lock on the trunk and turn it clockwise. You can also
press the trunk symbol on the remote keyless entry
transmitter.
2-1 1