2003 PONTIAC GRAND PRIX maintenance schedule
[x] Cancel search: maintenance schedulePage 2 of 378

The 2003 Pontiac Grand Prix Owner Manual a
Seats and Restpaint Systems ........................... ? -1
Front Seats ............................................... 1-2
Safety Belts
.............................................. 1-7
Child Restraints
....................................... 1-29
Supplemental Restraint System
(SRS) ......... 1-51
Restraint System Check
............................ 1-58
Keys
........................................................ 2-3
Doors and Locks
....................................... 2-8
Windows
................................................. 2-1 3
Theft-Deterrent Systems
............................ 2-1 5
Starting and Operating Your Vehicle
........... 2-19
Mirrors
.................................................... 2-33
Onstar@ System
...................................... 2-38
Storage Areas
......................................... 2-40
Sunroof
.................................................. 2-42
Vehicle Personalization
............................. 2-43
Instrument Panel Overview
.......................... 3-2
Climate Controls
...................................... 3-20
Warning Lights, Gages and Indicators
......... 3-23
Driver Information Center (DIC)
.................. 3-38
Trip Computer
......................................... 3-40
Audio System(s)
....................................... 3-44
Features and Controls ..................................... 2-1
Instrument Panel ............................................. 3-1
~rivingi yoerr Vehicle ....................................... 4-1
Your Driving, the Road, and Your Vehicle
..... 4-2
Towing
................................................... 4-33
Service
..................................................... 5-3
Fuel
......................................................... 5-5
Checking Things Under the Hood
............... 5-10
Headlamp Aiming
..................................... 5-59
Bulb Replacement
.................................... 5-60
Windshield Wiper Blade Replacement
......... 5-67
Tires
...................................................... 5-68
Appearance Care
..................................... 5-88
Vehicle Identification
................................. 5-96
Electrical System
...................................... 5-97
Capacities and Specifications
................... 5-1 02
Normal Maintenance Replacement Parts .... 5-1 04
Maintenance Schedule ........................... ,6-1 ..
Maintenance Schedule ................................ 6-2
Customer Assistance Information .................... 7-1
Customer Assistance Information
.................. 7-2
Service and Appearance Care .......................... 5-1
Reporting Safety Defects
......................... 7-9
Index ........................................ ..... 1
Page 160 of 378

The Driver Information Center (DIC) gives you important
safety and maintenance facts. When you turn the
ignition on, all of the DIC lights illuminate for a few
seconds. After this, the DIC will begin working.
Functions
__ (Door Ajar): If one of the doors is ajar, this light
will appear next to that door on the vehicle outline.
CHANGE OIL SOON: This light will appear when the
system indicates that it’s time for an oil change. The
system predicts remaining oil life using data from length
of drives, coolant temperature, engine rpm and
vehicle speed. It alerts you to change the oil on a
schedule consistent with the vehicle’s driving conditions.
After changing the oil, the system must be reset. See
How to Reset the GM
Oil Life SystemTM under
Engine
Oil on page 5- 18.
e LOW: This light will come on when the ignition is
on and the fluid in the washer fluid container is low.
AJAR: This light alerts you that the trunk is not
fully closed.
LOW TRAC (Low Traction): If your vehicle is equipped
with anti-lock brakes, this light will come on when the
enhanced traction system is limiting wheel spin. See Enhanced Traction System (ETS) on page 4-
I I or
Low Traction Light on page 3-30.
TRAC OFF (Traction Off): If your vehicle is equipped
with anti-lock brakes, this light lets you know that
the enhanced traction system has been disabled and
will not limit wheel spin. See Enhanced Traction System
Warning Light
on page 3-30 or Low Traction Light on
page 3-30.
TRAC (Traction): If the vehicle has anti-lock brakes
and the enhanced traction system, you will have a
disable button on the far right side of the DIC.
The enhanced traction system is automatically activated
when you turn the ignition on. This button will
activate/deactivate the system. If you need to disable
the system, such
as when you are stuck and are rocking
the vehicle back and forth, push this button. See If
You Are Stuck: in Sand, Mud, Ice or Snow on
page 4-32.
3-39
Page 224 of 378

But if you ever have to park your rig on a hill, here’s
how to do it:
1.
2.
3.
4.
5.
Apply your regular brakes, but don’t shift into
PARK
(P) yet.
Have someone place chocks under the trailer
wheels.
When the wheel chocks are in place, release the
regular brakes until the chocks absorb the load.
Reapply the regular brakes. Then apply your
parking brake, and then shift to PARK
(P).
Release the regular brakes.
When You Are Ready to Leave After
Parking on a
Hill
1. Apply your regular brakes and hold the pedal down
while you:
start your engine,
0 shift into a gear, and
0 release the parking brake. 2. Let
up on the brake pedal.
3. Drive slowly until the trailer is clear of the chocks.
4. Stop and have someone pick up and store the
chocks.
Maintenance When Trailer Towing
Your vehicle will need service more often when you’re
pulling a trailer. See Part
A: Scheduled Maintenance
Services on page
6-4 for more information. Things that
are especially important in trailer operation are
automatic transaxle fluid (don’t overfill), engine oil, drive
belts, cooling system and brake system. Each of
these is covered in this manual, and the Index will help
you find them quickly.
If you’re trailering, it’s a good
idea to review this information before you start your trip.
Check periodically
to see that all hitch nuts and bolts
are tight.
Engine Cooling When Trailer Towing
Your cooling system may temporarily overheat during
severe operating conditions. See Engine Overheating
on page
5-33.
4-43
Page 251 of 378

3. Pull out the filter.
4. Check or install a new engine air cleanerbiker. See
Normal Maintenance Replacement Parts on
page
5- 104.
5. To reinstall the cover, position the tabs through the
slots on the housing.
A notch on the sides of the
filter cover will indicate the correct engagement.
Reinstall the two clips on the top of the housing
when you are finished.
Refer to the Maintenance Schedule to determine when
to replace the air filter.
See Part A: Scheduled Maintenance Services on
page
6-4.
Operating t--. engine with the air cleaner/filter
off can cause you or others to be burned. The
air cleaner not only cleans the air,
it stops
flame if the engine backfires. If
it isn’t there
and the engine backfires, you could be burned. Don’t drive with
it off, and be careful working
on the engine with the air cleanedfilter
off.
Nofice: If the air cleaner/filter is off, a backfire can
cause a damaging engine fire. And, dirt can easily get
into your engine, which will damage
it. Always have
the air cleanedfilter in place when you’re driving.
5-26
Page 252 of 378

Automatic Transaxle Fluid
When to Check and Change
A good time to check your automatic transaxle fluid
level is when the engine oil is changed.
Change both the fluid and filter every 50,000 miles
(83
000 km) if the vehicle is mainly driven under one or
more of these conditions:
In heavy city traffic where the outside temperature
0 In hilly or mountainous terrain.
0 When doing frequent trailer towing.
0 Uses such as found in taxi, police or delivery service.
regularly reaches
90°F (32°C)
or higher.
If you do not use your vehicle under any of these
conditions, change the fluid and filter at
100,000 miles (166 000 km).
See Part
A: Scheduled Maintenance Services on
page
6-4.
How to Cheek
Because this operation can be a little difficult, you may
choose to have this done at the dealership service
department.
If you do it yourself, be sure to follow all the instructions
here, or you could get a false reading on the dipstick.
Nofice: Too much or too little fluid can damage
your transaxle.
Too much can mean that some of the
fluid could come out and fall on hot engine or
exhaust system parts, starting a fire.
Too little fluid
could cause the transaxle to overheat. Be sure
to get an accurate reading
if you check your
transaxle fluid.
Wait at least 30 minutes before checking the transaxle
fluid level
if you have been driving:
When outside temperatures are above
90°F (32°C).
At high speed for quite a while.
In heavy traffic
- especially in hot weather.
While pulling a trailer.
5-27
Page 254 of 378

3100 V6 Engine
3.
4.
3800 V6 or 3800 V6 Supercharged Engine
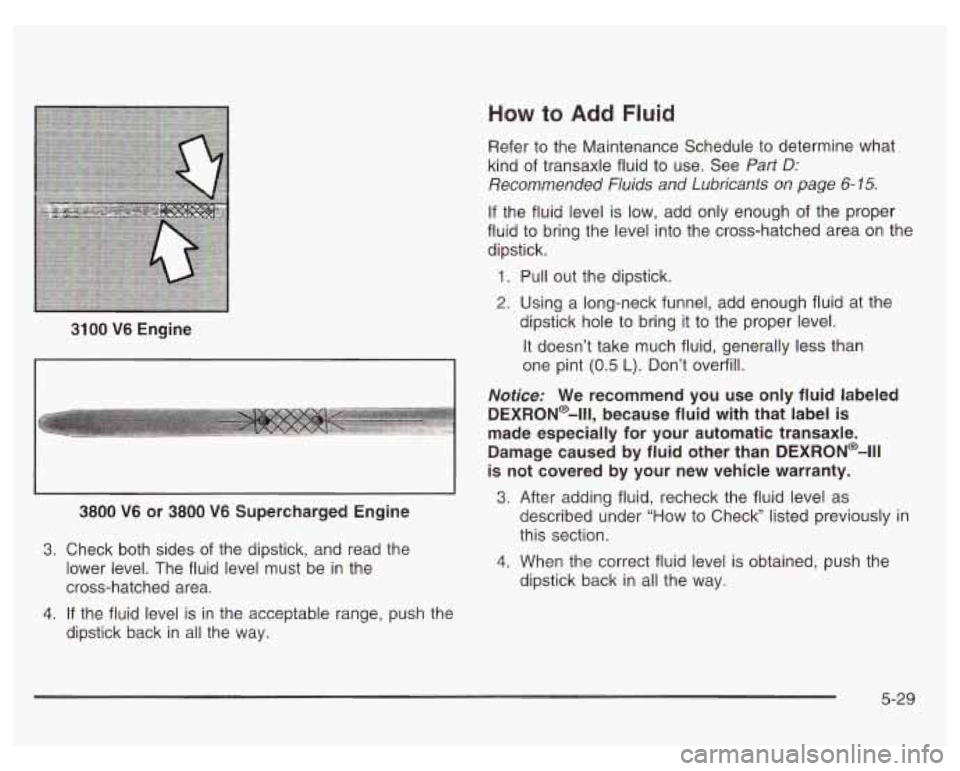
Check both sides of the dipstick, and read the
lower level. The fluid level must be in the
cross-hatched area.
If the fluid level is in the acceptable range, push the
dipstick back in all the way.
How to Add Fluid
Refer to the Maintenance Schedule to determine what
kind of transaxle fluid to use. See Part
D:
Recommended Fluids and Lubricants on page 6-15.
If the fluid level is low, add only enough of the proper
fluid to bring the level into the cross-hatched area on the
dipstick.
1. Pull out the dipstick.
2. Using a long-neck funnel, add enough fluid at the
dipstick hole to bring it to the proper level.
It doesn’t take much fluid, generally less than
one pint
(0.5 L). Don’t overfill.
Notice: We recommend you use only fluid labeled
DEXRON@-Ill, because fluid with that label is
made especially for your automatic transaxle.
Damage caused by fluid other than DEXRON@-Ill
is not covered by your new vehicle warranty.
3.
4.
After adding fluid, recheck the fluid level as
described under “How to Check” listed previously in
this section.
When the correct fluid level is obtained, push the
dipstick back in all the way.
5-29
Page 294 of 378

Bad wear
0 Bad handling
Bad fuel economy
If your tires have too much air (overinflation),
you can get the following:
Unusual wear
Bad handling
Rough ride
Needless damage from road hazards
When to Check
Check your tires once a month or more.
Don’t forget your compact spare tire. It should be
at
60 psi (420 kPa).
How to Check
Use a good quality pocket-type gage to check tire
pressure. You can’t tell
if your tires are properly inflated
simply by looking at them. Radial tires may look
properly inflated even when they’re underinflated.
Be sure to put the valve caps back on the valve stems.
They help prevent leaks by keeping out dirt and
moisture.
Tire Inspection and Rotation
Tires should be rotated every 7,500 miles (1 2 500 km).
Any time you notice unusual wear, rotate your tires
as soon as possible and check wheel alignment.
Also
check for damaged tires or wheels. See When It Is Time
for New Tires on page
5-70 and Wheel Replacement
on page 5-73 for more information.
The purpose of regular rotation is to achieve more
uniform wear for all tires on the vehicle. The first rotation
is the most important. See “Part A: Scheduled
Maintenance Services,’’ in Section
6, for scheduled
rotation intervals.
1
When rotating your tires, always use the correct rotation
pattern shown here.
5-69
Page 330 of 378

Section 6 Maintenance Schedule
Maintenance Schedule ...................................... 6-2
Introduction
................................................... 6-2
Your Vehicle and the Environment
.................... 6-2
Maintenance Requirements
.............................. 6-2
How This Section is Organized
......................... 6-3
Part A: Scheduled Maintenance Services
........... 6-4
Using Your Maintenance Schedule
.................... 6.4
Scheduled Maintenance
.................. ......... 6.5
Part B: Owner Checks and Services
.... ..... 6.9
At Each Fuel Fill
........................................ 6-9
At Least Once a Month
................................... 6.9
At Least Twice a Year
................................... 6.10 At
Least Once a Year
................................... 6.10
Pari C: Periodic
Maintenance inspections ......... 6.13
Steering, Suspension and Front Drive Axle
Boot and Seal Inspection
............................ 6-13
Exhaust System Inspection
............................ 6.13
Fuel System Inspection
.................................. 6.13
Engine Cooling System Inspection
................... 6.13
Throttle System Inspection
............................ -6-14
Brake System Inspection
................................ 6.14
Part D: Recommended Fluids and Lubricants
.... 6-15
Part
E: Maintenance Record ........................... 6.16
6- 1