2003 PONTIAC GRAND PRIX radio controls
[x] Cancel search: radio controlsPage 122 of 378

Section 3 Instrument Panel
Instrument Panel Overview .......................... -3-2
Hazard Warning Flashers
-3-3
Other Warning Devices ................................... 3.4
Horn
............................................................. 3.4
Tilt Wheel
..................................................... 3.4
Turn Signal/Multifunction Lever
......................... 3.5
Exterior Lamps
............................................. 3.10
Interior Lamps
.............................................. 3.12
Head-Up Display (HUD)
................................. 3-15
Accessory Power Outlets
............................... 3.18
Auxiliary Power Connection (Power Drop)
......... 3.19
Ashtrays and Cigarette Lighter
........................ 3-19
Climate Controls ............................................ 3.20
Dual Climate Control System
.......................... 3.20
Outlet Adjustment
......................................... 3.22
Warning Lights, Gages and Indicators ............. 3.23
Instrument Panel Cluster
................................ 3.24
Speedometer and Odometer
........................... 3.25
Tachometer
................................................. 3.25
Safety Belt Reminder Light
............................. 3.26
Air Bag Readiness Light
................................ 3-26
Charging System Light
.................................. 3.27
Brake System Warning Light
......................... -3-28
Anti-Lock Brake System Warning Light
............. 3.29
Traction Control System (TCS) Warning Light
...... 3.29
Enhanced Traction System Warning Light
........ -3-30
.. ...............................
Low Traction Light ....................................... -3-30
Engine Coolant Temperature Gage
.................. 3-31
Malfunction Indicator Lamp
............................ -3-32
Oil Pressure Light
........................................ -3-35
Security Light
............................................... 3-36
Fuel Gage
................................................... 3-37
Low Fuel Warning Light
................................. 3-37
Driver Information Center (DE) ....................... 3-38
Trip Computer ................................... ..... 3-40
Control Buttons
............................................ 3-42
Functions
.................................................... 3-42
Audio System(s) ............................................. 3-44
Setting the Time
........................................... 3-44
Radio with Cassette
...................................... 3-45
Radio with CD (Base Level)
........................... 3-48
Radio with CD
(Up Level) .............................. 3-51
Theft-Deterrent Feature
.................................. 3-54
Engine
Coolant Temperature 'Warning Light
...... 3.31
Low Oil Level Light ....................................... 3-36
Audio Steering Wheel Controls
....................... 3-56
Understanding Radio Reception
...................... 3-57
Care of Your Cassette Tape Player
................. 3-58
Care
of Your CDs ......................................... 3-59
Care of Your CD Player
................................ 3-59
Backglass Antenna
....................................... 3-59
3-
1
Page 137 of 378

The HUD also shows the following lights when they are
lit on the instrument panel cluster:
Turn Signal Indicators
High-Beam Indicator Symbol
Low Fuel Symbol
The HUD will display CHECK GAGES when the
following items are lit on the instrument panel cluster:
Oil Warning Symbol
Coolant Temperature Symbol
Charging System Symbol
When the ignition key is turned to RUN, the entire HUD
image will come on. Then the Head-Up Display will
operate normally.
Notice: Although the HUD image appears to be
near the front
of the vehicle, do not use it as
a parking aid. The
HUD was not designed for that
purpose.
If you try to use it as such, you may
misjudge the distance and damage your vehicle.
When the HUD is on, the speedometer reading will be
displayed continually. The current radio station
or
CD track number will only be displayed for three
seconds after the radio or CD track status changes.
This will happen whenever one of the radio controls is
pressed, either on the radio itself or on the optional
steering wheel controls. To
adjust the HUD
so you can see it properly do the
following:
1. Adjust your seat, if necessary, to a comfortable
position.
2. Start the engine and adjust the HUD controls
located on the instrument panel, to the right
of
the steering wheel. Move the DIM thumbwheel up
or down to adjust brightness.
3-1 6
Page 165 of 378
Audio System(s) Your vehicle may have a feature called Retained
Accessory Power (RAP). With RAP, you can play your
audio system even after the ignition is turned
off.
See “Retained Accessory Power (RAP)” under Ignition
Positions on
page 2- 19.
Notice: Before you add any sound equipment to
your vehicle
- like a tape player, CB radio, mobile
telephone or two-way radio
- be sure you can
add what you want. If you can, it’s very important to
do
it properly. Added sound equipment may Setting the Time
interfere with the operation of your vehicle’s engine,
Delphi Electronics radio or other systems, and
Press RECALL, then press and hold HR or MIN for two
even damage them. Your vehicle’s systems may seconds. Then press and hold HR until the correct
interfere with the operation of sound equipment that hour appears on the display. AM or PM will also appear.
has been added improperly. Press and hold MIN until the correct minute appears ~~
So, before adding sound equipment, check with
your dealer and be sure to check federal rules
covering mobile radio and telephone units.
Your audio system has been designed to operate easily
and to give years
of listening pleasure. You will get the
most enjoyment out of it
if you acquaint yourself with it
first. Find out what your audio system can do and how to
operate all
of its controls to be sure you’re getting the
most out
of the advanced engineering that went into it. on
the display. The time can only be set with the
ignition
off.
3-44
Page 167 of 378
Setting the Tone (Bassnreble)
BASS: Slide the lever to the right or to the left to
increase or to decrease bass.
TREBLE: Slide the lever to the right or to the left to
increase or to decrease treble.
If a station is weak
or noisy, you may want to decrease the treble.
Adjusting the Speakers (Balance/Fade)
BAL (Balance): Press this knob lightly so it extends.
Turn this knob to move the sound toward the left or the
right speakers.
FADE: Press this knob lightly so it extends. Turn this
knob to move the sound toward the front or the rear
speakers.
Press these knobs back into their stored positions when
you’re not using them.
Playing a Cassette Tape
Your tape player is built to work best with tapes that are
up to
30 to 45 minutes long on each side. Tapes
longer than that are
so thin they may not work well in
this player. While
the tape is playing, use the VOL, FADE, BAL,
BASS and TREBLE controls just as you
do for the radio.
The display will show an arrow to show which side
of
the tape is playing. When the down indicator arrow is lit,
selections listed on the bottom side of the cassette
are playing. When the up arrow is lit, selections listed
on the top side of the cassette are playing. The
tape player automatically begins playing the other side
when it reaches the end of the tape.
If an error appears on the display, see ‘Cassette Tape
Messages” later in this section.
1 PREV (Previous): Your tape must have at least three
seconds
of silence between each selection for previous
to work. Press this pushbutton to search for the
previous selection on the tape. Press PREV again or
the SEEK down arrow to stop searching.
2 NEXT: Your tape must have at least three seconds of
silence between each selection for next or seek to
work. Press this pushbutton to search for the next
selection on the tape.
If you hold the pushbutton, the
player will continue moving forward through the
tape. Press NEXT again or the SEEK
up arrow to stop
searching.
3 PROG (Program): Press this pushbutton to play the
other side
of the tape.
3-46
Page 177 of 378
Disabling the Theft-Deterrent Feature
Enter your secret code as follows; pause no more than
15 seconds between steps:
1. Turn the ignition on.
2. Turn the radio off.
3. Press the 1 and 4 pushbuttons at the same time.
Hold them down until
SEC shows on the display.
4. Press MIN and 000 will appear on the display.
5. Press MIN again to make the last two digits agree
with your code.
6. Press HR to make the first one or two digits agree
with your code.
7. Press AM/FM after you have confirmed that the
code matches the secret code you have written
down. The display will show
---, indicating that the
radio is no longer secured.
If the code entered is incorrect,
SEC will appear on the
display. The radio will remain secured until the correct
code is entered.
When battery power is removed and later applied to
a
secured radio, the radio won’t turn on and LOC will
appear on the display.
To unlock a secured radio, see “Unlocking the
Theft-Deterrent Feature After a Power
Loss” earlier in
this section.
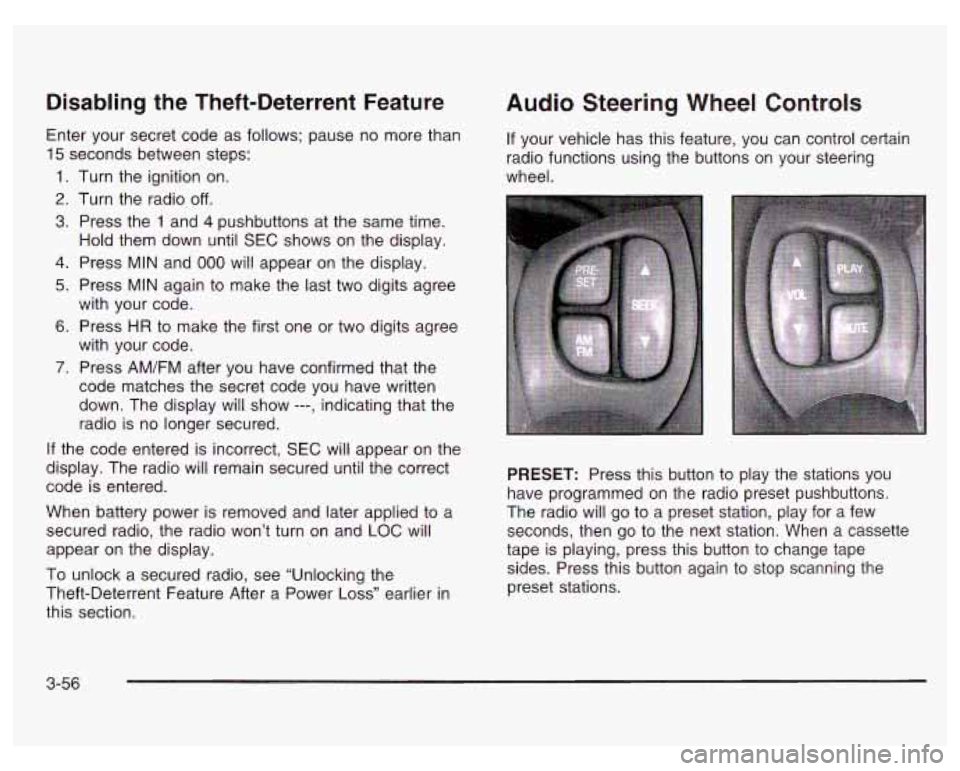
Audio Steering Wheel Controls
If your vehicle has this feature, you can control certain
radio functions using the buttons on your steering
wheel.
PRESET: Press this button to play the stations you
have programmed on the radio preset pushbuttons.
The radio will go to a preset station, play for a few
seconds, then go to the next station. When a cassette
tape is playing, press this button to change tape
sides. Press this button again to stop scanning the
preset stations.
3-56
Page 360 of 378
A
Accessory Power Outlets ................................. 3-1 8
Activating the Theft-Deterrent Feature
................ 3-54
Adding Washer Fluid
....................................... 5-48
Additional Program Information
........................... 7-8
Additives, Fuel
................................................. 5-6
Add-on Electrical Equipment
............................ 5-97
Adjusting the Speakers
(Balance/Fade)
............................ 3-46, 3-49, 3-52
Air Bag Readiness Light
.................................... ~ ~ ~ ~ ~ ~ ~ 3-26
Air Bag System, Supplemental Restraint
System (SRS)
............................................. 1-51
Air Cleaner/Filter, Engine
................................. 5-25
All Overseas Locations ...................................... 7-4
Aluminum or Chrome Plated Wheels
............. 5-93
Antenna, Backglass
......................................... 3-59
Anti-lock Brake System (ABS)
............................ 4-7
Anti-Lock Brake, System Warning Light
.............. 3-29
Appearance Care
............................................ 5-88
Care of Safety Belts
.................................... 5-91
Cleaning the Inside of Your Vehicle
................ 5-88
Cleaning the Outside of Your Vehicle
.............. 5-91
Finish Damage
............................................ 5-93
GM Vehicle Care/Appearance Materials
.......... 5-94
Underbody Maintenance
............................... 5-93
AM
........................................................... 3-57
Chemical Paint Spotting
............................... 5-94
Sheet Metal Damage
................................... 5-93 Appearance
Care (cont.)
Weatherstrips
.......................................... 5-91
Arming and Disarming the Content
Theft-Deterrent System
................................. 2-52
Arming Confirmation
........................................ 2-16
Arming with the Power Lock Switch
................... 2-15
Arming with the Remote Keyless Entry
Transmitter
................................................. 2-16
Ashtrays
............. ............................... 3-19
Assist Handles
.... ................................... 2-41
Audio System(s)
......................................... 3-44
Audio Systems Audio Steering Wheel Controls
...... ........ 3-56
Backglass Antenna
...................................... 3-59
Care of Your Cassette Tape Player
................ 3-58
Care of Your CD Player
............................... 3-59
Care of Your CDs
........................................ 3-59
Radio with Cassette
..................................... 3-45
Radio with CD .................................... 3-48, 3-51
Setting the Time
.......................................... 3-44
Theft-Deterrent Feature
................................ 3-54
Understanding Radio Reception
..................... 3-57
Automatic Door Locks
..................................... 2-45
Automatic Transaxle
Fluid
.......................................................... 5-27
Operation
................................................... 2-24
Automatic Transaxle Check
.............................. 6-10
Automatic Transaxle Shift Lock Control
System Check
............................................. 6-11
Auxiliary Power Connection (Power Drop)
........... 3-19
1
Page 369 of 378
P
Park (P)
Park (P)
Parking Shifting Into
................................................ 2-28
Shifting Out of
............................................ 2-30
Brake
........................................................ 2-27
Over Things That Burn
................................. 2-30
Parking Brake and Automatic Transaxle Park (P)
Mechanism Check
....................................... 6-1 2
Parking
on Hills .............................................. 4-42
Part A
- Scheduled Maintenance Services ............ 6-4
Part
B - Owner Checks and Services .................. 6-9
Part
C - Periodic Maintenance Inspections .......... 6-13
Part D
- Recommended Fluids and Lubricants .... 6-1 5
Part E - Maintenance Record ........................... 6-16
Passing
................................................. 4-15, 4-41
PASS-Key@ Ill
................................................ 2-16
Plan Ahead When Possible
................................ 7-7
Playing a Cassette Tape
.................................. 3-46
Playing the Radio
........................... 3-45, 3-48, 3-51
Power
............................................................. 1-3
Accessory Outlets
........................................ 3-1 8
Auxiliary Connection
................................. 3-1 9
Door Locks
.............. ................. 2-9
Drop
....................... .... .... 3-19
PASS-Key@
Ill Operation .................................. 2-17
Playing a Compact Disc
.......................... 3-50, 3-53 Power (cont.)
Electrical System
......................................... 5-97
Lumbar Controls
........................................... 1-3
Steering Fluid
............................................. 5-46
Windows
.................................................... 2-14
Power Steering
............................................... 4-13
Programmable Automatic Door Locks
................. 2-10
Programmable Modes
............. 2-44, 2-45, 2-47, 2-48,
Programming Mode 2-49,
2-51, 2-52
Entering
..................................................... 2-44
Exiting
....................................................... 2-53
Purse or Litter Bag Holder
............................... 2-41
Questions and Answers About Safety Belts
......... 1-11
Radiator Pressure Cap
................................ 5-33
Radios
......................................... ......... 3-44
Care of Your Cassette Tape Player
................ 3-58
Care
of Your CD Player ............................... 3-59
Care of Your
CDs ........................................ 3-59
Radio with Cassette
..................................... 3-45
Radio with CD
.................................... 3-48, 3-51
10
Page 372 of 378

Steering ........................................................ 4-1 3
Steering in Emergencies
.................................. 4-14
Steering, Suspension and Front Drive Axle Boot
and Seal Inspection
..................................... 6-13
Steering
Tips .................................................. 4-13
Steering Wheel Controls, Audio
......................... 3-56
Storage Areas Center Console Storage Area
........................ 2-40
Convenience Net
......................................... 2-41
Glove Box
.................................................. 2-40
Overhead Console
....................................... 2-40
Purse or Litter Bag Holder
............................ 2-41
Rear Storage Area
....................................... 2-41
Trunk Access Panel
..................................... 2-41
Storing the Flat Tire and Tools
.......................... 5-85
Storing the Spare Tire and Tools
....................... 5-86
Stuck in Sand, Mud, Ice or Snow
...................... 4-32
Sun Visors
................................... ........... 2-14
Sunglasses Storage Compartment
.................. 2-40
Sunroof
......................................................... 2-42
Supplemental Restraint System
(SRS) ............... 1-51
How Does an Air Bag Restrain?
.................... 1-55
Servicing Your Air Bag-Equipped Vehicle
......... 1-57
What Makes an Air Bag Inflate?
.................... 1-55
What Will You See After an Air Bag
Inflates?
.................................................. 1-56
When Should an Air Bag Inflate?
................... 1-55
Where Are the Air Bags?
.............................. 1-53
T
Tachometer .................................................... 3-25
Taillamps Sidemarker
and Back-up Lamps .................... 5-64
TCS Warning Light
.......................................... 3-29
Temperature Display
................................ 2.34. 2-35
Theft.Deterrent. Radio
..................................... 3-54
Theft-Deterrent Systems
................................... 2-15
Content Theft-Deterrent
................................ 2-15
PASS-Key@
Ill ............................................. 2-16
Throttle System Inspection
............................... 6-14
Tilt Wheel
........................................................ 3-4
Tire Inflation Check
........................................... 6-9
Tires
..................................................... 5-68, 5-93
Buying New Tires
........................................ 5-71
Chains ....................................................... 5-75
Changing a Flat Tire
.................................... 5-76
Compact Spare Tire
..................................... 5-87
If a Tire Goes Flat
....................................... 5-76
Inflation
-- Tire Pressure ............................... 5-68
Inspection and Rotation
................................ 5-69
Uniform Tire Quality Grading
......................... 5-72
Wheel Alignment and Tire Balance
................. 5-73
Wheel Replacement
..................................... 5-73
When It
Is Time for New Tires ...................... 5-70
PASS-Key@
Ill Operation .............................. 2-17
13