2003 PONTIAC BONNEVILLE light
[x] Cancel search: lightPage 170 of 418
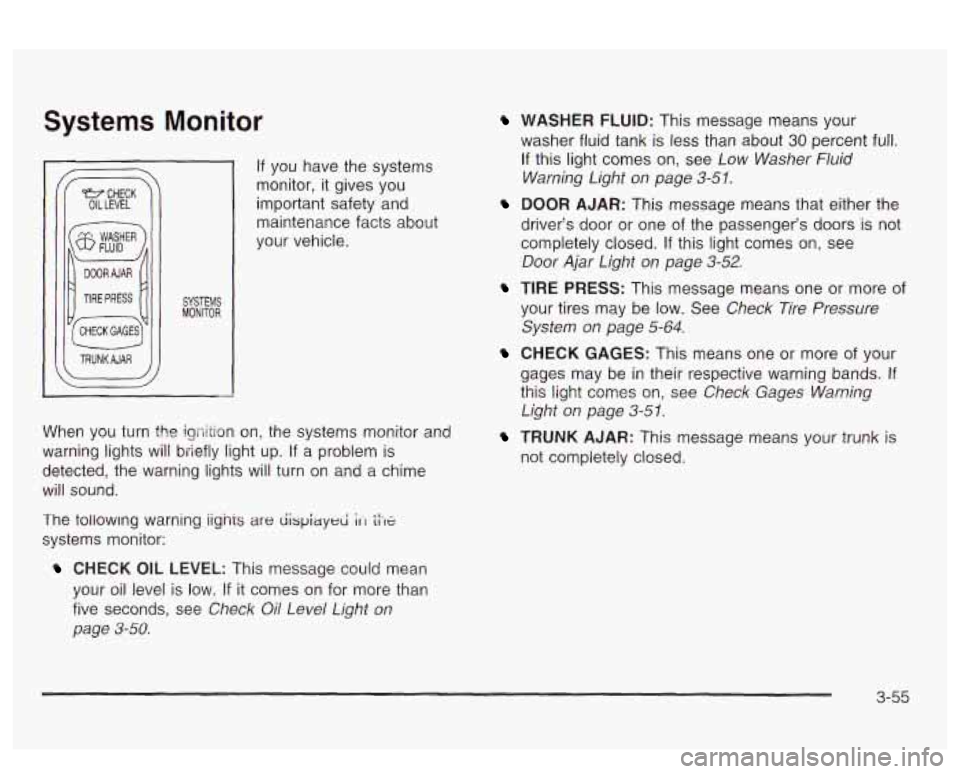
Systems Monitor
I TRUNKAJAR
If you have the systems
monitor, it gives you
important safety and
maintenance facts about
your vehicle.
When you turn the igriition on, the systems monitor and
warning lights will briefly light up. If
a problem is
detected, the warning lights will turn
on and a chime
will sound.
The tollowmg warning iignis
are dispiayed ;It tiX
systems monitor:
CHECK OIL LEVEL: This message could mean
your oil level is low.
If it comes on for more than
five seconds, see
Check Oil Level Light on
page 3-58.
WASHER FLUID: This message means your
washer fluid tank is less than about
30 percent full.
If this light comes on, see Low Washer Fluid
Warning Light on page
3-51.
DOOR AJAR: This message means that either the
driver’s door or one of the passenger’s doors
is not
completely closed.
If this light comes on, see
Door Ajar Light on page 3-52.
TIRE PRESS: This message means one or more of
your tires may be low. See Check Tire Pressure
System on page
5-64.
CHECK GAGES: This means one or more of your
gages may be
in their respective warning bands. If
this light comes on, see Check Gages Warning
Light on page 3-5 1.
TRUNK AJAR: This message means your trunk is
not completely closed.
3-55
Page 177 of 418
DIC Vehicle Personalization
The DIC can be used to program the following
personalization features available with your vehicle:
Automatic Door Locks
Window Lock Out
Security Feedback
Delayed Locking
Perimeter Lighting
Memory Seats
Outside Curb View Assist Mirror
Driver ID
The DIC is used to program the personal choices of two
drivers. The drivers are recognized as DRIVER
#1
and DRIVER #2. You will let the DIC know which driver
you are by using your remote keyless entry transmitter
or by pressing the appropriate memory seat control
button located on the driver’s door or by choosing the
driver with the
DIC. Each remote keyless entry
transmitter was preprogrammed to belong to DRIVER
#I
or DRIVER #2. Each transmitter may be programmed
differently for each driver. When you
press the button with the unlock symbol on
your transmitter, the DIC will automatically change driver
numbers and the vehicle will recall the personalization
settings that were last made to correspond to your
transmitter, including your radio and comfort control
settings. See
Climate Controls Personalization on
page
3-33.
If you unlock the vehicle using your door key instead of
your transmitter, the DIC will not change drivers and
will recall the information from the last transmitter use or
the last driver change using the memory seat controls.
If this happens and you were not the last driver of
the vehicle, simply press your correct driver number on
the memory seat controls or press the button with
the unlock symbol
on your transmitter or select the
personalization programming mode and choose
the correct driver number.
Use the following steps for personalization programming
instructions.
1. Turn the ignition on and keep the transaxle in
2. Press the MODE button to reach personalization
3. Press the SELECT button to enter personalization
PARK (P).
programming display. programming mode.
3-62
Page 178 of 418
4. The first choice to be made will be DRIVER ID 1
or 2. Press the RESET button to toggle between
your selections within a display and SELECT
to choose the current selection and move on to the
next personalization feature.
You are now in the selection mode and the DIC
is ready
to program your personal choices in memory.
Each feature that can be personalized will appear in the
display. Once you have made a selection for a
feature, the DIC will move on to the next personalization
feature.
Scroll through the following messages and feature
options:
AUTO DOOR LOCKS - OFFiON
UNLOCK - OFF/ON
UNLOCK - KEY OFF/PARK
DOOR TO UNLOCK - DRIVER/ALL
WINDOW LOCKOUT - R + PASS/REAP
KEYLESS FEEDBACK - OFF/ON
LIGHTS FEEDBACK - OFF/ON
HORN FEEDBACK - OFF/ON
DELAYED LOCKING - OFF/ON
PERIMETER LIGHTS - OFF/ON
PERIMETER LIGHTS - TIMEOUT 15 SEC
SEAT RECALL - OFF/ON
* RECALL POSITION - MEMORY/EXIT
TILT MIRROR - OFF/ON
0 DRIVER ID - OFF/ON
If you would like to exit the selection mode without
moving through each of the personalization features,
simply press a different button on the DIC or turn off the
ignition. The personal choices you made will still be
retained, even without passing through each of
the features. In order for your personal choices
to save,
you must press SELECT after making your selections.
If you happen to move past a selection you would like to
make a personal choice for, press unlock on your
transmitter or press the appropriate driver number on
the memory seat control. This will return you to the
A description of each feature programmable through the
DIC follows.
k.--i-n;-m uGylIlII,,Iy nf v, thn 'I ,v nntinn ..r""' foatt1t-P .-e--. nrnnr;lmming mode. I-. -a -.
3-63
Page 180 of 418
Window Lock Out
The number of passenger windows locked out by the
window LOCK switch can be programmed through
the DIC.
If you choose R + PASS, all three passenger window
switches will be inactive when the window LOCK switch
is enabled.
If you choose REAR, only the two rear passenger
window switches will be locked out when the window
LOCK switch is enabled.
To change modes do the following:
1. Move the arrow on the display between R + PASS
and REAR by pressing the RESET button.
2. Once you have made your selection, press the
SELECT button. Your choice will be retained in
memory.
For more information on this feature, see “Window Lock
Out” under
Power Windows on page 2-20.
Security Feedback
By choosing different combinations of these selections,
you can choose the type
of transmitter activated
feedback when locking and unlocking your vehicle with
your transmitter. Each time you make a selection by
pressing the RESET button, press the SELECT button
to record your choice.
@ KEYLESS FEEDBACK - OFF/ON
LIGHTS FEEDBACK - OFF/ON
HORN FEEDBACK - OFF/ON
If you choose
ON for KEYLESS FEEDBACK you will
also need to choose LIGHTS and/or HORN FEEDBACK.
You can select the following modes:
If you choose OFF for KEYLESS FEEDBACK, you
will receive no security feedback when locking or
unlocking your vehicle.
If you choose ON for KEYLESS FEEDBACK and
ON for LIGHTS FEEDBACK, the exterior lamps
will flash twice when unlocking your venicie
and once when locking your vehicle.
3-65
Page 181 of 418
If you choose ON for KEYLESS FEEDBACK and
ON for HORN FEEDBACK, your horn will chirp
when locking and unlocking your vehicle.
If you choose ON for KEYLESS, LIGHTS and
HORN FEEDBACK, your exterior lamps will
flash twice at the first unlock button press, your
exterior lamps will flash twice and your horn
will chirp once at the second unlock button press,
and the exterior lamps will flash once and the
horn will chirp once when locking your vehicle.
For more information on this feature, see “Security
Feedback under
Remote Keyless Entry System
Operation on page
2-6.
Delayed Locking
The delayed locking feature, which delays the actual
locking of the vehicle, can be made active or inactive
through the DIC. When DELAYED LOCKING
- OFF/ON
appears on the display, use the RESET button to
toggle the arrow between OFF and
ON. When you have
made your choice, press the SELECT button to record
your selection.
Perimeter Lighting
When the button with the unlock symbol on the
transmitter is pressed, the Daytime Running Lamps
(high-beams at reduced intensity), parking lamps and
back-up lamps will turn on
if it is dark enough according
to the Twilight Sentinel@
.
You can control activation of this feature by choosing
OFF
or ON when the PERIMETER LIGHTS choice
is displayed on the DIC. Make your choice by pressing
the RESET button and record your choice by pressing
the SELECT button. You will then be prompted
to
choose a TIMEOUT period.
The PERIMETER LIGHTS TIMEOUT feature can be
changed
to the desired setting by using the RESET
button to toggle from
5 to 30 seconds. Each toggle will
increase the time by five seconds. Once the desired
timeout
is displayed, press the SELECT button to record
your choice and move on to the next personalization
feature.
For more information on this feature, see “Perimeter
Lighting” under
lnterior Lamps on page 3-16.
For more information on this feature, see Delayed
Locking
on page 2-12.
3-66
Page 189 of 418
Setting Preset Stations
The six numbered pushbuttons let you return to your
favorite stations. You can set up to
30 stations (six AM,
six FM1 and six FM2, six XM1 and six XM2
(USA
only, if your radio is equipped with the XMTM Satellite
Radio Service), by pedorming the following steps:
1. Turn the radio on.
2. Press BAND to select AM, FMI or FM2,
3. Tune in the desired station.
4. Press EQ to select the equalization.
5. Press and hold one of the six numbered
or
XMl, XM2.
pushbuttons until you hear a beep. Whenever you
press that numbered pushbutton, the station
you set
will return and the equalization that you
selected will also be automatically selected for that
pushbutton.
6. Repeat the steps for each pushbutton.
Setting the Tone (Bassnreble)
TONE: Press and release this button until BASS, MID
or TREB appears on the display. The SELECT LED
indicator
will light to show that the tone control can be
adjusted. Turn the SELECT knob to increase or
to
decrease. If a station is weak or noisy, you may want to
decrease the treble. To
adjust all of the tone controls
to the middle position,
press and hold TONE until FLAT appears on the
display.
EQ (Equalizer): Press this button to select customized
bass, mid and treble equalization settings.
You can set up to six customized equalization settings
by performing the following steps:
1.
2.
3.
4.
5.
6. Turn
the radio on.
Use the TONE button and the SELECT knob to
create the desired equalization.
Press and hold the
EQ button for two seconds.
SELECT EQ
# will appear on the display and the
EQ symbol will flash.
Press EQ or turn the
SELECT knob to select the
desired EQ number.
Press and hold the EQ button or push the SELECT
knob
to store the equalization setting and the
number. You will hear
a beep and EQ SAVED will
appear on the display.
Repeat the steps for the other
EQ settings and
numbers.
EQ
5 has been programmed at the factory for use with
talk radio, but it can be preset
to a different tone.
3-74
Page 190 of 418
Adjusting the Speakers (Balance/Fade)
BAL (Balance): Press and release this button until
BAL appears on the display. The SELECT LED indicator
will light to show that the speakers can be adjusted.
Turn the SELECT knob to move the sound toward the
left or the right speakers.
FADE: Press and release this button until FADE
appears on the display. The SELECT LED indicator will
light to show that the speakers can be adjusted.
Turn the SELECT knob to move the sound toward the
front or the speakers.
Pressing and holding the BAL FADE button for two
seconds
will return all speaker settings t~ the middle
position.
Finding a PTY Station (RDS, and XMTM)
To select and find a desired PTY perform the following:
1. Press PROG TYPE. The PTY symbol will be
2. Select a category by turning the SELECT knob.
eis;!2yed 2r! the screen.
3. Once the desired category is displayed, press either
SEEK arrow to select the category and take you to
the category’s first station.
4. If you want to go to another station within that
category and the category is displayed, press
either SEEK arrow once.
If the category is not
displayed, press either SEEK arrow twice to display
the category and then to go to another station.
5. Press PROG TYPE to exit program type mode.
SCAN: You can also scan through the channels within
a category by performing the following:
1. Press PROG TYPE. The PTY symbol will be
2. Select a category by turning the SELECT knob.
3. Once the desired category is displayed, press and
hold either SCAN arrow, and the radio will begin
scanning within your chosen category.
particular station.
displayed
on the screen.
4. Press either SCAN
arrow again to stop at a
3-75
Page 199 of 418
Setting Preset Stations
The six numbered pushbuttons let you return to your
favorite stations. You can set up to
30 stations (six AM,
six FMI and six FM2, six XMI and six XM2
if your
radio is equipped with the XM Satellite Radio Service)
by performing the following steps:
1. Turn the radio on.
2. Press BAND to select AM, FMI or FM2,
3. Tune in the desired station.
4. Press EQ to select the equalization.
5. Press and hold one of the six numbered
XMI
or XM2.
pushbuttons until you hear a beep. Whenever you
press that numbered pushbutton, the station
you set will return and the equalization that you
selected will also be automatically selected for that
pushbutton.
6. Repeat the steps for each pushbutton.
Setting the Tone (Bassnreble)
TONE: Press and release this button until BASS, MID
or TREB appears on the display. The SELECT LED
indicator will light to show that the tone control can be
adjusted. Turn the SELECT knob to increase or to
decrease.
If a station is weak or noisy, you may want to
decrease the treble. To
adjust all of the tone controls to the middle position,
press and hold TONE until FLAT appears on the
display.
EQ
(Equalizer): Press this button to select customized
bass, mid and treble equalization settings.
You can set
up to six customized equalization settings
by performing the following steps:
1.
2.
3.
4.
5.
6.
Turn the radio on.
Use the TONE button and the SELECT knob to
create the desired equalization.
Press and hold the EQ button for two seconds.
SELECT EQ
# will appear on the display and the
EQ symbol will flash.
Press the
EQ button or turn the SELECT knob to
select the desired EQ setting number.
Press and hold the EQ button or push the SELECT
knob to store the equalization setting and the
number. You will hear a beep and EQ SAVED
will
appear on the display.
Repeat the steps for the other EQ settings and
numbers.
EQ 5 has been programmed at the factory for use with
talk radio, but it can be set to a different tone.
3-84