2003 PONTIAC BONNEVILLE buttons
[x] Cancel search: buttonsPage 108 of 418
Programming the HomeLinkB
Transmitter
Do not use the HomeLink@ Transmitter with any garage
door opener that does not have the “stop and reverse”
feature. This includes any garage door opener model
manufactured before April
1, 1982.
Keep the original transmitter for use in other vehicles as
well as for future HomeLink@ programming. It is also
recommended that upon the sale of the vehicle,
the programmed HomeLink@ buttons should be erased
for security purposes. Refer to “Erasing HomeLink@
Buttons” or, for assistance, contact HomeLink@ on the
internet at: www.homelink.com or by calling
1 -800-355-351 5.
Be sure that people and objects are clear of the garage
door or gate operator you are programming. When
programming a garage door, it is advised to park outside
of the garage.
It is recommended that a new battery be installed in
your hand-held transmitter for quicker and more
accurate transmission of the radio frequency. Your vehicle’s engine should
be turned
off while
programming the transmitter. Follow these steps to
program up to three channels:
1. Press and hold down the two outside buttons,
releasing only when the indicator light begins to
flash, after
20 seconds. Do not hold down the
buttons for longer than
30 seconds and do not
repeat this step to program
a second and/or third
transmitter to the remaining two HomeLink@ buttons.
2. Position the end of your hand-held transmitter about
1 to 3 inches (3 to 8 cm) away from the HomeLink@
buttons while keeping the indicator light in view.
3. Simultaneously press and hold both the desired
button on HomeLink@ and the hand-held transmitter
button.
Do not release the buttons until Step 4
has been completed.
Some entry gates and garage door openers may
require you to substitute Step
3 with the procedure
noted in “Gate Operator and Canadian
Programming” later in this section.
4. The indicator light wiii tiasn siowiy at iirsi and iilerl
rapidly after HomeLink@ successfully receives the
frequency signal from the hand-held transmitter.
Release both buttons.
2-43
Page 109 of 418
5. Press and hold the newly-trained HomeLink@ button
and observe the indicator light.
If the indicator light stays on constantly,
programming is complete and your device should
activate when the HomeLink@ button is pressed and
released.
To program the remaining two HomeLink@ buttons,
begin with Step
2 under “Programming HomeLink@.”
Do not repeat Step 1 as this will erase all of the
programmed channels.
If the indicator light blinks rapidly for two seconds
and then turns to a constant light, continue with
Steps
6 through 8 following to complete the
programming
of a rolling-code equipped device
(most commonly, a garage door opener).
6. At the garage door opener receiver (motor-head
unit) in the garage, locate the “Learn” or “Smart”
button. This can usually be found where the hanging
antenna wire is attached to the motor-head unit.
7. Firmly press and release the “Learn” or “Smart”
button. The name and color
of the button may
vary by manufacturer.
You will have
30 seconds to start Step 8.
8. Return to the vehicle. Firmly press and hold the
programmed HomeLink@ button for two seconds,
then release. Repeat the press/hold/release
sequence a second time, and depending on the
2-44
brand of the garage door opener (or other rolling
code device), repeat this sequence
a third time
to complete the programming.
HomeLink@ should now activate your rolling code
equipped device.
To program the remaining two HomeLink@ buttons,
begin with Step
2 of “Programming HomeLink@.” Do not
repeat Step
1.
Gate Operator and Canadian
Programming
Canadian radio-frequency laws require transmitter
signals
to “time out” or quit after several seconds of
transmission. This may not be long enough for
HomeLink@ to pick up the signal during programming.
Similarly, some
U.S. gate operators are manufactured to
“time out” in the same manner.
If you live in Canada, or you are having difficulty
programming a gate operator by using the
“Programming HomeLink@’ procedures (regardless
of
where you live), replace Step 3 under “Programming
HomeLink@’ with the following:
Continue to press and hold the HomeLink@ button while
you press and release every two seconds (cycle)
your hand-held transmitter until the frequency signal has
been successfully accepted by HomeLink@. The
indicator light will flash slowly at first and then rapidly.
Proceed with Step
4 under “Programming HomeLink@“
to complete.
Page 110 of 418
Using HomeLink@
Press and hold the appropriate HomeLink@ button for at
least half of a second. The indicator light will come
on while the signal is being transmitted.
Erasing HomeLink@ Buttons
To erase programming from the three buttons do the
following:
1. Press and hold down the two outside buttons until
the indicator light begins to flash, after
20 seconds.
2. Release both buttons. Do not hold for longer than
HomeLink@ is now in the train jiearning) mode
and can
be programmed at any time beginning with Step
2
under “Programming HomeLink@.”
30 seconds.
Individual buttons can not be erased, but they can be
reprogrammed. See “Reprogramming a Single
HomeLink@ Button” next.
Reprogramming a Single HomeLink@
Button
To program a device to HomeLink@ using a HomeLink@
button previously trained, follow these steps:
1. Press and hold the desired HomeLink@ button.
Do not release the button.
2. The indicator light will begin to flash after
20 seconds. While still holding the HomeLink@
button, proceed with Step
2 under “Programming
HomeLink@.”
Resetting Defaults
1. Hold down the two outside buttons for about
20 seconds until the indicator light begins to flash.
2. Continue to hold both buttons until the HomeLink@
indicator light turns
off.
3. Release both buttons.
For questions or comments, contact HomeLink@ at
1-800-355-351 5, or on the internet at
www.homelink.com.
2-45
Page 111 of 418
Storage Areas
Glove Box
Use the master key to lock and unlock the glove box.
To open it, lift the latch release on the left side of
the glove box door.
The VALET key will not work in the glove box door lock.
Front Storage Area
Press the buttons on either side of the armrest to open
the storage area for cassette tapes, gloves, etc.
Center Console Storage Area Rear Seat
Pass Through
Your vehicle has a rear seat armrest with cupholders
and a pass-through feature.
Pull down the interior door
to access the trunk.
Convenience Net
Your vehicle may have a convenience net. You’ll see it
just inside the back wall of the trunk.
Put small loads, like grocery bags, behind the net.
It can
help keep them from falling over during sharp turns or
quick starts and stops. For heavier loads, store
them in the trunk as far forward as you can.
You can unhook the net
so that it will lie flat when
you’re not using it.
If your vehicle has this feature, press the button at the
front edge of the armrest
to open the storage area
for cassette tapes, gloves, etc.
2-46
Page 141 of 418

.1#t A/C (Air Conditioning): Press this button to turn
the air conditioning compressor on and off. When
A/C is
pressed, an indicator light in the button will come on
to let you know that air conditioning is activated.
If your
climate control system is
off, you may also turn it
back on in vent mode by selecting the
A/C button.
On hot days, open the windows
to let hot inside
air escape; then close them. This helps
to reduce the
time
it takes for your vehicle to cool down. It also helps
the system
to operate more efficiently.
For quick cool down on hot days, do the following:
1. Select the vent mode.
2. Select the recirculation mode.
3. Select NC.
4. Select the coolest temperature.
5. Select the highest fan speed.
Using these settings together for long periods of time
may cause the air inside
of your vehicle to become too
dry.
To prevent this from happening, after the air in
your vehicle has cooled, turn the recirculation mode
off.
The air conditioning system removes moisture from
the air,
so you may sometimes notice a small amount of
water dripping underneath your vehicle while idling or
after turning off the engine. This is normal.
Sensors
The solar sensor on your vehicle monitors
radiation and the air inside of your vehicle, the solar
then uses the
information
to maintain the selected temperature by
initiating needed adjustments
to the temperature, the fan
speed and the air delivery system. The system may
also supply cooler air to the side of the vehicle facing the
sun. The recirculation mode will also be activated, as
necessary.
Do not cover the solar sensor located in the
center of the instrument panel, near the windshield,
or the system will not work properly.
Defogging and Defrosting
There are two modes to clear fog or frost from your
windshield. Use the defog mode to clear the windows of
fog or moisture and warm the passengers. Use the
defrost mode
to remove fog or frost from the windshield
more quickly.
Press one of the available mode buttons
to select the
defog or defrost mode.
+3 (Defog): This mode directs most of the air to the
windshield and the floor outlets.
A small amount of air is
also directed to the outboard outlets (for the side
windows). When you select this mode, the system turns
off recirculation and runs the air conditioning compressor
unless the outside temperature is at or below freezing.
The recirculation mode cannot be selected while in
the defog mode.
3-26
Page 148 of 418
Climate Controls Personalization
If your vehicle is equipped with this feature, up to two
drivers are able to store and recall climate control
settings for the temperature, the fan speed and the
direction
of the airflow.
Memory buttons
1 and 2 are located on the driver’s
door panel and correspond to the numbers
1 or 2 found
on the back
of each remote keyless entry transmitter.
To store settings, do the following:
1. Select the desired temperature, fan speed and
airflow mode,
If desired, a separate temperature
setting may also be selected for the front seat
passenger. For information on how to
do this, see
Automatic Climate Control System on page 3-28.
2. Locate memory buttons 1 and 2 on the driver’s
door panel.
3. Press the memory button on the door panel that
corresponds to the number on the back of the
transmitter you are programming, until you hear two
beeps. The beeps confirm that your selection has
been saved and can now
be recalled. For more
information on the memory feature, see
Memory
Seat and Mirrors on page 2-48.
Follow these steps each time you want to change the
stored settings.
To recall the climate control settings last stored on your
transmitter, press the unlock button on your remote
keyless entry transmitter and put the ignition in
ACCESSORY or RUN.
3-33
Page 171 of 418
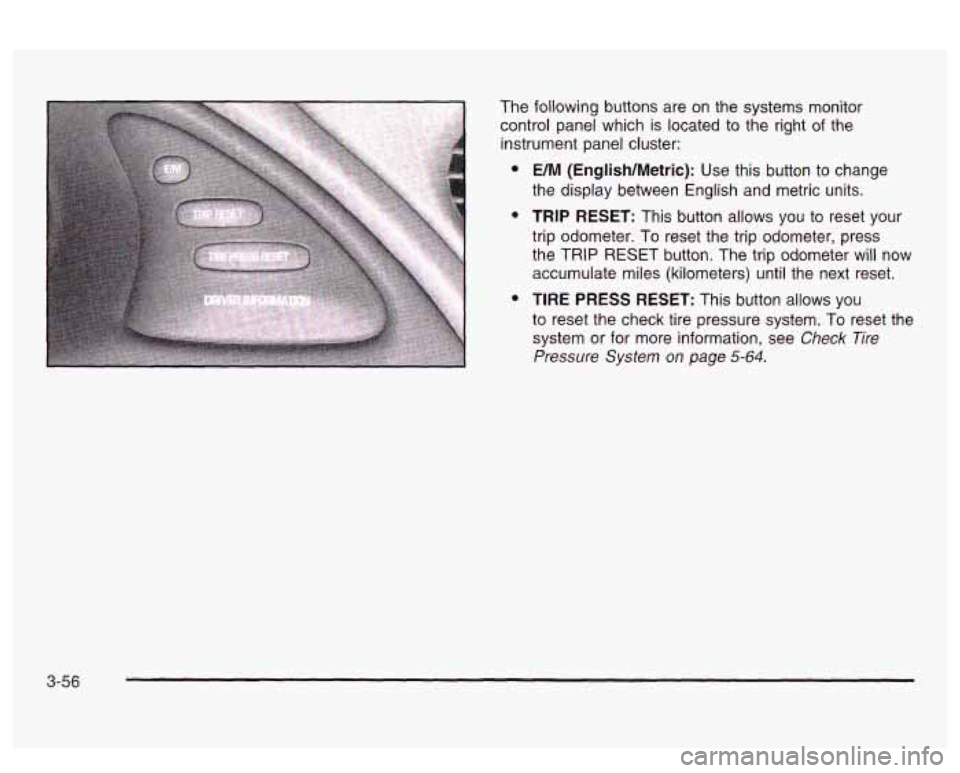
The following buttons are on the systems monitor
control panel which is located to the right
of the
instrument panel cluster:
e
e
e
UM (English/Metric): Use this button to change
the display between English and metric units.
TRIP RESET: This button allows you to reset your
trip odometer. To reset the trip odometer, press
the TRIP RESET button. The trip odometer will now
accumulate miles (kilometers) until the next reset.
TIRE PRESS RESET: This button allows you
to reset the check tire pressure system. To reset the
system or for more information, see
Check Tire
Pressure System on page 5-64.
3-56
Page 172 of 418
Driver Information Center (DIC)
Your vehicle may have a Driver Information Center
(DIC). The DIC will display information about how your
vehicle
is functioning, as well as warning messages
if a system problem is detected. If a problem
is detected, a diagnostic message will
appear
in the display. The message center is
continuously updated with the vehicle’s performance
status.
The following information will show the messages you
may see on the
DIC display.
DIC Controls and Displays
2
COMPASS
DRIVER INFORMATION
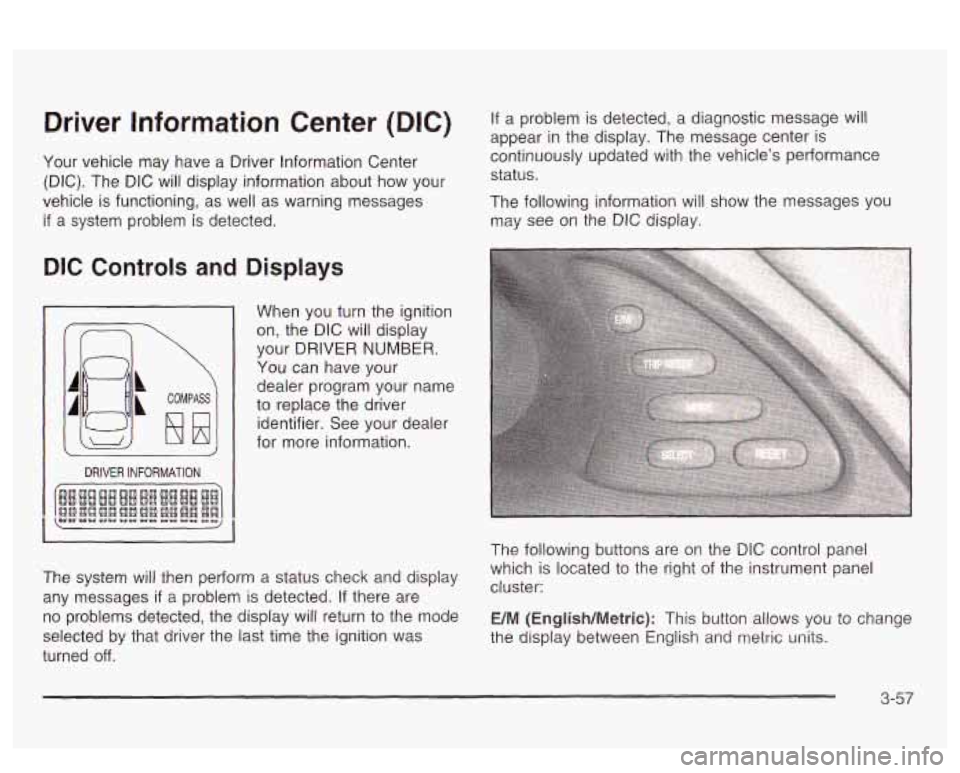
When you turn the ignition
on, the DIC will display
your DRIVER
NUMBER.
You can have your
dealer program your name
to replace the driver
identifier. See your dealer
for more information.
The system will then perform a status check and display
any messages
if a problem is detected. If there are
no problems detected, the display will return to the mode
selected by that driver the last time the ignition was
turned
off.
The following buttons are on the DIC control panel
which is located to the right of the instrument panel
cluster:
E/M (English/Metric): This button allows you to change
the display between Engiisn ana
metric units.
3-57