Page 283 of 354

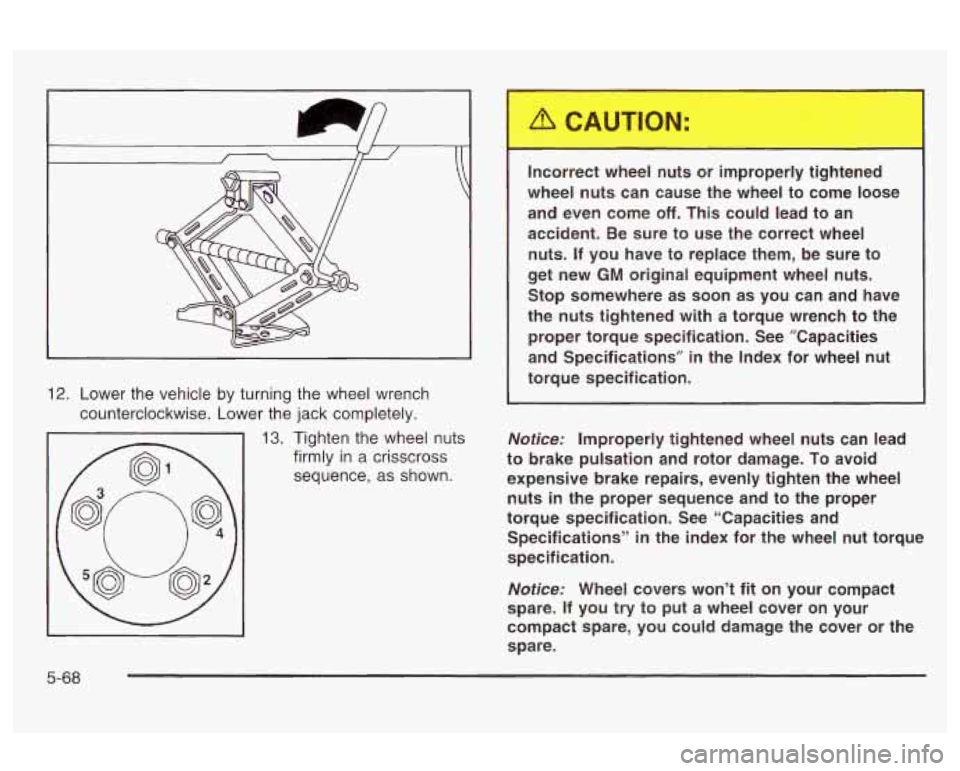
12. Lower the vehicle by turning the wheel wrench
counterclockwise. Lower the jack completely.
13. Tighten the wheel nuts
firmly
in a crisscross
sequence,
as shown. Incorrect wheel nuts or improperly tightened
wheel nuts can cause the wheel to come loose
and even come
off. This could lead to an
accident. Be sure to use the correct wheel
nuts. If you have to replace them, be sure to
get new GM original equipment wheel nuts.
Stop somewhere as soon as you can and have
the nuts tightened with a torque wrench to the proper torque specification. See ”Capacities
and Specifications’’ in the Index for wheel nut
torque specification.
Notice: Improperly tightened wheel nuts can lead
to brake pulsation and rotor damage.
To avoid
expensive brake repairs, evenly tighten the wheel
nuts in the proper sequence and to the proper
torque specification. See “Capacities and
Specifications”
in the index for the wheel nut torque
specification.
Notice: Wheel covers won’t fit on your compact
spare. If you try
to put a wheel cover on your
compact spare, you could damage the cover or the
spare.
5-68
Page 296 of 354

Electrical System
Add-On Electrical Equipment
Notice: Don’t add anything electrical to your
vehicle unless you check with your dealer first.
Some electrical equipment can damage your vehicle
and the damage wouldn’t be covered by your
warranty. Some add-on electrical equipment can
keep other components from working as they
should.
Your vehicle has an air bag system. Before attempting
to add anything electrical to your vehicle, see
Servicing Your Air Bag-Equipped Vehicle on page 1-59.
Windshield Wiper Fuses
The windshield wiper motor is protected by a circuit
breaker and a fuse. If the motor overheats due to heavy
the overload is caused by some electrical problem, have
it fixed. snow,
eic., iile wiper wiii siup ui-liii ti-le i-hstci- GS~S. If
Power Windows and Other Power
Options
A circuit breaker in the fuse panel protects the power
windows. When the current load is too heavy, the circuit
breaker opens and closes, protecting the circuit until
the problem is fixed.
Fuses and Circuit Breakers
The wiring circuits in your vehicle are protected from
short circuits by a combination
of fuses, circuit breakers
and fusible links. This greatly reduces the chance of
damage caused by electrical problems.
There are three fuse blocks in your vehicle: two
instrument panel fuse blocks and the engine
compartment fuse block.
There are four spare fuses located in the driver’s side
instrument panel end cap for your use.
Instrument Panel Fuse Blocks
There are two fuse panels for your vehicle. One is
located on the driver’s side of the instrument panel and
the other is located on the passenger’s side.
5-81
Page 297 of 354
Instrument Panel Fuse Block
(Driver's Side)
f I A) WIPER I
F) EFC BATT G) PCMACC I ti: DALOCK I PWR SEAT E) 0 I) IPC / BFC ACG F) .
DRIVER
Fuses
WIPER
TRUNK REURADIO
AMP
TURN LPS Usage
Windshield Wiper Motor,
Washer Pump
Trunk Release Relay/Motor, Audio
Amplifier/RFA
Turn Signal Lamps
Fuses
PWR MIRROR
AIR BAG
BFC BATT
PCM ACC
DR LOCK
IPC/BFC ACC
STOP LPS
HAZARD LPS
I PC/HVAC
BATT
Circuit Breakers
PWR SEAT Usage
Power Mirrors
Air Bags Body Computer (BFC)
Power Control Module (PCM) Door Lock Motors
Cluster, Body Computer (BFC) Stop Lamps
Hazard Lamps
HVAC Head, Cluster, Data Link
Connector
Usage Power Seats
Relay Usage
TRUNK
REL Trunk Relay
DR UNLOCK Door Unlock Relay
DR LOCK Door Lock Relay
DRIVER DR Driver's Door Unlock Relay
UNLOCK
5-82
Page 298 of 354
Instrument Panel Fuse Block
(Passenger’s Side)
SEE OTHER END CAF FOR FUSE PULLER &SPARE FUSES
A) INST LPS
C) CRUISE
SW B) CRUISE SW LPS
0) HVAC BLOWER E) CRUISE F) FOG LPS G) INT LPS H) RADIO BATr I) SUNROOF
* SEE OWNERS MANUAL /
1’
Fuse
INST LPS
CRUISE SW LPS
CRUISE SW Usage
Interior Lamp Dimming
Steering Wheel Cruise Control
Switch Lamps
Steering Wheel Cruise Control
Switches
HVAC Blower Motor
HVAC
BLOWER
CRUISE Cruise Control
FOG LPS
Fog Lamps
INT LPS Interior Courtesy Lamps
RADIO BAT Radio, XMTM Satellite Radio/DAB
SUNROOF Power Sunroof
Circuit Breaker Usage
PWR WNDW Power Windows
Relay
FOG LFS
Usage
Fog iarnps
5-83
Page 299 of 354
Engine Compartment Fuse Block
The engine compartment fuse block is located on the
driver’s side of the engine compartment, near the
battery. Fuse 1
2
3
4
5
6
7
8
Relays
9
10
11
12
13
14
15
Usage
Ignition Switch
Right Electrical Center-Fog Lamps,
Radio, Body Function Control
Module, Interior Lamps
Left Electrical Center-Stop Lamps,
Hazard Lamps, Body Function
Control Module, Cluster, Climate
Control System
Anti-Lock Brakes
Left Electrical Center-Power Seats,
Power Mirrors, Door Locks, Trunk
Release, Audio Amplifier, Remote
Keyless Entry
Not Used
Ignition Switch
Cooling Fan
#I
Usage
Rear Defog
Not Used
Starter
Cooling Fan
#1
HVAC Blower (Climate Control)
Cooling Fan
#2
Cooling Fan
5-84
Page 300 of 354
Relays 16
17
18
19
20 21
22
Fuses
23-32 33
34
35
36
37
36
39
40 Usage
Air Conditioning Compressor
Not Used
Fuel Pump
Automatic Headlamp System
Automatic Headlamp System
Horn
Daytime Running Lamps (DRL)
Usage
Spare Fuse Holder
Rear Defog
ACC~SSGP~ Power Outlets, Cigarette
Lighter
Generator Not Used
Air Conditioning Compressor, Body
Function Control Module
Powertrain Control Module (PCM)
Anti-Lock Brakes (ABS)
A ..I -._-- +:- T --.---., I, r\ULUI I Idllb I I C€l13C€AlG
Fuses 41
42
43
44
45
46 47
48 49
50
51
52
53
54
55
56
57 Usage
Ignition System
Back-up Lamps, Brake Transaxle
Shift Interlock
Horn
PCM
Parking Lamps
Climate Control System, Air
Conditioning
Canister Vent Valve, Exhaust
Oxygen Sensors
Fuel Pump, Injectors
Not Used
Right Headlamp
Left Headlamp
Cooling Fan
#2
HVAC Blower (Climate Control)
Crank Cooling Fan
#2 Ground
Fuse Puller for Mini Fuses
Not Used
5-85
Page 313 of 354

At Least Twice a Year
Restraint System Check
Make sure the safety belt reminder light and all your
belts, buckles, latch plates, retractors and anchorages
are working properly. Look for any other loose or
damaged safety belt system parts. If you see anything
that might keep a safety belt system from doing its
job, have it repaired. Have any torn or frayed safety belts
replaced.
Also look for any opened or broken air bag coverings,
and have them repaired or replaced. (The air bag
system does not need regular maintenance.)
Wiper Blade Check
Inspect wiper blades for wear or cracking. Replace
blade inserts that appear worn or damaged or that
streak or miss areas of the windshield.
Also see
Cleaning the Outside of Your Vehicle on page 5-75.
Weatherstrip Lubrication
Silicone grease on weatherstrips will make them last
longer, seal better, and not stick or squeak. Apply
silicone grease with a clean cloth. During very cold,
damp weather more frequent application may be
required. See
Part D: Recommended Fluids and
Lubricants on page 6-15.
Manual Transaxle Check
It is not necessary to check the transaxle fluid level.
Check for leaks.
A fluid leak is the only reason for fluid
loss. Have the system inspected and repaired if
needed.
Automatic Transaxle Check
It is not necessary to check the transaxle fluid level. A
transaxle fluid leak is the only reason for fluid loss.
Check for leaks. If a leak occurs, take the vehicle to your
dealer and have it repaired as soon as possible.
Hydraulic Clutch System Check
Check the fluid level in the clutch reservoir. See
Hydraulic Clutch on page 5-22. A fluid loss in this
system could indicate a problem. Have the system
inspected and repaired at once.
At Least Once a Year
Key Lock Cylinders Service
Lubricate the key lock cylinders with the lubricant
specified in Part
D.
6-1 0
Page 314 of 354

Body Lubrication Service
Lubricate all the door hinges and latches, including
those for the hood and the trunk lid. Part
D tells
you what to use. More frequent lubrication may be
required when exposed to a corrosive environment.
Starter S---:tc" Ct---'-
Automatic Transaxle Shift Lock Control
System Check
When you are doing this chec the vehicle
could move suddenly.
If it does, you or others
could be injured. Follow the steps below.
When you are doing this check, the vehicle
could move suddenly.
If it does, you or others
CGG!~ be i~j~d. FO~~GVV the steps below.
1. Before you start, be sure you have enough room
2. Firmly apply both the parking brake and the regular
around the vehicle.
brake. See
Parking Brake on page 2-26 if
necessary.
Do not use the accelerator pedal, and be ready to
turn
off the engine immediately if it starts.
3. Try to start the engine in each gear. The starter
should work only in PARK (P) or NEUTRAL (N).
If the starter works in any other position, your
vehicle needs service.
1. Before you start, be sure you have enough room
around the vehicle. It should be parked
on a level
surface.
2. Firmly apply the parking brake. See Parking Brake
on page
2-26 if necessary.
Be ready to apply the regular brake immediately
if
the vehicle begins to move.
but don't start the engine. Without applying the
regular brake, try to move the shift lever out
of PARK (P) with normal effort. If the shift lever
moves out of PARK (P), your vehicle needs service.
3. With the engine off, turn the key to the ON position,
6-1 1