2003 Oldsmobile Alero service reset
[x] Cancel search: service resetPage 134 of 354
Anti-Lock Brake System
Warning Light
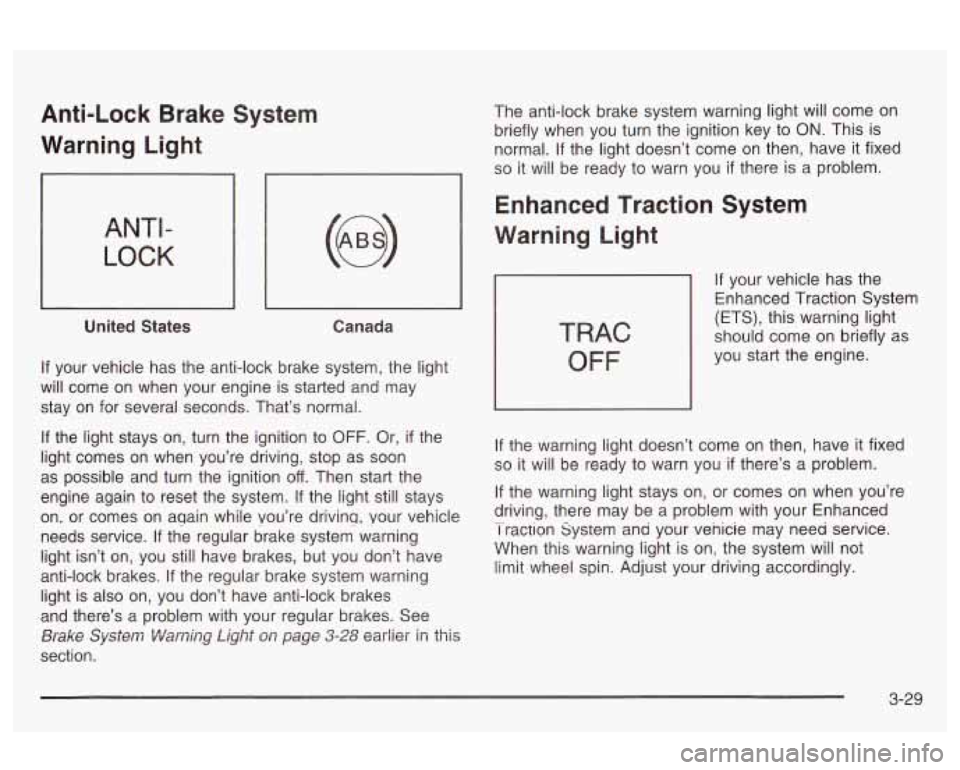
ANTI -
LOCK
United States Canada
If your vehicle has the anti-lock brake system, the light
will come on when your engine is started and may
stay on for several seconds. That’s normal.
If the light stays on, turn the ignition to OFF. Or, if the
light comes on when you’re driving, stop as soon
as possible and turn the ignition
off. Then start the
engine again to reset the system.
If the light still stays
on, or comes on aqain while Vou’re drivinq, your vehicle
needs service. If the regular brake system warning
light isn’t on, you still have brakes, but you don’t have
anti-lock brakes. If the regular brake system warning
light is also on, you don’t have anti-lock brakes
and there’s a problem with your regular brakes. See
section.
Brake Sy~Sei~7 Viamj~~ Light O/T page 3-28 earlier in this
The anti-lock brake system warning light will come on
briefly when you turn the ignition key to
ON. This is
normal.
If the light doesn’t come on then, have it fixed
so it will be ready to warn you if there is a problem.
Enhanced Traction System
Warning Light
TRAC
OFF
If your vehicle has the
Enhanced Traction System
(ETS), this warning light
should come on briefly as
you start the engine.
If the warning light doesn’t come on then, have it fixed
so it will be ready to warn you if there’s a problem.
If the warning light stays on, or comes on when you’re
driving, there may be a problem with your Enhanced
I raction system ana your venicie may need service.
When this warning light is on, the system will not
limit wheel spin. Adjust your driving accordingly. -
3-29
Page 140 of 354

Low Oil Level Light
LOW
OIL
If your vehicle is equipped
with a
3400 V6 engine,
then you
will have a LOW
OIL light in your
instrument panel cluster.
This light will come on briefly when you start your
vehicle.
If the light stays on after starting your vehicle, or comes
on and chimes while you are driving, your engine
oil
level should be checked.
Prior to checking the oil level, be sure your vehicle has
been shut
off for several minutes and is on a level
surface. Check the oil level on your dipstick and bring it
to the proper level. See
Engine Oil on page 5-15.
The oil level monitoring system only checks oil level
during the brief period between when the key is on and
the engine is cranking. It does not monitor engine oil level
when the engine is running. Additionally, an oil level
check is only performed
if the engine has been turned off
for a considerable period of time allowing the oil normally
in circulation to drain back into the oil pan.
Change Engine Oil Light
CHANGE
OIL
The CHANGE OIL light
should come on briefly as
a bulb check when you
start the engine. If the light
' doesn't come on, have it
~ serviced.
I I
If the CHANGE OIL light comes on and stays on after
you start the engine, have the oil changed.
To reset the CHANGE
OIL light, see Engine Oil on
page 5- 15.
3-35
Page 150 of 354
< SCAN > : Press and hold either arrow for
two seconds until SC appears on the display and you
hear a beep. The radio will go to a station, play for a few
seconds, then go on to the next station. Press either
arrow again to stop scanning.
To scan preset stations, press and hold either SCAN
arrow for more than four seconds. PRESET SCAN will
appear on the display. You will hear a double beep
and the P will blink with the preset number. The radio
will go to the first preset station stored on your
pushbuttons, play for a few seconds, then go on to the
next preset station. Press either SCAN arrow again
to stop scanning presets.
The radio
will scan only to stations that are in the
selected band and only to those with a strong signal.
Setting Preset Stations
The six numbered pushbuttons let you return to your
favorite stations. You can set up to
30 stations (six AM,
six FM1 and six FM2, six XMI and six XM2 (USA
Radio Service) or DAB1 and DAB2 (Canada only,
if your
radio is equipped with DAB), by performing the
following steps:
Gi.i[.y., if .y.zlui- rzd;G is i;-le y"!'" Saieiiiie
1. Turn the radio on.
3. Press BAND to se!ect AM, FM! or FM2, or XM!,
XM2, or DAB1, DAB2.
3. Tune in the desired station.
4. Press AUTO EQ to select the equalization.
5. Press and hold one of the six numbered
pushbuttons until you hear
a beep. Whenever you
press that numbered pushbutton, the station
you set will return and the equalization that you
selected will also be automatically selected for that
pushbutton.
6. Repeat the steps for each pushbutton.
Setting the Tone (Bass/Treble)
AUDIO: Press and release this button until BASS, MID
or TREB appears on the display. Press the knob
above the AUDIO button to extend it, then turn the knob
to increase or to decrease.
If a station is weak or
noisy, you may want to decrease the treble.
Pressing and holding the AUDIO button for at least
two seconds will return all tone settings, including
baiance ana iaae,
io iiai.
AUTO
EQ (Automatic Equalizer): Press this button to
choose bass, midrange and treble equalization
settings designed for country, jazz, talk, pop, rock, and
classical program types.
3-45
Page 160 of 354
< SCAN > : Press and hold either arrow for two
seconds until SC appears on the display and you hear a
beep. The radio will go
to a station, play for a few
seconds, then go on to the next station. Press either
SCAN arrow again to stop scanning.
To scan preset stations, press and hold either SCAN
arrow for more than four seconds. PRESET SCAN will
appear on the display. You will hear a double beep
and the P will blink with the preset number. The radio
will
go to the first preset station stored on your
pushbuttons, play for a few seconds, then go on to the
next preset station. Press either SCAN arrow again
to stop scanning presets.
The radio will scan only to stations that are in the
selected band and only to those with a strong signal.
Setting Preset Stations
The six numbered pushbuttons let you return to your
favorite stations. You can
set up to 30 stations (six AM,
six
FMI and six FM2, six XMI and six XM2 (USA
Radio Service) or DAB1 and DAB2 (Canada only,
if your
radio is equipped with DAB), by performing the
following steps:
m1\/, if \/fly rdi~ ql_lir"p& ).!"lit.c! ?$ATM ss:c!!$e
1. Turn the radio on.
2. Press BAND to select AM, FMI or FM2, or XMl,
XM2, or DABI, DAB2.
3. Tune in the desired station.
4. Press AUTO EQ to select the equalization.
5. Press and hold one of the six numbered
pushbuttons until you hear a beep. Whenever you
press that numbered pushbutton, the station
you set will return and the equalization that you
selected will
also be automatically selected for that
pushbutton.
6. Repeat the steps for each pushbutton.
Setting the Tone (Bassmreble)
AUDIO: Press and release the AUDIO button until
BASS, MID or TREB appears on the display. Press the
knob above the AUDIO button
to extend it, then turn
the knob
to increase or to decrease. If a station is weak
or noisy, you may want to decrease the treble.
Pressing and holding the AUDIO button for at least
two seconds will return
all tone settings, including
ljaiar 1c;e ar~d fade io iiai.
AUTO EQ (Automatic Equalizer): Press this button to
choose bass, midrange and treble equalization
settings designed for country, jazz, talk, pop, rock, and
classical program types.
3-55
Page 170 of 354
Understanding Radio Reception
AM
The range for most AM stations is greater than for FM,
especially at night. The longer range, however, can
cause stations to interfere with each other. AM can pick
up noise from things like storms and power lines. Try
reducing the treble to reduce this noise
if you ever get it.
FM Stereo
FM stereo will give you the best sound, but FM signals
will reach only about
10 to 40 miles (16 to 65 km).
Tall buildings or hills can interfere with FM signals,
causing the sound to come and go.
XMTM Satellite Radio Service
XMTM Satellite Radio gives you digital radio reception
from coast to coast. Just as with FM, tall buildings
or hills can interfere with Satellite radio signals, causing
the sound to come and
so. Your radio may display
“NO SIGNAL” to indicate interference.
DAB Radio
DAB gives you digital radio reception. Just as with FM,
tall buildings or hills can interfere with radio signals,
causing the sound to come and go. Your radio
may display “NO
SIGNAL” to indicate interference,
Care of Your Cassette Tape Player
A tape player that is not cleaned regularly can cause
reduced sound quality, ruined cassettes or a damaged
mechanism. Cassette tapes should be stored in their
cases away from contaminants, direct sunlight and
extreme heat.
If they aren’t, they may not operate
properly or may cause failure of the tape player.
Your tape player should be cleaned regularly after every
50 hours of use. Your radio may display CLEAN
PLAYR to indicate that you have used your tape player
for 50 hours without resetting the tape clean timer.
If
this message appears on the display, your cassette tape
player needs to be cleaned. It will still play tapes, but
you should clean
it as soon as possible to prevent
damage to your tapes and player.
If you notice a
reduction in sound quality, try a known good cassette to
see
if the tape or the tape player is at fault. If this
other cassette has no improvement in sound quality,
clean the tape player.
For best results, use a scrubbing action, non-abrasive
head as the hubs of the cleaner cassette turn. The
recommended cleaning cassette is available through
your dealership.
WGUI III ty baaacttc VVILI I paua VVI IILI I X,IUIJ LI te tape nlhnn;,..r* ,-..-..-.--++e ... :rL ...-A- ..,L:-L *I- - I-.- -
3-65
Page 171 of 354
The cut tape detection feature of your cassette tape
player may identify the cleaning cassette as a damaged
tape, in error. To prevent the cleaning cassette from
being ejected, use the following steps.
1. Turn the ignition on.
2. Turn the radio off.
3. Press and hold the TP CD button for five seconds.
4. Insert the scrubbing action cleaning cassette.
5. Eject the cleaning cassette after the manufacturer’s
recommended cleaning time.
You may also choose a non-scrubbing action, wet-type
cleaner which uses a cassette with a fabric belt to
clean the tape head. This type
of cleaning cassette will
not eject on its own. A non-scrubbing action cleaner
may not clean as thoroughly as the scrubbing type
cleaner. The use of a non-scrubbing action, dry-type
cleaning cassette is not recommended.
After you clean the player, press and hold the eject
button for five seconds to reset the CLEAN PLAYR
indicator. The radio will display CLEANED to show the
indicator was reset.
Cassettes are subject to wear and the sound quality
may degrade over time. Always make sure the cassette
tape is in good condition before you have your tape
player serviced.
Care of Your CDs
Handle discs carefully. Store them in their original cases
or other protective cases and away from direct sunlight
and dust.
If the surface of a disc is soiled, dampen
a clean, soft cloth in a mild, neutral detergent solution
and clean
it, wiping from the center to the edge.
Be sure never to touch the side without writing when
handling discs. Pick up discs by grasping the outer
edges or the edge of the hole and the outer edge.
Care of Your CD Player
The use of CD lens cleaner discs is not advised, due to
the risk of contaminating the lens of the CD optics
with lubricants internal to the CD mechanism.
Backglass Antenna
Your AM-FM antenna is integrated with your rear
window defogger, located in the rear window. Be sure
that the inside surface of the rear window is not
scratched and that the lines on the glass are not
damaged.
If the inside surface is damaged, it could
interfere with radio reception.
3-66
Page 235 of 354
How to Reset the Change Oil Light
The GM Oil Life SystemTM calculates when to change
your engine oil and filter based on vehicle use. Anytime
your oil is changed, reset the system
so it can
calculate when the next oil change is required. If a
situation occurs where you change your oil prior to a
CHANGE OIL light being turned on, reset the system.
After changing the engine oil, the system must be reset.
To reset the oil life indicator, do the following steps:
1. With the ignition key in ON (a short time after
turning
off the engine), press the RESET button
located in the driver's side instrument panel
fuse block. See "Instrument Panel Fuse Block"
under
Fuses and Circuit Breakers on page 5-81.
2. When the CHANGE OIL light starts to flash, press
and hold the RESET button again.
The reset
is complete when you hear the chimes and
the CHANGE
OIL light goes out.
If your vehicle is equipped with a 2.2L L4 ECOTEC
engine, it has a unique oil filter element. When
reinstalling the filter cap do not exceed
18 Ib ft (25 N*m ).
Inspect the condition of the O-ring and replace if
damaged.
See your dealer for additional information.
What to Do with Used Oil
Used engine oil contains certain elements that may be
unhealthy for your skin and could even cause cancer.
Don't let used oil stay on your skin for very long. Clean
your skin and nails with soap and water, or a good
hand cleaner. Wash or properly dispose
of clothing or
rags containing used engine oil. See the manufacturer's
warnings about the use and disposal of oil products.
Used oil can be a threat to the environment. If you
change your own oil, be sure to drain all the oil from the
filter before disposal. Never dispose of oil by putting it
in the trash, pouring it on the ground, into sewers, or into
streams or bodies of water. Instead, recycle it by
taking it to a place that collects used oil.
If you have a
problem properly disposing of your used
oil, ask
your dealer, a service station or a local recycling center
for help.
5-20
Page 273 of 354
Treadwear
The treadwear grade is a comparative rating based on
the wear rate of the tire when tested under controlled
conditions on a specified government test course.
For example, a tire graded
150 would wear one and
a half
(1.5) times as well on the government course as
a tire graded
100. The relative performance of tires
depends upon the actual conditions of their use,
however, and may depart significantly from the norm
due
to variations in driving habits, service practices and
differences in road characteristics and climate.
Traction - AA, A, B, C
The traction grades, from highest to lowest, are AA, A,
B, and C. Those grades represent the tire’s ability
to stop on wet pavement as measured under controlled
conditions on specified government test surfaces of
asphalt and concrete.
A tire marked C may have poor
traction performance. Warning: The traction grade
assigned
to this tire is based on straight-ahead braking
traction tests, and does not include acceleration,
cornering, hydroplaning, or peak traction characteristics.
Temperature - A, B, C
The temperature grades are A (the highest), B, and C,
representing the tire’s resistance to the generation
of heat and its ability
to dissipate heat when tested
under controlled conditions on a specified indoor
laboratory test wheel. Sustained high temperature can cause
the material of the tire to degenerate and reduce
tire life, and excessive temperature can lead
to
sudden tire failure. The grade C corresponds to a level
of performance which all passenger car tires must
meet under the Federal Motor Vehicle Safety Standard
No. 109. Grades B and A represent higher levels of
performance on the laboratory test wheel than the
minimum required by law.
Warning: The temperature grade for this tire is
established for a tire that is properly inflated and not
overloaded. Excessive speed, underinflation, or
excessive loading, either separately or in combination,
can cause heat buildup and possible tire failure.
Wheel Alignment and Tire Balance
The wheels on your vehicle were aligned and balanced
carefully at the factory
to give you the longest tire life
and best overall performance.
Scheduled wheel alignment and wheel balancing are not needed. However,
if you notice unusual tire wear or
your vehicle pulling one way
or the other, the alignment
may need to be reset. If you notice your vehicle
vibrating when driving on a smooth road, your wheels
may need to be rebalanced.
5-58