Page 3515 of 4179

TROUBLE DIAGNOSIS
ATC-119
C
D
E
F
G
H
I
K
L
MA
B
AT C
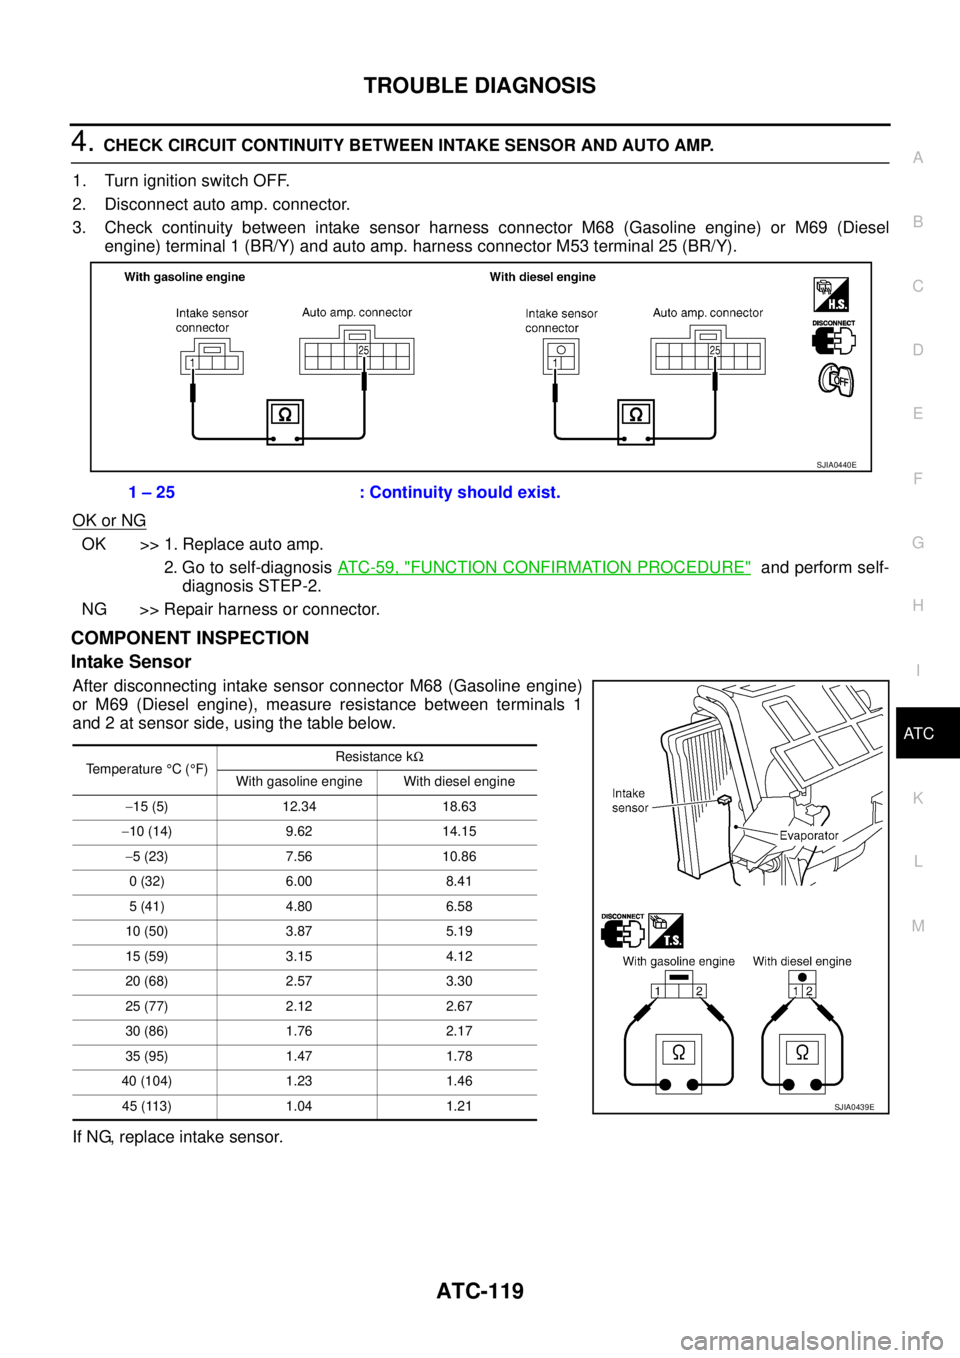
4. CHECK CIRCUIT CONTINUITY BETWEEN INTAKE SENSOR AND AUTO AMP.
1. Turn ignition switch OFF.
2. Disconnect auto amp. connector.
3. Check continuity between intake sensor harness connector M68 (Gasoline engine) or M69 (Diesel
engine) terminal 1 (BR/Y) and auto amp. harness connector M53 terminal 25 (BR/Y).
OK or NG
OK >> 1. Replace auto amp.
2. Go to self-diagnosis AT C - 5 9 , "
FUNCTION CONFIRMATION PROCEDURE" and perform self-
diagnosis STEP-2.
NG >> Repair harness or connector.
COMPONENT INSPECTION
Intake Sensor
After disconnecting intake sensor connector M68 (Gasoline engine)
or M69 (Diesel engine), measure resistance between terminals 1
and 2 at sensor side, using the table below.
If NG, replace intake sensor.1 – 25 : Continuity should exist.
SJIA0440E
Temperature °C (°F)Resistance kΩ
With gasoline engine With diesel engine
−15 (5) 12.34 18.63
−10 (14) 9.62 14.15
−5 (23) 7.56 10.86
0 (32) 6.00 8.41
5 (41) 4.80 6.58
10 (50) 3.87 5.19
15 (59) 3.15 4.12
20 (68) 2.57 3.30
25 (77) 2.12 2.67
30 (86) 1.76 2.17
35 (95) 1.47 1.78
40 (104) 1.23 1.46
45 (113) 1.04 1.21
SJIA0439E
Page 3527 of 4179
HEATER & COOLING UNIT ASSEMBLY
ATC-131
C
D
E
F
G
H
I
K
L
MA
B
AT C
HEATER & COOLING UNIT ASSEMBLYPFP:27110
Removal and InstallationEJS000UT
REMOVAL
1. Use a refrigerant collecting equipment (for HFC-134a) to discharge refrigerant.
2. Drain coolant from cooling system. Refer to CO-9, "
Changing Engine Coolant" for QR engine or CO-31,
"Changing Engine Coolant" for YD engine.
3. Disconnect two heater hoses from heater core pipe.
4. Remove mounting bolt from low-pressure flexible hose.
CAUTION:
Cap or wrap the joint of the pipe with suitable material such
as vinyl tape to avoid the entry of air.
5. Remove the blower unit. Refer to ATC-125, "
BLOWER UNIT" .
6. Remove clips of vehicle harness from steering member.
7. Remove mounting nuts, and then remove instrument stay.
8. Remove mounting bolts from heater & cooling unit.
RJIA0060E
RJIA0061E
RJIA2444E
Page 3528 of 4179
ATC-132
HEATER & COOLING UNIT ASSEMBLY
9. Remove steering member.
10. Remove heater & cooling unit.
CAUTION:
Cap or wrap the joint of the pipe with suitable material such as vinyl tape to avoid the entry of air.
INSTALLATION
Installation is basically the reverse order of removal.
CAUTION:
�Replace the O-ring of the low-pressure flexible hose and the high-pressure pipe with a new one,
and then apply compressor oil to it when installing it.
�When recharging refrigerant, check for leaks.
NOTE:
When filling radiator with coolant, refer to CO-9, "
Changing Engine Coolant" for QR engine or CO-31, "Chang-
ing Engine Coolant" for YD engine.
Disassembly and AssemblyEJS000UU
NOTE:
This illustration is for RHD models. The layout for LHD models is symmetrically opposite.
RJIA2404E
Page 3539 of 4179
REFRIGERANT LINES
ATC-143
C
D
E
F
G
H
I
K
L
MA
B
AT C
ComponentsEJS00287
Refer to page AT C - 5 , "Precautions for Refrigerant Connection" .
WITH GASOLINE ENGINE
NOTE:
This illustration is for RHD models. The blower unit and heater & cooling unit layouts for LHD models are sym-
metrically opposite.
RJIA2843E
Page 3540 of 4179
ATC-144
REFRIGERANT LINES
WITH DIESEL ENGINE
NOTE:
This illustration is for RHD models. The blower unit and heater & cooling unit layouts for LHD models are sym-
metrically opposite.
Removal and Installation of CompressorEJS000V9
REMOVAL
With Gasoline Engine
RJIA2844E
RJIA3185E
Page 3541 of 4179
REFRIGERANT LINES
ATC-145
C
D
E
F
G
H
I
K
L
MA
B
AT C
With Diesel Engine
1. Use a refrigerant collecting equipment (for HFC-134a) to discharge the refrigerant.
2. Remove engine undercover.
3. Remove compressor-alternator belt. Refer to EM-13, "
Removal and Installation" or EM-14, "Removal and
Installation of Drive Belt Auto-Tensioner" for QR engine, EM-132, "Removal and Installation" for YD
engine.
4. Remove mounting nut (bolts) from high-pressure flexible hose
and low-pressure flexible hose.
CAUTION:
Cap or wrap the joint of the pipe with suitable material such
as vinyl tape to avoid the entry of air.
5. Disconnect compressor connector.
RHA667H
RJIA3175E
RJIA0579E
Page 3542 of 4179
ATC-146
REFRIGERANT LINES
6. Remove mounting bolts from compressor.
7. Remove compressor from the lower side of the vehicle.
INSTALLATION
Installation is basically the reverse order of removal.
CAUTION:
�Replace the O-ring of low-pressure flexible hose and high-pressure flexible hose with a new one,
then apply compressor oil to it when installing it.
�When recharging refrigerant, check for leaks.
Removal and Installation of Compressor ClutchEJS000VA
REMOVAL
Overhaul (With Gasoline Engine: CWV-615M Compressor)
1. When removing center bolt, hold clutch disc with wrench.
RJIA0021E
RJIA0580E
RHA136E
Page 3544 of 4179
ATC-148
REFRIGERANT LINES
5. Remove field coil harness clip using a pair of pliers.
6. Remove snap ring using external snap ring pliers.
Overhaul (With Diesel Engine: DKV-11G Compressor)
1. Remove two screws holding connector bracket, thermal protec-
tor to compressor.
2. When removing center bolt, hold clutch disc with clutch disc
wrench.
RHA125F
RHA145E
RHA669H
SHA097EA