Page 3497 of 4179

TROUBLE DIAGNOSIS
ATC-101
C
D
E
F
G
H
I
K
L
MA
B
AT C
Test Reading (YD Engine)
Recirculating-to-discharge Air Temperature Table
Ambient Air Temperature-to-operating Pressure Table
Inside air (Recirculating air) at blower assembly inlet
Discharge air temperature at center ventilator
°C (°F) Relative humidity
%Air temperature
°C (°F)
50 - 6020 (68) 6.5 - 9.0 (44 - 48)
25 (77) 12 - 14 (54 - 57)
30 (86) 15.5 - 18.8 (60 - 66)
35 (95) 20.4 - 24.0 (69 - 75)
60 - 7020 (68) 9.0 - 11.0 (48 - 52)
25 (77) 14.0 - 16.5 (57 - 62)
30 (86) 18.8 - 21.5 (66 - 71)
35 (95) 24 - 27 (75 - 81)
Ambient air
High-pressure (Discharge side)
kPa (bar, kg/cm
2 , psi)Low-pressure (Suction side)
kPa (bar, kg/cm2 , psi) Relative humidity
%Air temperature
°C (°F)
50 - 7020 (68) 765 - 922
(7.65 - 9.22, 7.8 - 9.4, 111 - 134) 177 - 226
(1.77 - 2.26, 1.8 - 2.3, 26 - 33)
25 (77) 922 - 1,020
(9.22 - 10.20, 9.4 - 10.4, 134 - 148) 196 - 245
(1.96 - 2.45, 2.0 - 2.5, 28 - 36)
30 (86)1,177 - 1,451
(11.77 - 14.51, 12.0 - 14.8, 171 - 210) 235 - 284
(2.35 - 2.84, 2.4 - 2.9, 34 - 41)
35 (95)1,373 - 1,667
(13.73 - 16.67, 14.0 - 17.0, 199 - 242) 275 - 333
(2.75 - 3.33, 2.8 - 3.4, 40 - 48)
40 (104)1,618 - 1,961
(16.18 - 19.61, 16.5 - 20.0, 235 - 284)333 - 392
(3.33 - 3.92, 3.4 - 4.0, 48 - 57)
Page 3498 of 4179

ATC-102
TROUBLE DIAGNOSIS
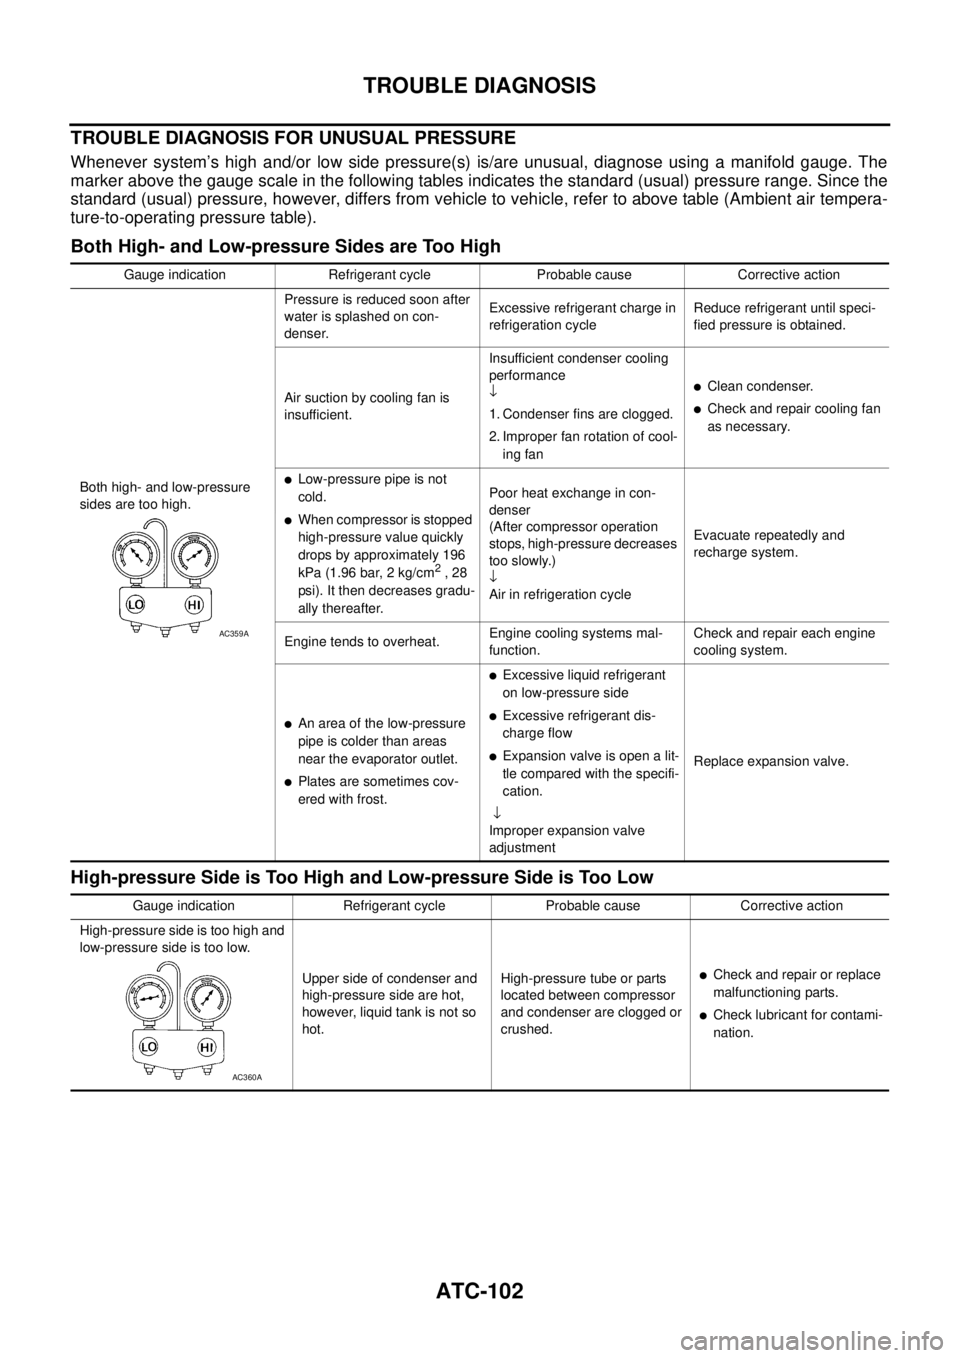
TROUBLE DIAGNOSIS FOR UNUSUAL PRESSURE
Whenever system’s high and/or low side pressure(s) is/are unusual, diagnose using a manifold gauge. The
marker above the gauge scale in the following tables indicates the standard (usual) pressure range. Since the
standard (usual) pressure, however, differs from vehicle to vehicle, refer to above table (Ambient air tempera-
ture-to-operating pressure table).
Both High- and Low-pressure Sides are Too High
High-pressure Side is Too High and Low-pressure Side is Too Low
Gauge indication Refrigerant cycle Probable cause Corrective action
Both high- and low-pressure
sides are too high.Pressure is reduced soon after
water is splashed on con-
denser.Excessive refrigerant charge in
refrigeration cycleReduce refrigerant until speci-
fied pressure is obtained.
Air suction by cooling fan is
insufficient.Insufficient condenser cooling
performance
↓
1. Condenser fins are clogged.
2. Improper fan rotation of cool-
ing fan
�Clean condenser.
�Check and repair cooling fan
as necessary.
�Low-pressure pipe is not
cold.
�When compressor is stopped
high-pressure value quickly
drops by approximately 196
kPa (1.96 bar, 2 kg/cm
2 , 28
psi). It then decreases gradu-
ally thereafter.Poor heat exchange in con-
denser
(After compressor operation
stops, high-pressure decreases
too slowly.)
↓
Air in refrigeration cycleEvacuate repeatedly and
recharge system.
Engine tends to overheat.Engine cooling systems mal-
function.Check and repair each engine
cooling system.
�An area of the low-pressure
pipe is colder than areas
near the evaporator outlet.
�Plates are sometimes cov-
ered with frost.
�Excessive liquid refrigerant
on low-pressure side
�Excessive refrigerant dis-
charge flow
�Expansion valve is open a lit-
tle compared with the specifi-
cation.
↓
Improper expansion valve
adjustmentReplace expansion valve.
AC359A
Gauge indication Refrigerant cycle Probable cause Corrective action
High-pressure side is too high and
low-pressure side is too low.
Upper side of condenser and
high-pressure side are hot,
however, liquid tank is not so
hot.High-pressure tube or parts
located between compressor
and condenser are clogged or
crushed.
�Check and repair or replace
malfunctioning parts.
�Check lubricant for contami-
nation.
AC360A
Page 3499 of 4179

TROUBLE DIAGNOSIS
ATC-103
C
D
E
F
G
H
I
K
L
MA
B
AT C
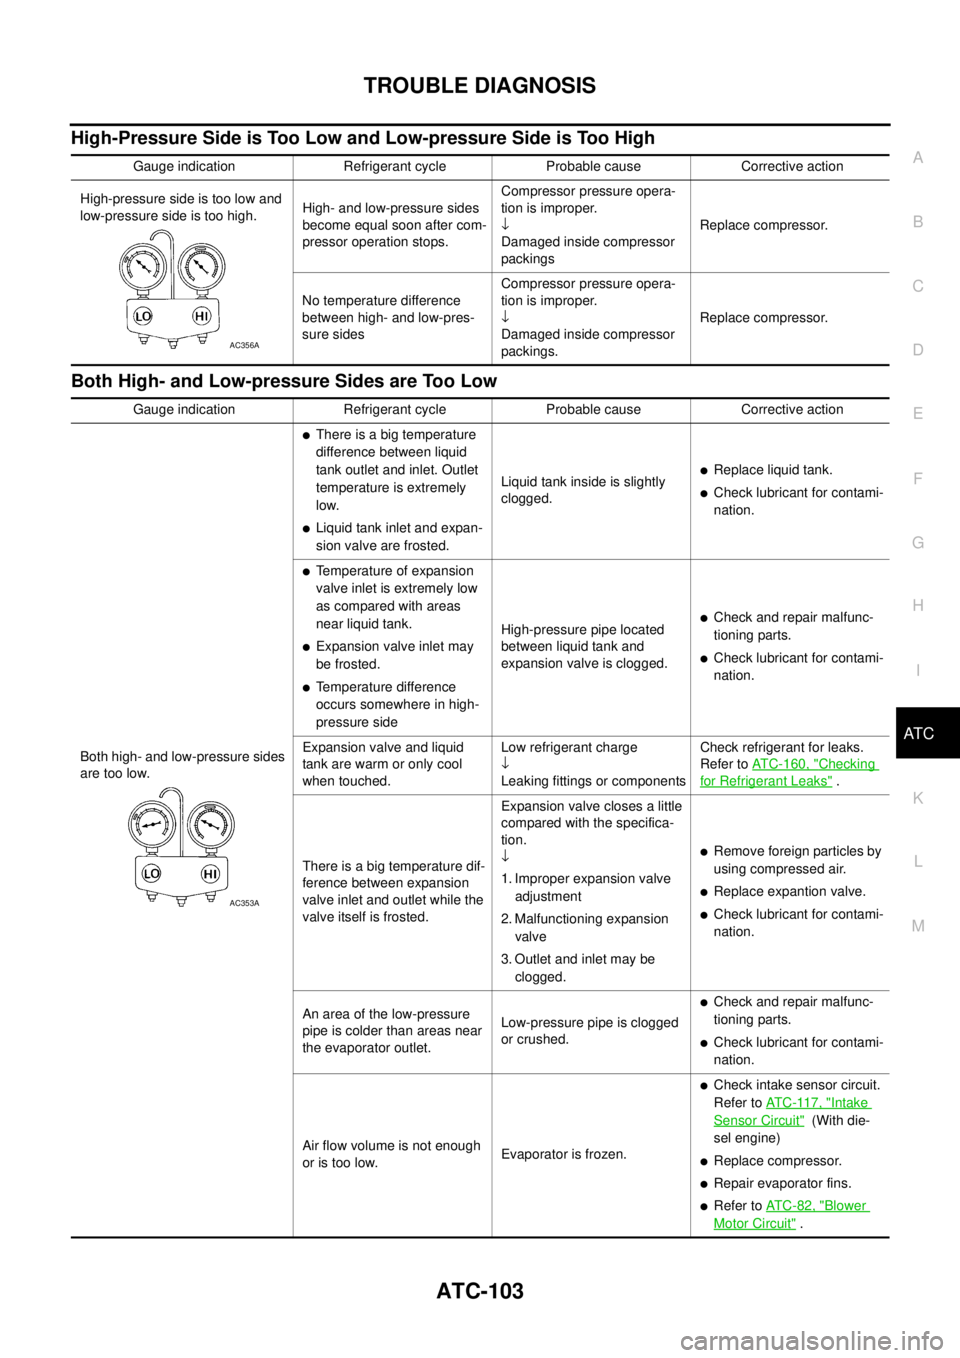
High-Pressure Side is Too Low and Low-pressure Side is Too High
Both High- and Low-pressure Sides are Too Low
Gauge indication Refrigerant cycle Probable cause Corrective action
High-pressure side is too low and
low-pressure side is too high.High- and low-pressure sides
become equal soon after com-
pressor operation stops.Compressor pressure opera-
tion is improper.
↓
Damaged inside compressor
packingsReplace compressor.
No temperature difference
between high- and low-pres-
sure sidesCompressor pressure opera-
tion is improper.
↓
Damaged inside compressor
packings.Replace compressor.
AC356A
Gauge indication Refrigerant cycle Probable cause Corrective action
Both high- and low-pressure sides
are too low.
�There is a big temperature
difference between liquid
tank outlet and inlet. Outlet
temperature is extremely
low.
�Liquid tank inlet and expan-
sion valve are frosted.Liquid tank inside is slightly
clogged.
�Replace liquid tank.
�Check lubricant for contami-
nation.
�Temperature of expansion
valve inlet is extremely low
as compared with areas
near liquid tank.
�Expansion valve inlet may
be frosted.
�Temperature difference
occurs somewhere in high-
pressure sideHigh-pressure pipe located
between liquid tank and
expansion valve is clogged.
�Check and repair malfunc-
tioning parts.
�Check lubricant for contami-
nation.
Expansion valve and liquid
tank are warm or only cool
when touched.Low refrigerant charge
↓
Leaking fittings or componentsCheck refrigerant for leaks.
Refer to ATC-160, "
Checking
for Refrigerant Leaks" .
There is a big temperature dif-
ference between expansion
valve inlet and outlet while the
valve itself is frosted.Expansion valve closes a little
compared with the specifica-
tion.
↓
1. Improper expansion valve
adjustment
2. Malfunctioning expansion
valve
3. Outlet and inlet may be
clogged.
�Remove foreign particles by
using compressed air.
�Replace expantion valve.
�Check lubricant for contami-
nation.
An area of the low-pressure
pipe is colder than areas near
the evaporator outlet.Low-pressure pipe is clogged
or crushed.
�Check and repair malfunc-
tioning parts.
�Check lubricant for contami-
nation.
Air flow volume is not enough
or is too low.Evaporator is frozen.
�Check intake sensor circuit.
Refer to AT C - 11 7 , "
Intake
Sensor Circuit" (With die-
sel engine)
�Replace compressor.
�Repair evaporator fins.
�Refer to AT C - 8 2 , "Blower
Motor Circuit" .
AC353A
Page 3502 of 4179
ATC-106
TROUBLE DIAGNOSIS
*1AT C - 6 5 , "Operational Check".*2ATC-59, "FUNCTION CONFIRMA-
TION PROCEDURE", see No. 1.*3ATC-59, "
FUNCTION CONFIRMA-
TION PROCEDURE", see No. 5 to 7.
*4 QR engine: CO-9, "
Changing
Engine Coolant" or YD engine: CO-
31, "Changing Engine Coolant" .*5 QR engine; CO-13, "
Checking Radi-
ator Cap" or YD engine; CO-35,
"Checking Radiator Cap" .*6 QR engine; (WITH EURO-OBD) EC-
162, "DTC P0117, P0118 ECT SEN-
SOR" .
QR engine; (WITHOOUT EURO-
OBD) EC-597, "
DTC P0117, P0118
ECT SENSOR" .
YD engine; (WITH EURO-OBD) EC-
981, "DTC P0117, P0118 ECT SEN-
SOR" .
YD engine; (WITHOUT EURO-OBD)
EC-1291, "
DTC P0117, P0118 ECT
SENSOR" .
*7AT C - 5 9 , "
FUNCTION CONFIRMA-
TION PROCEDURE", see No. 9.*8ATC-69, "
LAN System Circuit".*9ATC-82, "Blower Motor Circuit".
*10AT C - 7 6 , "
Air Mix Door Motor Cir-
cuit".
Page 3504 of 4179
ATC-108
TROUBLE DIAGNOSIS
Self-diagnosisEJS004H5
SYMPTOM: Self-diagnosis cannot be performed.
INSPECTION FLOW
*1 Compressor clutch ATC-146,
"REMOVAL" .*2 Compressor clutch ATC-150, "INSTALLATION" .*3AT C - 2 4 , "
Maintenance of Lubricant
Quantity in Compressor".
*4ATC-65, "
Operational Check". *5 QR engine; EM-13, "Checking Drive
Belts" or YD engine; EM-131,
"Checking Drive Belts" .
*1ATC-65, "
Operational Check".*2ATC-67, "Power Supply and Ground
Circuit for Auto Amp.".*3AT C - 3 4 , "
SYMPTOM TABLE".
RJIA3109E
Page 3505 of 4179

TROUBLE DIAGNOSIS
ATC-109
C
D
E
F
G
H
I
K
L
MA
B
AT C
Ambient Sensor CircuitEJS004YP
COMPONENT DESCRIPTION
Ambient Sensor
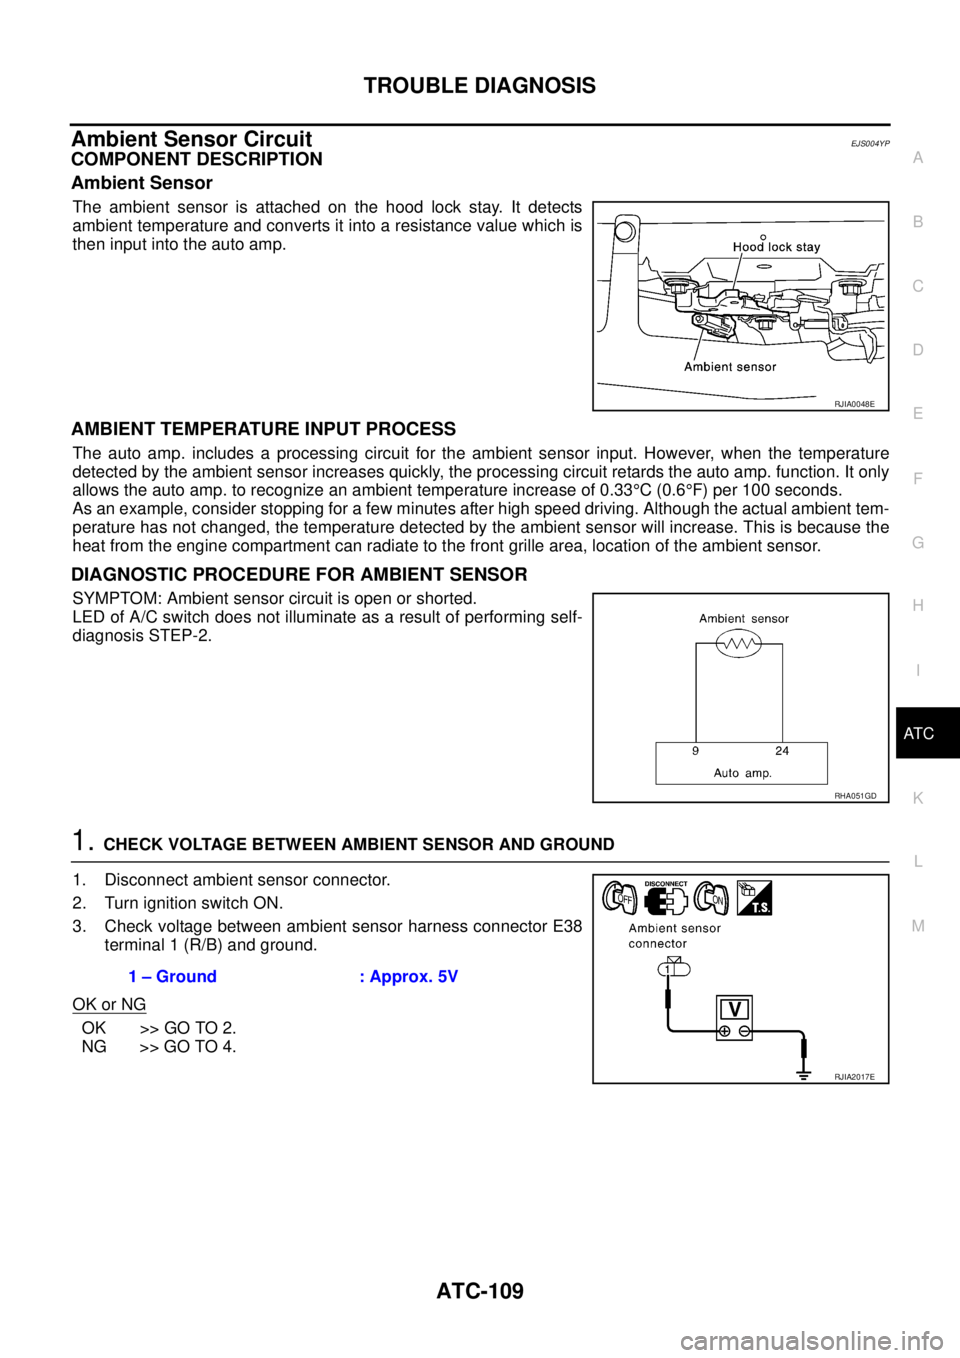
The ambient sensor is attached on the hood lock stay. It detects
ambient temperature and converts it into a resistance value which is
then input into the auto amp.
AMBIENT TEMPERATURE INPUT PROCESS
The auto amp. includes a processing circuit for the ambient sensor input. However, when the temperature
detected by the ambient sensor increases quickly, the processing circuit retards the auto amp. function. It only
allows the auto amp. to recognize an ambient temperature increase of 0.33°C (0.6°F) per 100 seconds.
As an example, consider stopping for a few minutes after high speed driving. Although the actual ambient tem-
perature has not changed, the temperature detected by the ambient sensor will increase. This is because the
heat from the engine compartment can radiate to the front grille area, location of the ambient sensor.
DIAGNOSTIC PROCEDURE FOR AMBIENT SENSOR
SYMPTOM: Ambient sensor circuit is open or shorted.
LED of A/C switch does not illuminate as a result of performing self-
diagnosis STEP-2.
1. CHECK VOLTAGE BETWEEN AMBIENT SENSOR AND GROUND
1. Disconnect ambient sensor connector.
2. Turn ignition switch ON.
3. Check voltage between ambient sensor harness connector E38
terminal 1 (R/B) and ground.
OK or NG
OK >> GO TO 2.
NG >> GO TO 4.
RJIA0048E
RHA051GD
1 – Ground : Approx. 5V
RJIA2017E
Page 3513 of 4179
TROUBLE DIAGNOSIS
ATC-117
C
D
E
F
G
H
I
K
L
MA
B
AT C
Intake Sensor CircuitEJS004L6
COMPONENT DESCRIPTION
Intake Sensor
The intake sensor is located on the heater & cooling unit. It converts
temperature of air after it passes through the evaporator into a resis-
tance value which is then input to the auto amp.
DIAGNOSTIC PROCEDURE FOR INTAKE SENSOR
SYMPTOM: Intake sensor circuit is open or shorted.
LED of A/C switch does not illuminate as a result of performing self-
diagnosis STEP-2.
1. CHECK VOLTAGE BETWEEN INTAKE SENSOR AND GROUND
1. Disconnect intake sensor connector.
2. Turn ignition switch ON.
3. Check voltage between intake sensor harness connector M68 (Gasoline engine) or M69 (Diesel engine)
terminal 1 (BR/Y) and ground.
OK or NG
OK >> GO TO 2.
NG >> GO TO 4.
RJIA0051E
RJIA0567E
1 – Ground : Approx. 5V
RJIA0568E
Page 3514 of 4179
ATC-118
TROUBLE DIAGNOSIS
2. CHECK CIRCUIT CONTINUITY BETWEEN INTAKE SENSOR AND AUTO AMP.
1. Turn ignition switch OFF.
2. Disconnect auto amp. connector.
3. Check continuity between intake sensor harness connector M68 (Gasoline engine) or M69 (Diesel
engine) terminal 2 (B/Y) and auto amp. harness connector M53 terminal 24 (B/Y).
OK or NG
OK >> GO TO 3.
NG >> Repair harness or connector.
3. CHECK INTAKE SENSOR
Refer to AT C - 11 9 , "
Intake Sensor" .
OK or NG
OK >> 1. Replace auto amp.
2. Go to self-diagnosis AT C - 5 9 , "
FUNCTION CONFIRMATION PROCEDURE" and perform self-
diagnosis STEP-2.
NG >> 1. Replace intake sensor.
2. Go to self-diagnosis AT C - 5 9 , "
FUNCTION CONFIRMATION PROCEDURE" and perform self-
diagnosis STEP-2. 2 – 24 : Continuity should exist.
RJIA0569E