Page 3300 of 4179

EI-2 DOOR FINISHER ...................................................... 32
Removal and Installation ........................................ 32
FRONT AND REAR ............................................. 32
BACK DOOR TRIM ................................................... 34
Removal and Installation ........................................ 34
REMOVAL ........................................................... 34
INSTALLATION .................................................... 34
BODY SIDE TRIM ..................................................... 35
Removal and Installation ........................................ 35
CENTER PILLAR LOWER GARNISH ................. 36
CENTER PILLAR UPPER GARNISH .................. 36
LUGGAGE SIDE LOWER FINISHER ................. 36
REAR PILLAR FINISHER ................................... 36
DASHBOARD SIDE FINISHER ........................... 36
BODY SIDE WELT .............................................. 36FLOOR TRIM ............................................................. 38
Removal and Installation ......................................... 38
REMOVAL ............................................................ 38
INSTALLATION .................................................... 38
HEADLINING ............................................................. 39
Removal and Installation ......................................... 39
REMOVAL ............................................................ 39
INSTALLATION .................................................... 40
Page 3333 of 4179
BODY SIDE TRIM
EI-35
C
D
E
F
G
H
J
K
L
MA
B
EI
BODY SIDE TRIMPFP:76913
Removal and InstallationEIS000NB
PIIB0591E
1. Front pillar garnish 2. Dashboard side finisher 3. Front body side welt
4. Front kick panel 5. Center pillar upper garnish 6. Center pillar lower garnish
7. Rear body side welt 8. Rear kick panel 9. Rear pillar finisher
10. Luggage side lower finisher 11. Front luggage floorboard 12. Luggage floor rear spacer (right)
13. Luggage floor rear spacer (center) 14. Luggage floor rear spacer (left) 15. Luggage floorboard (right)
16. Rear luggage floorboard 17. Luggage floorboard (left) 18. Luggage rear plate
19. Back door weather strip 20. Hook 21. Net
22. Tonneau cover
Page 3334 of 4179

EI-36
BODY SIDE TRIM
CENTER PILLAR LOWER GARNISH
Removal
Remove front and rear kick panels.
Installation
Installation is in the reverse order of removal.
CENTER PILLAR UPPER GARNISH
Removal
1. Remove seat belt shoulder anchor bolt. Refer to SB-3, "Removal and Installation of Front Seat Belt" .
2. Remove front and rear kick panels.
3. Remove center pillar lower garnish.
Installation
Installation is in the reverse order of removal.
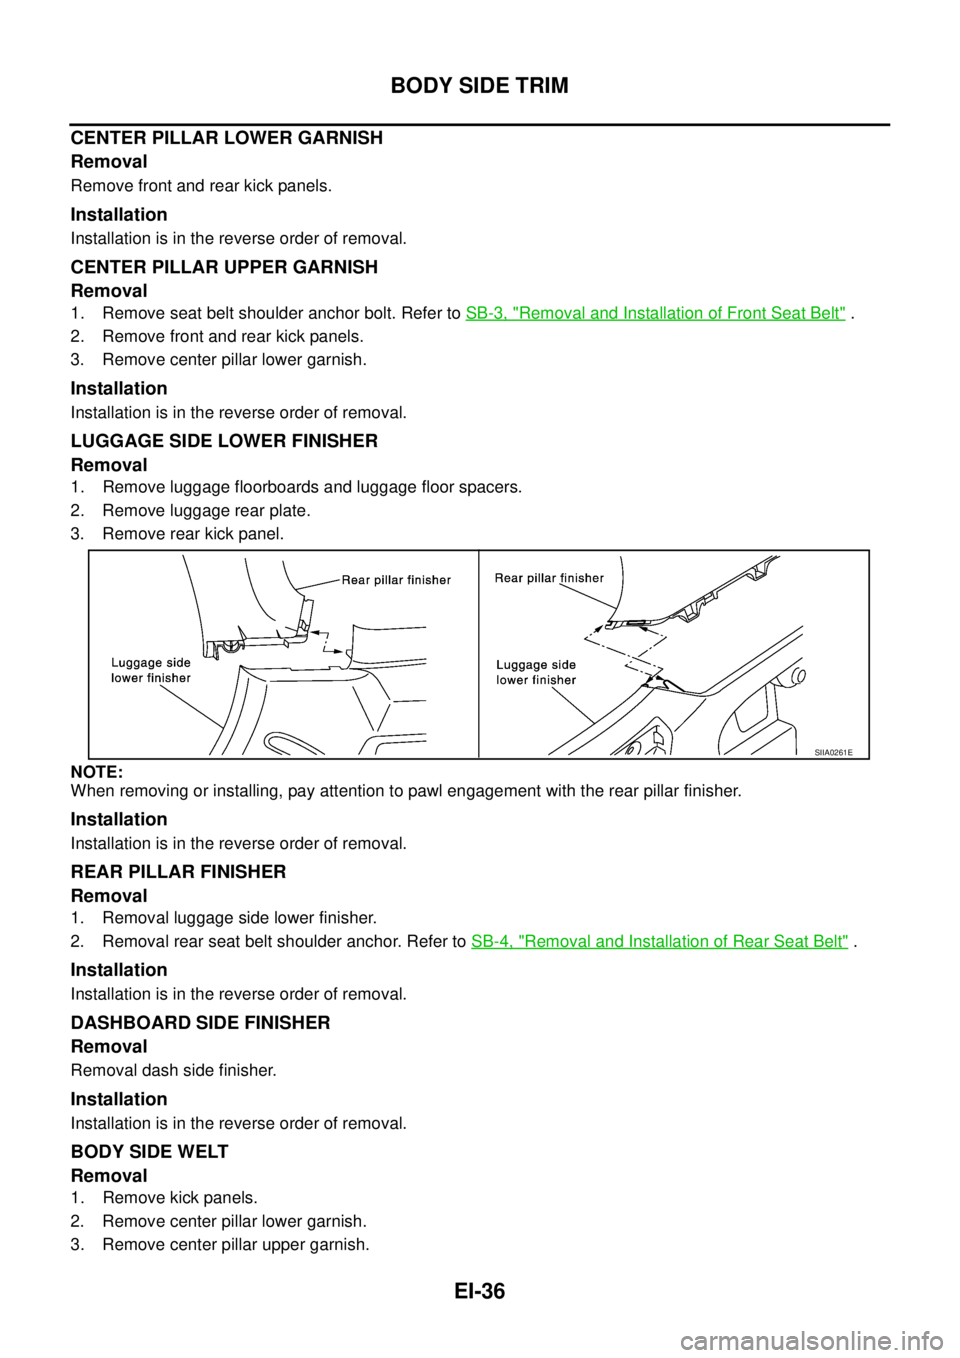
LUGGAGE SIDE LOWER FINISHER
Removal
1. Remove luggage floorboards and luggage floor spacers.
2. Remove luggage rear plate.
3. Remove rear kick panel.
NOTE:
When removing or installing, pay attention to pawl engagement with the rear pillar finisher.
Installation
Installation is in the reverse order of removal.
REAR PILLAR FINISHER
Removal
1. Removal luggage side lower finisher.
2. Removal rear seat belt shoulder anchor. Refer to SB-4, "
Removal and Installation of Rear Seat Belt" .
Installation
Installation is in the reverse order of removal.
DASHBOARD SIDE FINISHER
Removal
Removal dash side finisher.
Installation
Installation is in the reverse order of removal.
BODY SIDE WELT
Removal
1. Remove kick panels.
2. Remove center pillar lower garnish.
3. Remove center pillar upper garnish.
SIIA0261E
Page 3336 of 4179

EI-38
FLOOR TRIM
FLOOR TRIMPFP:74902
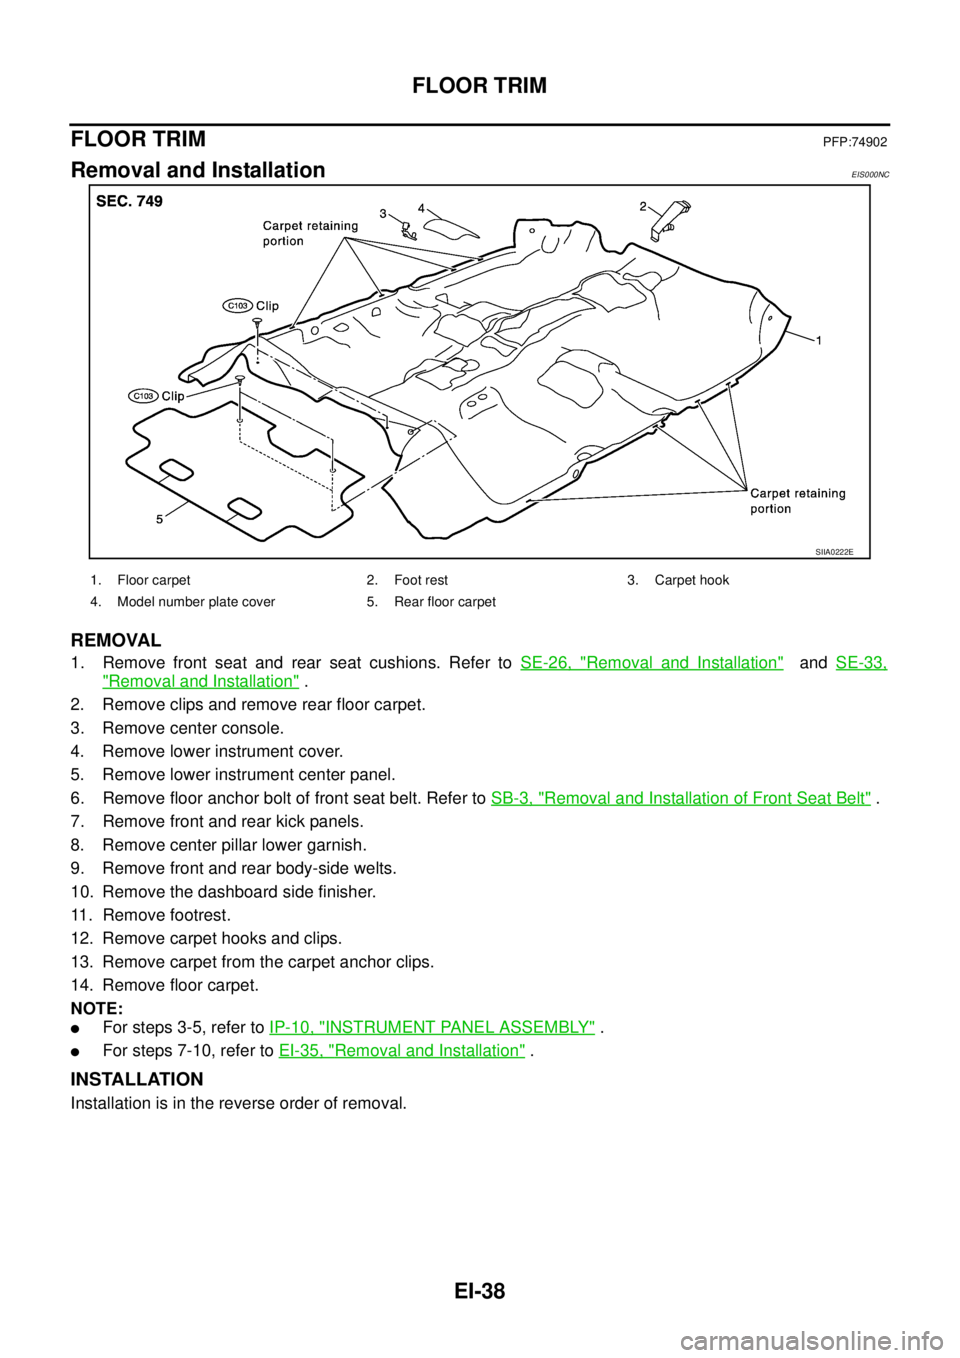
Removal and InstallationEIS000NC
REMOVAL
1. Remove front seat and rear seat cushions. Refer to SE-26, "Removal and Installation" and SE-33,
"Removal and Installation" .
2. Remove clips and remove rear floor carpet.
3. Remove center console.
4. Remove lower instrument cover.
5. Remove lower instrument center panel.
6. Remove floor anchor bolt of front seat belt. Refer to SB-3, "
Removal and Installation of Front Seat Belt" .
7. Remove front and rear kick panels.
8. Remove center pillar lower garnish.
9. Remove front and rear body-side welts.
10. Remove the dashboard side finisher.
11. Remove footrest.
12. Remove carpet hooks and clips.
13. Remove carpet from the carpet anchor clips.
14. Remove floor carpet.
NOTE:
�For steps 3-5, refer to IP-10, "INSTRUMENT PANEL ASSEMBLY" .
�For steps 7-10, refer to EI-35, "Removal and Installation" .
INSTALLATION
Installation is in the reverse order of removal.
SIIA0222E
1. Floor carpet 2. Foot rest 3. Carpet hook
4. Model number plate cover 5. Rear floor carpet