Page 3209 of 4179

REAR WINDOW DEFOGGER
GW-23
C
D
E
F
G
H
J
K
L
MA
B
GW
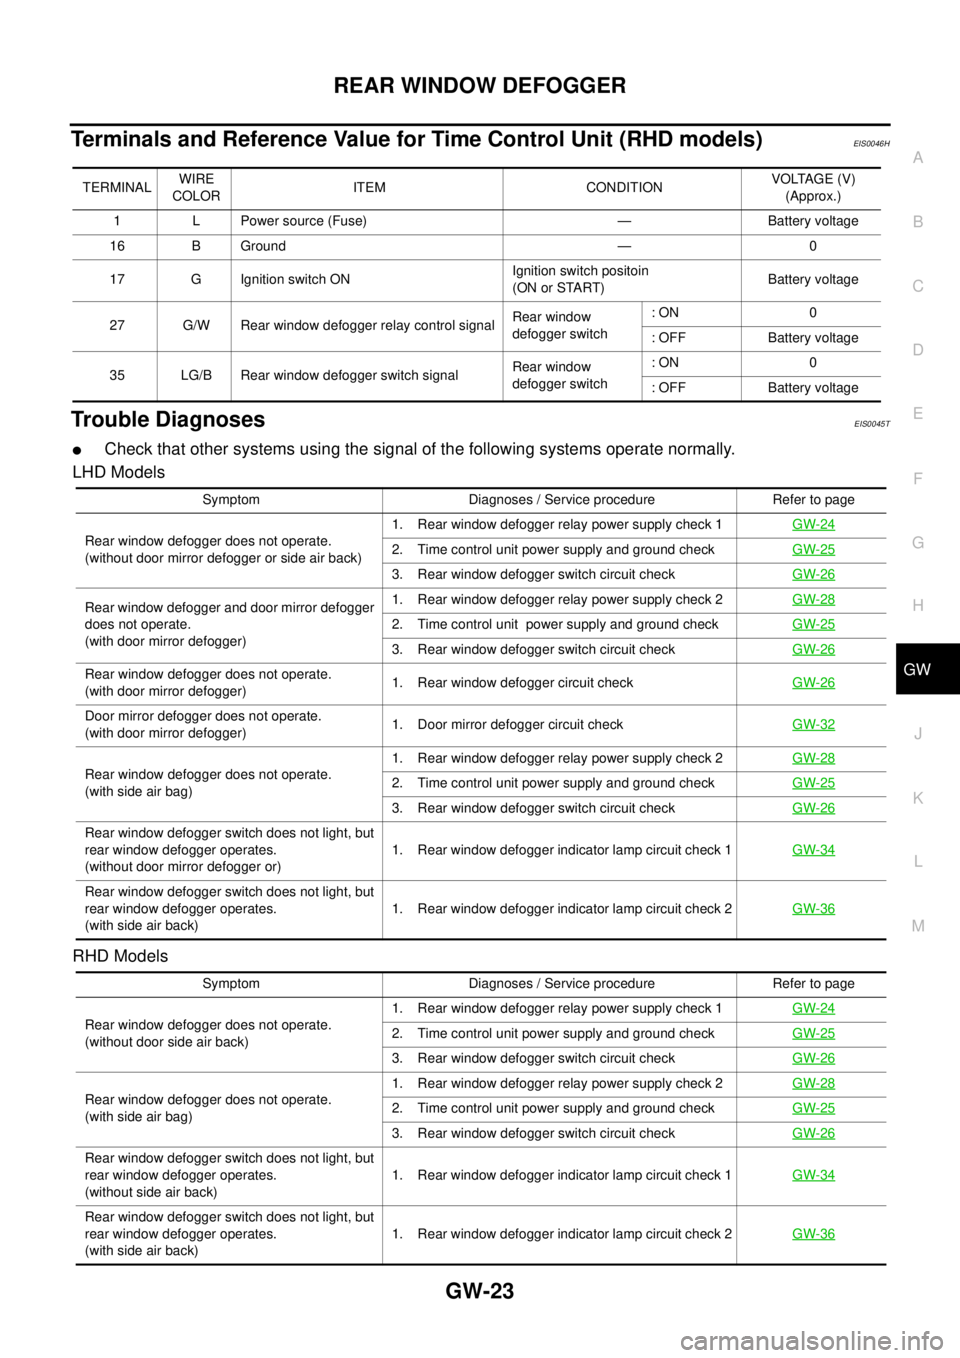
Terminals and Reference Value for Time Control Unit (RHD models)EIS0046H
Trouble DiagnosesEIS0045T
�Check that other systems using the signal of the following systems operate normally.
LHD Models
RHD Models
TERMINALWIRE
COLORITEM CONDITIONVOLTAGE (V)
(Approx.)
1 L Power source (Fuse) — Battery voltage
16 B Ground — 0
17 G Ignition switch ONIgnition switch positoin
(ON or START)Battery voltage
27 G/W Rear window defogger relay control signalRear window
defogger switch : ON 0
: OFF Battery voltage
35 LG/B Rear window defogger switch signalRear window
defogger switch: ON 0
: OFF Battery voltage
Symptom Diagnoses / Service procedure Refer to page
Rear window defogger does not operate.
(without door mirror defogger or side air back)1. Rear window defogger relay power supply check 1GW-24
2. Time control unit power supply and ground checkGW-25
3. Rear window defogger switch circuit checkGW-26
Rear window defogger and door mirror defogger
does not operate.
(with door mirror defogger)1. Rear window defogger relay power supply check 2GW-28
2. Time control unit power supply and ground checkGW-25
3. Rear window defogger switch circuit checkGW-26
Rear window defogger does not operate.
(with door mirror defogger)1. Rear window defogger circuit checkGW-26
Door mirror defogger does not operate.
(with door mirror defogger)1. Door mirror defogger circuit checkGW-32
Rear window defogger does not operate.
(with side air bag)1. Rear window defogger relay power supply check 2GW-282. Time control unit power supply and ground checkGW-25
3. Rear window defogger switch circuit checkGW-26
Rear window defogger switch does not light, but
rear window defogger operates.
(without door mirror defogger or)1. Rear window defogger indicator lamp circuit check 1GW-34
Rear window defogger switch does not light, but
rear window defogger operates.
(with side air back)1. Rear window defogger indicator lamp circuit check 2GW-36
Symptom Diagnoses / Service procedure Refer to page
Rear window defogger does not operate.
(without door side air back)1. Rear window defogger relay power supply check 1GW-24
2. Time control unit power supply and ground checkGW-25
3. Rear window defogger switch circuit checkGW-26
Rear window defogger does not operate.
(with side air bag)1. Rear window defogger relay power supply check 2GW-282. Time control unit power supply and ground checkGW-25
3. Rear window defogger switch circuit checkGW-26
Rear window defogger switch does not light, but
rear window defogger operates.
(without side air back)1. Rear window defogger indicator lamp circuit check 1GW-34
Rear window defogger switch does not light, but
rear window defogger operates.
(with side air back)1. Rear window defogger indicator lamp circuit check 2GW-36
Page 3210 of 4179
![NISSAN X-TRAIL 2003 Service Repair Manual GW-24
REAR WINDOW DEFOGGER
Rear Window Defogger Relay Power Supply Check 1EIS008AL
1. CHECK FUSE
�Check 10A fuse [No. 5, located in fuse block (J/B)]
�Check 20A fuse [No. 25, located in fuse block ( NISSAN X-TRAIL 2003 Service Repair Manual GW-24
REAR WINDOW DEFOGGER
Rear Window Defogger Relay Power Supply Check 1EIS008AL
1. CHECK FUSE
�Check 10A fuse [No. 5, located in fuse block (J/B)]
�Check 20A fuse [No. 25, located in fuse block (](/manual-img/5/57404/w960_57404-3209.png)
GW-24
REAR WINDOW DEFOGGER
Rear Window Defogger Relay Power Supply Check 1EIS008AL
1. CHECK FUSE
�Check 10A fuse [No. 5, located in fuse block (J/B)]
�Check 20A fuse [No. 25, located in fuse block (J/B)]
NOTE:
Refer to GW-17, "
Component Parts and Harness Connector Location"
OK or NG
OK >> GO TO 2.
NG >> If fuse is blown, be sure to eliminate cause of malfunction before installing new fuse. Refer to PG-
2, "POWER SUPPLY ROUTING"
2. CHECK REAR WINDOW DEFOGGER RELAY POWER SUPPLY CIRCUIT
1. Turn ignition switch OFF.
2. Remove rear window defogger relay.
3. Turn ignition switch ON.
4. Check voltage between rear window defogger relay harness
connector B29 terminal 1, 5 and ground.
OK or NG
OK >> GO TO 3.
NG >> Repair or replace harness between fuse block (J/B) and
rear window defogger relay.
3. CHECK REAR WINDOW DEFOGGER RELAY
Check continuity between rear window defogger relay terminal 3 and 5.
OK or NG
OK >> GO TO 4.
NG >> Replace rear window defogger relay1 (G/Y) - Ground : Battery voltage
5 (L/B) - Ground : Battery voltage
PIIA9549E
Terminal Condition Continuity
3512V direct current supply between
terminal 1 and 2Ye s
Not current supply No
PIIA2636J
Page 3211 of 4179

REAR WINDOW DEFOGGER
GW-25
C
D
E
F
G
H
J
K
L
MA
B
GW
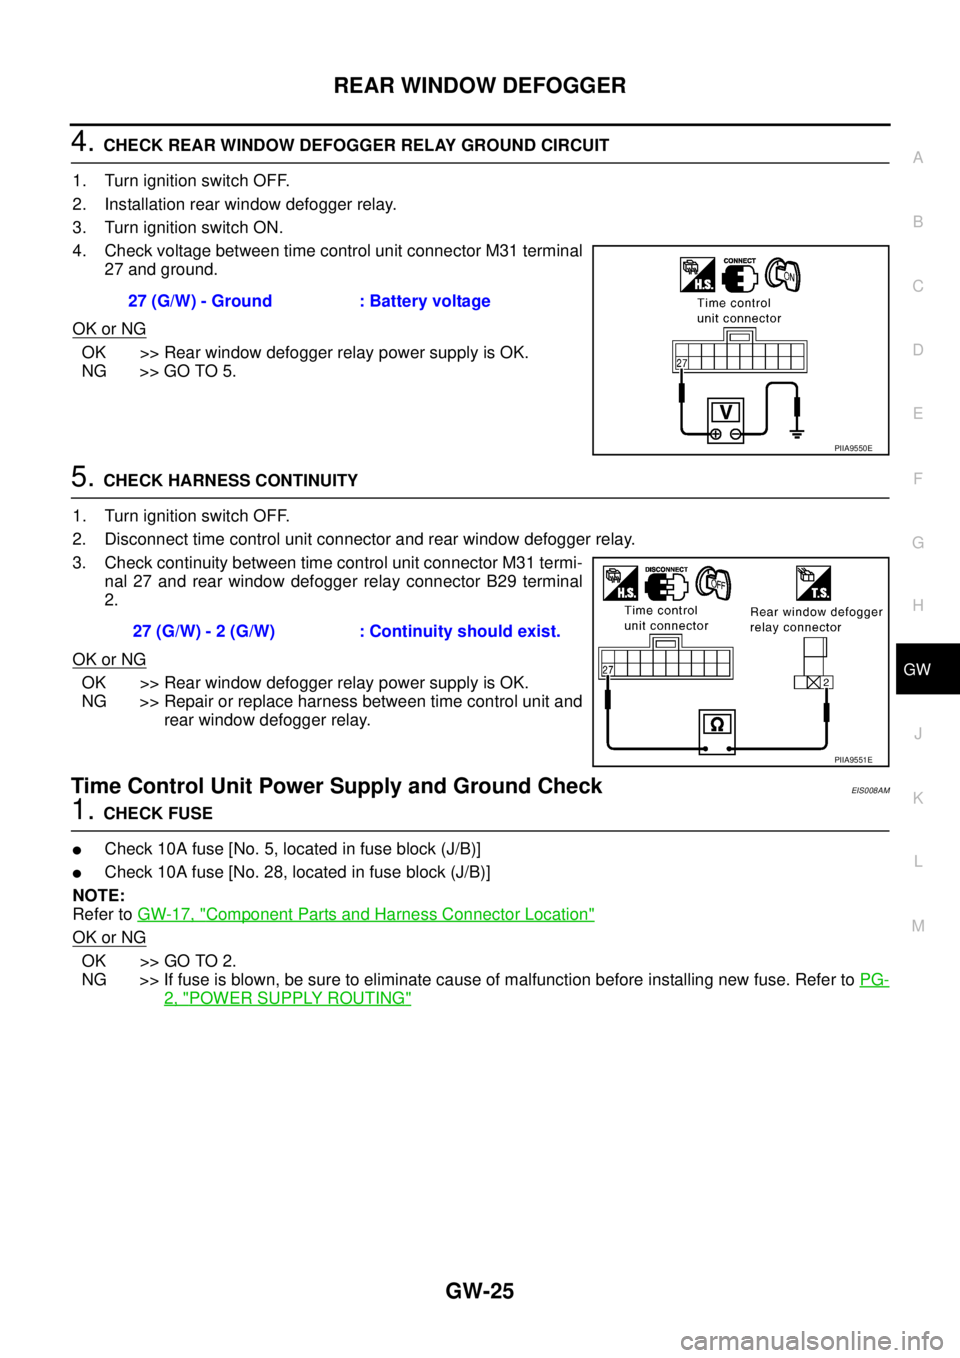
4. CHECK REAR WINDOW DEFOGGER RELAY GROUND CIRCUIT
1. Turn ignition switch OFF.
2. Installation rear window defogger relay.
3. Turn ignition switch ON.
4. Check voltage between time control unit connector M31 terminal
27 and ground.
OK or NG
OK >> Rear window defogger relay power supply is OK.
NG >> GO TO 5.
5. CHECK HARNESS CONTINUITY
1. Turn ignition switch OFF.
2. Disconnect time control unit connector and rear window defogger relay.
3. Check continuity between time control unit connector M31 termi-
nal 27 and rear window defogger relay connector B29 terminal
2.
OK or NG
OK >> Rear window defogger relay power supply is OK.
NG >> Repair or replace harness between time control unit and
rear window defogger relay.
Time Control Unit Power Supply and Ground CheckEIS008AM
1. CHECK FUSE
�Check 10A fuse [No. 5, located in fuse block (J/B)]
�Check 10A fuse [No. 28, located in fuse block (J/B)]
NOTE:
Refer to GW-17, "
Component Parts and Harness Connector Location"
OK or NG
OK >> GO TO 2.
NG >> If fuse is blown, be sure to eliminate cause of malfunction before installing new fuse. Refer to PG-
2, "POWER SUPPLY ROUTING"
27 (G/W) - Ground : Battery voltage
PIIA9550E
27 (G/W) - 2 (G/W) : Continuity should exist.
PIIA9551E
Page 3214 of 4179

GW-28
REAR WINDOW DEFOGGER
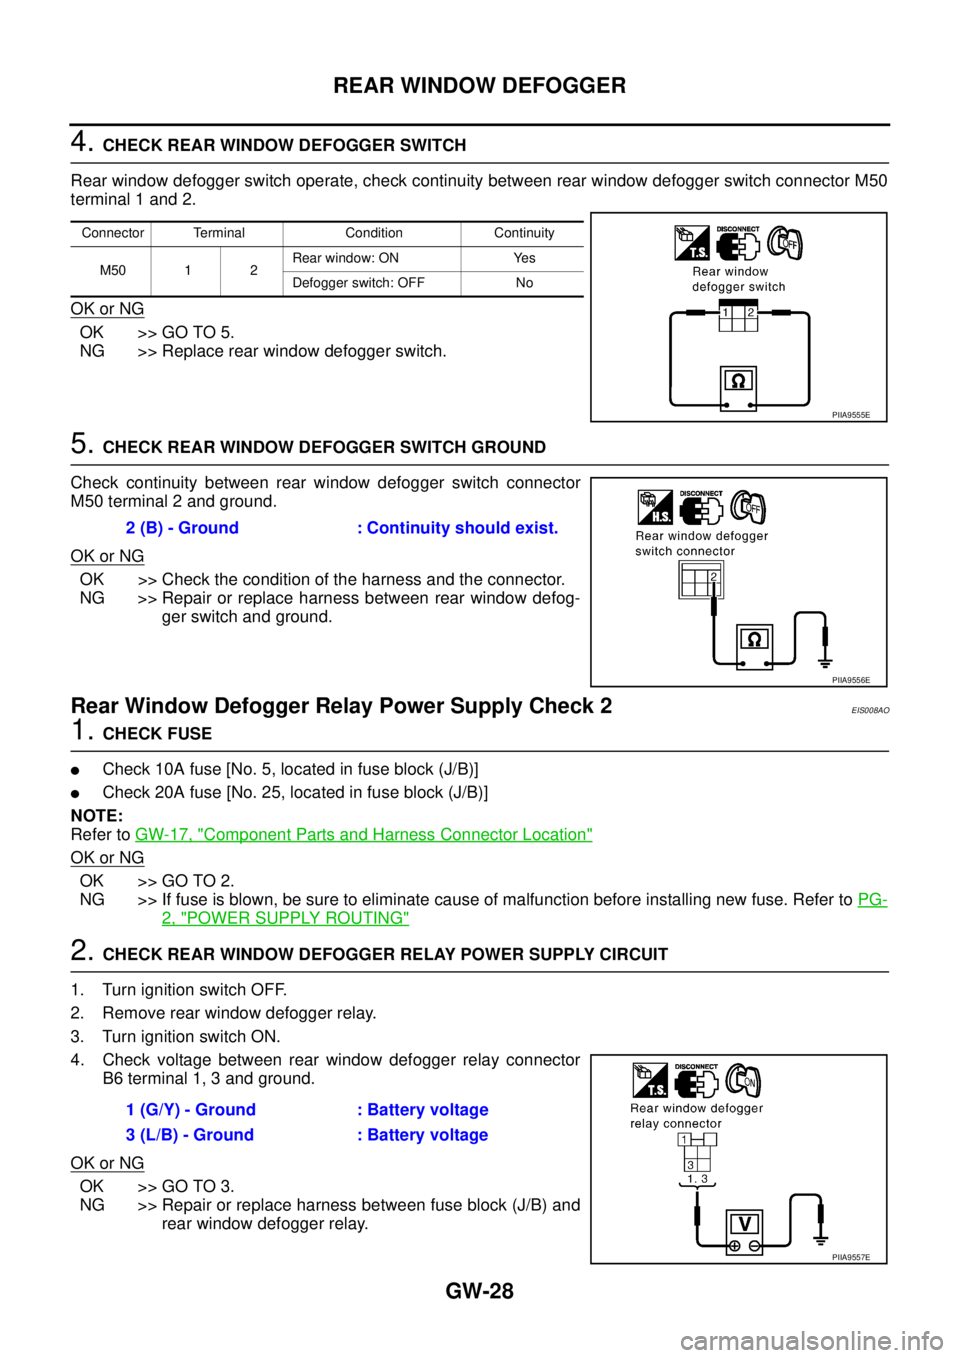
4. CHECK REAR WINDOW DEFOGGER SWITCH
Rear window defogger switch operate, check continuity between rear window defogger switch connector M50
terminal 1 and 2.
OK or NG
OK >> GO TO 5.
NG >> Replace rear window defogger switch.
5. CHECK REAR WINDOW DEFOGGER SWITCH GROUND
Check continuity between rear window defogger switch connector
M50 terminal 2 and ground.
OK or NG
OK >> Check the condition of the harness and the connector.
NG >> Repair or replace harness between rear window defog-
ger switch and ground.
Rear Window Defogger Relay Power Supply Check 2EIS008AO
1. CHECK FUSE
�Check 10A fuse [No. 5, located in fuse block (J/B)]
�Check 20A fuse [No. 25, located in fuse block (J/B)]
NOTE:
Refer to GW-17, "
Component Parts and Harness Connector Location"
OK or NG
OK >> GO TO 2.
NG >> If fuse is blown, be sure to eliminate cause of malfunction before installing new fuse. Refer to PG-
2, "POWER SUPPLY ROUTING"
2. CHECK REAR WINDOW DEFOGGER RELAY POWER SUPPLY CIRCUIT
1. Turn ignition switch OFF.
2. Remove rear window defogger relay.
3. Turn ignition switch ON.
4. Check voltage between rear window defogger relay connector
B6 terminal 1, 3 and ground.
OK or NG
OK >> GO TO 3.
NG >> Repair or replace harness between fuse block (J/B) and
rear window defogger relay.
Connector Terminal Condition Continuity
M50 1 2Rear window: ON Yes
Defogger switch: OFF No
PIIA9555E
2 (B) - Ground : Continuity should exist.
PIIA9556E
1 (G/Y) - Ground : Battery voltage
3 (L/B) - Ground : Battery voltage
PIIA9557E
Page 3218 of 4179
![NISSAN X-TRAIL 2003 Service Repair Manual GW-32
REAR WINDOW DEFOGGER
Door Mirror Defogger Circuit CheckEIS008AQ
1. CHECK FUSE
Check 10A fuse [No.27, located in fuse block (J/B)]
NOTE:
Refer to GW-17, "
Component Parts and Harness Connector NISSAN X-TRAIL 2003 Service Repair Manual GW-32
REAR WINDOW DEFOGGER
Door Mirror Defogger Circuit CheckEIS008AQ
1. CHECK FUSE
Check 10A fuse [No.27, located in fuse block (J/B)]
NOTE:
Refer to GW-17, "
Component Parts and Harness Connector](/manual-img/5/57404/w960_57404-3217.png)
GW-32
REAR WINDOW DEFOGGER
Door Mirror Defogger Circuit CheckEIS008AQ
1. CHECK FUSE
Check 10A fuse [No.27, located in fuse block (J/B)]
NOTE:
Refer to GW-17, "
Component Parts and Harness Connector Location"
OK or NG
OK >> GO TO 2.
NG >> If fuse is blown, be sure to eliminate cause of malfunction before installing new fuse. Refer to PG-
2, "POWER SUPPLY ROUTING"
2. CHECK REAR WINDOW DEFOGGER RELAY POWER SUPPLY CIRCUIT
1. Turn ignition switch OFF.
2. Remove rear window defogger relay.
3. Turn ignition switch ON.
4. Check voltage between rear window defogger relay harness
connector B6 terminal 6 and ground.
OK or NG
OK >> GO TO 3.
NG >> Repair or replace harness between fuse block (J/B) and
rear window defogger relay.
3. CHECK REAR WINDOW DEFOGGER RELAY
Check continuity between rear window defogger relay terminal 6 and 7.
OK or NG
OK >> GO TO 4.
NG >> Replace rear window defogger relay.6 (R/B) - Ground : Battery voltage
PIIA9561E
Terminal Condition Continuity
6712V direct current supply
between terminals 1 and 2Ye s
No current supply No
SEC202B
Page 3226 of 4179

GW-40
POWER WINDOW SYSTEM
POWER WINDOW SYSTEMPFP:25401
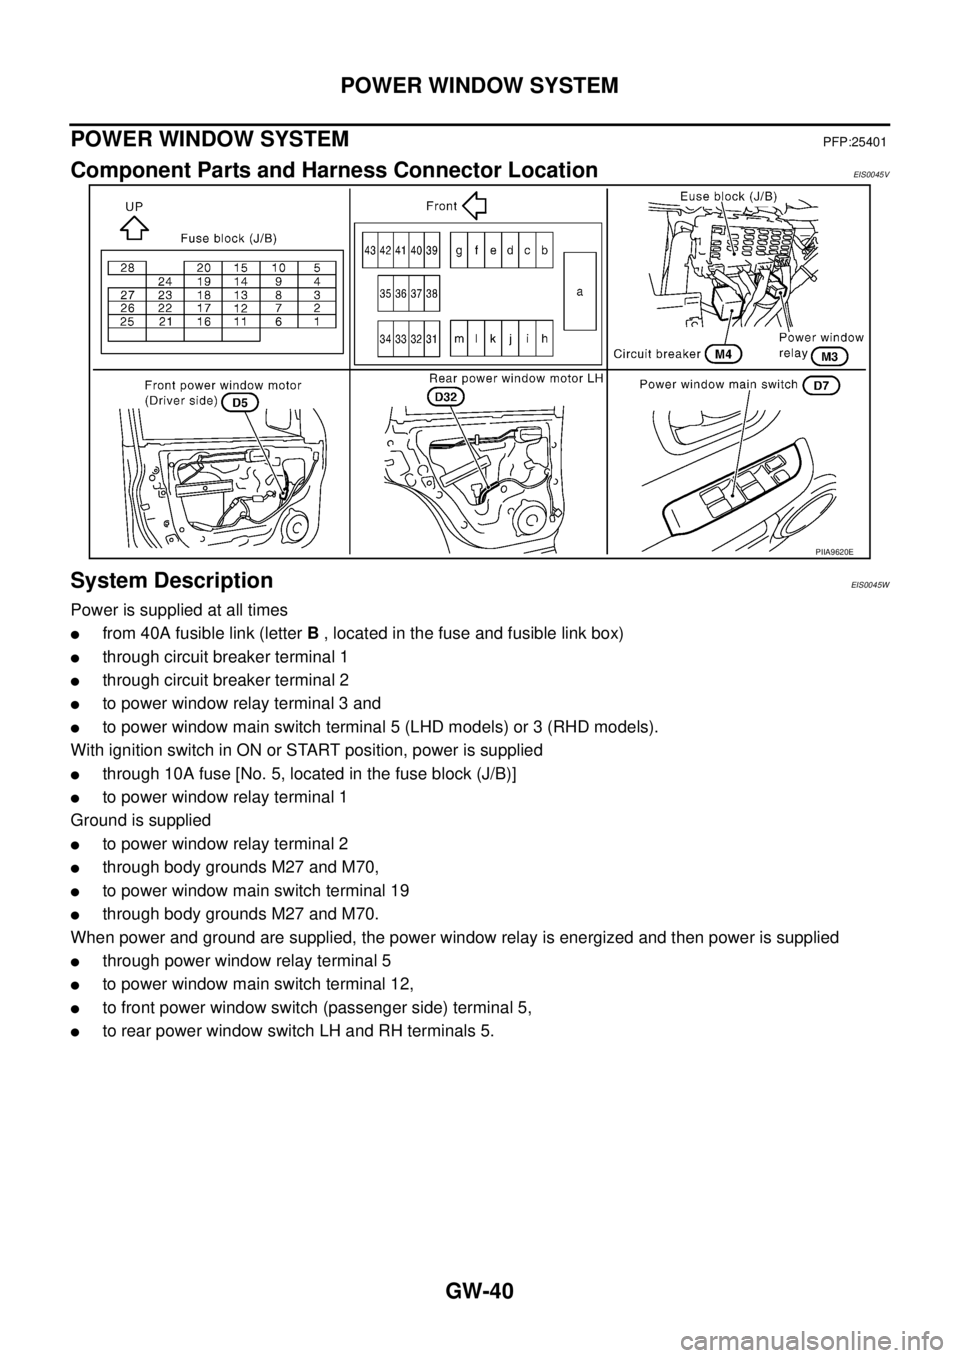
Component Parts and Harness Connector LocationEIS0045V
System DescriptionEIS0045W
Power is supplied at all times
�from 40A fusible link (letter B , located in the fuse and fusible link box)
�through circuit breaker terminal 1
�through circuit breaker terminal 2
�to power window relay terminal 3 and
�to power window main switch terminal 5 (LHD models) or 3 (RHD models).
With ignition switch in ON or START position, power is supplied
�through 10A fuse [No. 5, located in the fuse block (J/B)]
�to power window relay terminal 1
Ground is supplied
�to power window relay terminal 2
�through body grounds M27 and M70,
�to power window main switch terminal 19
�through body grounds M27 and M70.
When power and ground are supplied, the power window relay is energized and then power is supplied
�through power window relay terminal 5
�to power window main switch terminal 12,
�to front power window switch (passenger side) terminal 5,
�to rear power window switch LH and RH terminals 5.
PIIA9620E
Page 3245 of 4179
![NISSAN X-TRAIL 2003 Service Repair Manual POWER WINDOW SYSTEM
GW-59
C
D
E
F
G
H
J
K
L
MA
B
GW
Power Window Relay Power Supply and Ground Circuit CheckEIS008BB
1. CHECK FUSE
�Check 10A fuse [No. 5, located in fuse block (J/B)]
�Check 40A fus NISSAN X-TRAIL 2003 Service Repair Manual POWER WINDOW SYSTEM
GW-59
C
D
E
F
G
H
J
K
L
MA
B
GW
Power Window Relay Power Supply and Ground Circuit CheckEIS008BB
1. CHECK FUSE
�Check 10A fuse [No. 5, located in fuse block (J/B)]
�Check 40A fus](/manual-img/5/57404/w960_57404-3244.png)
POWER WINDOW SYSTEM
GW-59
C
D
E
F
G
H
J
K
L
MA
B
GW
Power Window Relay Power Supply and Ground Circuit CheckEIS008BB
1. CHECK FUSE
�Check 10A fuse [No. 5, located in fuse block (J/B)]
�Check 40A fusible link (litter B , located in the fuse and fusible link box.)
NOTE:
Refer to GW-40, "
Component Parts and Harness Connector Location" .
OK or NG
OK >> GO TO 2.
NG >> If fuse is blown out, be sure to eliminate cause of malfunction before installing new fuse. Refer to
PG-2, "
POWER SUPPLY ROUTING" .
2. CHECK POWER WINDOW RELAY POWER SUPPLY
1. Turn ignition switch OFF.
2. Remove power window relay.
3. Turn ignition switch ON.
4. Check voltage between power window relay connector M3 ter-
minal 1, 3 and ground.
OK or NG
OK >> GO TO 3.
NG >> Check power window relay power supply circuit for open
or short.
3. CHECK POWER WINDOW RELAY GROUND
1. Turn ignition switch OFF.
2. Check continuity between power window relay connector M3
terminal 2 and ground.
OK or NG
OK >> GO TO 4.
NG >> Check power window relay ground circuit for open or
short.
4. CHECK POWER WINDOW RELAY
Check continuity between power window relay terminal 3 and 5.
OK or NG
OK >> Check the condition of the harness and the connector.
NG >> Replace power window relay.1 (G) - Ground : Battery voltage
3 (W) - Ground : Battery voltage
PIIA9574E
2 (B) - Ground : Continuity should exist.
PIIA9575E
Terminal Condition Continuity
3512V direct current supply between
terminals 1 and 2Ye s
No current supply No
PIIA2636E
Page 3279 of 4179
DOOR MIRROR
GW-93
C
D
E
F
G
H
J
K
L
MA
B
GW
ASSEMBLY
1. Install bracket to the electric retracting unit.
2. Connect power unit connector. Install electric retracting unit (bracket).
3. Install electric retracting unit and base to the housing.
4. Place power unit and mirror body assembly in a horizontal position.
5. Engage upper tabs of mirror glass with power unit. Then, press lower part of mirror glass down until the
lower part snaps to allow engagement of lower tabs.
NOTE:
After installation, visually check that the lower tabs (2) are securely engaged when viewed from the bot-
tom of mirror surface.
6. Install the packing to the base.
7. Insert the harness terminal into the connector.
NOTE:
Make sure to insert the harness terminal into the correct connector. Do not confuse the locations.