Page 2106 of 4179
AT-70
[EURO-OBD]
TROUBLE DIAGNOSIS — BASIC INSPECTION
Road TestECS004QT
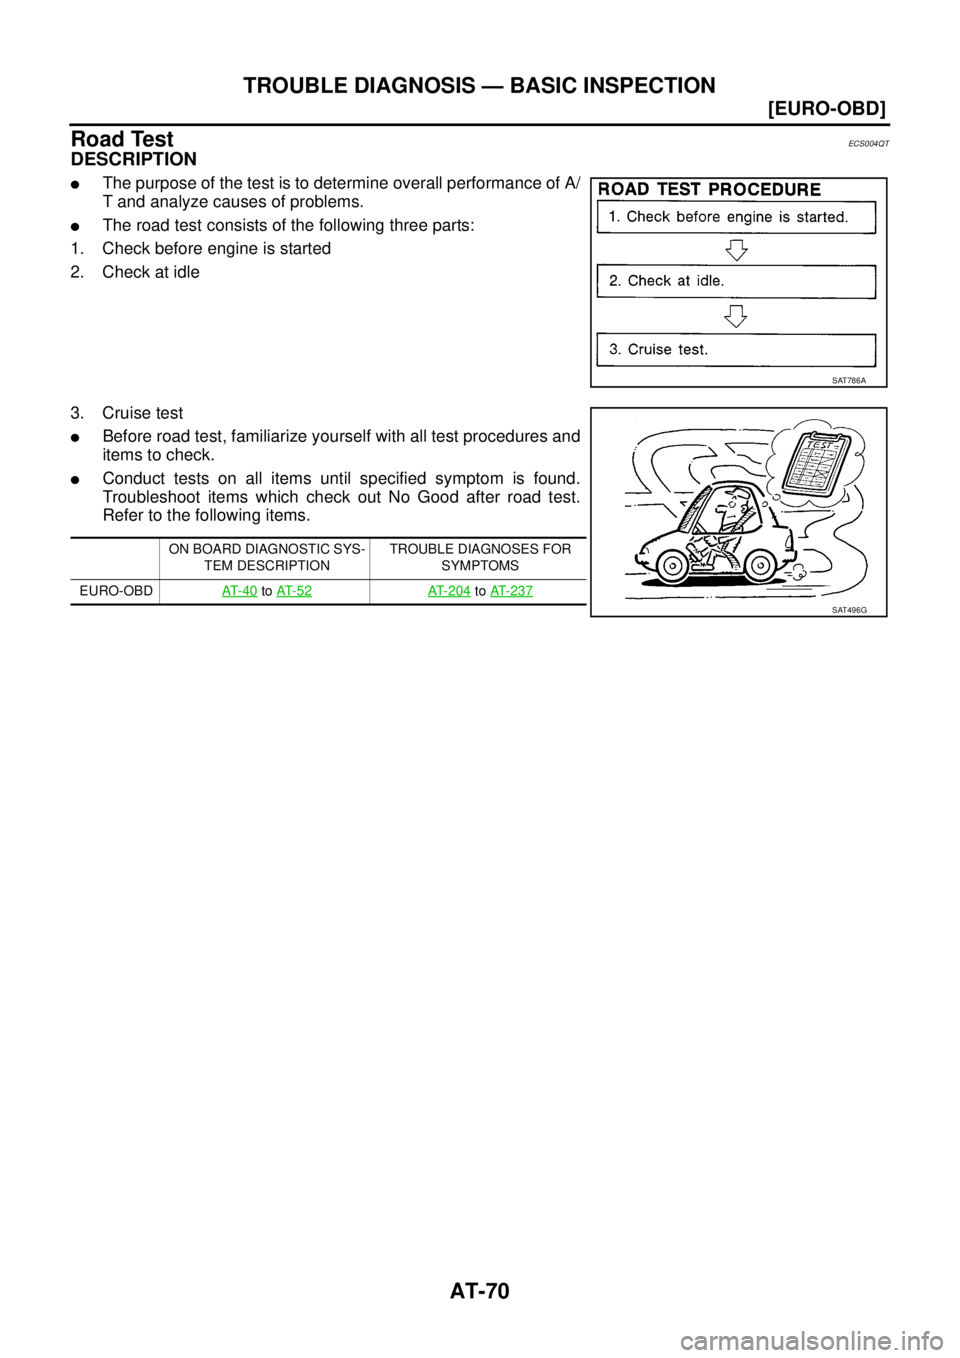
DESCRIPTION
�The purpose of the test is to determine overall performance of A/
T and analyze causes of problems.
�The road test consists of the following three parts:
1. Check before engine is started
2. Check at idle
3. Cruise test
�Before road test, familiarize yourself with all test procedures and
items to check.
�Conduct tests on all items until specified symptom is found.
Troubleshoot items which check out No Good after road test.
Refer to the following items.
SAT786A
ON BOARD DIAGNOSTIC SYS-
TEM DESCRIPTIONTROUBLE DIAGNOSES FOR
SYMPTOMS
EURO-OBDAT- 4 0
to AT- 5 2AT-204 to AT- 2 3 7
SAT496G
Page 2107 of 4179
TROUBLE DIAGNOSIS — BASIC INSPECTION
AT-71
[EURO-OBD]
D
E
F
G
H
I
J
K
L
MA
B
AT
1. CHECK BEFORE ENGINE IS STARTED
1. CHECK O/D OFF INDICATOR LAMP
1. Park vehicle on flat surface.
2. Move selector lever to “P” position.
3. Turn ignition switch OFF. Wait at least 5 seconds.
4. Turn ignition switch ON. (Do not start engine.)
Does O/D OFF indicator lamp come on for about 2 seconds?
YES >> 1. Turn ignition switch OFF.
2. Perform self-diagnosis and note NG items.
Refer to AT- 4 5 , "
SELF-DIAGNOSTIC PROCEDURE
(WITH CONSULT-II)" , AT- 5 2 , "Diagnostic Procedure
Without CONSULT-II" .
3. Go to AT- 7 2 , "
2. CHECK AT IDLE" .
NO >> Stop “Road Test”. Go to AT- 2 0 4 , "
O/D OFF Indicator
Lamp Does Not Come On" .
SAT774B
SCIA5468E
Page 2108 of 4179
![NISSAN X-TRAIL 2003 Service Repair Manual AT-72
[EURO-OBD]
TROUBLE DIAGNOSIS — BASIC INSPECTION
2. CHECK AT IDLE
1. CHECK ENGINE START
1. Park vehicle on flat surface.
2. Turn ignition switch ON. (Do not start engine.)
3. Move selector le](/manual-img/5/57404/w960_57404-2107.png "NISSAN X-TRAIL 2003 Service Repair Manual AT-72
[EURO-OBD]
TROUBLE DIAGNOSIS — BASIC INSPECTION
2. CHECK AT IDLE
1. CHECK ENGINE START
1. Park vehicle on flat surface.
2. Turn ignition switch ON. (Do not start engine.)
3. Move selector le")
AT-72
[EURO-OBD]
TROUBLE DIAGNOSIS — BASIC INSPECTION
2. CHECK AT IDLE
1. CHECK ENGINE START
1. Park vehicle on flat surface.
2. Turn ignition switch ON. (Do not start engine.)
3. Move selector lever to “P” or “N” position.
4. Turn ignition switch START position.
Is engine started?
YES >> GO TO 2.
NO >>
�Stop “Road Test”. Mark the box on the “DIAGNOSTIC
WORKSHEET”. Refer to AT- 5 8
.
�GO TO AT- 2 0 6 , "Engine Cannot Be Started In “P” and
“N” Position" .
2. CHECK ENGINE START
1. Turn ignition switch ON. (Do not start engine.)
2. Move selector lever to “R”, “D”, “2” or “1” position.
3. Turn ignition switch START position.
Is engine started?
YES >>�Stop “Road Test”. Mark the box on the “DIAGNOSTIC
WORKSHEET”. Refer to AT- 5 8
.
�GO TO AT- 2 0 6 , "Engine Cannot Be Started In “P” and
“N” Position" .
�Continue “Road Test”.
NO >> GO TO 3.
3. CHECK VEHICLE MOVE
1. Move selector lever to “P” position.
2. Turn ignition switch OFF.
3. Release parking brake.
4. Push vehicle forward or backward.
Does vehicle move when it is pushed forward or backyard?
YES >>�Mark the box on the “DIAGNOSTIC WORKSHEET”.
Refer to AT- 5 8
.
�GO TO AT- 2 0 7 , "In “P” Position, Vehicle Moves For-
ward Or Backward When Pushed" .
�Continue “Road Test”.
NO >> GO TO 4.
SAT769B
SAT770B
SAT768B
SAT796A
Page 2109 of 4179
![NISSAN X-TRAIL 2003 Service Repair Manual TROUBLE DIAGNOSIS — BASIC INSPECTION
AT-73
[EURO-OBD]
D
E
F
G
H
I
J
K
L
MA
B
AT
4. CHECK VEHICLE MOVE
1. Apply parking brake.
2. Start engine.
3. Move selector lever to “N” position.
4. Releas](/manual-img/5/57404/w960_57404-2108.png "NISSAN X-TRAIL 2003 Service Repair Manual TROUBLE DIAGNOSIS — BASIC INSPECTION
AT-73
[EURO-OBD]
D
E
F
G
H
I
J
K
L
MA
B
AT
4. CHECK VEHICLE MOVE
1. Apply parking brake.
2. Start engine.
3. Move selector lever to “N” position.
4. Releas")
TROUBLE DIAGNOSIS — BASIC INSPECTION
AT-73
[EURO-OBD]
D
E
F
G
H
I
J
K
L
MA
B
AT
4. CHECK VEHICLE MOVE
1. Apply parking brake.
2. Start engine.
3. Move selector lever to “N” position.
4. Release parking brake.
Does vehicle move forward or backward?
YES >>�Mark the box on the “DIAGNOSTIC WORKSHEET”.
Refer to AT- 5 8
.
�GO TO AT- 2 0 8 , "In “N” Position, Vehicle Moves" .
�Continue “Road Test”.
NO >> GO TO 5.
5. CHECK SHIFT SHOCK
1. Apply foot brake.
2. Move selector lever to “R” position.
Is there large shock when changing from
“N” to “R” position?
YES >>�Mark the box on the “DIAGNOSTIC WORKSHEET”.
Refer to AT- 5 8
.
�GO TO AT- 2 0 9 , "Large Shock. “N” → “R” Position" .
�Continue “Road Test”.
NO >> GO TO 6.
6. CHECK VEHICLE MOVE
Release foot brake for several seconds.
Does vehicle creep backward when foot brake is released?
YES >> GO TO 7.
NO >>
�Mark the box on the “DIAGNOSTIC WORKSHEET”.
Refer to AT- 5 8
.
�GO TO AT- 2 1 0 , "Vehicle Does Not Creep Backward
In “R” Position" .
�Continue “Road Test”.
SAT771B
SAT797A
SAT772B
SAT799A
Page 2110 of 4179
AT-74
[EURO-OBD]
TROUBLE DIAGNOSIS — BASIC INSPECTION
7. CHECK VEHICLE MOVE
Move selector lever to “D”, “2” and “1” positions and check if vehicle
creeps forward.
Does vehicle creep forward in all three positions?
YES >> Go to AT- 7 4 , "3. CRUISE TEST" .
NO >>
�Mark the box on the “DIAGNOSTIC WORKSHEET”.
Refer to AT- 5 8
.
�GO TO AT- 2 1 2 , "Vehicle Does Not Creep Forward In
“D”, “2” Or “1” Position" .
�Continue “Road Test”.
3. CRUISE TEST
�Check all items listed in Parts 1 through 3.
With CONSULT-II
�Using CONSULT-II, conduct a cruise test and record the result.
�Print the result and ensure that shifts and lock-ups take place as
per Shift Schedule.
CONSULT-II Setting Procedure
1. Turn ignition switch ON. (Do not start engine.)
2. Touch “START (NISSAN BASED VHCL)”.
3. Touch “A/T”.
If “A/T” is not indicated, go to GI-35, "
CONSULT-II Data Link
Connector (DLC) Circuit" .
SAT773B
SAT601J
SAIA0450E
SAT014K
Page 2114 of 4179
AT-78
[EURO-OBD]
TROUBLE DIAGNOSIS — BASIC INSPECTION
Cruise Test — Part 1
1. CHECK STARTING GEAR (D1 ) POSITION
1. Drive vehicle for approximately 10 minutes to warm engine oil and ATF up to operating temperature.
2. Park vehicle on flat surface.
3. Set overdrive control switch to ON position.
4. Move selector lever to “P” position.
5. Start engine.
6. Move selector lever to “D” position.
7. Accelerate vehicle by constantly depressing accelerator pedal
half-way.
Read gear position. Refer to AT- 4 6 , "
DATA MONITOR
MODE (A/T)" .
Does vehicle start from D
1 ?
YES >> GO TO 2.
NO >>
�Mark the box on the “DIAGNOSTIC WORKSHEET”.
Refer to AT- 5 8
.
�GO TO AT- 2 1 4 , "Vehicle Cannot Be Started From D1"
.
�Continue “Road Test”. ATF operating temperature: 50 - 80°C (122 - 176°F)
SAT774B
SAT775B
SAT495G
Page 2116 of 4179
![NISSAN X-TRAIL 2003 Service Repair Manual AT-80
[EURO-OBD]
TROUBLE DIAGNOSIS — BASIC INSPECTION
5. CHECK LOCK-UP (D4 TO D4 L/U)
Check lock-up (D
4 to D4 L/U).
Specified speed when lock-up occurs. Refer to AT- 5 3 0 , "
VEHICLE SPEED WH](/manual-img/5/57404/w960_57404-2115.png "NISSAN X-TRAIL 2003 Service Repair Manual AT-80
[EURO-OBD]
TROUBLE DIAGNOSIS — BASIC INSPECTION
5. CHECK LOCK-UP (D4 TO D4 L/U)
Check lock-up (D
4 to D4 L/U).
Specified speed when lock-up occurs. Refer to AT- 5 3 0 , \"
VEHICLE SPEED WH")
AT-80
[EURO-OBD]
TROUBLE DIAGNOSIS — BASIC INSPECTION
5. CHECK LOCK-UP (D4 TO D4 L/U)
Check lock-up (D
4 to D4 L/U).
Specified speed when lock-up occurs. Refer to AT- 5 3 0 , "
VEHICLE SPEED WHEN PERFORMING LOCK-UP"
.
Read vehicle speed, throttle opening when lock-up duty
becomes 94%. Refer to AT- 4 6 , "
DATA MONITOR MODE (A/T)" .
Does A/T perform lock-up at the specified speed?
YES >> GO TO 6.
NO >>
�Mark the box on the “DIAGNOSTIC WORKSHEET”.
Refer to AT- 5 8
.
�GO TO AT- 2 2 4 , "A/T Does Not Perform Lock-up" .
�Continue “Road Test”.
6. CHECK LOCK-UP HOLD
Check lock-up hold.
When lock-up duty becomes 94%. Refer to AT- 4 6 , "
DATA MONITOR MODE (A/T)" .
Does A/T hold lock-up condition for more than 30 seconds?
YES >> GO TO 7.
NO >>
�Mark the box on the “DIAGNOSTIC WORKSHEET”. Refer to AT- 5 8 .
�GO TO AT- 2 2 5 , "A/T Does Not Hold Lock-up Condition" .
�Continue “Road Test”.
7. CHECK SHIFT-DOWN (D4 L/U TO D4 )
Release accelerator pedal.
When lock-up duty becomes 4%. Refer to AT- 4 6 , "
DATA
MONITOR MODE (A/T)" .
Is lock-up released when accelerator pedal is released?
YES >> GO TO 8.
NO >>
�Mark the box on the “DIAGNOSTIC WORKSHEET”.
Refer to AT- 5 8
.
�GO TO AT- 2 2 7 , "Lock-up Is Not Released" .
�Continue “Road Test”.
8. CHECK SHIFT-DOWN (D4 TO D3 )
Decelerate vehicle by applying foot brake lightly.
Read gear position and engine speed. Refer to AT- 4 6 , "
DATA
MONITOR MODE (A/T)" .
Does engine speed return to idle smoothly when A/T is shifted from
D4 to D3 ?
YES >> 1. Stop vehicle.
2. Go to AT- 8 1 , "
Cruise Test — Part 2" .
NO >>
�Mark the box on the “DIAGNOSTIC WORKSHEET”.
Refer to AT- 5 8
.
�GO TO AT- 2 2 8 , "Engine Speed Does Not Return To
Idle (Light Braking D4 → D3 )" .
�Continue “Road Test”.
SAT957I
SAT958I
SAT959I
Page 2118 of 4179
![NISSAN X-TRAIL 2003 Service Repair Manual AT-82
[EURO-OBD]
TROUBLE DIAGNOSIS — BASIC INSPECTION
4. CHECK SHIFT-UP (D3 TO D4 ) AND ENGINE BRAKE
Release accelerator pedal after shifting from D
2 to D3 .
Read gear position, throttle open](/manual-img/5/57404/w960_57404-2117.png "NISSAN X-TRAIL 2003 Service Repair Manual AT-82
[EURO-OBD]
TROUBLE DIAGNOSIS — BASIC INSPECTION
4. CHECK SHIFT-UP (D3 TO D4 ) AND ENGINE BRAKE
Release accelerator pedal after shifting from D
2 to D3 .
Read gear position, throttle open")
AT-82
[EURO-OBD]
TROUBLE DIAGNOSIS — BASIC INSPECTION
4. CHECK SHIFT-UP (D3 TO D4 ) AND ENGINE BRAKE
Release accelerator pedal after shifting from D
2 to D3 .
Read gear position, throttle opening and vehicle speed.
Refer to AT- 4 6 , "
DATA MONITOR MODE (A/T)" .
Does A/T shift from D
3 to D4 and does vehicle decelerate by engine
brake?
YES >> 1. Stop vehicle.
2. Go to AT- 8 2 , "
Cruise Test — Part 3" .
NO >>
�Mark the box on the “DIAGNOSTIC WORKSHEET”.
Refer to AT- 5 8
.
�GO TO AT- 2 2 2 , "A/T Does Not Shift: D3 → D4" .
�Continue “Road Test”.
Cruise Test — Part 3
1. CHECK SHIFT-DOWN (D4 TO 33 )
1. Confirm overdrive control switch is ON position.
2. Confirm gear selector lever is in “D” position.
3. Accelerate vehicle using half-throttle to D
4 .
4. Release accelerator pedal.
5. Set overdrive control switch to OFF position while driving in D
4 .
Read gear position and vehicle speed. Refer to AT- 4 6 ,
"DATA MONITOR MODE (A/T)" .
Does A/T shift from D
4 to D3 (O/D OFF)?
YES >> GO TO 2.
NO >>
�Mark the box on the “DIAGNOSTIC WORKSHEET”.
Refer to AT- 5 8
.
�GO TO AT- 2 3 1 , "A/T Does Not Shift: D4 → D3 , When
Overdrive Control Switch “ON” → “OFF”" .
�Continue “Road Test”.
SAT405H
SAT812A
SAT813A
SAT776BA
![NISSAN X-TRAIL 2003 Service Repair Manual TROUBLE DIAGNOSIS — BASIC INSPECTION
AT-71
[EURO-OBD]
D
E
F
G
H
I
J
K
L
MA
B
AT
1. CHECK BEFORE ENGINE IS STARTED
1. CHECK O/D OFF INDICATOR LAMP
1. Park vehicle on flat surface.
2. Move selector](/manual-img/5/57404/w960_57404-2106.png "NISSAN X-TRAIL 2003 Service Repair Manual TROUBLE DIAGNOSIS — BASIC INSPECTION
AT-71
[EURO-OBD]
D
E
F
G
H
I
J
K
L
MA
B
AT
1. CHECK BEFORE ENGINE IS STARTED
1. CHECK O/D OFF INDICATOR LAMP
1. Park vehicle on flat surface.
2. Move selector")
![NISSAN X-TRAIL 2003 Service Repair Manual AT-74
[EURO-OBD]
TROUBLE DIAGNOSIS — BASIC INSPECTION
7. CHECK VEHICLE MOVE
Move selector lever to “D”, “2” and “1” positions and check if vehicle
creeps forward.
Does vehicle creep fo](/manual-img/5/57404/w960_57404-2109.png "NISSAN X-TRAIL 2003 Service Repair Manual AT-74
[EURO-OBD]
TROUBLE DIAGNOSIS — BASIC INSPECTION
7. CHECK VEHICLE MOVE
Move selector lever to “D”, “2” and “1” positions and check if vehicle
creeps forward.
Does vehicle creep fo")
![NISSAN X-TRAIL 2003 Service Repair Manual AT-78
[EURO-OBD]
TROUBLE DIAGNOSIS — BASIC INSPECTION
Cruise Test — Part 1
1. CHECK STARTING GEAR (D1 ) POSITION
1. Drive vehicle for approximately 10 minutes to warm engine oil and ATF up to op](/manual-img/5/57404/w960_57404-2113.png "NISSAN X-TRAIL 2003 Service Repair Manual AT-78
[EURO-OBD]
TROUBLE DIAGNOSIS — BASIC INSPECTION
Cruise Test — Part 1
1. CHECK STARTING GEAR (D1 ) POSITION
1. Drive vehicle for approximately 10 minutes to warm engine oil and ATF up to op")