Page 497 of 3502

HEATER & COOLING UNIT ASSEMBLY
ATC-119
C
D
E
F
G
H
I
K
L
MA
B
AT C
HEATER & COOLING UNIT ASSEMBLYPFP:27110
Removal and InstallationBJS000HH
REMOVAL
1. Use a refrigerant collecting equipment (for HFC-134a) to discharge the refrigerant.
2. Drain coolant from cooling system. Refer to CO-10, "
Changing Engine Coolant" (QR engine) or CO-34,
"Changing Engine Coolant" (VQ engine).
3. Remove extension cowl top lower panel. Refer to EI-21, "
COWL TOP" .
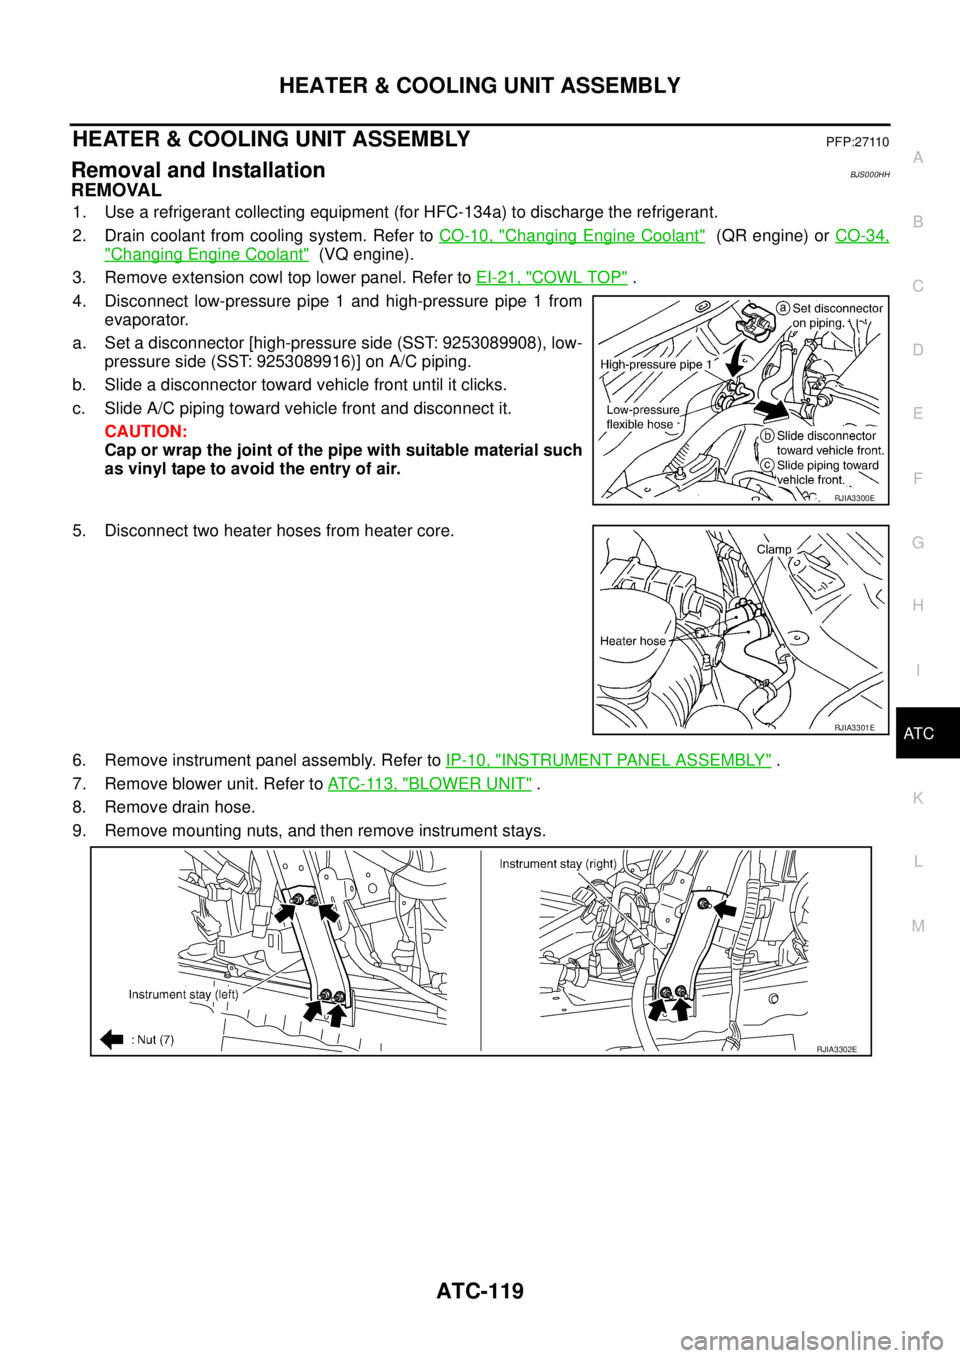
4. Disconnect low-pressure pipe 1 and high-pressure pipe 1 from
evaporator.
a. Set a disconnector [high-pressure side (SST: 9253089908), low-
pressure side (SST: 9253089916)] on A/C piping.
b. Slide a disconnector toward vehicle front until it clicks.
c. Slide A/C piping toward vehicle front and disconnect it.
CAUTION:
Cap or wrap the joint of the pipe with suitable material such
as vinyl tape to avoid the entry of air.
5. Disconnect two heater hoses from heater core.
6. Remove instrument panel assembly. Refer to IP-10, "
INSTRUMENT PANEL ASSEMBLY" .
7. Remove blower unit. Refer to AT C - 11 3 , "
BLOWER UNIT" .
8. Remove drain hose.
9. Remove mounting nuts, and then remove instrument stays.
RJIA3300E
RJIA3301E
RJIA3302E
Page 501 of 3502
MODE DOOR MOTOR
ATC-123
C
D
E
F
G
H
I
K
L
MA
B
AT C
MODE DOOR MOTORPFP:27731
Removal and InstallationBJS000HJ
REMOVAL
1. Remove instrument driver lower panel. Refer to IP-10, "INSTRUMENT PANEL ASSEMBLY" .
2. Disconnect mode door motor connector.
3. Remove mounting screws, and then remove mode door motor.
INSTALLATION
Installation is basically the reverse order of removal.
RJIA3306E
Page 502 of 3502
ATC-124
AIR MIX DOOR MOTOR
AIR MIX DOOR MOTOR PFP:27732
Removal and InstallationBJS000HK
REMOVAL
Driver Side
1. Set the temperature (driver side) at 18°C, and then disconnect the battery cable from the negative termi-
nal.
2. Remove instrument driver lower panel. Refer to IP-10, "
INSTRUMENT PANEL ASSEMBLY" .
3. Remove aspirator.
4. Remove mounting screws, and then remove air mix door motor.
5. Disconnect air mix door motor connector.
Passenger Side
1. Set the temperature (passenger side) at 18°C, and then disconnect the battery cable from the negative
terminal.
2. Remove blower unit. Refer to AT C - 11 3 , "
BLOWER UNIT" .
3. Remove mounting screws, and then remove air mix door motor.
4. Disconnect air mix door motor connector.
INSTALLATION
Installation is basically the reverse order of removal.
RJIA3307E
RJIA3308E
Page 504 of 3502
ATC-126
DUCTS AND GRILLES
DUCTS AND GRILLESPFP:27860
Removal and InstallationBJS000HM
REMOVAL
Removal of Center Ventilator Grilles
1. Remove cluster lid D. Refer to IP-10, "INSTRUMENT PANEL ASSEMBLY" .
2. Remove mounting clips, and then remove center ventilator
grilles.
1. Defroster nozzle 2. Duct assembly 3. Instrument panel
4. Side defroster grille (left) 5. Side ventilator grille (left) 6. Center ventilator grille (left)
7. Center ventilator grille (right) 8. Side ventilator grille (right) 9. Side defroster grille (right)
SJIA1653E
RJIA2209E
Page 505 of 3502
DUCTS AND GRILLES
ATC-127
C
D
E
F
G
H
I
K
L
MA
B
AT C
Removal of Side Ventilator Grilles
1. Remove instrument passenger upper panel. Refer to IP-10, "INSTRUMENT PANEL ASSEMBLY" .
2. Remove mounting clips, and then remove side ventilator grille
(right).
3. Remove cluster lid A. Refer to IP-10, "
INSTRUMENT PANEL ASSEMBLY" .
4. Remove mounting clips, and then remove side ventilator grille
(left).
Removal of Rear Ventilator Grille
1. Remove console rear cover. Refer to IP-10, "INSTRUMENT PANEL ASSEMBLY" .
2. Remove mounting clips, and then remove rear ventilator grille.
RJIA3311E
RJIA3312E
RJIA2212E
Page 506 of 3502
ATC-128
DUCTS AND GRILLES
Removal of Defroster Nozzle and Duct Assembly
1. Remove instrument panel assembly. Refer to IP-10, "INSTRUMENT PANEL ASSEMBLY" .
2. Remove mounting screws, and then remove defroster nozzle.
3. Remove mounting screws, and then remove duct assembly.
Removal of Side Defroster Grilles
1. Remove duct assembly.
2. Remove side defroster grilles.
RJIA3313E
RJIA3314E
Page 507 of 3502
DUCTS AND GRILLES
ATC-129
C
D
E
F
G
H
I
K
L
MA
B
AT C
Removal of Rear Ventilator Ducts
1. Remove center console. Refer to IP-10, "INSTRUMENT PANEL ASSEMBLY" .
2. Remove mounting clips, and then remove rear ventilator duct 2.
3. Remove mounting clips and screw, and then remove rear venti-
lator duct 1.
Removal of Foot Ducts
1. Remove instrument driver lower panel. Refer to IP-10, "INSTRUMENT PANEL ASSEMBLY" .
2. Remove instrument lower cover (driver side)
3. Remove mounting screws, and then remove foot duct (left).
4. Remove blower unit. Refer to AT C - 11 3 , "
BLOWER UNIT" .
5. Remove intake sensor connector from foot duct.
6. Remove mounting screws, and then remove foot duct (right).
RJIA3315E
RJIA3316E
RJIA3317E
RJIA3318E
Page 508 of 3502
ATC-130
DUCTS AND GRILLES
Removal of Floor Ducts
1. Remove front seats and center console. Refer to SE-97, "FRONT SEAT" and IP-10, "INSTRUMENT
PANEL ASSEMBLY" .
2. Slide front floor duct downward, and then remove it.
3. Remove floor carpet. Refer to EI-52, "
FLOOR TRIM" .
4. Remove mounting clips, and then remove floor ducts.
INSTALLATION
Installation is basically the reverse order of removal.
RJIA3319E
RJIA3320E