2003 NISSAN ALMERA N16 air filter
[x] Cancel search: air filterPage 1784 of 3189
![NISSAN ALMERA N16 2003 Electronic Repair Manual AT-328
[EXC.F/EURO-OBD]
TROUBLE DIAGNOSES FOR SYMPTOMS
5. DETECT MALFUNCTIONING ITEM
1. Remove control valve assembly. Refer to AT- 4 0 6 , "
Control Valve Assembly and Accumulators" .
2. Ch NISSAN ALMERA N16 2003 Electronic Repair Manual AT-328
[EXC.F/EURO-OBD]
TROUBLE DIAGNOSES FOR SYMPTOMS
5. DETECT MALFUNCTIONING ITEM
1. Remove control valve assembly. Refer to AT- 4 0 6 , "
Control Valve Assembly and Accumulators" .
2. Ch](/manual-img/5/57350/w960_57350-1783.png)
AT-328
[EXC.F/EURO-OBD]
TROUBLE DIAGNOSES FOR SYMPTOMS
5. DETECT MALFUNCTIONING ITEM
1. Remove control valve assembly. Refer to AT- 4 0 6 , "
Control Valve Assembly and Accumulators" .
2. Check the following items:
–Torque converter clutch control valve
–Pilot valve
–Pilot filter
3. Disassemble A/T.
4. Check torque converter and oil pump assembly.
OK or NG
OK >> GO TO 4
NG >> Repair or replace damaged parts.
14. Lock-up Is Not ReleasedECS007RD
SYMPTOM:
Lock-up is not released when accelerator pedal is released.
1. CHECK THROTTLE POSITION SENSOR* CIRCUIT
*: This sensor means accelerator pedal position (APP) sensor.
With CONSULT-II
Does “TCM INPUT SIGNALS” in “DATA MONITOR” show damage throttle position sensor circuit?
Without CONSULT-II
Does self-diagnosis show damage to throttle position sensor circuit?
Ye s o r N o
Yes >> Check throttle position sensor circuit. Refer to AT- 3 3 3 ,
"21. TCM Self-diagnosis Does Not Activate (PNP &
Overdrive Control Switches, and Throttle Position Sen-
sor Circuit Checks)" .
No >> GO TO 2
2. CHECK SYMPTOM
Check again.
OK or NG
OK >>INSPECTION END
NG >> 1. Perform TCM input/output signal inspection.
2. If NG, recheck TCM pin terminals for damage or loose connection with harness connector.
15. Engine Speed Does Not Return To Idle (Light Braking D4→ D3 )ECS007RE
SYMPTOM:
●Engine speed does not smoothly return to idle when A/T shifts from D4 to D3 .
●Vehicle does not decelerate by engine brake when turning overdrive control switch OFF.
●Vehicle does not decelerate by engine brake when shifting A/T from “D” to “2” position.
SCIA0706E
Page 1895 of 3189
![NISSAN ALMERA N16 2003 Electronic Repair Manual REPAIR FOR COMPONENT PARTS
AT-439
[ALL]
D
E
F
G
H
I
J
K
L
MA
B
AT
Control Valve AssemblyECS007TC
COMPONENTS
1. Solenoid valve assembly 2. O-ring 3. Clip
4. Terminal body 5. Control valve lower body 6. NISSAN ALMERA N16 2003 Electronic Repair Manual REPAIR FOR COMPONENT PARTS
AT-439
[ALL]
D
E
F
G
H
I
J
K
L
MA
B
AT
Control Valve AssemblyECS007TC
COMPONENTS
1. Solenoid valve assembly 2. O-ring 3. Clip
4. Terminal body 5. Control valve lower body 6.](/manual-img/5/57350/w960_57350-1894.png)
REPAIR FOR COMPONENT PARTS
AT-439
[ALL]
D
E
F
G
H
I
J
K
L
MA
B
AT
Control Valve AssemblyECS007TC
COMPONENTS
1. Solenoid valve assembly 2. O-ring 3. Clip
4. Terminal body 5. Control valve lower body 6. Oil strainer
7. Support plate 8. Lower inter separating gasket 9. Separating plate
10. Lower separating gasket 11. Steel ball 12. Control valve inter body
13. Pilot filter 14. Upper inter separating gasket 15. Separating plate
16. Upper separating gasket 17 Steel ball 18. Control valve upper body
19. Check ball 20. Fluid cooler relief valve spring 21. O-ring
22. T/C pressure holding spring 23. Check ball
SAT868J
Page 1898 of 3189
![NISSAN ALMERA N16 2003 Electronic Repair Manual AT-442
[ALL]
REPAIR FOR COMPONENT PARTS
9. Remove inter body from upper body.
10. Remove pilot filter, separating plate and gaskets from upper
body.
11. Check to see that steel balls are NISSAN ALMERA N16 2003 Electronic Repair Manual AT-442
[ALL]
REPAIR FOR COMPONENT PARTS
9. Remove inter body from upper body.
10. Remove pilot filter, separating plate and gaskets from upper
body.
11. Check to see that steel balls are](/manual-img/5/57350/w960_57350-1897.png)
AT-442
[ALL]
REPAIR FOR COMPONENT PARTS
9. Remove inter body from upper body.
10. Remove pilot filter, separating plate and gaskets from upper
body.
11. Check to see that steel balls are properly positioned in inter
body and then remove them.
●Be careful not to lose steel balls.
12. Check to see that steel balls are properly positioned in upper
body and then remove them.
●Be careful not to lose steel balls.
INSPECTION
Lower and Upper Bodies
●Check to see that retainer plates are properly positioned in lower
body.
SAT065F
SAT870J
SAT871J
SAT872J
Page 1901 of 3189
![NISSAN ALMERA N16 2003 Electronic Repair Manual REPAIR FOR COMPONENT PARTS
AT-445
[ALL]
D
E
F
G
H
I
J
K
L
MA
B
AT
d. Install pilot filter.
e. Place lower body as shown in illustration (side of inter body face
up). Install steel balls in their prope NISSAN ALMERA N16 2003 Electronic Repair Manual REPAIR FOR COMPONENT PARTS
AT-445
[ALL]
D
E
F
G
H
I
J
K
L
MA
B
AT
d. Install pilot filter.
e. Place lower body as shown in illustration (side of inter body face
up). Install steel balls in their prope](/manual-img/5/57350/w960_57350-1900.png)
REPAIR FOR COMPONENT PARTS
AT-445
[ALL]
D
E
F
G
H
I
J
K
L
MA
B
AT
d. Install pilot filter.
e. Place lower body as shown in illustration (side of inter body face
up). Install steel balls in their proper positions.
f. Install inter body on upper body using reamer bolts “F” as
guides.
●Be careful not to dislocate or drop steel balls.
g. Install check balls, fluid cooler relief valve springs and T/C pres-
sure holding spring in their proper positions in lower body.
h. Install lower separating gasket, lower inter separating gasket
and lower separating plate in order shown in illustration.
SAT074F
SAT870J
SAT076F
MCIB9019E
BAT002
Page 1983 of 3189

ATC-3
C
D
E
F
G
H
I
K
L
MA
B
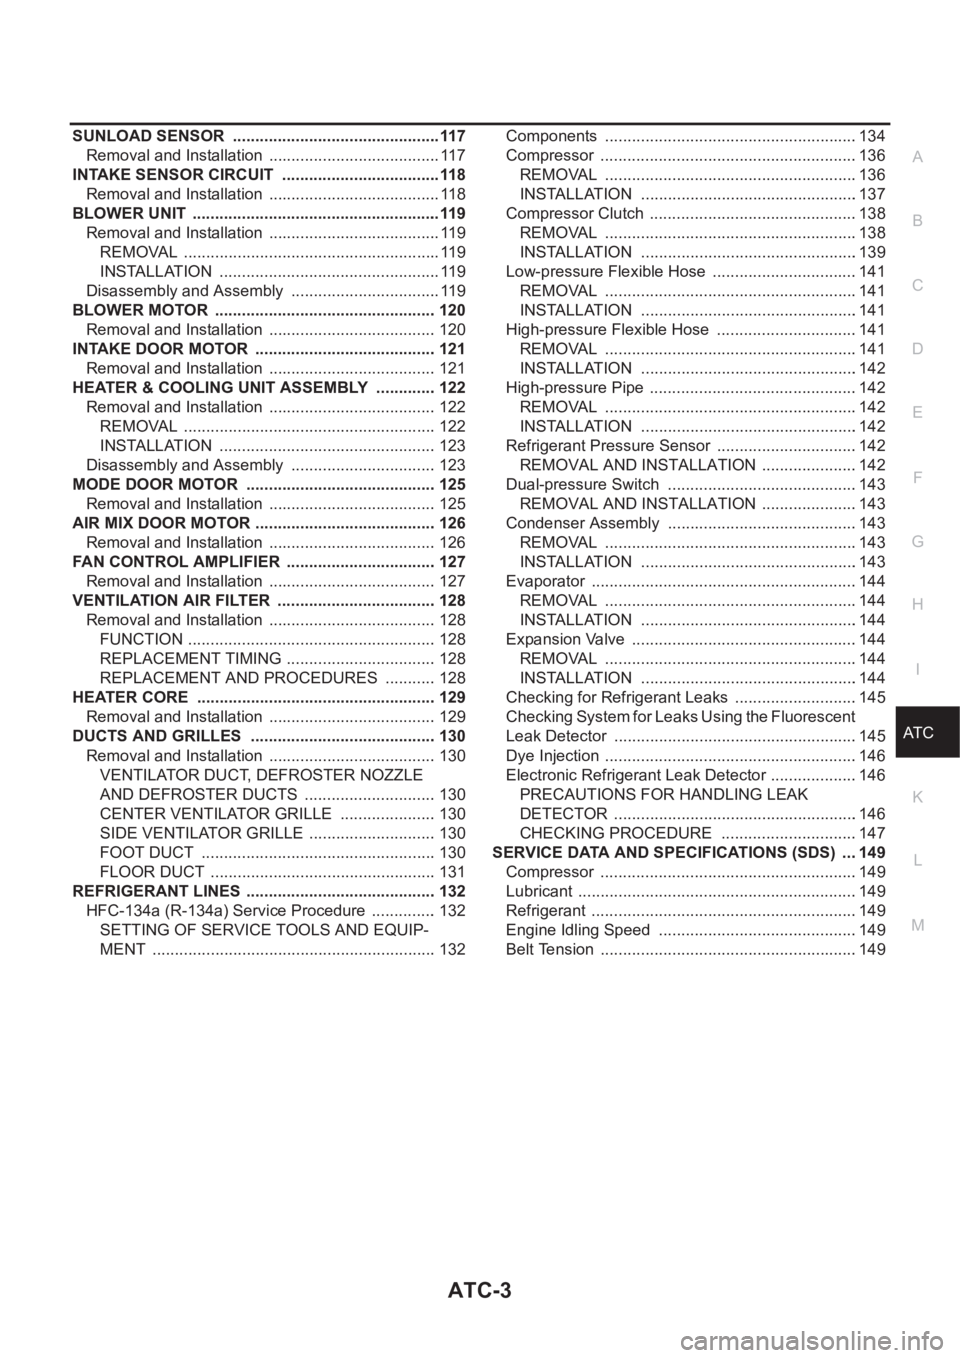
AT C SUNLOAD SENSOR ...............................................117
Removal and Installation ....................................... 117
INTAKE SENSOR CIRCUIT ....................................118
Removal and Installation ....................................... 118
BLOWER UNIT ........................................................119
Removal and Installation ....................................... 119
REMOVAL .......................................................... 119
INSTALLATION .................................................. 119
Disassembly and Assembly .................................. 119
BLOWER MOTOR .................................................. 120
Removal and Installation ...................................... 120
INTAKE DOOR MOTOR ......................................... 121
Removal and Installation ...................................... 121
HEATER & COOLING UNIT ASSEMBLY .............. 122
Removal and Installation ...................................... 122
REMOVAL ......................................................... 122
INSTALLATION ................................................. 123
Disassembly and Assembly ................................. 123
MODE DOOR MOTOR ........................................... 125
Removal and Installation ...................................... 125
AIR MIX DOOR MOTOR ......................................... 126
Removal and Installation ...................................... 126
FAN CONTROL AMPLIFIER .................................. 127
Removal and Installation ...................................... 127
VENTILATION AIR FILTER .................................... 128
Removal and Installation ...................................... 128
FUNCTION ........................................................ 128
REPLACEMENT TIMING .................................. 128
REPLACEMENT AND PROCEDURES ............ 128
HEATER CORE ...................................................... 129
Removal and Installation ...................................... 129
DUCTS AND GRILLES .......................................... 130
Removal and Installation ...................................... 130
VENTILATOR DUCT, DEFROSTER NOZZLE
AND DEFROSTER DUCTS .............................. 130
CENTER VENTILATOR GRILLE ...................... 130
SIDE VENTILATOR GRILLE ............................. 130
FOOT DUCT ..................................................... 130
FLOOR DUCT ................................................... 131
REFRIGERANT LINES ........................................... 132
HFC-134a (R-134a) Service Procedure ............... 132
SETTING OF SERVICE TOOLS AND EQUIP-
MENT ................................................................ 132Components .........................................................134
Compressor ..........................................................136
REMOVAL .........................................................136
INSTALLATION .................................................137
Compressor Clutch .............................................. .138
REMOVAL .........................................................138
INSTALLATION .................................................139
Low-pressure Flexible Hose .................................141
REMOVAL .........................................................141
INSTALLATION .................................................141
High-pressure Flexible Hose ................................141
REMOVAL .........................................................141
INSTALLATION .................................................142
High-pressure Pipe ...............................................142
REMOVAL .........................................................142
INSTALLATION .................................................142
Refrigerant Pressure Sensor ................................142
REMOVAL AND INSTALLATION ......................142
Dual-pressure Switch ...........................................143
REMOVAL AND INSTALLATION ......................143
Condenser Assembly ...........................................143
REMOVAL .........................................................143
INSTALLATION .................................................143
Evaporator ............................................................144
REMOVAL .........................................................144
INSTALLATION .................................................144
Expansion Valve ...................................................144
REMOVAL .........................................................144
INSTALLATION .................................................144
Checking for Refrigerant Leaks ............................145
Checking System for Leaks Using the Fluorescent
Leak Detector .......................................................145
Dye Injection .........................................................146
Electronic Refrigerant Leak Detector ....................146
PRECAUTIONS FOR HANDLING LEAK
DETECTOR .......................................................146
CHECKING PROCEDURE ...............................147
SERVICE DATA AND SPECIFICATIONS (SDS) ....149
Compressor ..........................................................149
Lubricant ...............................................................149
Refrigerant ............................................................149
Engine Idling Speed .............................................149
Belt Tension ..........................................................149
Page 2099 of 3189

BLOWER UNIT
ATC-119
C
D
E
F
G
H
I
K
L
MA
B
AT C
BLOWER UNITPFP:27200
Removal and InstallationEJS00206
REMOVAL
1. Remove the glove box assembly.
2. Remove the glove box cover and instrument lower assist panel.
3. Remove the ECM with ECM bracket.
4. Remove the blower unit fixing bolt and screw.
5. Disconnect the blower motor connector, intake door motor con-
nector and auto amp. connector.
6. Remove the harness fixing clip.
7. Move the blower unit downwards.
CAUTION:
Slide the blower unit toward the passenger side, remove loca-
tion pins (2 pieces), then move it downwards.
8. Remove the blower unit.
INSTALLATION
CAUTION:
●Make sure the location pins (2 pieces) are securely installed.
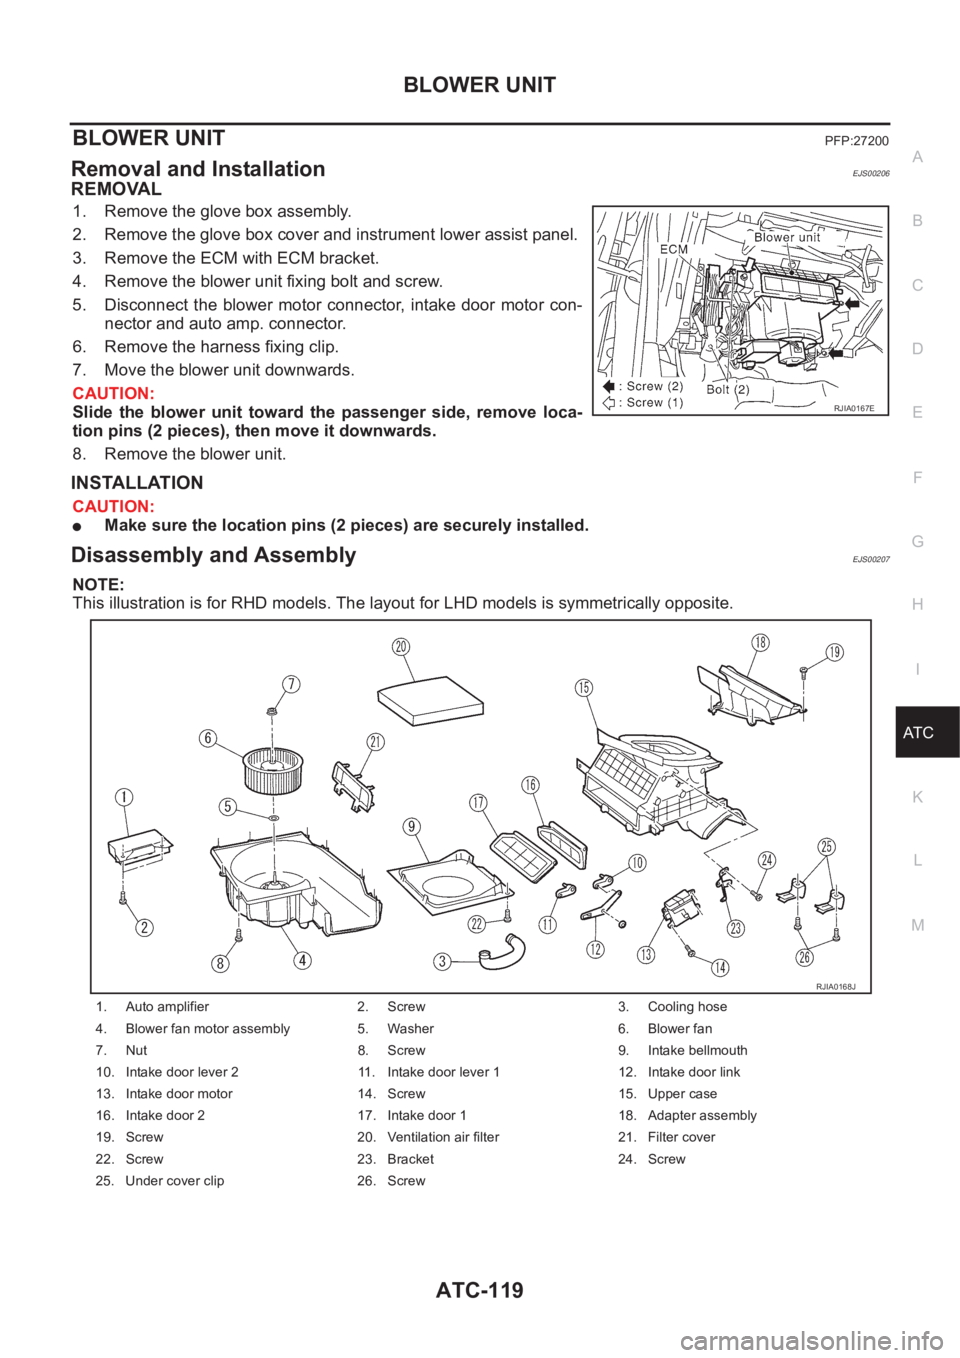
Disassembly and AssemblyEJS00207
NOTE:
This illustration is for RHD models. The layout for LHD models is symmetrically opposite.
RJIA0167E
1. Auto amplifier 2. Screw 3. Cooling hose
4. Blower fan motor assembly 5. Washer 6. Blower fan
7. Nut 8. Screw 9. Intake bellmouth
10. Intake door lever 2 11. Intake door lever 1 12. Intake door link
13. Intake door motor 14. Screw 15. Upper case
16. Intake door 2 17. Intake door 1 18. Adapter assembly
19. Screw 20. Ventilation air filter 21. Filter cover
22. Screw 23. Bracket 24. Screw
25. Under cover clip 26. Screw
RJIA0168J
Page 2108 of 3189

ATC-128
VENTILATION AIR FILTER
VENTILATION AIR FILTER
PFP:27277
Removal and InstallationEJS0020F
FUNCTION
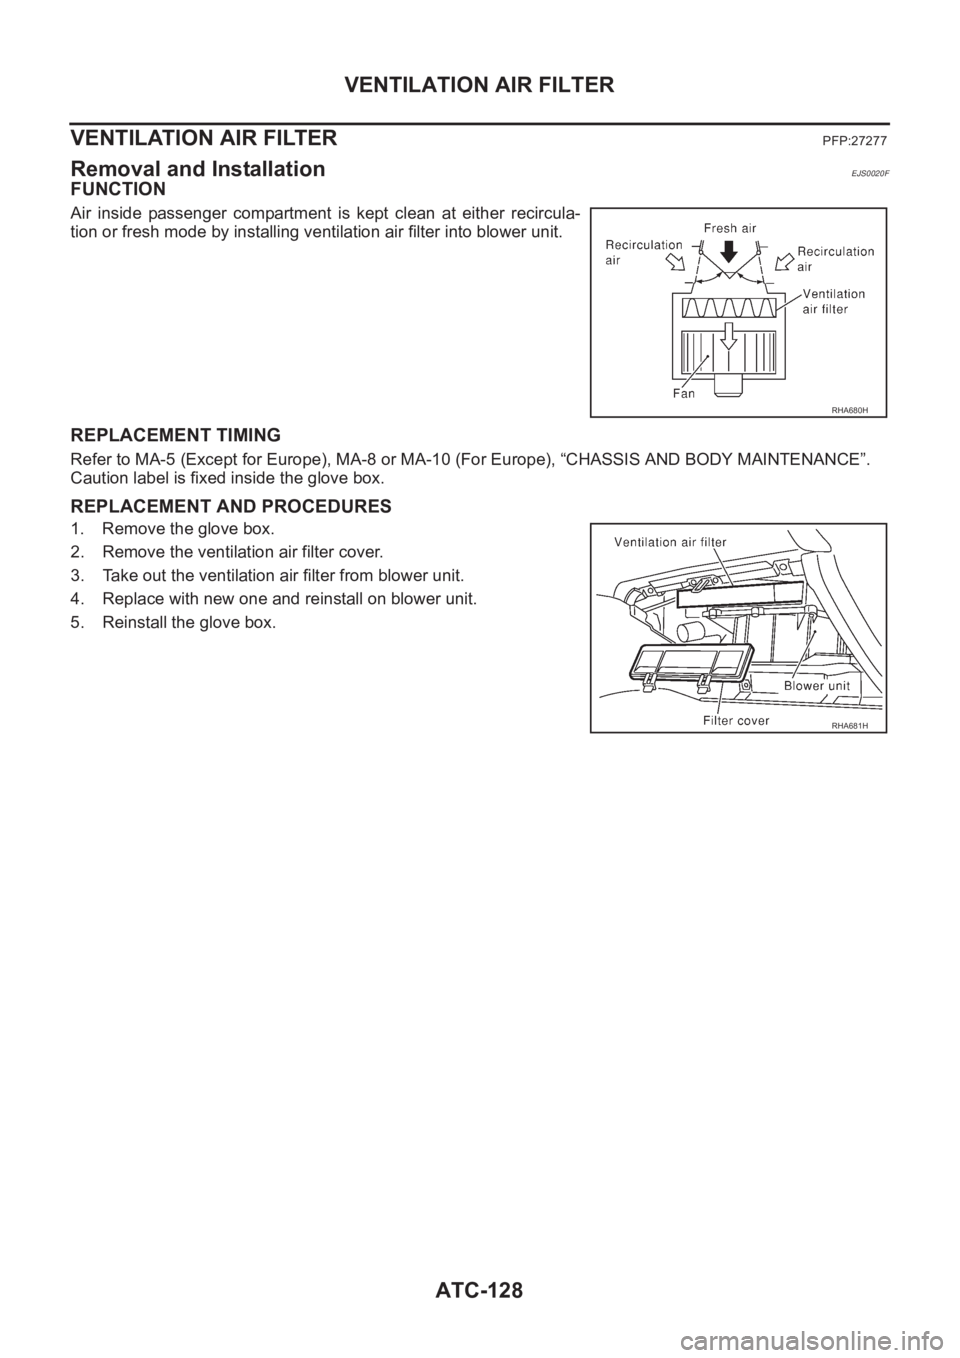
Air inside passenger compartment is kept clean at either recircula-
tion or fresh mode by installing ventilation air filter into blower unit.
REPLACEMENT TIMING
Refer to MA-5 (Except for Europe), MA-8 or MA-10 (For Europe), “CHASSIS AND BODY MAINTENANCE”.
Caution label is fixed inside the glove box.
REPLACEMENT AND PROCEDURES
1. Remove the glove box.
2. Remove the ventilation air filter cover.
3. Take out the ventilation air filter from blower unit.
4. Replace with new one and reinstall on blower unit.
5. Reinstall the glove box.
RHA680H
RHA681H
Page 2198 of 3189

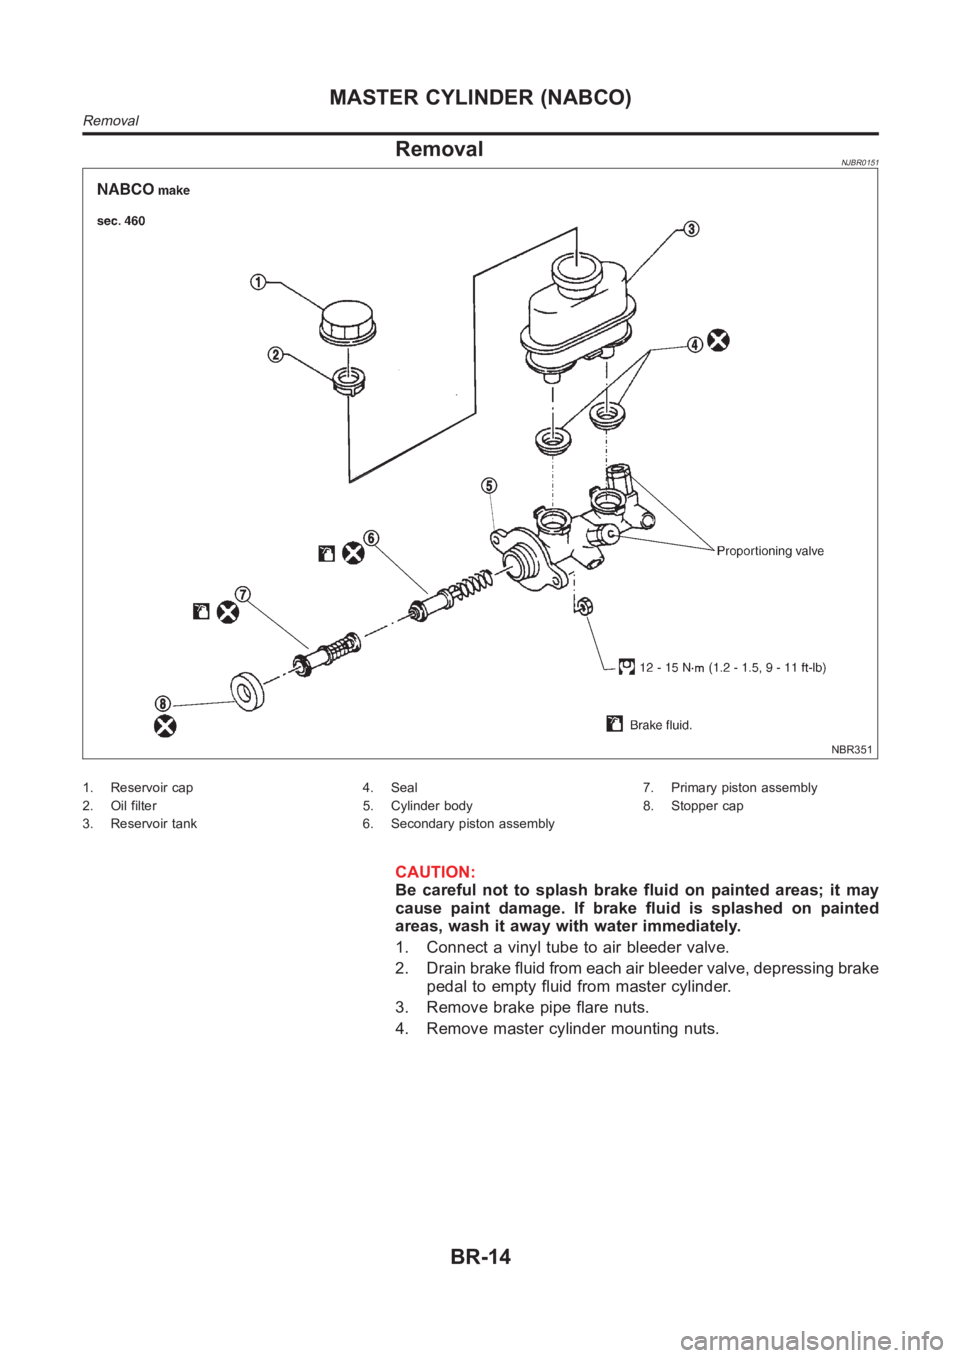
RemovalNJBR0151
NBR351
1. Reservoir cap
2. Oil filter
3. Reservoir tank4. Seal
5. Cylinder body
6. Secondary piston assembly7. Primary piston assembly
8. Stopper cap
CAUTION:
Be careful not to splash brake fluid on painted areas; it may
cause paint damage. If brake fluid is splashed on painted
areas, wash it away with water immediately.
1. Connect a vinyl tube to air bleeder valve.
2. Drain brake fluid from each air bleeder valve, depressing brake
pedal to empty fluid from master cylinder.
3. Remove brake pipe flare nuts.
4. Remove master cylinder mounting nuts.
MASTER CYLINDER (NABCO)
Removal
BR-14