Page 133 of 3189
![NISSAN ALMERA N16 2003 Electronic Repair Manual OIL SEAL
EM-55
[QG]
C
D
E
F
G
H
I
J
K
L
MA
EM
Removal and Installation of Front Oil SealEBS00LQF
REMOVAL
1. Remove the following parts:
●Undercover (with splash cover)
●Drive belt; Refer to EM-11, NISSAN ALMERA N16 2003 Electronic Repair Manual OIL SEAL
EM-55
[QG]
C
D
E
F
G
H
I
J
K
L
MA
EM
Removal and Installation of Front Oil SealEBS00LQF
REMOVAL
1. Remove the following parts:
●Undercover (with splash cover)
●Drive belt; Refer to EM-11,](/manual-img/5/57350/w960_57350-132.png)
OIL SEAL
EM-55
[QG]
C
D
E
F
G
H
I
J
K
L
MA
EM
Removal and Installation of Front Oil SealEBS00LQF
REMOVAL
1. Remove the following parts:
●Undercover (with splash cover)
●Drive belt; Refer to EM-11, "DRIVE BELTS" .
●Crankshaft pulley; Refer to EM-47, "TIMING CHAIN" .
2. Using flat-head screwdriver, remove front oil seal.
CAUTION:
Be careful not to damage front timing chain cover and crankshaft.
INSTALLATION
1. Apply engine oil on new front oil seal.
2. Using a suitable drift, press fit until the height of front oil seal is
level with the mounting surface.
●Suitable drift : outer diameter 50 mm (1.97 in), inner diameter
44 mm (1.73 in).
CAUTION:
●Be careful not to damage front cover and crankshaft.
●Press oil seal straight so that it is not curling up or
inclined.
3. Perform steps in the reverse order of removal for the following
operations.
Removal and Installation of Rear Oil SealEBS00LQG
REMOVAL
1. Remove transaxle assembly. Refer to MT-23, "Removal" (RS5F30A), MT-23, "Removal" (RS5F70A) and
AT-411, "Removal" (AUTOMATIC TRANSAXLE).
2. Remove drive plate. Refer to EM-70, "
CYLINDER BLOCK" .
3. Using flat-head screwdriver, remove front oil seal.
CAUTION:
Be careful not to damage mounting surface.
INSTALLATION
1. Using a suitable drift, press rear oil seal to rear oil seal retainer.
●Suitable drift : outer diameter 102 mm (4.02 in), inner diame-
ter 90 mm (3.54 in).
CAUTION:
●Do not touch grease applied on oil seal lip
●Be careful not to damage rear oil seal retainer and crank-
shaft.
●Press in straight to avoid causing any burrs or tilting of
oil seal.
SEM912F
SEM715A
SEM097F
Page 138 of 3189
EM-60
[QG]
CYLINDER HEAD
3. Tighten cylinder auxiliary bolts (11) to (14) in numerical order
shown in figure.
●Pay attention to shank length under bolt head. [11: 20 mm
(0.79 in), 12 - 14: 25 mm (0.98 in)]
Disassembly and AssemblyEBS00LQJ
CAUTION:
●When installing camshafts, chain tensioners, oil seals or other sliding parts, lubricate contacting
surface with new engine oil.
●Apply new engine oil to threads and seat surface when installing cylinder head, camshaft
sprocket, crankshaft pulley and camshaft bracket.
●Attach tags to valve lifters so as not to mix them up.
DISASSEMBLY
1. Remove adjusting shim (if so equipped) and valve lifter.
●Confirm installation point.
SEM900F
PBIC0973E
1. Cylinder head 2. Valve (INT) 3. Valve (EXH)
4. Valve seat 5. Engine coolant temperature sensor 6. Copper washer
7. Spark plug tube 8. Spark plug
Page 183 of 3189
![NISSAN ALMERA N16 2003 Electronic Repair Manual SERVICE DATA AND SPECIFICATIONS (SDS)
EM-105
[QG]
C
D
E
F
G
H
I
J
K
L
MA
EM
Intake valve timing control solenoid valve
6.3 - 8.3 (0.64 - 0.85, 56 - 73)*2
Camshaft position sensor (PHASE)
7.2 - 10.8 (0 NISSAN ALMERA N16 2003 Electronic Repair Manual SERVICE DATA AND SPECIFICATIONS (SDS)
EM-105
[QG]
C
D
E
F
G
H
I
J
K
L
MA
EM
Intake valve timing control solenoid valve
6.3 - 8.3 (0.64 - 0.85, 56 - 73)*2
Camshaft position sensor (PHASE)
7.2 - 10.8 (0](/manual-img/5/57350/w960_57350-182.png)
SERVICE DATA AND SPECIFICATIONS (SDS)
EM-105
[QG]
C
D
E
F
G
H
I
J
K
L
MA
EM
Intake valve timing control solenoid valve
6.3 - 8.3 (0.64 - 0.85, 56 - 73)*2
Camshaft position sensor (PHASE)
7.2 - 10.8 (0.73 - 1.1, 64 - 95) *2
Camshaft sprocket (INT) 78.4 - 88.2 (8.0 - 9.0, 58 - 65)
Camshaft sprocket (EXH) 98.1 - 127.5 (10.0 - 13.0, 73 - 94)
*1 Camshaft bracket 1)
2.0 (0.2, 18) *
2
2)
5.9 (0.6, 52) *2
3)
9.0 - 11.8 (0.92 - 1.20, 80 - 104)*2
Crankshaft pulley132.4 - 152.0 (14.0 - 15.0, 98 - 112)
Front cover
6.92 - 9.51 (0.71 - 0.97, 62 - 84)*
2
Timing chain tension guide 15.7 - 20.6 (1.6 - 2.1, 12 - 15)
*1 Cylinder head 1) 29.4 (3.0, 22)
2) 58.8 (6.0, 43)
3) 0 (0.0, 0)
4) 27.4 - 31.4 (2.8 - 3.2, 21 - 23)
5) 50° - 55° (Angle tightening)
Cylinder head front cover
6.92 - 9.5 (0.71 - 0.96, 62 - 84)*
2
Flywheel (M/T)83.4 - 93.2 (8.5 - 9.5, 62 - 68)
Drive plate (A/T)93.2 - 103 (9.5 - 10.5, 69 - 75)
*1 Connecting rod bearing cap 1) 13.72 - 15.68 (1.4 - 1.5, 10.2 - 11 . 5 )
2) 35° - 40° (Angle tightening)
Knock sensor15.7 - 20.6 (1.6 - 2.1, 12 - 15)
Crankshaft position sensor (POS)
7.2 - 10.8 (0.8 - 1.1, 64 - 95)*
2
Rear oil seal retainer
6.3 - 8.3 (0.65 - 0.84, 56 - 73)*2
Signal plate
7.6 - 9.2 (0.78 - 0.93, 68 - 81)*2
Page 187 of 3189

Parts Requiring Angular TighteningNJEM0047Use an angle wrench for the final tightening of the following
engine parts:
a) Cylinder head bolts
b) Main bearing cap bolts
c) Connecting rod cap nuts
d) Crankshaft pulley bolt
Do not use a torque value for final tightening.
The torque value for these parts are for a preliminary step.
Ensure thread and seat surfaces are clean and coated with
engine oil.
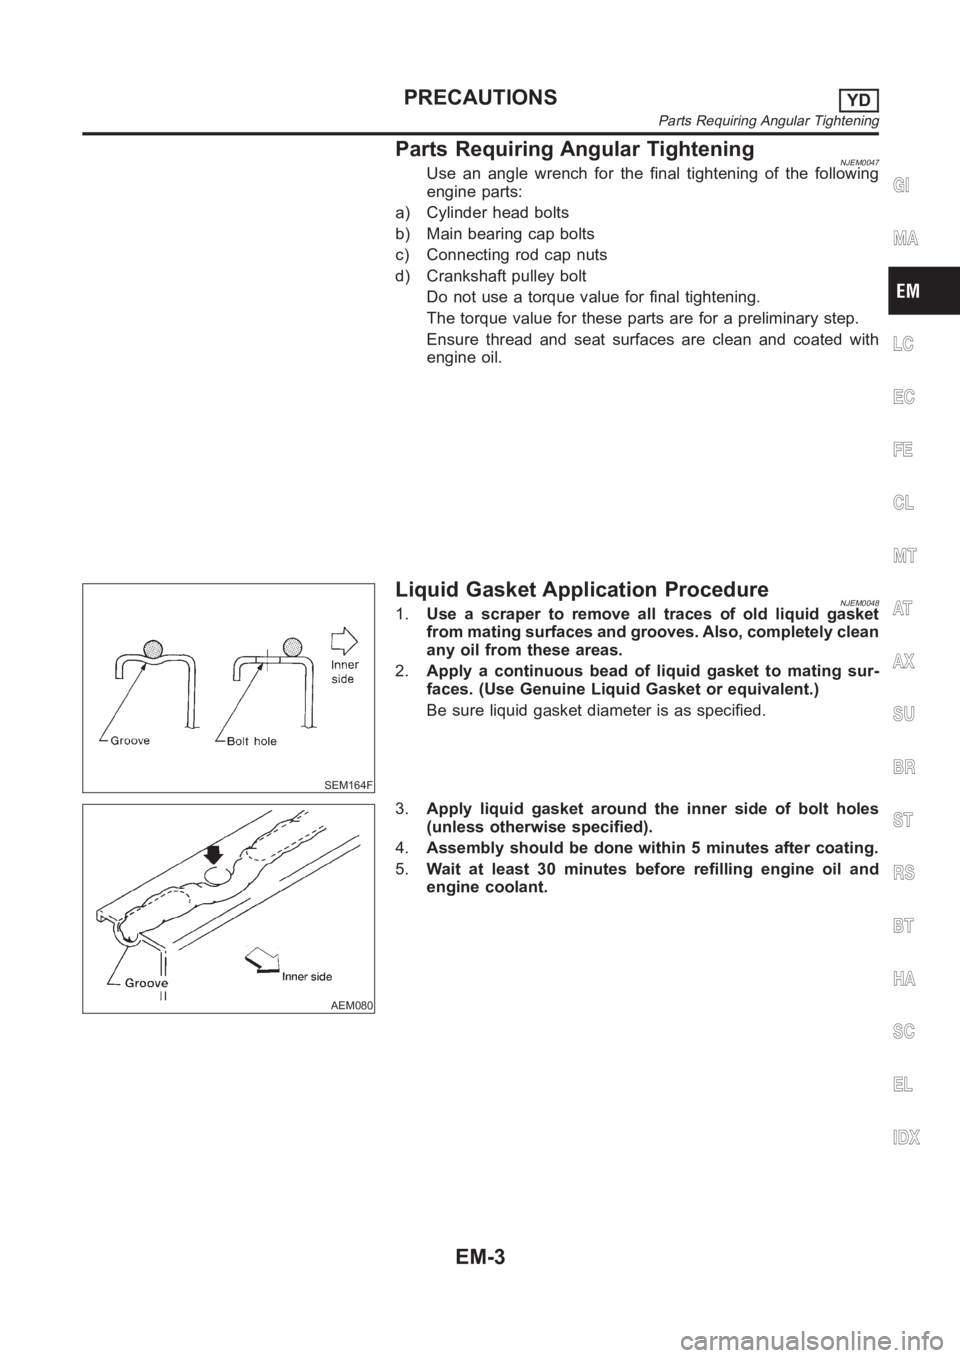
SEM164F
Liquid Gasket Application ProcedureNJEM00481.Use a scraper to remove all traces of old liquid gasket
from mating surfaces and grooves. Also, completely clean
any oil from these areas.
2.Apply a continuous bead of liquid gasket to mating sur-
faces. (Use Genuine Liquid Gasket or equivalent.)
Be sure liquid gasket diameter is as specified.
AEM080
3.Apply liquid gasket around the inner side of bolt holes
(unless otherwise specified).
4.Assembly should be done within 5 minutes after coating.
5.Wait at least 30 minutes before refilling engine oil and
engine coolant.
GI
MA
LC
EC
FE
CL
MT
AT
AX
SU
BR
ST
RS
BT
HA
SC
EL
IDX
PRECAUTIONSYD
Parts Requiring Angular Tightening
EM-3
Page 189 of 3189
Tool number
Tool nameDescription
KV101056S0
Ring gear stopper
1 KV10105630
Adapter
2 KV10105610
Plate
NT617
Preventing crankshaft from rotating
a: 3 (0.12)
b: 6.4 (0.252)
c: 2.8 (0.110)
d: 6.6 (0.260)
e: 107 (4.21)
f: 14 (0.55)
g: 20 (0.79)
h: 14 (0.55) dia.
Unit: mm (in)
KV101151S0
Lifter stopper set
1 KV10115110
Camshaft pliers
2 KV10115120
Lifter stopper
NT041
Changing shims
ST16610001
Pilot bushing puller
NT045
Removing crankshaft pilot bushing
KV10111100
Seal cutter
NT046
Removing steel oil pan and rear timing chain
case
WS39930000
Tube presser
NT052
Pressing the tube of liquid gasket
KV10112100
Angle wrench
NT014
Tightening bolts for bearing cap, cylinder
head, etc.
KV10109300
Pulley holder
NT628
a: 68 mm (2.68 in)
b: 8 mm (0.31 in) dia.
GI
MA
LC
EC
FE
CL
MT
AT
AX
SU
BR
ST
RS
BT
HA
SC
EL
IDX
PREPARATIONYD
Special Service Tools (Cont’d)
EM-5
Page 192 of 3189

NJEM0051
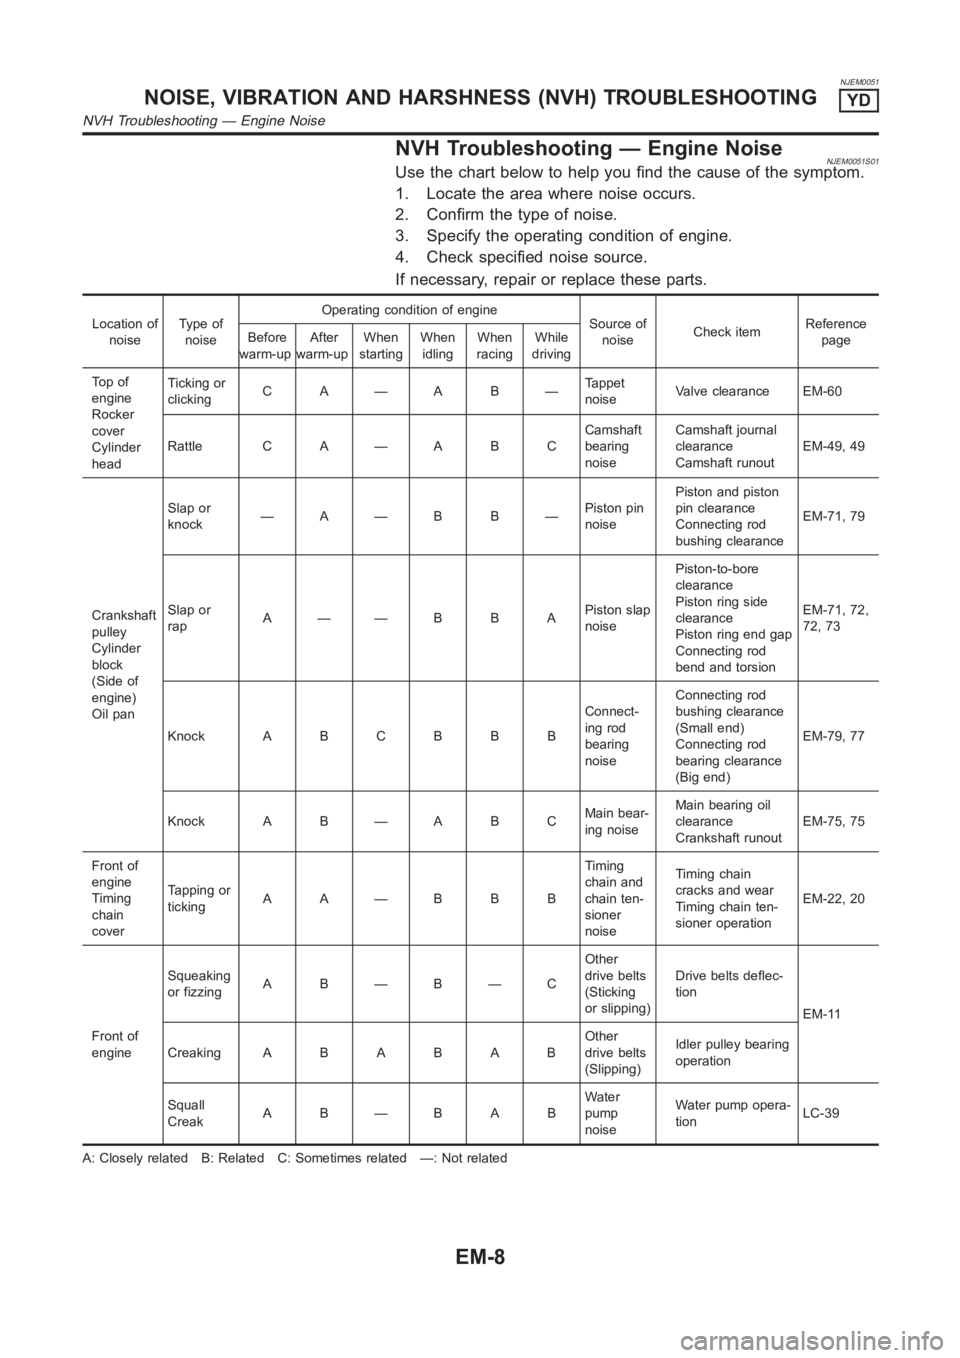
NVH Troubleshooting — Engine NoiseNJEM0051S01Use the chart below to help you find the cause of the symptom.
1. Locate the area where noise occurs.
2. Confirm the type of noise.
3. Specify the operating condition of engine.
4. Check specified noise source.
If necessary, repair or replace these parts.
Location of
noiseTy p e o f
noiseOperating condition of engine
Source of
noiseCheck itemReference
page Before
warm-upAfter
warm-upWhen
startingWhen
idlingWhen
racingWhile
driving
To p o f
engine
Rocker
cover
Cylinder
headTicking or
clickingC A—A B—Tappet
noiseValve clearance EM-60
Rattle C A — A B CCamshaft
bearing
noiseCamshaft journal
clearance
Camshaft runoutEM-49, 49
Crankshaft
pulley
Cylinder
block
(Side of
engine)
Oil panSlap or
knock—A—B B—Piston pin
noisePiston and piston
pin clearance
Connecting rod
bushing clearanceEM-71, 79
Slap or
rapA——B B APiston slap
noisePiston-to-bore
clearance
Piston ring side
clearance
Piston ring end gap
Connecting rod
bend and torsionEM-71, 72,
72, 73
Knock A B C B B BConnect-
ing rod
bearing
noiseConnecting rod
bushing clearance
(Small end)
Connecting rod
bearing clearance
(Big end)EM-79, 77
Knock A B — A B CMain bear-
ing noiseMain bearing oil
clearance
Crankshaft runoutEM-75, 75
Front of
engine
Timing
chain
coverTapping or
tickingAA—BBBTiming
chain and
chain ten-
sioner
noiseTiming chain
cracks and wear
Timing chain ten-
sioner operationEM-22, 20
Front of
engineSqueaking
or fizzingA B—B—COther
drive belts
(Sticking
or slipping)Drive belts deflec-
tion
EM-11
CreakingABABABOther
drive belts
(Slipping)Idler pulley bearing
operation
Squall
CreakAB—BABWater
pump
noiseWater pump opera-
tionLC-39
A: Closely related B: Related C: Sometimes related —: Not related
NOISE, VIBRATION AND HARSHNESS (NVH) TROUBLESHOOTINGYD
NVH Troubleshooting — Engine Noise
EM-8
Page 195 of 3189

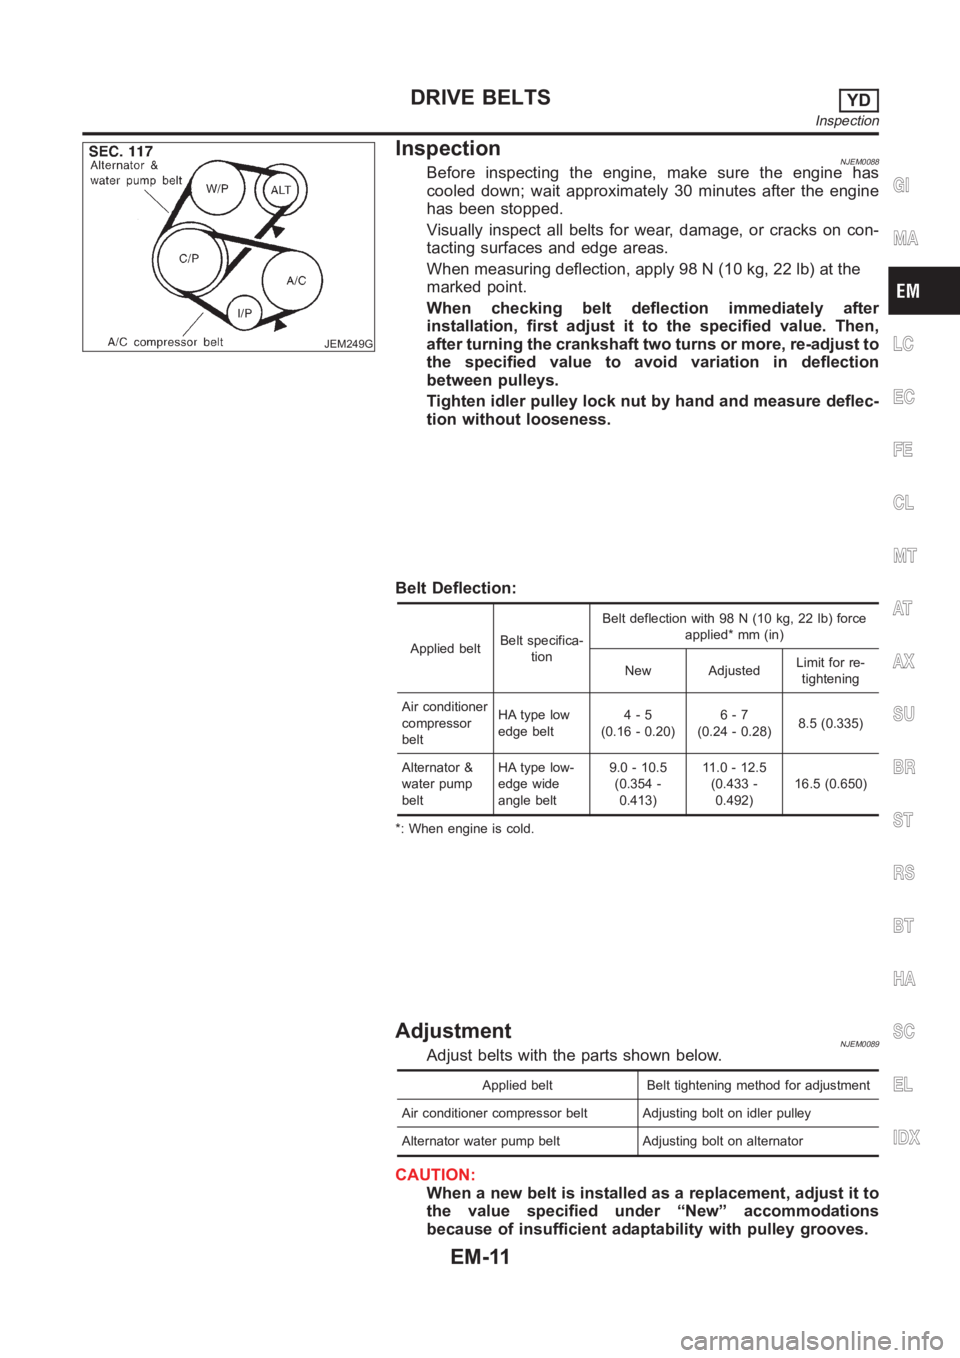
JEM249G
InspectionNJEM0088Before inspecting the engine, make sure the engine has
cooled down; wait approximately 30 minutes after the engine
has been stopped.
Visually inspect all belts for wear, damage, or cracks on con-
tacting surfaces and edge areas.
When measuring deflection, apply 98 N (10 kg, 22 lb) at the
marked point.
When checking belt deflection immediately after
installation, first adjust it to the specified value. Then,
after turning the crankshaft two turns or more, re-adjust to
the specified value to avoid variation in deflection
between pulleys.
Tighten idler pulley lock nut by hand and measure deflec-
tion without looseness.
Belt Deflection:
Applied beltBelt specifica-
tionBelt deflection with 98 N (10 kg, 22 lb) force
applied* mm (in)
New AdjustedLimit for re-
tightening
Air conditioner
compressor
beltHA type low
edge belt4-5
(0.16 - 0.20)6-7
(0.24 - 0.28)8.5 (0.335)
Alternator &
water pump
beltHA type low-
edge wide
angle belt9.0 - 10.5
(0.354 -
0.413)11 . 0 - 1 2 . 5
(0.433 -
0.492)16.5 (0.650)
*: When engine is cold.
AdjustmentNJEM0089Adjust belts with the parts shown below.
Applied belt Belt tightening method for adjustment
Air conditioner compressor belt Adjusting bolt on idler pulley
Alternator water pump belt Adjusting bolt on alternator
CAUTION:
When a new belt is installed as a replacement, adjust it to
the value specified under “New” accommodations
because of insufficient adaptability with pulley grooves.
GI
MA
LC
EC
FE
CL
MT
AT
AX
SU
BR
ST
RS
BT
HA
SC
EL
IDX
DRIVE BELTSYD
Inspection
EM-11
Page 196 of 3189

If the belt deflection of the current belt is out of the “Limit
for re-tightening”, adjust to the “Adjusted value”.
When checking belt deflection immediately after
installation, first adjust it to the specified value. Then,
after turning crankshaft two turns or more, re-adjust it to
the specified value to avoid variation in deflection
between pulleys.
Make sure the belts are fully fitted into the pulley grooves
during installation.
Handle with care to avoid smearing the belts with oil or
cooling water etc.
Do not twist or bend the belts with strong force.
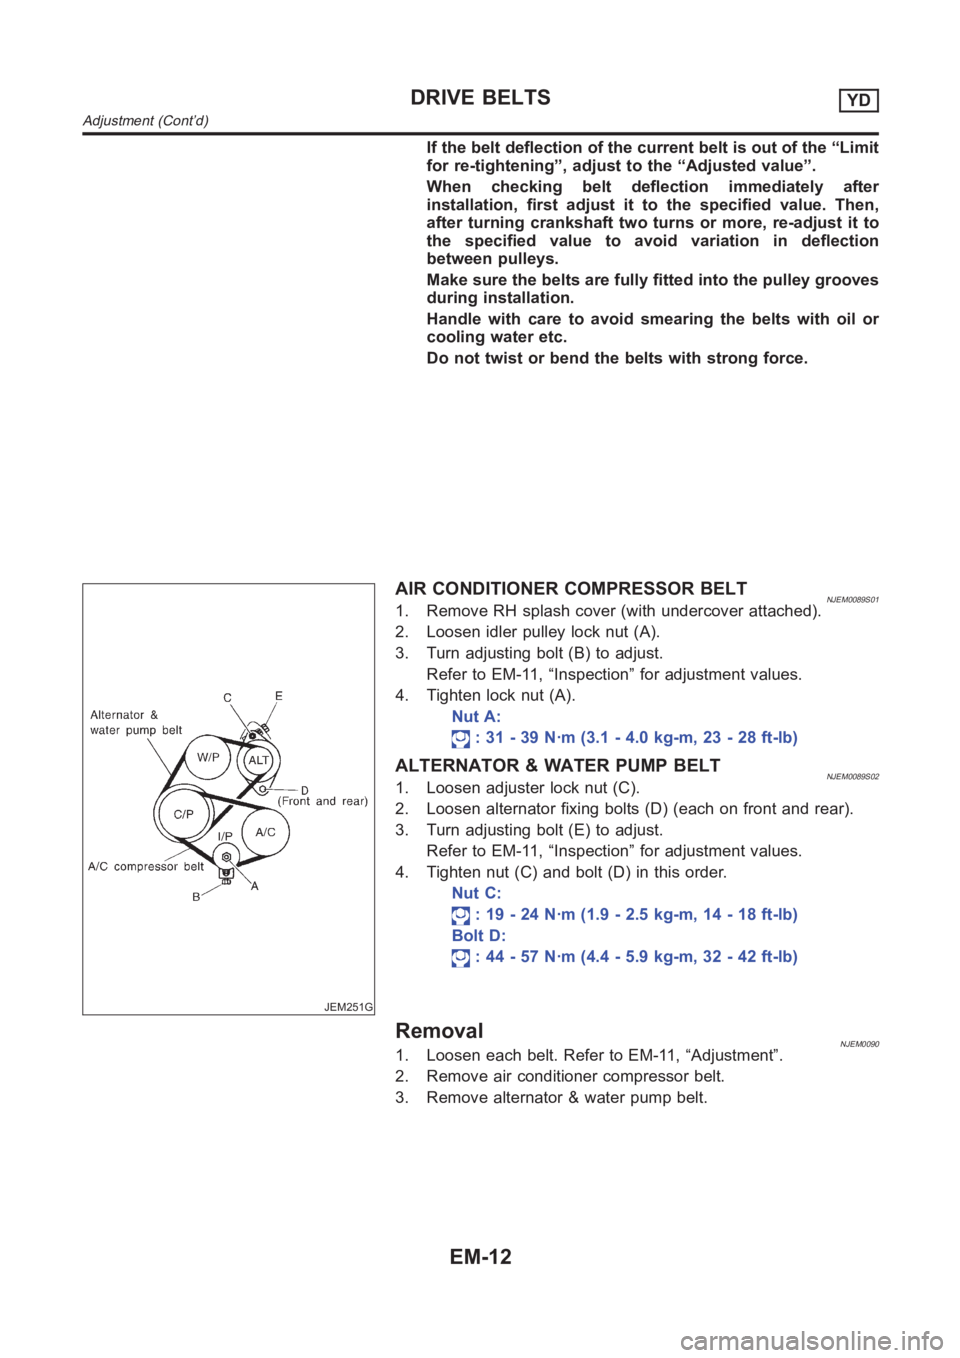
JEM251G
AIR CONDITIONER COMPRESSOR BELTNJEM0089S011. Remove RH splash cover (with undercover attached).
2. Loosen idler pulley lock nut (A).
3. Turn adjusting bolt (B) to adjust.
Refer to EM-11, “Inspection” for adjustment values.
4. Tighten lock nut (A).
Nut A:
: 31 - 39 N·m (3.1 - 4.0 kg-m, 23 - 28 ft-lb)
ALTERNATOR & WATER PUMP BELTNJEM0089S021. Loosen adjuster lock nut (C).
2. Loosen alternator fixing bolts (D) (each on front and rear).
3. Turn adjusting bolt (E) to adjust.
Refer to EM-11, “Inspection” for adjustment values.
4. Tighten nut (C) and bolt (D) in this order.
Nut C:
: 19 - 24 N·m (1.9 - 2.5 kg-m, 14 - 18 ft-lb)
Bolt D:
: 44 - 57 N·m (4.4 - 5.9 kg-m, 32 - 42 ft-lb)
RemovalNJEM00901. Loosen each belt. Refer to EM-11, “Adjustment”.
2. Remove air conditioner compressor belt.
3. Remove alternator & water pump belt.
DRIVE BELTSYD
Adjustment (Cont’d)
EM-12