2003 NISSAN ALMERA N16 iat
[x] Cancel search: iatPage 1314 of 3189

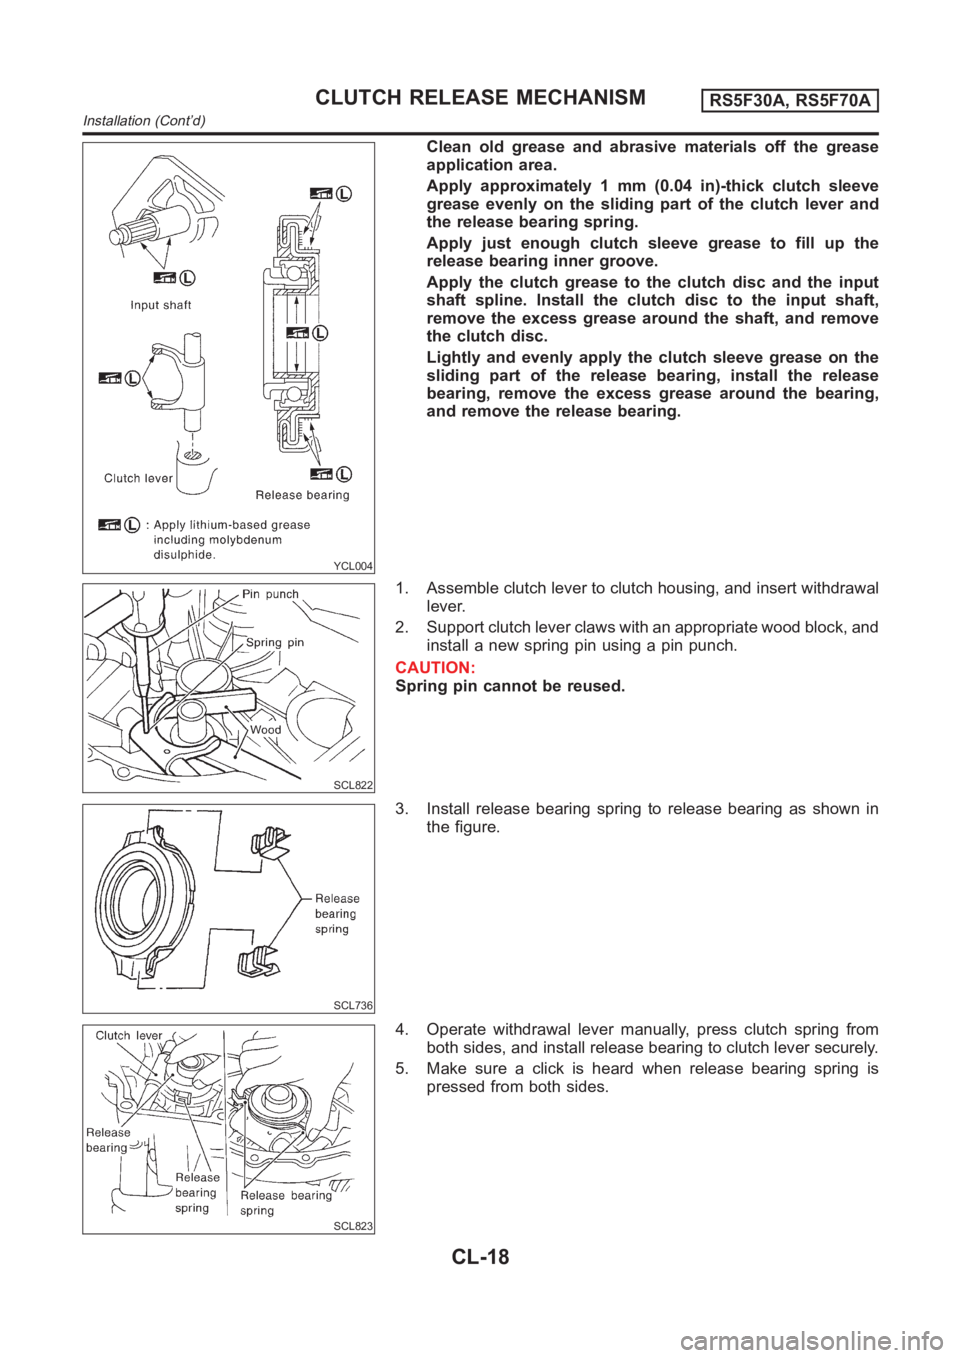
YCL004
Clean old grease and abrasive materials off the grease
application area.
Apply approximately 1 mm (0.04 in)-thick clutch sleeve
grease evenly on the sliding part of the clutch lever and
the release bearing spring.
Apply just enough clutch sleeve grease to fill up the
release bearing inner groove.
Apply the clutch grease to the clutch disc and the input
shaft spline. Install the clutch disc to the input shaft,
remove the excess grease around the shaft, and remove
the clutch disc.
Lightly and evenly apply the clutch sleeve grease on the
sliding part of the release bearing, install the release
bearing, remove the excess grease around the bearing,
and remove the release bearing.
SCL822
1. Assemble clutch lever to clutch housing, and insert withdrawal
lever.
2. Support clutch lever claws with an appropriate wood block, and
install a new spring pin using a pin punch.
CAUTION:
Spring pin cannot be reused.
SCL736
3. Install release bearing spring to release bearing as shown in
the figure.
SCL823
4. Operate withdrawal lever manually, press clutch spring from
both sides, and install release bearing to clutch lever securely.
5. Make sure a click is heard when release bearing spring is
pressed from both sides.
CLUTCH RELEASE MECHANISMRS5F30A, RS5F70A
Installation (Cont’d)
CL-18
Page 1469 of 3189

A/T FLUID
AT-13
D
E
F
G
H
I
J
K
L
MA
B
AT
A/T FLUIDPFP:KLE40
Checking A/T FluidECS007NC
1. Warm up engine.
2. Check for fluid leakage.
3. Before driving, fluid level can be checked at fluid temperatures
of 30 to 50°C (86 to 122°F) using “COLD” range on dipstick.
a. Park vehicle on level surface and set parking brake.
b. Start engine and move selector lever through each gear posi-
tion. Leave selector lever in “P” position.
c. Check fluid level with engine idling.
d. Remove dipstick and note reading. If level is at low side of either
range, and fluid to the charging pipe.
e. Re-insert dipstick into charging pipe as far as it will go.
f. Remove dipstick and note reading. If reading is at low side of range, add fluid to the charging pipe.
Do not overfill.
4. Drive vehicle for approximately 5 minutes in urban areas.
5. Re-check fluid level at fluid temperatures of 50 to 80°C (122 to 176°F) using “HOT” range on dipstick.
6. Check fluid condition.
●If fluid is very dark or smells burned, refer to AT section for
checking operation of A/T. Flush cooling system after repair of
A/T.
●If A/T fluid contains frictional material (clutches, bands, etc.),
replace radiator and flush cooler line using cleaning solvent
and compressed air after repair of A/T. Refer to LC-16, "Radi-
ator".
Changing A/T FluidECS007ND
1. Warm up A/T fluid.
2. Stop engine.
3. Drain A/T fluid from drain plug and refill with new A/T fluid.
Always refill same volume with drained fluid.
4. Run engine at idle speed for five minutes.
5. Check fluid level and condition. Refer to AT- 1 3 , "
Checking A/T Fluid" . If fluid is still dirty, repeat steps 2
through 5.
SMA827CA
SMA853B
Fluid grade:
Genuine Nissan ATF or equivalent. Refer to MA-
19, "RECOMMENDED FLUID AND LUBRI-
CANTS".
Fluid capacity (With torque converter):
Approx. 7.7 (6-3/4 lmp qt)
Drain plug:
: 29 - 39 N·m (3.0 - 4.0 kg-m, 22 - 29 ft-lb)
SMA027D
Page 1520 of 3189
![NISSAN ALMERA N16 2003 Electronic Repair Manual AT-64
[EURO-OBD]
TROUBLE DIAGNOSIS — BASIC INSPECTION
Stall Test
ECS007NX
STALL TEST PROCEDURE
1. Check A/T fluid and engine oil levels. If necessary, add.
2. Drive vehicle for approx. 10 minut NISSAN ALMERA N16 2003 Electronic Repair Manual AT-64
[EURO-OBD]
TROUBLE DIAGNOSIS — BASIC INSPECTION
Stall Test
ECS007NX
STALL TEST PROCEDURE
1. Check A/T fluid and engine oil levels. If necessary, add.
2. Drive vehicle for approx. 10 minut](/manual-img/5/57350/w960_57350-1519.png)
AT-64
[EURO-OBD]
TROUBLE DIAGNOSIS — BASIC INSPECTION
Stall Test
ECS007NX
STALL TEST PROCEDURE
1. Check A/T fluid and engine oil levels. If necessary, add.
2. Drive vehicle for approx. 10 minutes or until fluid and oil reach
operating temperature.
3. Set parking brake and block wheels.
4. Install a tachometer where it can be seen by driver during test.
●It is good practice to mark the point of specified engine
rpm on indicator.
5. Start engine, apply foot brake, and place selector lever in D
position.
6. Accelerate to wide open throttle gradually while applying foot
brake.
7. Quickly note the engine stall revolution and immediately release
throttle.
●During test, never hold throttle wide open for more than 5
seconds.
Stall revolution:
8. Move selector lever to “N” position.
9. Cool off ATF.
●Run engine at idle for at least one minute.
10. Repeat steps 5 through 9 with selector lever in “2”, “1” and “R”
positions.ATF operating temperature:
50 - 80°C (122 - 176°F)
SAT647B
SAT513G
SAT514G
QG18DE 2,300 - 2,750 rpm
SAT771B
Page 1718 of 3189
![NISSAN ALMERA N16 2003 Electronic Repair Manual AT-262
[EXC.F/EURO-OBD]
TROUBLE DIAGNOSIS — BASIC INSPECTION
Stall Test
ECS007QS
STALL TEST PROCEDURE
1. Check A/T fluid and engine oil levels. If necessary, add.
2. Drive vehicle for approx. 10 NISSAN ALMERA N16 2003 Electronic Repair Manual AT-262
[EXC.F/EURO-OBD]
TROUBLE DIAGNOSIS — BASIC INSPECTION
Stall Test
ECS007QS
STALL TEST PROCEDURE
1. Check A/T fluid and engine oil levels. If necessary, add.
2. Drive vehicle for approx. 10](/manual-img/5/57350/w960_57350-1717.png)
AT-262
[EXC.F/EURO-OBD]
TROUBLE DIAGNOSIS — BASIC INSPECTION
Stall Test
ECS007QS
STALL TEST PROCEDURE
1. Check A/T fluid and engine oil levels. If necessary, add.
2. Drive vehicle for approx. 10 minutes or until fluid and oil reach
operating temperature.
3. Set parking brake and block wheels.
4. Install a tachometer where it can be seen by driver during test.
●It is good practice to mark the point of specified engine
rpm on indicator.
5. Start engine, apply foot brake, and place selector lever in D
position.
6. Accelerate to wide open throttle gradually while applying foot
brake.
7. Quickly note the engine stall revolution and immediately release
throttle.
●During test, never hold throttle wide open for more than 5
seconds.
Stall revolution:
8. Move selector lever to “N” position.
9. Cool off ATF.
●Run engine at idle for at least one minute.
10. Repeat steps 5 through 9 with selector lever in “2”, “1” and “R”
positions.ATF operating temperature:
50 - 80°C (122 - 176°F)
SAT647B
SAT513G
SAT514G
QG18DE 2,300 - 2,750 rpm
SAT771B
Page 1875 of 3189
![NISSAN ALMERA N16 2003 Electronic Repair Manual DISASSEMBLY
AT-419
[ALL]
D
E
F
G
H
I
J
K
L
MA
B
AT
4. Remove A/T fluid charging pipe and fluid cooler tube.
5. Set manual shaft to position P.
6. Remove park/neutral position (PNP) switch.
7. Remove o NISSAN ALMERA N16 2003 Electronic Repair Manual DISASSEMBLY
AT-419
[ALL]
D
E
F
G
H
I
J
K
L
MA
B
AT
4. Remove A/T fluid charging pipe and fluid cooler tube.
5. Set manual shaft to position P.
6. Remove park/neutral position (PNP) switch.
7. Remove o](/manual-img/5/57350/w960_57350-1874.png)
DISASSEMBLY
AT-419
[ALL]
D
E
F
G
H
I
J
K
L
MA
B
AT
4. Remove A/T fluid charging pipe and fluid cooler tube.
5. Set manual shaft to position P.
6. Remove park/neutral position (PNP) switch.
7. Remove oil pan and oil pan gasket.
●Do not reuse oil pan bolts.
8. Check foreign materials in oil pan to help determine causes of
malfunction. If the fluid is very dark, smells burned, or contains
foreign particles, the frictional material (clutches, band) may
need replacement. A tacky film that will not wipe clean indicates
varnish build up. Varnish can cause valves, servo, and clutches
to stick and can inhibit pump pressure.
●If frictional material is detected, replace radiator after
repair of A/T. Refer to LC-16, "RADIATOR".
9. Remove control valve assembly according to the following pro-
cedures.
a. Remove control valve assembly mounting bolts A, B and C.
MCIB9012E
SAT023JA
SAT128E
AAT260A
Page 1984 of 3189

ATC-4
PRECAUTIONS
PRECAUTIONS
PFP:00001
Precautions for Supplemental Restraint System (SRS) “AIR BAG” and “SEAT
BELT PRE-TENSIONER”
EJS001YP
The Supplemental Restraint System such as “AIR BAG” and “SEAT BELT PRE-TENSIONER”, used along
with a front seat belt, helps to reduce the risk or severity of injury to the driver and front passenger for certain
types of collision. Information necessary to service the system safely is included in the SRS and SB section of
this Service Manual.
WARNING:
●To avoid rendering the SRS inoperative, which could increase the risk of personal injury or death
in the event of a collision which would result in air bag inflation, all maintenance must be per-
formed by an authorized NISSAN/INFINITI dealer.
●Improper maintenance, including incorrect removal and installation of the SRS, can lead to per-
sonal injury caused by unintentional activation of the system. For removal of Spiral Cable and Air
Bag Module, see the SRS section.
●Do not use electrical test equipment on any circuit related to the SRS unless instructed to in this
Service Manual. SRS wiring harnesses can be identified by yellow and/or orange harness connec-
tors.
Precautions for Working with HFC-134a (R-134a)EJS001YQ
WARNING:
●Use only specified lubricant for the HFC-134a (R-134a) A/C system and HFC-134a (R-134a) compo-
nents. If lubricant other than that specified is used, compressor malfunction is likely to occur.
●The specified HFC-134a (R-134a) lubricant rapidly absorbs moisture from the atmosphere. The fol-
lowing handling precautions must be observed:
–When removing refrigerant components from a vehicle, immediately cap (seal) the component to
minimize the entry of moisture from the atmosphere.
–When installing refrigerant components to a vehicle, do not remove the caps (unseal) until just
before connecting the components. Connect all refrigerant loop components as quickly as possi-
ble to minimize the entry of moisture into system.
–Only use the specified lubricant from a sealed container. Immediately reseal containers of lubri-
cant. Without proper sealing, lubricant will become moisture saturated and should not be used.
–Avoid breathing A/C refrigerant and lubricant vapor or mist. Exposure may irritate eyes, nose and
throat. Remove HFC-134a (R-134a) from the A/C system, using certified service equipment meet-
ing requirements of SAE J2210 HFC-134a (R-134a) recycling equipment, or J2209 HFC-134a (R-
134a) recovery equipment. If accidental system discharge occurs, ventilate work area before
resuming service. Additional health and safety information may be obtained from refrigerant and
lubricant manufacturers.
–Do not allow lubricant (Nissan A/C System Oil Type S) to come in contact with styrofoam parts.
Damage may result.
General Refrigerant PrecautionsEJS001YR
WARNING:
●Do not release refrigerant into the air. Use approved recovery/recycling equipment to capture the
refrigerant every time an air conditioning system is discharged.
●Always wear eye and hand protection (goggles and gloves) when working with any refrigerant or
air conditioning system.
●Do not store or heat refrigerant containers above 52°C (125°F).
●Do not heat a refrigerant container with an open flame; if container warming is required, place the
bottom of the container in a warm pail of water.
●Do not intentionally drop, puncture, or incinerate refrigerant containers.
●Keep refrigerant away from open flames: poisonous gas will be produced if refrigerant burns.
●Refrigerant will displace oxygen, therefore be certain to work in well ventilated areas to prevent
suffocation.
●Do not pressure test or leak test HFC-134a (R-134a) service equipment and/or vehicle air condi-
tioning systems with compressed air during repair. Some mixtures of air and HFC-134a (R-134a)
Page 1985 of 3189

PRECAUTIONS
ATC-5
C
D
E
F
G
H
I
K
L
MA
B
AT C
have been shown to be combustible at elevated pressures. These mixtures, if ignited, may cause
injury or property damage. Additional health and safety information may be obtained from refriger-
ant manufacturers.
Lubricant PrecautionsEJS001YS
●Use only specified lubricant for the HFC-134a (R-134a) A/C system and HFC-134a (R-134a) components.
If lubricant other than that specified is used, compressor malfunction is likely to occur.
●The specified HFC-134a (R-134a) lubricant rapidly absorbs moisture from the atmosphere. The following
handling precautions must be observed:
–When removing refrigerant components from a vehicle, immediately cap (seal) the component to minimize
the entry of moisture from the atmosphere.
–When installing refrigerant components to a vehicle, do not remove the caps (unseal) until just before con-
necting the components. Connect all refrigerant loop components as quickly as possible to minimize the
entry of moisture into system.
–Only use the specified lubricant from a sealed container. Immediately reseal containers of lubricant. With-
out proper sealing, lubricant will become moisture saturated and should not be used.
●Avoid breathing A/C refrigerant and lubricant vapor or mist. Exposure may irritate eyes, nose and throat.
Remove HFC-134a (R-134a) from the A/C system, using certified service equipment meeting require-
ments of SAE J2210 HFC-134a (R-134a) recycling equipment, or J2209 HFC-134a (R-134a) recovery
equipment. If accidental system discharge occurs, ventilate work area before resuming service. Additional
health and safety information may be obtained from refrigerant and lubricant manufacturers.
●Do not allow lubricant (Nissan A/C System Oil Type S) to come in contact with styrofoam parts. Damage
may result.
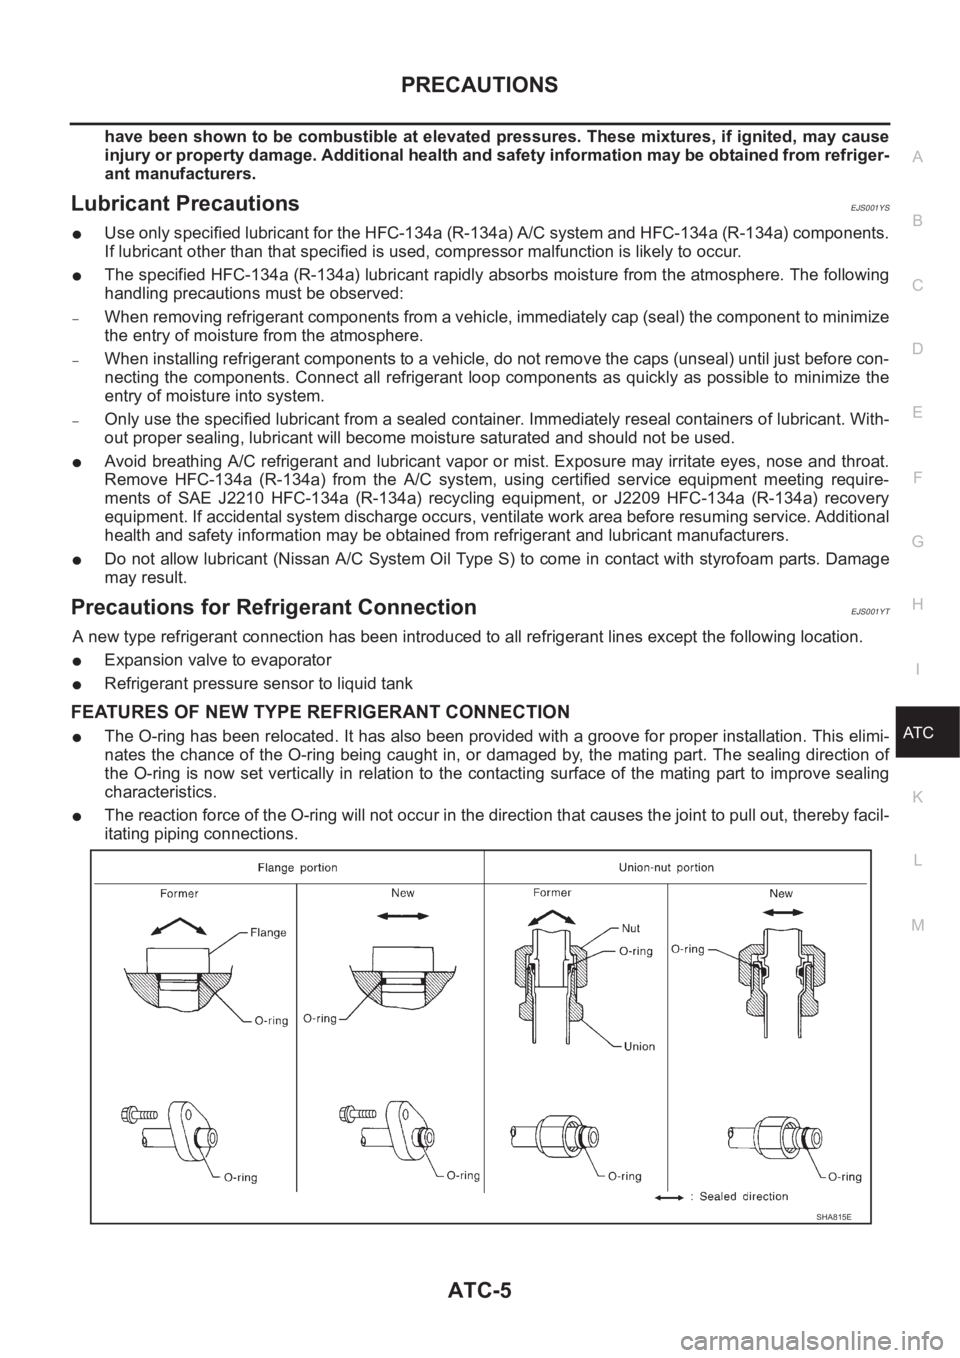
Precautions for Refrigerant ConnectionEJS001YT
A new type refrigerant connection has been introduced to all refrigerant lines except the following location.
●Expansion valve to evaporator
●Refrigerant pressure sensor to liquid tank
FEATURES OF NEW TYPE REFRIGERANT CONNECTION
●The O-ring has been relocated. It has also been provided with a groove for proper installation. This elimi-
nates the chance of the O-ring being caught in, or damaged by, the mating part. The sealing direction of
the O-ring is now set vertically in relation to the contacting surface of the mating part to improve sealing
characteristics.
●The reaction force of the O-ring will not occur in the direction that causes the joint to pull out, thereby facil-
itating piping connections.
SHA815E
Page 1986 of 3189

ATC-6
PRECAUTIONS
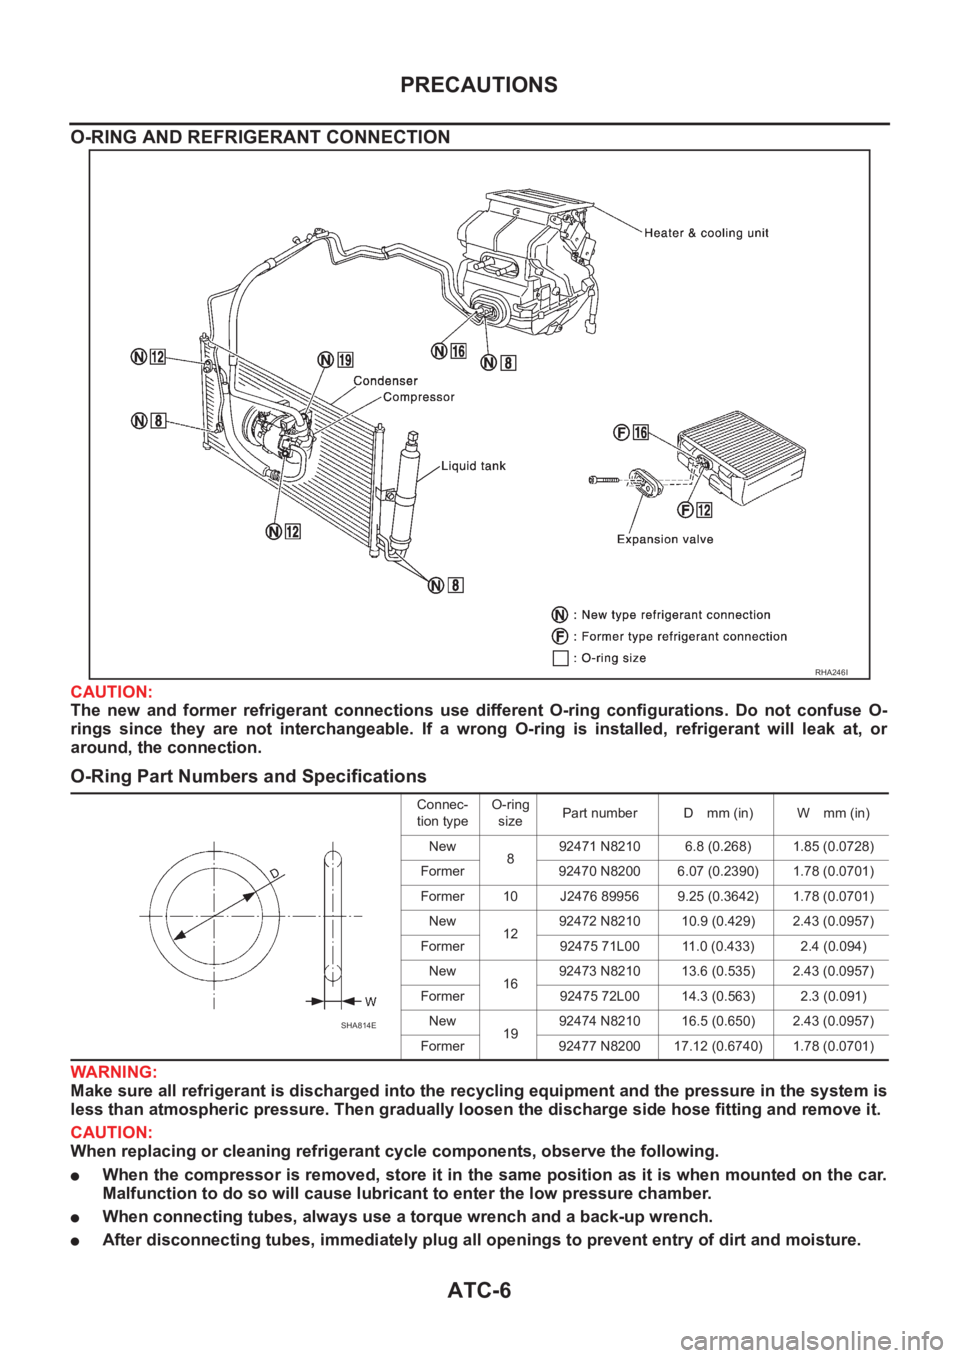
O-RING AND REFRIGERANT CONNECTION
CAUTION:
The new and former refrigerant connections use different O-ring configurations. Do not confuse O-
rings since they are not interchangeable. If a wrong O-ring is installed, refrigerant will leak at, or
around, the connection.
O-Ring Part Numbers and Specifications
WARNING:
Make sure all refrigerant is discharged into the recycling equipment and the pressure in the system is
less than atmospheric pressure. Then gradually loosen the discharge side hose fitting and remove it.
CAUTION:
When replacing or cleaning refrigerant cycle components, observe the following.
●When the compressor is removed, store it in the same position as it is when mounted on the car.
Malfunction to do so will cause lubricant to enter the low pressure chamber.
●When connecting tubes, always use a torque wrench and a back-up wrench.
●After disconnecting tubes, immediately plug all openings to prevent entry of dirt and moisture.
RHA246I
Connec-
tion typeO-ring
sizePart number D mm (in) W mm (in)
New
892471 N8210 6.8 (0.268) 1.85 (0.0728)
Former 92470 N8200 6.07 (0.2390) 1.78 (0.0701)
Former 10 J2476 89956 9.25 (0.3642) 1.78 (0.0701)
New
1292472 N8210 10.9 (0.429) 2.43 (0.0957)
Former 92475 71L00 11.0 (0.433) 2.4 (0.094)
New
1692473 N8210 13.6 (0.535) 2.43 (0.0957)
Former 92475 72L00 14.3 (0.563) 2.3 (0.091)
New
1992474 N8210 16.5 (0.650) 2.43 (0.0957)
Former 92477 N8200 17.12 (0.6740) 1.78 (0.0701)
SHA814E