2003 NISSAN 350Z buttons
[x] Cancel search: buttonsPage 66 of 227

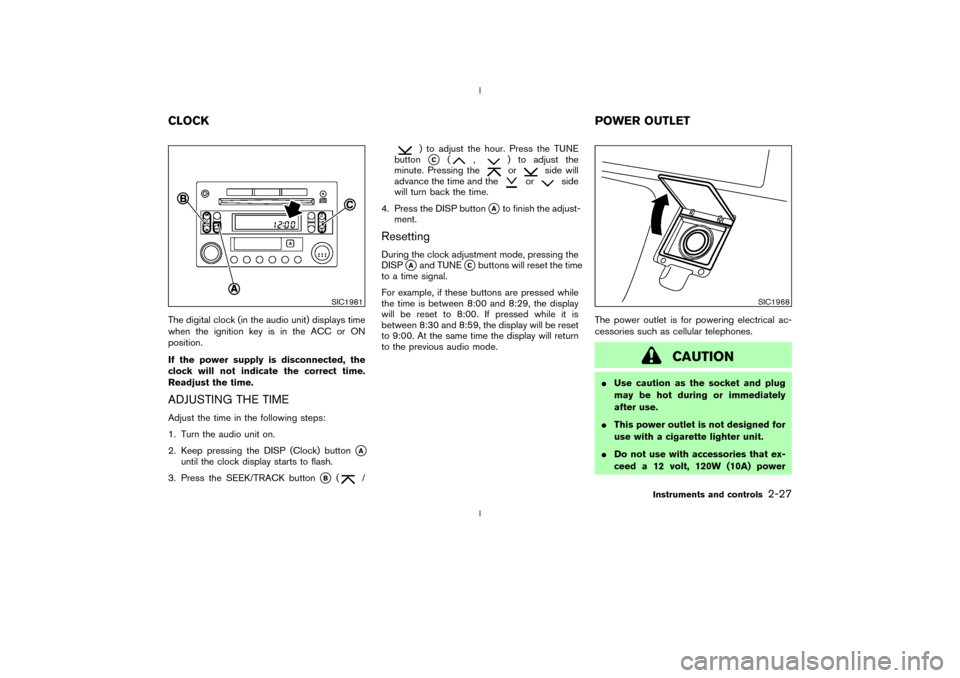
The digital clock (in the audio unit) displays time
when the ignition key is in the ACC or ON
position.
If the power supply is disconnected, the
clock will not indicate the correct time.
Readjust the time.ADJUSTING THE TIMEAdjust the time in the following steps:
1. Turn the audio unit on.
2. Keep pressing the DISP (Clock) button
qA
until the clock display starts to flash.
3. Press the SEEK/TRACK button
qB
(
/
) to adjust the hour. Press the TUNE
buttonqC
(
,
) to adjust the
minute. Pressing theor
side will
advance the time and the
or
side
will turn back the time.
4. Press the DISP button
qAto finish the adjust-
ment.
ResettingDuring the clock adjustment mode, pressing the
DISP
qAand TUNE
qCbuttons will reset the time
to a time signal.
For example, if these buttons are pressed while
the time is between 8:00 and 8:29, the display
will be reset to 8:00. If pressed while it is
between 8:30 and 8:59, the display will be reset
to 9:00. At the same time the display will return
to the previous audio mode.The power outlet is for powering electrical ac-
cessories such as cellular telephones.
CAUTION
IUse caution as the socket and plug
may be hot during or immediately
after use.
IThis power outlet is not designed for
use with a cigarette lighter unit.
IDo not use with accessories that ex-
ceed a 12 volt, 120W (10A) power
SIC1981
SIC1968
CLOCKPOWER OUTLET
Instruments and controls
2-27
Z
02.9.13/Z33-D/V5.0
X
Page 75 of 227

The light on the vanity mirror will turn on when
the cover on the vanity mirror is opened.
When the vanity mirror light stays on, it will
automatically turn off 30 minutes after the
ignition switch has been turned to the OFF
position. To turn on the light again, turn the
ignition switch to the ON position.The light illuminates when the rear hatch is
opened. When the rear hatch is closed, the light
will go off.The HomeLink
Universal Transceiver provides a
convenient way to consolidate the functions of
up to three individual hand-held transmitters into
one built-in device.
HomeLink
Universal Transceiver:
IWill operate most Radio Frequency (RF)
devices such as garage doors, gates, home
and office lighting, entry door locks and se-
curity systems.
IIs powered by your vehicle's battery. No
separate batteries are required. If the vehi-
cle's battery is discharged or is discon-
nected, HomeLink
will retain all program-
ming.
Once the HomeLinkUniversal Transceiver
is programmed, retain the original trans-
mitter for future programming procedures
(for example, new vehicle purchases).
Upon sale of the vehicle, the programmed
HomeLink
Universal Transceiver buttons
should be erased for security purposes.
For additional information, refer to ªPro-
gramming HomeLink
º later in this section.
SIC1859
VANITY MIRROR LIGHT (if so
equipped)LUGGAGE COMPARTMENT LIGHT
HomeLink
UNIVERSAL
TRANSCEIVER (if so equipped)
2-36
Instruments and controls
Z
02.9.13/Z33-D/V5.0
X
Page 76 of 227

WARNING
IDo not use the HomeLink
Universal
Transceiver with any garage door
opener that lacks safety stop and
reverse features as required by fed-
eral safety standards. (These stan-
dards became effective for opener
models manufactured after April 1,
1982). A garage door opener which
cannot detect an object in the path of
a closing garage door and then auto-
matically stop and reverse, does not
meet current federal safety stan-
dards. Using a garage door opener
without these features increases the
risk of serious injury or death.
IDuring programming, your garage
door or gate may open or close.
Make sure that people and objects
are clear of the garage door or gate
that you are programming.
IYour vehicle's engine should be
turned off while programming the
HomeLink
Universal Transceiver.
PROGRAMMING HomeLinkTo program your HomeLink Transceiver to oper-
ate a garage door, gate, or entry door opener,
home or office lighting, you need to be at the
same location as the device. Note: Garage door
openers (manufactured after 1996) have ªrolling
code protectionº. To program a garage door
opener equipped with ªrolling code protectionº;
you will need to use a ladder to get up to the
garage door opener motor to be able to access
the ªsmart or learnº program button.
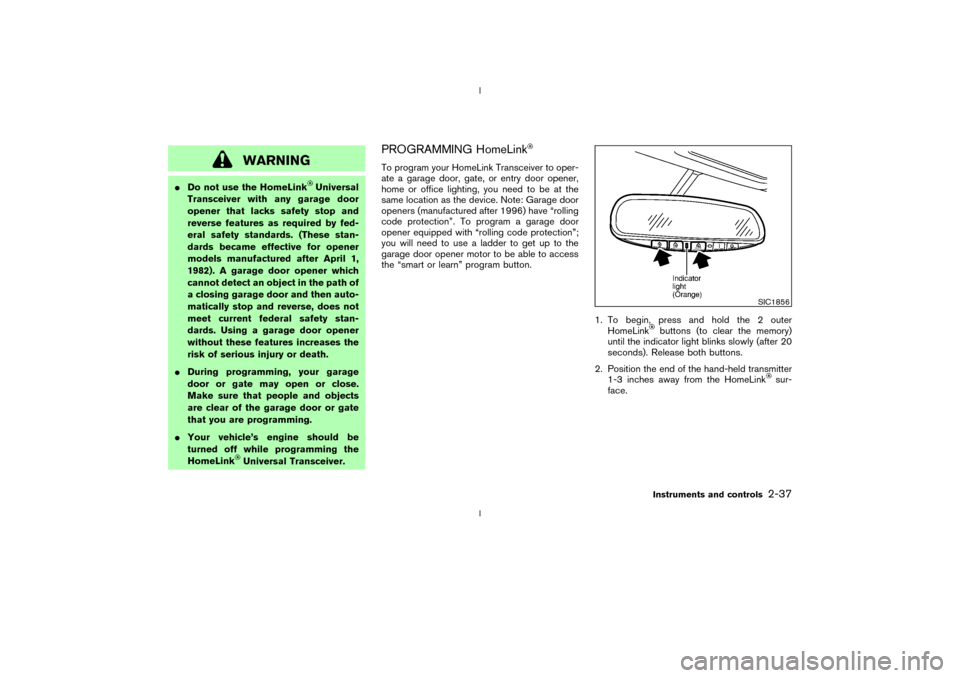
1. To begin, press and hold the 2 outer
HomeLink
buttons (to clear the memory)
until the indicator light blinks slowly (after 20
seconds). Release both buttons.
2. Position the end of the hand-held transmitter
1-3 inches away from the HomeLink
sur-
face.
SIC1856
Instruments and controls
2-37
Z
02.9.13/Z33-D/V5.0
X
Page 77 of 227

3. Using both hands, simultaneously press and
hold both the HomeLink
button you want to
program and the hand-held transmitter but-
ton.
DO NOT release the buttons until step 4 has
been completed.
4. Hold down both buttons until the indicator
light on the HomeLinkflashes, changing
from a ªslow blinkº to a ªrapidly flashing
blinkº. This could take up to 90 seconds.
When the indicator light flashes rapidly, both
buttons may be released. The rapidly flashing
light indicates successful programming. To
activate the garage door or other pro-
grammed device, press and hold the pro-grammed HomeLink
button - releasing
when the device begins to activate.
5. If the indicator light on the HomeLink
blinks
rapidly for two seconds and then turns solid,
HomeLink
has picked up a ªrolling codeº
garage door opener signal. You will need to
proceed with the next steps to train the
HomeLinkto complete the programming
which may require a ladder and another
person for convenience.
6. Press and release the ªsmartº or ªlearnº
program button located on the garage door
opener's motor to activate the ªtraining
modeº. This button is usually located near the
antenna wire that hangs down from the mo-
tor. If the wire originates from under a light
lens, you will need to remove the lens to
access the program button.
NOTE:
Once you have pressed and released the
program button on the garage door open-
er's motor and the ªtraining lightº is lit, you
have 30 seconds in which to perform step
7. Use the help of a second person for
convenience to assist when performing
this step.
7. Quickly within 30 seconds of pressing and
releasing the garage door opener programbutton, firmly press and release the
HomeLink
button you've just programmed.
Press and release the HomeLink
button up
to three times to complete the training.
8. Your HomeLink
button should now be pro-
grammed. (To program the remaining
HomeLink
buttons for additional door or
gate openers, follow steps 2-8 only.
NOTE:
Do not repeat step one unless you want to
ªclearº all previously programmed
HomeLinkbuttons).
If you have any questions or are having difficulty
programming your HomeLink
buttons, please
refer to the HomeLink
web site at: ww-
w.homelink.com or call 1-800-662-6200.
PROGRAMMING HomeLink
FOR
CANADIAN CUSTOMERS
Prior to 1992, D.O.C. regulations required hand-
held transmitters to stop transmitting after 2
seconds. To program your hand-held transmitter
to HomeLink
, continue to press and hold the
HomeLinkbutton (note steps 2 through 4
under ªProgramming HomeLink
º) while you
press and re-press (ªcycleº) your hand-held
transmitter every 2 seconds until the indicator
SIC1863
2-38
Instruments and controls
Z
02.9.13/Z33-D/V5.0
X
Page 78 of 227

light flashes rapidly (indicating successful pro-
gramming).
NOTE:
If programming a garage door opener, etc.,
it is advised to unplug the device during
the ªcyclingº process to prevent possible
damage to the garage door opener compo-
nents.OPERATING THE HomeLinkUNIVERSAL TRANSCEIVERThe HomeLink
Universal Transceiver (once
programmed) may now be used to activate the
garage door, etc. To operate, simply press the
appropriate programmed HomeLink
Universal
Transceiver button. The red indicator light will
illuminate while the signal is being transmitted.
PROGRAMMING TROUBLE
DIAGNOSISIf the HomeLink
does not quickly learn the
hand-held transmitter information:
Ireplace the hand-held transmitter batteries
with new batteries.
Iposition the hand-held transmitter with its
battery area facing away from the HomeLink
surface.Ipress and hold both the HomeLink
and
hand-held transmitter buttons without inter-
ruption.
Iposition the hand-held transmitter 2 to 5
inches (50 to 127 mm) away from the
HomeLink
surface. Hold the transmitter in
that position for up to 15 seconds. If
HomeLinkis not programmed within that
time, try holding the transmitter in another
position - keeping the indicator light in view at
all times.
If you continue to have programming difficulties,
please contact the NISSAN Consumer Affairs
Department. The phone numbers are located in
the Foreword of this Owner's Manual.
CLEARING THE PROGRAMMED
INFORMATIONIndividual buttons cannot be cleared, however to
clear all programming, press and hold the two
outside buttons and release when the indicator
light begins to flash (approximately 20 seconds).
REPROGRAMMING A SINGLE
HomeLink
BUTTON
To reprogram a HomeLink
Universal Trans-
ceiver button, complete the following.
1. Press and hold the desired HomeLink
but-
ton.Do notrelease the button until step 4
has been completed.
2. When the indicator light begins to flash
slowly (after 20 seconds), position the hand-
held transmitter 2 to 5 inches (50 to 127 mm)
away from the HomeLink
surface.
3. Press and hold the hand-held transmitter
button.
4. The HomeLink
indicator light will flash, first
slowly and then rapidly. When the indicator
light begins to flash rapidly, release both
buttons.
The HomeLinkUniversal Transceiver button
has now been reprogrammed. The new device
can be activated by pushing the HomeLink
button that was just programmed. This proce-
dure will not affect any other programmed
HomeLink
buttons.
IF YOUR VEHICLE IS STOLENIf your vehicle is stolen, you should change the
codes of any non-rolling code device that has
Instruments and controls
2-39
Z
02.9.13/Z33-D/V5.0
X
Page 86 of 227

HOW TO USE REMOTE KEYLESS
ENTRY SYSTEM
Setting hazard indicator and horn
modeThis vehicle is set in hazard indicator and horn
mode when you first receive the vehicle.
In hazard indicator and horn mode, when the
LOCK button is pushed, the hazard indicator
flashes twice and the horn chirps once. When
the UNLOCK button is pushed, the hazard indi-
cator flashes once.
If hazard indicator and horn mode is not neces-sary, you can switch to hazard indicator only
mode by following the switching procedure.
In hazard indicator only mode, when the LOCK
button is pushed, the hazard indicator flashes
twice. When the UNLOCK button is pushed,
neither the hazard indicator nor the horn oper-
ates.
(Switching procedure)
Push the LOCK and UNLOCK buttons on the
keyfob simultaneously for more than 2 seconds
to switch from one mode to the other.
When pushing the buttons to set hazard indica-tor only mode, the hazard indicator flashes 3
times.
When pushing the buttons to set hazard indica-
tor and horn mode, the hazard indicator flashes
once and the horn chirps once.
Locking doors1. Remove the ignition key.*1 *2
2. Close all the doors.*3
3. Push the LOCK button on the keyfob.
4. All the doors will lock.
All of the doors will lock when the LOCK
button on the keyfob is pushed even
though a door remains open and/or the
ignition key is in the ON position.
5. The hazard indicator flashes twice and the
horn chirps once.
IWhen the LOCK button is pushed with all
doors locked, the hazard indicator flashes
twice and the horn chirps once as a reminder
that the doors are already locked.
*1: Doors lock with the keyfob while a key is in
the ignition switch. However, the panic
alarm and the rear hatch release will not
activate when the key is in the ignition
switch.
SPA1260
Pre-driving checks and adjustments
3-5
Z
02.9.13/Z33-D/V5.0
X
Page 108 of 227

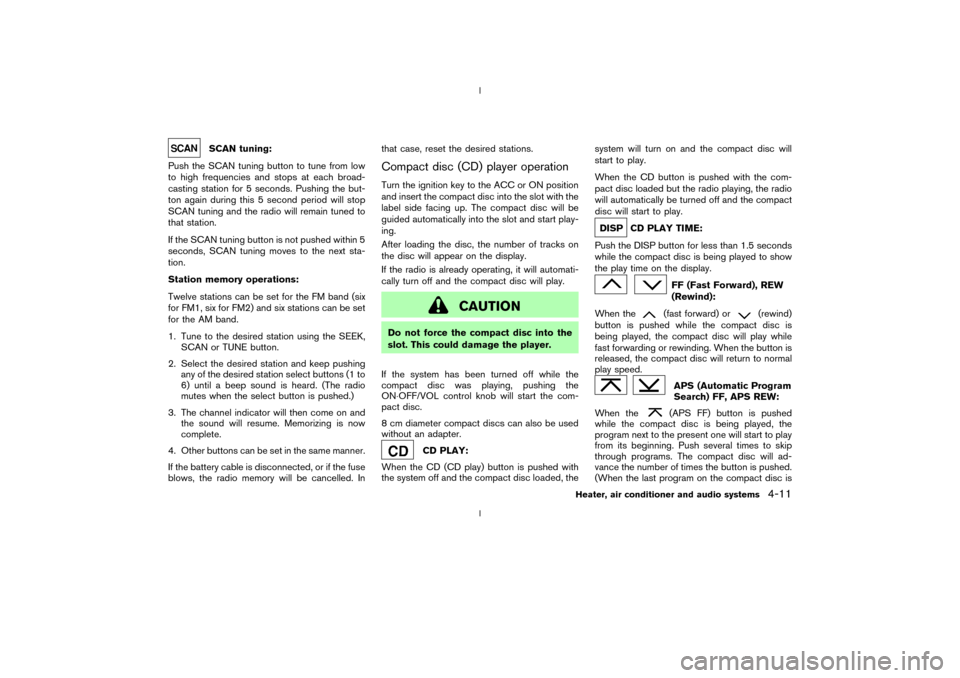
SCAN tuning:
Push the SCAN tuning button to tune from low
to high frequencies and stops at each broad-
casting station for 5 seconds. Pushing the but-
ton again during this 5 second period will stop
SCAN tuning and the radio will remain tuned to
that station.
If the SCAN tuning button is not pushed within 5
seconds, SCAN tuning moves to the next sta-
tion.
Station memory operations:
Twelve stations can be set for the FM band (six
for FM1, six for FM2) and six stations can be set
for the AM band.
1. Tune to the desired station using the SEEK,
SCAN or TUNE button.
2. Select the desired station and keep pushing
any of the desired station select buttons (1 to
6) until a beep sound is heard. (The radio
mutes when the select button is pushed.)
3. The channel indicator will then come on and
the sound will resume. Memorizing is now
complete.
4. Other buttons can be set in the same manner.
If the battery cable is disconnected, or if the fuse
blows, the radio memory will be cancelled. Inthat case, reset the desired stations.
Compact disc (CD) player operationTurn the ignition key to the ACC or ON position
and insert the compact disc into the slot with the
label side facing up. The compact disc will be
guided automatically into the slot and start play-
ing.
After loading the disc, the number of tracks on
the disc will appear on the display.
If the radio is already operating, it will automati-
cally turn off and the compact disc will play.
CAUTION
Do not force the compact disc into the
slot. This could damage the player.
If the system has been turned off while the
compact disc was playing, pushing the
ON×OFF/VOL control knob will start the com-
pact disc.
8 cm diameter compact discs can also be used
without an adapter.
CD PLAY:
When the CD (CD play) button is pushed with
the system off and the compact disc loaded, thesystem will turn on and the compact disc will
start to play.
When the CD button is pushed with the com-
pact disc loaded but the radio playing, the radio
will automatically be turned off and the compact
disc will start to play.
DISP CD PLAY TIME:
Push the DISP button for less than 1.5 seconds
while the compact disc is being played to show
the play time on the display.
FF (Fast Forward), REW
(Rewind):
When the(fast forward) or
(rewind)
button is pushed while the compact disc is
being played, the compact disc will play while
fast forwarding or rewinding. When the button is
released, the compact disc will return to normal
play speed.
APS (Automatic Program
Search) FF, APS REW:
When the(APS FF) button is pushed
while the compact disc is being played, the
program next to the present one will start to play
from its beginning. Push several times to skip
through programs. The compact disc will ad-
vance the number of times the button is pushed.
(When the last program on the compact disc is
Heater, air conditioner and audio systems
4-11
Z
02.9.13/Z33-D/V5.0
X
Page 112 of 227

change from stereo to monaural reception.
TUNE (Tuning):WARNING
The radio should not be tuned while
driving so full attention may be given to
vehicle operation.
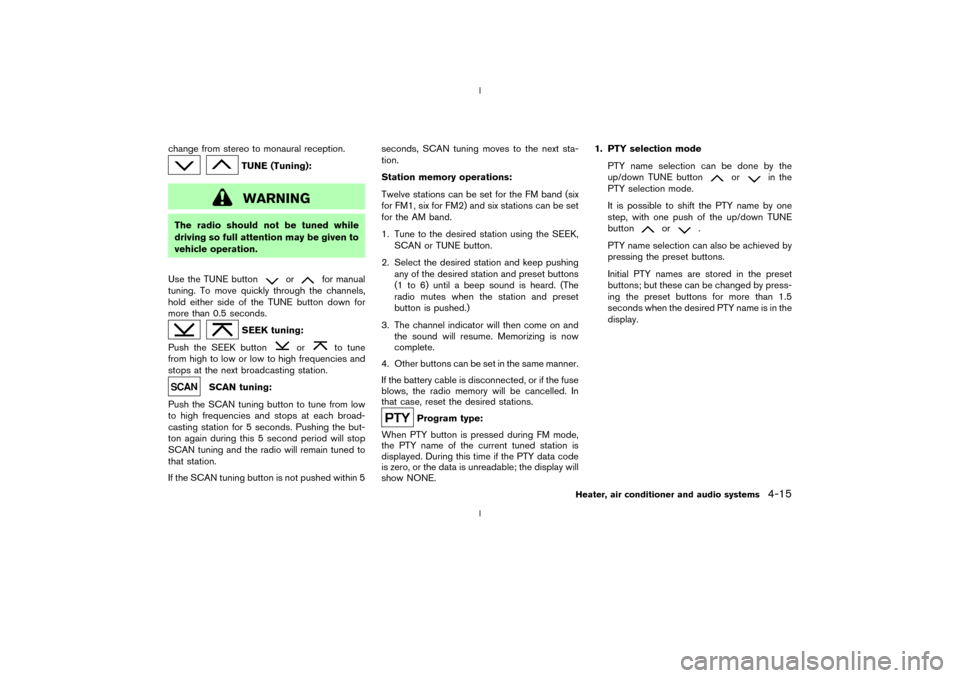
Use the TUNE button
or
for manual
tuning. To move quickly through the channels,
hold either side of the TUNE button down for
more than 0.5 seconds.
SEEK tuning:
Push the SEEK button
or
to tune
from high to low or low to high frequencies and
stops at the next broadcasting station.
SCAN tuning:
Push the SCAN tuning button to tune from low
to high frequencies and stops at each broad-
casting station for 5 seconds. Pushing the but-
ton again during this 5 second period will stop
SCAN tuning and the radio will remain tuned to
that station.
If the SCAN tuning button is not pushed within 5seconds, SCAN tuning moves to the next sta-
tion.
Station memory operations:
Twelve stations can be set for the FM band (six
for FM1, six for FM2) and six stations can be set
for the AM band.
1. Tune to the desired station using the SEEK,
SCAN or TUNE button.
2. Select the desired station and keep pushing
any of the desired station and preset buttons
(1 to 6) until a beep sound is heard. (The
radio mutes when the station and preset
button is pushed.)
3. The channel indicator will then come on and
the sound will resume. Memorizing is now
complete.
4. Other buttons can be set in the same manner.
If the battery cable is disconnected, or if the fuse
blows, the radio memory will be cancelled. In
that case, reset the desired stations.
Program type:
When PTY button is pressed during FM mode,
the PTY name of the current tuned station is
displayed. During this time if the PTY data code
is zero, or the data is unreadable; the display will
show NONE.1. PTY selection mode
PTY name selection can be done by the
up/down TUNE button
or
in the
PTY selection mode.
It is possible to shift the PTY name by one
step, with one push of the up/down TUNE
button
or
.
PTY name selection can also be achieved by
pressing the preset buttons.
Initial PTY names are stored in the preset
buttons; but these can be changed by press-
ing the preset buttons for more than 1.5
seconds when the desired PTY name is in the
display.
Heater, air conditioner and audio systems
4-15
Z
02.9.13/Z33-D/V5.0
X