Page 282 of 376
282 Practical hintsWhat to do if …Left display
Right display
Possible cause
Possible solution
Tire pressure
control activated!
Pressure display after
driving several mins.
The tire pressure is being checked.
H
Reactivate
tire press. monit
.
The tire inflation pressure monitor* is de-
activated.
�
Activate the tire inflation pressure
monitor* (
�page 237).
Tire press. monit.
currently inactive
The tire inflation pressure monitor* is un-
able to monitor the tire pressure due to:�
the presence of several wheel sensors
in the vehicle
�
excessive wheel sensor temperatures
�
a nearby radio interference source
�
unrecognized wheel sensors mounted
�
Check the tire pressure at the next
service station.
Warning!
G
Do not drive with a flat tire. A flat tire affects
the ability to steer or brake the vehicle.
You may lose control of the vehicle. Contin-
ued driving with a flat tire will cause exces-
sive heat build-up and possibly a fire.
Page 283 of 376
283 Practical hints
What to do if …
Left display
Right display
Possible cause
Possible solution
H
Tire press. monit.
Visit workshop!
The tire inflation pressure monitor is
malfunctioning.
A wheel without proper sensor was
installed.
�
Have the tire inflation pressure monitor
checked by an authorized Mercedes-Benz
Center.
�
Change the wheel.
Tire pressure, RL
Caution
tire defect!
The left rear tire is rapidly deflating.
�
Carefully bring the vehicle to a halt, avoiding
abrupt steering and braking maneuvers.
�
Change the wheel (
�page 312).
Tire pressure, RL
Check tires!
The left rear tire pressure is low.
�
Carefully bring the vehicle to a halt.
�
Check the tire pressure.
�
Change the wheel (
�page 312).
Warning!
G
Do not drive with a flat tire. A flat tire affects
the ability to steer or brake the vehicle. You
may lose control of the vehicle.
Continued driving with a flat tire will cause
excessive heat build-up and possibly a fire.
Page 284 of 376
284 Practical hintsWhat to do if …Left display
Right display
Possible cause
Possible solution
H
Tire pressure, RR
Caution
tire defect!
The right rear tire is rapidly deflat-
ing.
�
Carefully bring the vehicle to a halt, avoiding
abrupt steering and braking maneuvers.
�
Change the wheel (
�page 312).
Tire pressure, RR
Check tires!
The right rear tire pressure is low.
�
Carefully bring the vehicle to a halt.
�
Check the tire pressure.
�
Change the wheel (
�page 312).
Tire pressure, FL
Caution
tire defect!
The left front tire is rapidly deflat-
ing.
�
Carefully bring the vehicle to a halt, avoiding
abrupt steering and braking maneuvers.
�
Change the wheel (
�page 312).
Warning!
G
Do not drive with a flat tire. A flat tire affects
the ability to steer or brake the vehicle. You
may lose control of the vehicle. Continued
driving with a flat tire will cause excessive
heat build-up and possibly a fire.
Page 285 of 376
285 Practical hints
What to do if …
Left display
Right display
Possible cause
Possible solution
H
Tire pressure, FL
Check tires!
The left front tire pressure is low.
�
Carefully bring the vehicle to a halt.
�
Check the tire pressure.
�
Change the wheel (
�page 312).
Tire pressure, FR
Caution
tire defect!
The right front tire is rapidly deflat-
ing.
�
Carefully bring the vehicle to a halt, avoiding
abrubt steering and braking maneuvers.
�
Change the wheel (
�page 312).
Tire pressure, FR
Check tires!
The right front tire pressure is low.
�
Carefully bring the vehicle to a halt.
�
Change the wheel (
�page 312).
Warning!
G
Do not drive with a flat tire. A flat tire affects
the ability to steer or brake the vehicle. You
may lose control of the vehicle. Continued
driving with a flat tire will cause excessive
heat build-up and possibly a fire.
Page 293 of 376

293 Practical hints
Locking/unlocking in an emergency
Changing batteries
If the batteries in the key or the KEY-
LESS-GO* card are discharged, the vehicle
can no longer be locked or unlocked. It is
recommended to have the batteries re-
placed at an authorized Mercedes-Benz
Center.
Batteries contain materials that can harm
the environment if disposed of improperly.
Recycling of batteries is the preferred
method of disposal. Many states require
sellers of batteries to accept old batteries
for recycling.Key
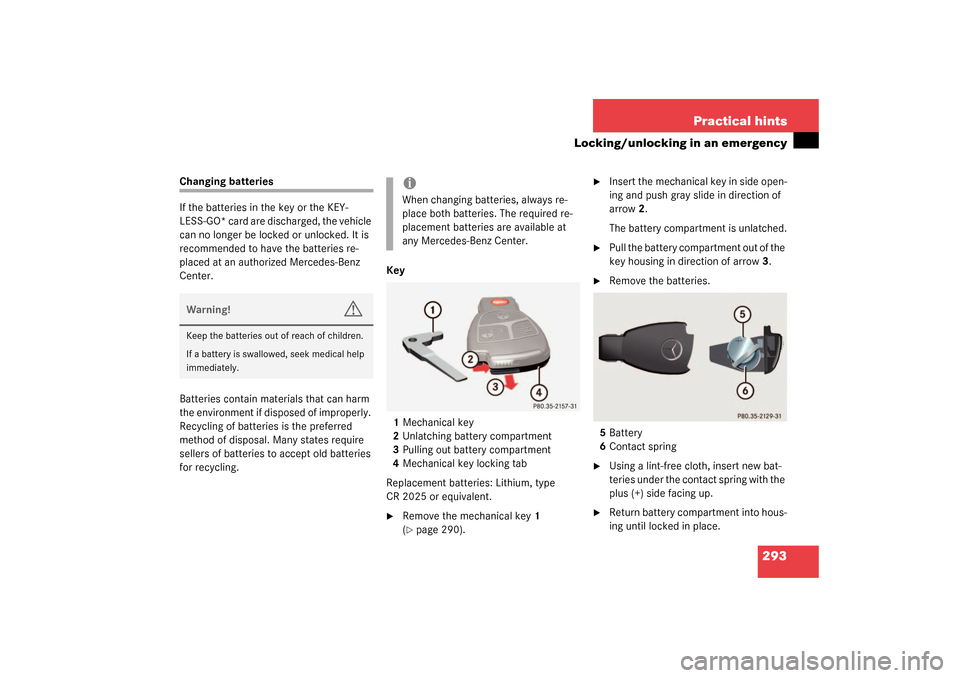
1Mechanical key
2Unlatching battery compartment
3Pulling out battery compartment
4Mechanical key locking tab
Replacement batteries: Lithium, type
CR 2025 or equivalent.
�
Remove the mechanical key1
(�page 290).
�
Insert the mechanical key in side open-
ing and push gray slide in direction of
arrow2.
The battery compartment is unlatched.
�
Pull the battery compartment out of the
key housing in direction of arrow3.
�
Remove the batteries.
5Battery
6Contact spring
�
Using a lint-free cloth, insert new bat-
teries under the contact spring with the
plus (+) side facing up.
�
Return battery compartment into hous-
ing until locked in place.
Warning!
G
Keep the batteries out of reach of children.
If a battery is swallowed, seek medical help
immediately.
iWhen changing batteries, always re-
place both batteries. The required re-
placement batteries are available at
any Mercedes-Benz Center.
Page 297 of 376

297 Practical hints
Replacing bulbs
Notes on bulb replacement�
Only use 12 volt bulbs of the same type
and with the specified watt rating.
�
Switch lights off before changing a bulb
to prevent short circuits.
�
Always use a clean lint-free cloth when
handling bulbs.
�
Your hands should be dry and free of oil
and grease.
�
If the newly installed bulb does not light
up, visit an authorized Mercedes-Benz
Center.Have the LEDs and bulbs for the following
lamps replaced by an authorized
Mercedes-Benz Center:
�
the additional turn signals in the exteri-
or rear view mirrors
�
the high mounted brake lamp
�
the brake lamps
�
the parking lamps and the side marker
lamps in the tail lamp assemblies
�
the rear fog lamps
�
the low beam (Xenon or Bi-Xenon*)
lamps
�
the front fog lamps
Warning!
G
Bulbs and bulb sockets can be very hot. Al-
low the lamp to cool down before changing
a bulb.
Keep bulbs out of reach of children.
Halogen lamps contain pressurized gas. A
bulb can explode if you:�
touch or move it when hot,
�
drop the bulb,
�
scratch the bulb.
Wear eye and hand protection.
Because of high voltage in Xenon lamps, it is
dangerous to replace the bulb or repair the
lamp and its components. We recommend
that you have such work done by a qualified
technician.
Page 298 of 376

298 Practical hintsReplacing bulbsReplacing bulbs for front lamps
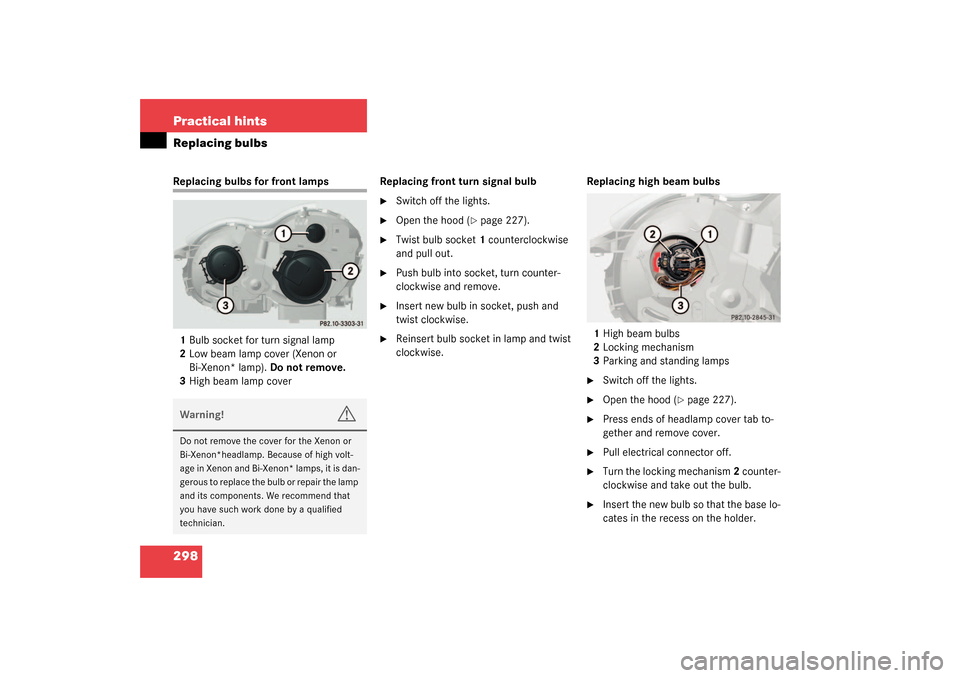
1Bulb socket for turn signal lamp
2Low beam lamp cover (Xenon or
Bi-Xenon* lamp). Do not remove.
3High beam lamp coverReplacing front turn signal bulb
�
Switch off the lights.
�
Open the hood (
�page 227).
�
Twist bulb socket 1 counterclockwise
and pull out.
�
Push bulb into socket, turn counter-
clockwise and remove.
�
Insert new bulb in socket, push and
twist clockwise.
�
Reinsert bulb socket in lamp and twist
clockwise.Replacing high beam bulbs
1High beam bulbs
2Locking mechanism
3Parking and standing lamps
�
Switch off the lights.
�
Open the hood (
�page 227).
�
Press ends of headlamp cover tab to-
gether and remove cover.
�
Pull electrical connector off.
�
Turn the locking mechanism 2 counter-
clockwise and take out the bulb.
�
Insert the new bulb so that the base lo-
cates in the recess on the holder.
Warning!
G
Do not remove the cover for the Xenon or
Bi-Xenon*headlamp. Because of high volt-
age in Xenon and Bi-Xenon* lamps, it is dan-
gerous to replace the bulb or repair the lamp
and its components. We recommend that
you have such work done by a qualified
technician.
Page 301 of 376

301 Practical hints
Replacing wiper blades
Replacing wiper blades
Removing�
Turn key in starter switch to position1.
�
Turn combination switch to wiper
setting2 (
�page 44).
�
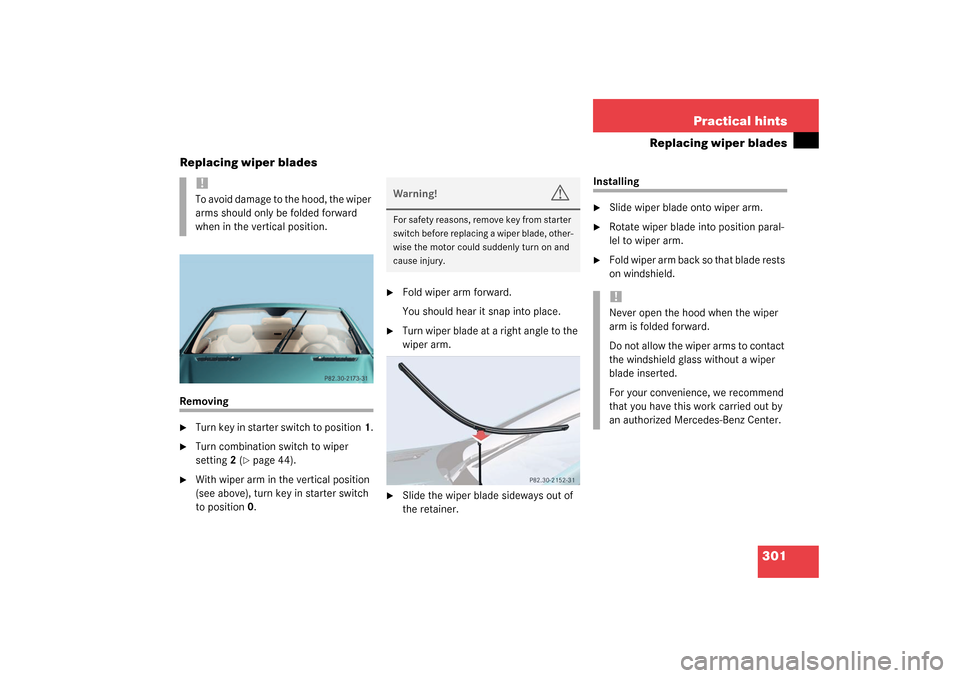
With wiper arm in the vertical position
(see above), turn key in starter switch
to position0.
�
Fold wiper arm forward.
You should hear it snap into place.
�
Turn wiper blade at a right angle to the
wiper arm.
�
Slide the wiper blade sideways out of
the retainer.
Installing�
Slide wiper blade onto wiper arm.
�
Rotate wiper blade into position paral-
lel to wiper arm.
�
Fold wiper arm back so that blade rests
on windshield.
!To avoid damage to the hood, the wiper
arms should only be folded forward
when in the vertical position.
Warning!
G
For safety reasons, remove key from starter
switch before replacing a wiper blade, other-
wise the motor could suddenly turn on and
cause injury.
!Never open the hood when the wiper
arm is folded forward.
Do not allow the wiper arms to contact
the windshield glass without a wiper
blade inserted.
For your convenience, we recommend
that you have this work carried out by
an authorized Mercedes-Benz Center.