Page 33 of 376

33 Getting started
Adjusting
The seat adjustment switch is located in
the door.
1Seat fore and aft adjustment
2Seat height
3Seat cushion tilt
4Backrest tilt
5Seat cushion depth
6Head restraint height�
Switch on the ignition by turning the
key in the starter switch to position2
or pressing the KEYLESS GO*
start/stop button twice.Seat fore and aft adjustment
�
Press the switch forward or backward
in the direction of arrow1.
Seat height
�
Press the switch up or down in the di-
rection of arrow2.
Seat cushion tilt
�
Press the switch up or down in the di-
rection of arrow3 until your upper legs
are lightly supported.
Backrest tilt
�
Press the switch forward or back in the
direction of arrow4.Seat cushion depth
�
Press the switch forward or back in the
direction of arrow5.
Head restraint height
�
Press the switch up or down in the di-
rection of arrow6.
!When moving the seat, be sure that
nothing is in the auxiliary cup holder
and that there are no items in the foot-
well or behind the seats. Otherwise the
seats could be damaged.
Warning!
G
For your protection, drive only with properly
positioned head restraints.
Adjust head restraint to support the back of
the head approximately at ear level.
Do not drive the vehicle without the seat
head restraints. Head restraints are intend-
ed to help reduce injuries during an acci-
dent.
Page 34 of 376

34 Getting startedAdjustingHead restraint tilt�
Manually adjust the angle of the head
restraint. Push or pull on the lower
edge of the head restraint cushion.
More information can be found in the
“Controls in detail” section (
�page 93).
Steering wheelThe stalk is located on the steering column
(lower left).
�
Make sure that the ignition is switched
on.
All the lights in the instrument cluster
light up.
1Steering column, lengthen or shorten
2Steering column, height
Steering column, lengthen or shorten
�
Move stalk forward or back in the direc-
tion of arrow1 until a comfortable
steering wheel position is reached with
your arms slightly bent at the elbow.
iThe memory function (
�page 99) lets
you store the steering wheel adjust-
ment together with the adjustment for
the seat and the exterior rear view mir-
rors.
Warning!
G
Do not adjust the steering wheel while driv-
ing. Adjusting the steering wheel while driv-
ing could cause the driver to lose control of
the vehicle.
When leaving the vehicle, always remove the
key from the starter switch, and take the
KEYLESS-GO
* card (if so equipped) with
you.
The steering wheel adjustment feature can
also be operated with the driver’s door
open. Do not leave children unattended in
the vehicle, or with access to an unlocked
vehicle. Unsupervised use of vehicle equip-
ment may cause an accident and/or serious
personal injury.
Page 35 of 376
35 Getting started
Adjusting
Steering column, height�
Move the stalk up or down in the direc-
tion of arrow2. Make sure that your
legs can move freely and that all the
displays (including malfunction and in-
dicator lamps) on the instrument clus-
ter are clearly visible.
Mirrors
Adjust the inside and exterior rear view
mirrors before driving so that you have a
good view of the road and traffic condi-
tions.
Inside rear view mirror�
Manually adjust the inside rear view
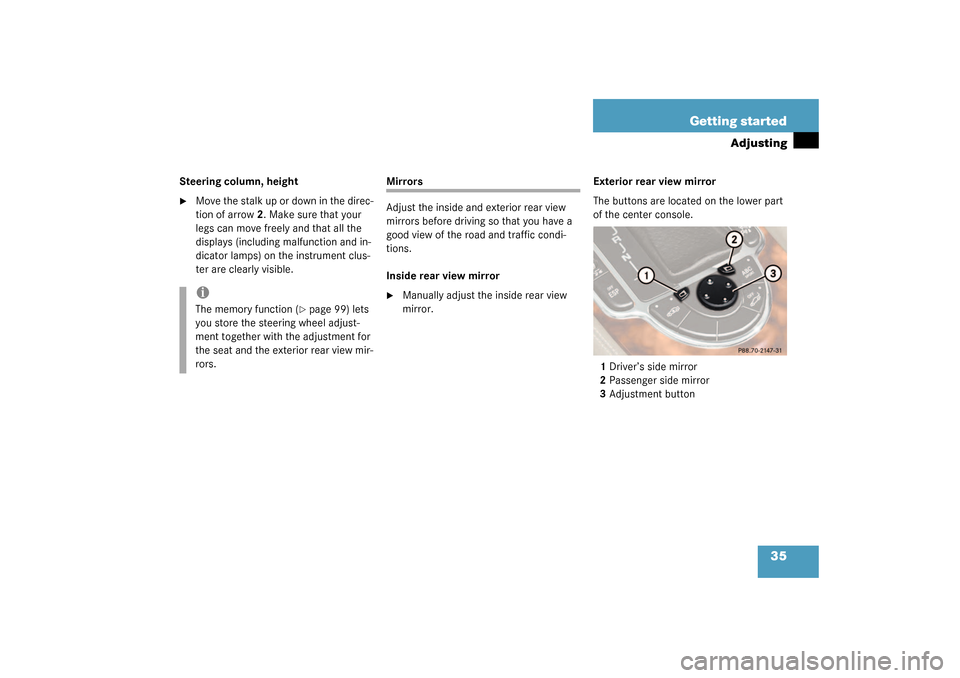
mirror.Exterior rear view mirror
The buttons are located on the lower part
of the center console.
1Driver’s side mirror
2Passenger side mirror
3Adjustment button
iThe memory function (
�page 99) lets
you store the steering wheel adjust-
ment together with the adjustment for
the seat and the exterior rear view mir-
rors.
Page 64 of 376

64 Safety and SecurityOccupant safety
BabySmart
TM airbag deactivation
system
Special BabySmart
TM compatible child
seats, designed for use with the
Mercedes-Benz system and available at
any authorized Mercedes-Benz Center, are
required for use with the BabySmart
TM air-
bag deactivation system. With the special
child seat properly installed, the passenger
front airbag will not deploy.
BabySmart
TM is a trademark of Siemens
Automotive Corp.
Infants and small children should never
share a seat belt with another occupant.
During an accident, they could be crushed
between the occupant and seat belt.
A child’s risk of serious or fatal injuries is
significantly increased if the child restraints
are not properly secured in the vehicle and
the child is not properly secured in the child
restraint.
Adjust the passenger seat as far as possible
rearward from the dashboard when the seat
is occupied.
Warning!
G
Children too big for child restraint systems
should use regular seat belts. Position the
shoulder belt across chest and shoulder, not
face or neck. A booster seat may be neces-
sary to achieve proper belt positioning for
children from 41 lbs. until they reach a
height where a lap/shoulder belt fits proper-
ly without a booster.
When the child restraint is not in use, re-
move it from the vehicle or secure it with the
seat belt to prevent the child restraint from
becoming a projectile in the event of an ac-
cident.
Do not leave children unattended in the ve-
hicle; even if the children are secured in a
child restraint system. Unsupervised chil-
dren in a child restraint system may use ve-
hicle equipment and may cause serious
personal injury.
Page 99 of 376

99 Controls in detail
Memory function
Memory function
With the memory switch you can store up
to three different settings per key and KEY-
LESS-GO* card.
The following settings are saved for each
stored position:�
Driver’s seat and backrest position
�
Steering wheel position
�
Inside rear view mirror position
�
Driver’s side exterior rear view mirror
position
�
Passenger side exterior rear view mir-
ror position
These key dependent memory settings can
be deactivated if desired (
�page 130).The memory switch is located on the door.
MMemory button
1, 2, 3Stored positions
�
Be sure that the ignition is switched on
or one door is open.
All the lamps in the instrument cluster
light up when the ignition is switched
on.
!Prior to operating the vehicle, the driv-
er should check and adjust the seat
height, seat position fore and aft, and
seat backrest angle if necessary, to en-
sure adequate control, reach and com-
fort. The head restraint should also be
adjusted for proper height. Also see air-
bag section (
�page 53) for proper seat
positioning.
In addition, adjust the steering wheel to
ensure adequate control, reach, opera-
tion and comfort. Both the inside and
outside rear view mirrors should be ad-
justed for adequate rear vision.
Fasten seat belts. Infants and small
children should be seated in a properly
secured restraint system that complies
with U.S. Federal Motor Vehicle Safety
Standard 213 and Canadian Motor Ve-
hicle Safety Standard 213.
Warning!
G
Do not activate the memory function while
driving. Activating the memory function
while driving could cause the driver to lose
control of the vehicle.
Page 160 of 376

160 Controls in detailRetractable hardtopLuggage cover
The luggage cover is located in the trunk.
1Handle
2Holders
Closing luggage cover�
Pull out the luggage cover using the
handle1.
�
Hook the luggage cover into the left
and right side holders2.Opening luggage cover
�
Unhook luggage cover from side hold-
ers.
�
While holding onto the handle1, guide
luggage cover back into its storage
compartment. Opening the retractable hardtop with
the switch
Hardtop switchBefore pulling on the hardtop switch, you
must make sure that:�
the parking brake is engaged
(�page 41)
�
the luggage cover is closed, see Lug-
gage cover
�
the trunk lid is closed
�
the ignition is switched on (key in start-
er switch position2)
!To prevent damage to the hardtop or
luggage/cargo when lowering the roof:�
load trunk only to the height of the
luggage cover
�
do not permit luggage/cargo to
push up the closed luggage cover
�
do not load anything on top of or in
front of the luggage cover
�
do not place anything on the shelf
behind the roll bar
Page 183 of 376
183 Controls in detail
Driving systems
Active Body Control (ABC)
The ABC system automatically selects the
optimum suspension tuning and ride
height for your vehicle.
Suspension tuning
The suspension tuning is set according to:�
Your driving style
�
Road surface conditions
�
The vehicle loading
�
Your choice of suspension style,
“sporty” or “regular”, which you select
using the ABC switch.
The selected suspension style is stored
in memory, even after the key is re-
moved from the starter switch.The ABC switch with the indicator lamp is
located in the lower section of the center
console.
1ABC switch
2Indicator lamp
�
Start the engine.Suspension for sporty driving style
The setting for sporty driving is selected
when the indicator lamp2 is illuminated.
�
Press switch1.
The indicator lamp2 comes on.
Suspension for regular driving style
The setting for regular driving is selected
when the indicator lamp2 is off.
�
Press switch1.
The indicator lamp2 goes out.
Page 184 of 376
184 Controls in detailDriving systemsVehicle level control
Your vehicle automatically adjusts its ride
height to:�
reduce fuel consumption
�
increase vehicle safety
The vehicle chassis ride height is raised or
lowered according to the selected level
setting and to the vehicle speed:
�
With increasing speed, ride height is re-
duced by up to approximately one inch
(25 mm).
�
With decreasing speed, the ride height
is again raised to the selected vehicle
level.Select the level 1 and 2 settings only when
required by current driving conditions.
Otherwise:
�
Fuel consumption may increase.
�
Handling may be impaired.iThese height adjustments are so small
that you may not notice any change.
Warning!
G
To help avoid personal injury, keep hands
and feet away from wheel housing area, and
stay away from under the vehicle when low-
ering the vehicle chassis.

The ABC system automatically selects the
optimum suspension tuning and ride
height for your vehicle.
Suspension tuning
The suspension")