Page 291 of 376

291 Practical hints
Locking/unlocking in an emergency
Unlocking the trunk
If you are unable to unlock the trunk with
the key, open the trunk with the mechani-
cal key as follows:Trunk lid lock1Unlocking�
Insert the mechanical key into the
trunk lid lock.
�
Perform the following two steps simul-
taneously:�
Turn the key counterclockwise to
position 1.
�
Pull the trunk lid handle and lift lid.Unlocking interior storage compart-
ments
Locking storage areas in the passenger
compartment include:
�
the glove box
�
the storage space under the armrest
�
the rear storage compartments
If these cannot be unlocked by means of
the key, the KEYLESS-GO* card or the cen-
tral locking button, use the mechanical key
to open the glove box.1Separately unlock storage compart-
ments
2Centrally lock/unlock storage com-
partments
3Separately lock storage compartments
�
Slide mechanical key out of key hous-
ing (
�page 290).
�
Insert the mechanical key into the
glove box lock and turn it to position 2.
All storage compartments are now un-
locked.
iThe storage space under the armrest
and the rear storage compartments
can only be unlocked using the me-
chanical key at the glove box lock.
Page 312 of 376
.
�
Turn spare wheel bracket counter-
clockwise to loosen.
�
Take the whe")
312 Practical hintsFlat tireMounting the spare wheel Preparing the vehicle
Prepare the vehicle as described above
(
�page 302).
�
Turn spare wheel bracket counter-
clockwise to loosen.
�
Take the wheel out of the trunk.
Lifting the vehicle
�
Prevent the vehicle from rolling away
by blocking wheels with wheel chocks
(not included) or other sizable objects.
When changing wheel on a level sur-
face:�
Place one chock in front of and one
behind the wheel that is diagonally
opposite to the wheel being
changed.
When changing wheel on a hill:
�
Place chocks on the downhill side
blocking both wheels of the other
axle.
�
Take the vehicle tool kit and the jack
out of the storage compartment under
the trunk floor (
�page 289).
Warning!
G
The dimensions of the spare wheel are dif-
ferent from those of the road wheels. As a
result, the vehicle handling characteristics
change when driving with a mounted spare
wheel. Adapt your driving style accordingly.
The spare wheel is for temporary use only.
When driving with spare wheel mounted, en-
sure proper tire pressure and do not exceed
vehicle speed of 50 mph (80 km/h).
Drive to the nearest Mercedes-Benz Center
as soon as possible to have the spare wheel
replaced with a regular road wheel.
Never operate the vehicle with more than
one spare wheel mounted.
Warning!
G
The jack is designed exclusively for jacking
up the vehicle at the jack tubes built into
both sides of the vehicle. To help avoid per-
sonal injury, use the jack only to lift the ve-
hicle during a wheel change. Never get
beneath the vehicle while it is supported by
the jack. Keep hands and feet away from the
area under the lifted vehicle. Always firmly
set parking brake and block wheels before
raising vehicle with jack.
Do not disengage parking brake while the
vehicle is raised. Be certain that the jack is
always vertical (plumb line) when in use, es-
pecially on hills. Always try to use the jack
on level surface. Be sure that the jack arm is
fully inserted in the jack tube. Always lower
the vehicle onto sufficient capacity jack-
stands before working under the vehicle.
Page 318 of 376
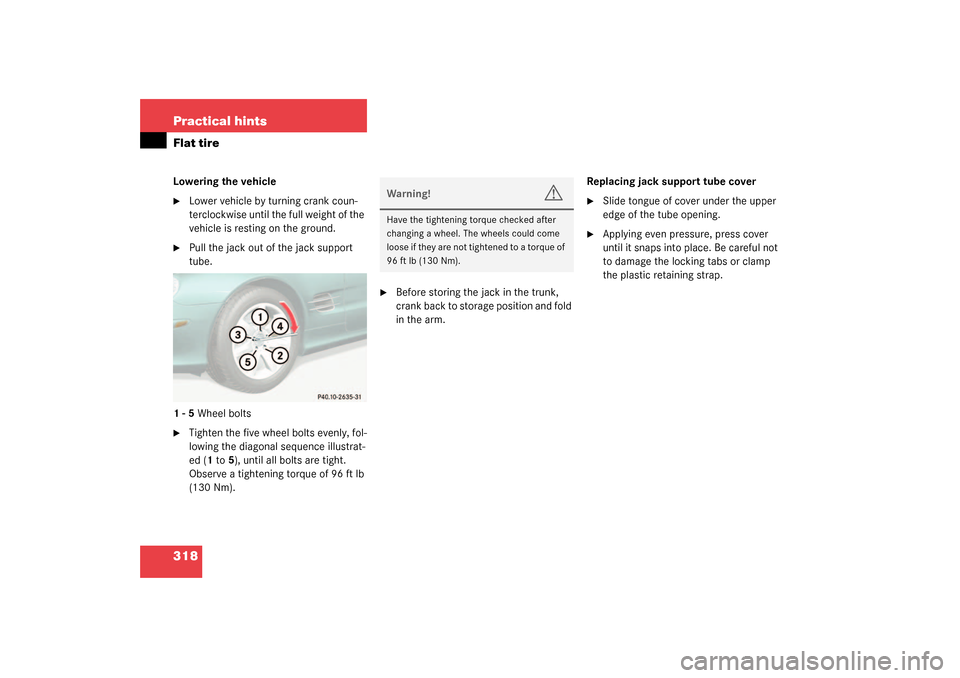
318 Practical hintsFlat tireLowering the vehicle�
Lower vehicle by turning crank coun-
terclockwise until the full weight of the
vehicle is resting on the ground.
�
Pull the jack out of the jack support
tube.
1 - 5 Wheel bolts
�
Tighten the five wheel bolts evenly, fol-
lowing the diagonal sequence illustrat-
ed (1 to 5), until all bolts are tight.
Observe a tightening torque of 96 ft lb
(130 Nm).
�
Before storing the jack in the trunk,
crank back to storage position and fold
in the arm.Replacing jack support tube cover
�
Slide tongue of cover under the upper
edge of the tube opening.
�
Applying even pressure, press cover
until it snaps into place. Be careful not
to damage the locking tabs or clamp
the plastic retaining strap.
Warning!
G
Have the tightening torque checked after
changing a wheel. The wheels could come
loose if they are not tightened to a torque of
96 ft lb (130 Nm).
Page 359 of 376

359 Index
Brakes 216
Warning lamp 253
Break-in period 214
Bulbs, replacing
Backup lamps 299
Brake lamps 296
Front lamps 295, 298
License plate lamps 300
Parking lamps 299
Rear fog lamp 299
Standing lamps 299
Tail lamp assemblies 299
Turn signal lamps, front 298
Turn signal lamps, rear 299
C
CAC (Customer Assistance Center) 351
CAN System 351
Capacities
Fuels, coolants, lubricants etc. 342
Catalytic converter 223
CD player
Operating 116
Center air vents 23
Center console
Lower part 24
Upper part 23Centigrade
Setting temperature units 122
Central locking
Automatic 91
Central locking switch 92
Switching on/off (control
system) 128
Unlocking from inside 92
Central locking switch 23
Central unlocking switch 23
Changing
Batteries (key) 293
Batteries (KEYLESS-GO* card) 294
Key setting 81
KEYLESS-GO* card setting 86
Vehicle level 185
Charging
Vehicle batteries 321
CHECK ENGINE malfunction indicator
lamp 21, 256
Checking
Batteries (KEYLESS-GO* card) 87
Coolant level 230
Oil level 226, 228
Tire inflate pressure 226
Vehicle lighting 226Vehicle lock status (KEYLESS-GO*
card) 87
Child safety
Airbags 54
Automatic child seat recognition 64
Infant and child restraint systems 52
Cigarette lighter 23, 197
Cleaning
Headlamps 146
Windshield 44
Clock 19
Closing
Glove box 190
Hood 228
Retractable hardtop (electronic
key) 164
Retractable hardtop (switch) 161
Side windows 158
Side windows (KEYLESS-GO*) 88
Sunshade* 167
Trunk lid 83, 91
Cockpit 352
Collapsible tire 352
COMAND 23
COMAND* 352
COMAND*, radio and telephone 222