Page 31 of 376
31 Getting started
Unlocking
Position 1�
Press the KEYLESS-GO start/stop but-
ton once.
Power supply for some electrical con-
sumers, such as seat adjustment.Ignition (or Position 2)
�
Press the KEYLESS-GO start/stop but-
ton twice.
Power supply for all electrical consum-
ers. All the lights in the instrument
cluster light up.
More information can be found in the
“Controls in detail” section (
�page 84).
For information on starting the engine us-
ing the KEYLESS-GO start/stop button,
see Starting with KEYLESS-GO
(
�page 40).
iIf you now press the KEYLESS-GO
start/stop button twice, the power
supply is again switched off.
iIf you now press the KEYLESS-GO
start/stop button once, the power sup-
ply is again switched off.
Page 43 of 376
43 Getting started
Driving
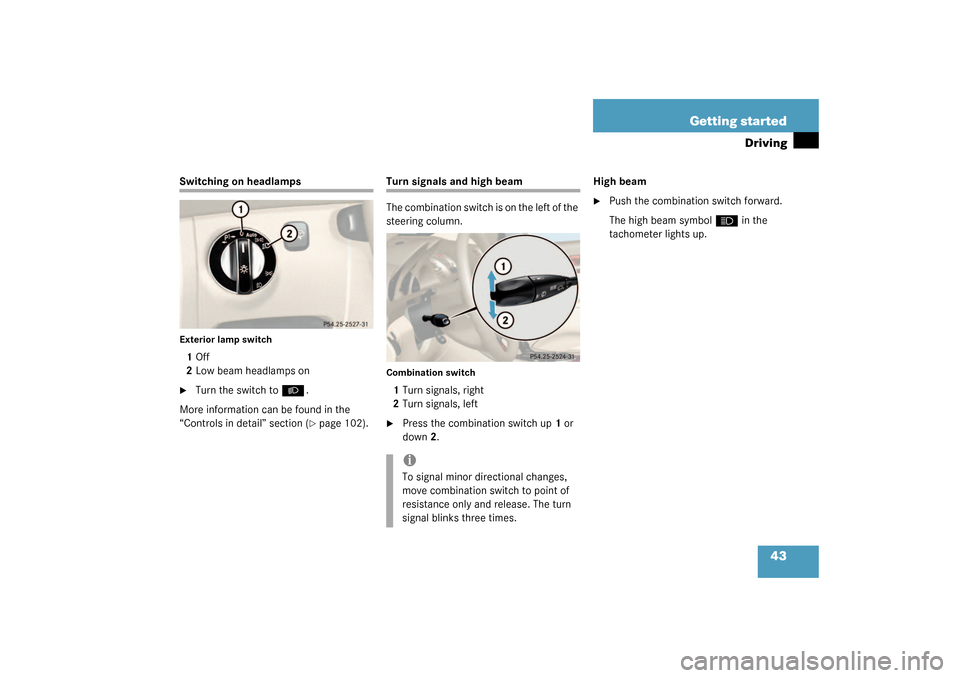
Switching on headlampsExterior lamp switch1Off
2Low beam headlamps on�
Turn the switch to
B
.
More information can be found in the
“Controls in detail” section (�page 102).
Turn signals and high beam
The combination switch is on the left of the
steering column.Combination switch1Turn signals, right
2Turn signals, left�
Press the combination switch up1 or
down2.High beam
�
Push the combination switch forward.
The high beam symbol
A
in the
tachometer lights up.
iTo signal minor directional changes,
move combination switch to point of
resistance only and release. The turn
signal blinks three times.
Page 49 of 376
.
The locking knobs on the doors move
down.
More information can be")
49 Getting started
Parking and locking
�
After exiting the vehicle, press the lock
button
‹
on the remote control
(
�page 28).
The locking knobs on the doors move
down.
More information can be found in the
“Controls in detail” section (
�page 80).
Turning off engine with KEYLESS-GO* �
Place the gear selector lever inP.
�
Press the KEYLESS-GO start/stop but-
ton until the engine shuts off.
With the driver's door closed, the start-
er switch is now in the position1. With
the driver's door opened, the starter
switch is set to position0, same as key
removed from starter switch
(�page 29).
�
Press the seat belt release button
(�page 37).
!If you hear a warning signal you have ei-
ther�
forgotten to turn off the lights, or
�
not put the gear selector lever inP
before opening the driver’s door.
Turn off the lights or place the gear se-
lector lever inP.
Warning!
G
To prevent possible personal injury, always
keep hands and fingers away from the door
openings when closing the doors. Be espe-
cially careful when small children are
around.
Before closing doors, make sure that there
is no possibility of someone getting caught
in a door during closing.
Page 70 of 376

monitors the vehicles traction (force of
adhesive friction between the tires and the
road surface) and handl")
70 Safety and SecurityDriving safety systems
ESP
The Electronic Stability Program (ESP)
monitors the vehicle's traction (force of
adhesive friction between the tires and the
road surface) and handling.
The ESP recognizes when a wheel is spin-
ning or if the vehicle starts to skid. By ap-
plying brakes to the appropriate wheel and
by limiting engine output, the ESP works to
stabilize the vehicle. The ESP is especially
useful while driving off and on wet or slip-
pery road surfaces.
The ABS/ESP warning lamp
v
in the
speedometer dial flashes when the ESP is
engaged.
The warning lamp
v
in the speedome-
ter dial (
�page 21) lights up when you
turn the key to position1 or2. It goes out
when you start the engine
Warning!
G
BAS cannot prevent the natural laws of
physics from acting on the vehicle, nor can
it increase braking efficiency beyond that af-
forded by the condition of the vehicle brakes
and tires or the traction. The BAS cannot
prevent accidents, including those resulting
from excessive speed in turns, following an-
other vehicle too closely, or hydroplaning.
Only a safe, attentive, and skillful driver can
prevent accidents. The capabilities of a BAS
equipped vehicle must never be exploited in
a reckless or dangerous manner which
could jeopardize the user’s safety or the
safety of others.
Warning!
G
Never switch off the ESP when you see the
ABS/ESP-warning lamp
v
flashing in
the speedometer dial. In this case proceed
as follows:
�
While driving off, apply as little throttle
as possible.
�
While driving, ease up on the accelera-
tor.
�
Adapt your speed and driving style to
the prevailing road conditions.
Failure to observe these guidelines could
cause the vehicle to skid.
The ESP cannot prevent accidents resulting
from excessive speed.
Page 72 of 376

72 Safety and SecurityDriving safety systemsThe button is located in the lower part of
the center console.
1ESP on/off�
Press ESP button1 until the ESP warn-
ing lamp
v
in the speedometer
lights up.
ESP is deactivated.
If one or more wheels are spinning, the
ESP warning lamp v
in the speedome-
ter flashes, regardless of the speed.
Traction control brakes a spinning wheel
even when ESP is deactivated.
ESP always operates when you are brak-
ing, even when it has been deactivated.Switching on ESP
�
Press button1.
The ESP warning lamp
v
in the
speedometer goes out. You are now
again in normal driving mode.
SBC brake system
The SBC brake system combines a hydrau-
lic brake circuit with electronically con-
trolled brake servo assistance. You have
increased braking safety and improved
braking comfort.
!Avoid spinning of a drive wheel for an
extended period with the ESP switched
off. This may cause serious damage to
the drive train which is not covered by
the Mercedes-Benz Limited Warranty.Warning!
G
When the ESP warning lamp
v
is
illuminated continuously, ESP is switched
off.
Adapt your speed and driving to the prevail-
ing road conditions and to the non-operating
status of the ESP.
Warning!
G
Never ignore a brake malfunction indicated
in the speedometer display, for example by
the
;
(USA only) or
3
(Canada only)
indicator lamp. Refer to the “Practical hints”
section (
�page 253). Also read and ob-
serve the messages in the instrument clus-
ter display (�page 257).
Page 77 of 376

77 Safety and Security
Anti-theft systems
Tow-away alarm
Once the tow-away alarm is armed, a visual
and audible alarm will be triggered when
someone attempts to raise the vehicle.
Arming tow-away alarm
When you lock your vehicle, the tow-away
alarm is automatically armed after about
30 seconds.
When you unlock your vehicle, the
tow-away protection disarms automatical-
ly.Disarming tow-away alarm
To prevent triggering the tow-away alarm
feature, switch off the tow-away alarm be-
fore towing the vehicle, or when parking on
a surface subject to movement, such as a
ferry or auto train.
The switch is on the center console be-
tween the driver’s seat and the passenger
seat.
1Tow-away alarm off switch
2Indicator lamp
�
Turn off the ignition and remove the
key.
�
Press switch1.
The indicator lamp2 in the switch
lights up briefly.
�
Lock your vehicle with the key or (vehi-
cles with KEYLESS-GO*) the lock but-
ton at each door handle.
The tow-away alarm remains disarmed un-
til you lock your vehicle again.
iThe tow-away protection alarm is trig-
gered, for example, if the vehicle is lift-
ed on one side.
If the alarm stays on for more than
20 seconds, an emergency call is initi-
ated automatically by the Tele Aid sys-
tem (
�page 202) provided Tele Aid
service was subscribed to and properly
activated.
iYou cannot disarm the tow-away alarm
if the ignition is turned on.
Page 94 of 376
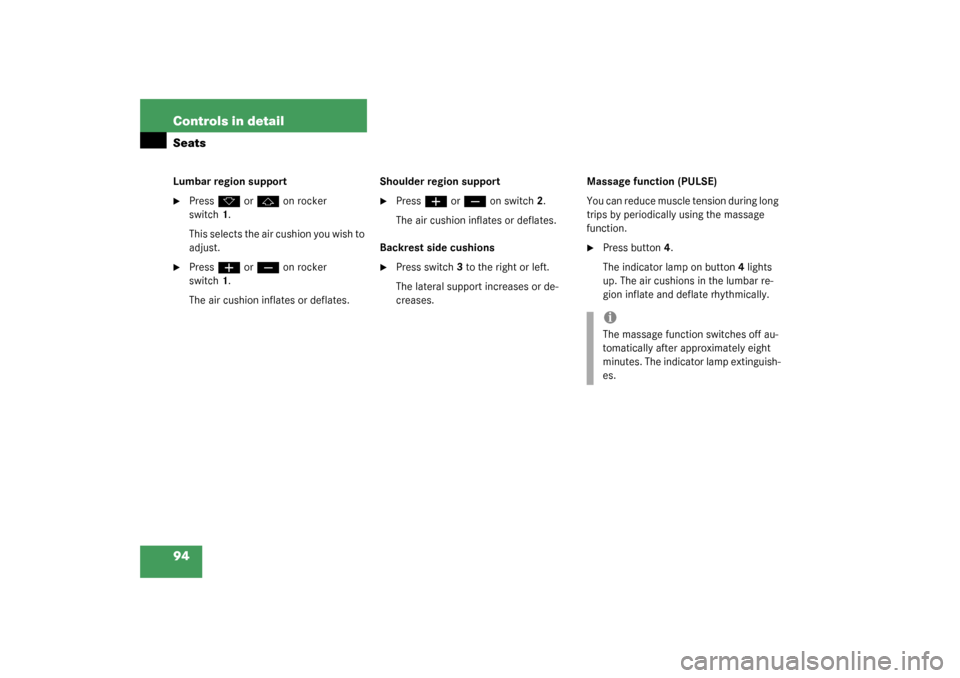
94 Controls in detailSeatsLumbar region support�
Press
k
or
j
on rocker
switch1.
This selects the air cushion you wish to
adjust.
�
Press
æ
or
ç
on rocker
switch1.
The air cushion inflates or deflates.Shoulder region support
�
Press
æ
or
ç
on switch2.
The air cushion inflates or deflates.
Backrest side cushions
�
Press switch3 to the right or left.
The lateral support increases or de-
creases.Massage function (PULSE)
You can reduce muscle tension during long
trips by periodically using the massage
function.
�
Press button4.
The indicator lamp on button4 lights
up. The air cushions in the lumbar re-
gion inflate and deflate rhythmically.iThe massage function switches off au-
tomatically after approximately eight
minutes. The indicator lamp extinguish-
es.
Page 97 of 376

97 Controls in detail
Seats
Seat heater
Vehicles without seat ventilation*
The switch is located on the door.
1Normal heating
2Rapid heating�
Make sure the ignition is switched on.
All the lamps in the instrument cluster
light up.Switching on the seat heater
�
Press lower switch position1.
A red indicator lamp on the switch
lights up.
Switching off the seat heater
�
Press lower switch position1 again.
Rapid seat heating mode
�
Press upper switch position2.
Both red indicator lamps on the switch
light up. Switching off rapid seat heating mode
�
Press upper switch position2 again.
iThe seat heater will be automatically
switched off after approximately
30 minutes. iThe system switches over to normal
heating mode after approximately five
minutes. Only the right-hand indicator
lamp remains lit.
!If one or both of the lamps on the seat
heater switch are blinking, there is in-
sufficient voltage available since too
many electrical consumers are turned
on. The seat heater switches off auto-
matically.
The seat heater will switch back on
again automatically as soon as suffi-
cient voltage is available.