Page 88 of 392

You can lock and unlock your vehicle
with the remote transmitter. When
you push the LOCK button, all doors
and the tailgate lock. The parking
lights, side marker lights, taillights
and instrument panel lights f lash
once.When you push the LOCK button a
second time within 5 seconds after
you have locked the doors, you will
hear a beep to verify that the
security system has set.
When you push the UNLOCK button
once, only the driver’s door unlocks.
The remaining doors and the tailgate
unlock when you push the button a
second time. The parking lights, side
marker lights, taillights and
instrument panel lights f lash twice
when you push the button.
When you press the UNLOCK
button, the f ront and rear individual
map lights and the cargo area light,
depending on their switch positions,
will come on (see page ). If you
do not open any door or the tailgate,
the lights stay on for about 10
seconds, then go out. If you relock
thedoorsandthetailgatewiththe
remote transmitter before 10
seconds have elapsed, the lights willgo of f immediately.
If you unlock the doors and the
tailgate with the remote transmitter,
but do not open any door or the
tailgate within 30 seconds, all doors
and the tailgate automatically relock.
You cannot lock the doors and the
tailgate with the remote transmitter
if any door or the tailgate is not f ully
closed. You cannot lock or unlock
thedoorsandthetailgatewiththe
key in the ignition switch.
112
Keys and Locks
Inst rument s and Cont rols
Remote Transmitter
84
LED LOCK
BUTTON
UNLOCK
BUTTON PANIC
BUTTON
Page 89 of 392

Panic mode allows you to remotely
activate your vehicle’s horn and
lights to attract attention. When
activated, the horn will sound, and
the headlights, parking lights, side
marker lights, taillights and
instrument panel lights will f lash f or
about 30 seconds. To activate panic
mode,pressandholdthePANIC
button f or about one second.When the remote transmitter’s
battery begins to get weak, it may
take several pushes on the button to
lock or unlock the doors and the
tailgate, and the LED will get dim.
Replace the battery as soon as
possible.
Battery type: CR2025
To cancel Panic mode bef ore 30
seconds, press any button on the
remote transmitter. You can also
turn the ignition switch to ON (II).
Panic mode will not activate if the
key is in the ON (II) position.
To replace the battery, remove the
round cover on the back of the trans-
mitter by turning it counterclockwise
with a coin.
CONT INUED
Panic Mode
Replacing t he Bat t ery
Keys and Locks
Inst rument s and Cont rols85
ROUND
COVERBATTERY
Page 90 of 392
 This devicemay not cause harmf ul interf erence, and(2)")
�´
�Õ �Ü
As required by the FCC:
This device complies with Part 15 of theFCC rules. Operation is subject to thef ollowing two conditions: (1) This devicemay not cause harmf ul interf erence, and(2) this device must accept anyinterf erence received, includinginterf erence that may cause undesiredoperation.
Changes or modif ications not expresslyapproved by the party responsible f orcompliance could void the user’sauthority to operate the equipment.
This device complies with IndustryCanada Standard RSS-210.Operation is subject to the f ollowing twoconditions: (1) this device may not causeinterf erence, and (2) this device mustaccept any interf erence that may causeundesired operation of the device.
Avoid severe shock to the trans-
mitter, such as dropping or throwing
it. Also, protect it f rom extreme hot
or cold temperatures.
Clean the transmitter case with a
sof t cloth. Do not use strong
cleaners or solvents that could harm
the case. Immersing the transmitter
in any liquid will harm the trans-
mitter and cause it to not f unction
properly.
Remove the old battery and note the
polarity. Make sure the polarity of
the new battery is the same ( side
f acing up), then insert it in the
transmitter.
Align the mark on the cover
with the mark on the
transmitter, then set the cover in
place and turn it clockwise.
If you lose a transmitter, you will
need to have the replacement
programmed to your vehicle’s
system by your Honda dealer. Any
other transmitters you have will also
need to be reprogrammed.
Transmitter Care
Keys and Locks
Inst rument s and Cont rols86
Page 91 of 392
See page for information on
cargo loading. Keep the tailgate
closed at all times while driving to
avoid damaging the tailgate and to
prevent exhaust gas f rom getting
into the interior. Seeon page .
To open the tailgate, pull the handle,
then lif t up the tailgate.
The childproof door locks are
designed to prevent children seated
in the rear f rom accidentally opening
the rear doors. Each rear door has a
lock lever near the edge. With the
lever in the LOCK position, the door
cannot be opened f rom the inside
regardless of the position of the lock
tab. To open the door, pull the lock
tab up and use the outside door
handle. To close the tailgate, use the inner
handle to pull the tailgate down, then
press down on the back edge.
56
225
Carbon
Monoxide Hazard
Childproof Door L ocks
T ailgate
Keys and Locks
Inst rument s and Cont rols87
LOCK LEVER HANDLE
Page 92 of 392
Open the glove box by pulling the
bottom of the handle. Close it with a
f irm push. Lock or unlock the glove
box with the master key.
The glove box light comes on only
when the parking lights are on. Glove Box
Keys and Locks
Inst rument s and Cont rols88
GLOVE BOX
An open glove box can cause
serious injury to your passenger
inacrash,evenifthe
passenger is wearing the seat
belt.
Always keep the glove box
closed while driving.
Page 95 of 392
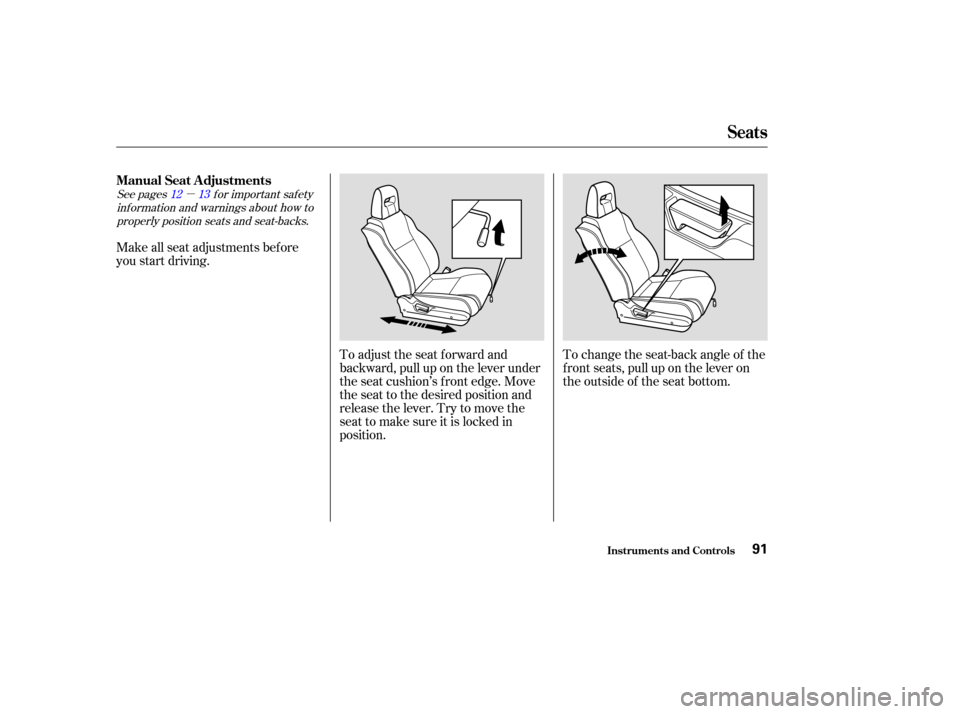
�µ
To adjust the seat forward and
backward, pull up on the lever under
the seat cushion’s f ront edge. Move
the seat to the desired position and
releasethelever.Trytomovethe
seat to make sure it is locked in
position.To change the seat-back angle of the
f ront seats, pull up on the lever on
the outside of the seat bottom.
Make all seat adjustments bef ore
you start driving.
See pages f or important saf ety
inf ormation and warnings about how toproperly position seats and seat-backs. 12 13
Manual Seat Adjustments
Seats
Inst rument s and Cont rols91
Page 98 of 392

To get into the third row seats, pull
uptheleveronthesideof the
passenger’s side second row seat-
back. The seat-back will tilt f orward,
and the seat will slide f orward.
After you return the seat-back to the
upright position, push the whole seat
backwards until it latches. Make
sure the seat is f ully latched bef ore
sitting in it.The lef t and right halves of the
second seat can be f olded up
separately to create more cargo
space.
If you are f olding the lef t half of
the seat, use the ignition key to
release the center seat belt from
the detachable anchor. Allow the
seat belt to retract into the roof.
Insert the latch plate into the roof
holder. Fold the seat-back forward.
Reverse this procedure to return the
seat to the upright position. Make
sure the seat is locked securely
bef ore driving.
(Lef t half ) Remove the center seat
belt f rom its holder in the roof , and
connect it to the detachable anchor
(see page ).
Pull up the handle on the outside
of the seat-back. Lower the head restraint to its
lowest position.
2.
3. 1.
4.
97
Rear Seat A ccess
Folding the Second Seat
Seats
Inst rument s and Cont rols94
HANDLE
RELEASE LEVER
Page 100 of 392
Unlock the seat-back by pulling
the handle. Push the seat-back
forward.Make sure you clip the small latch
plate of each outer shoulder belt to
the seat belt webbing whenever the
third seat is f olded.
Reverse this procedure to return the
seat to the upright position. Make
sure the seat is locked securely
bef ore driving.
Reinstall the head restraints.
Reconnect the seat belts to the
detachable anchors.
Make sure all items in the cargo area
are secured. Loose items can f ly
f orward and cause injury if you have
to brake hard. See
on page .
4.
225
Seats
Inst rument s and Cont rols
Carrying Cargo
96
HANDLE