Page 71 of 392
U.S. ModelsCanadian Models
This shows your speed in miles per
hour (mph). The smaller inner
numbers are the speed in kilometers
per hour (km/h).
This shows your speed in kilometers
per hour (km/h). The smaller inner
numbers are the speed in miles per
hour (mph). The tachometer shows the engine
speed in revolutions per minute
(rpm). To protect the engine f rom
damage, never drive with the
tachometer needle in the red zone.The odometer shows the total dis-
tance your vehicle has been driven.
It measures miles in U.S. models and
kilometers in Canadian models.
It is illegal under U.S. f ederal law and
Canadian provincial regulations to
disconnect, reset, or alter the
odometer with the intent to change
the number of miles or kilometers
indicated.
Speedometer Odometer
T achometer
Gauges
Inst rument s and Cont rols67
TACHOMETER SPEEDOMETER FUEL GAUGE TEMPERATURE
GAUGE
MAINTENANCE
REQUIRED INDICATOR TRIP METER
SELECT/RESET
BUTTON
TRIP METER
ODOMETER
Page 72 of 392
 or kilometers (Canada)
driven since you last reset it.This shows how much f uel you have.
It is most accurate when the vehicle
is on level ground. It may sh")
This meter shows the number of
miles (U.S.) or kilometers (Canada)
driven since you last reset it.This shows how much f uel you have.
It is most accurate when the vehicle
is on level ground. It may show
slightly more or less than the actual
amount when you are driving on
curvy or hilly roads.
The needle returns to the bottom
after you turn off the ignition. The
gauge shows the f uel level reading
immediately af ter you turn the
ignition switch back ON (II).
There are two trip meters: Trip A
and Trip B. Switch between these
displays and the outside temperature
display (EX model only) by pressing
the Select/Reset button repeatedly.
Each trip meter works independently,
so you can keep track of two
dif f erent distances. To reset a trip meter, display it and
then press and hold the Select/Reset
button until the number resets to
‘‘0.0’’. Both trip meters will reset if
the vehicle’s battery goes dead or is
disconnected.
This shows the temperature of the
engine’s coolant. During normal
operation, the pointer should rise
from the bottom white mark to about
the middle white mark. In severe
driving conditions, such as very hot
weather or a long period of uphill
driving, the pointer may rise to the
upper white mark. If it reaches the
red (Hot) mark, pull saf ely to the
side of the road. Turn to page f or
instructions and precautions on
checking the engine’s cooling
system.
345
Trip Meter
Fuel Gauge
Temperature Gauge
Inst rument s and Cont rols
Gauges
68
TRIP METER SELECT/
RESET BUTTON
Avoid driving with an extremely low
f uel level. Running out of f uel could
cause the engine to misf ire, damaging
the catalytic converter.
Page 73 of 392

This indicator reminds you that it is
time to take your vehicle in for
scheduled maintenance.
Ref er to the Maintenance Schedules
f or Normal and Severe Driving
Conditions on pages and .For the f irst 6,000 miles (9,600 km)
af ter the Maintenance Required
Indicator is reset, it will come on f or
two seconds when you turn the
ignition switch ON (II).
Between 6,000 miles (9,600 km) and
7,500 miles (12,000 km) this
indicator will light f or two seconds
when you first turn the ignition
switch ON (II), and then f lash f or
ten seconds.
If you exceed 7,500 miles (12,000
km) without having the scheduled
maintenance perf ormed, this
indicator will remain on as a constant
reminder.
Your dealer will reset this indicator
af ter completing the scheduled
maintenance. If this maintenance is
done by someone other than your
Honda dealer, reset the indicator as
f ollows.
Turn of f the engine.
Press and hold the Select/Reset
button on the instrument panel,
then turn the ignition switch ON
(II).
Hold the button f or approximately
ten seconds until the indicator
resets.
1.
2.
3.
274 276
Gauges
Inst rument s and Cont rols
Maintenance Required Indicator
69
MAINTENANCE REQUIRED INDICATOR SELECT/RESET BUTTON
Page 74 of 392
This indicator displays the outside
temperature in Fahrenheit in U.S.
models, and in Centigrade in
Canadian models. To see the outside
temperature, press and release the
Select/Reset button until the
temperature is displayed.
The temperature sensor is located in
the f ront bumper. Theref ore, the
temperature reading can be af f ected
by heat ref lection f rom the road sur-
f ace, engine heat, and the exhaust
f rom surrounding traf f ic. This can
cause an incorrect temperature read-
ing when your speed is under
19 mph (30 km/h).
In certain weather conditions,
temperature readings near f reezing
(32°F, 0°C) could mean that ice is
f orming on the road surf ace.
On EX model
Inst rument s and Cont rols
Gauges
Outside Temperature Indicator
70
Page 105 of 392

The power window system has a key-
of f delay f unction. The windows will
stilloperateforuptotenminutes
after you turn off the ignition.
Opening either f ront door cancels
the delay function. You must turn
the ignition switch ON (II) again
bef ore you can operate the windows.
If the driver’s window runs into any
obstacle while it is closing
automatically, it will reverse
direction, and then stop. To close the
window, remove the obstacle, then
use the window switch again.
Auto reverse stops sensing when the
window is almost closed. You should
always check that all passengers and
objects are away from the window
bef ore closing it. If your vehicle’s battery is
disconnected or goes dead, or the
driver’s window f use is removed, the
AUTO f unction will be disabled. The
power window system needs to be
reset af ter reconnecting the battery
or installing the f use. You should do
the f ollowing.
Start the engine. Push down on
the driver’s window switch until
the window is f ully open.
Pull back on the driver’s window
switch to close the window
completely, then hold the switch
f or a second or two more.
If the power windows do not operate
properly af ter resetting, have your
vehicle checked by a Honda dealer. 1.
2.
Power Windows
Inst rument s and Cont rols
Auto Reverse
101
Page 141 of 392
Your Honda’s audio system provides
clear reception on both AM and FM
bands, while the preset buttons allow
you to easily select your f avorite
stations.The ignition switch must be in
ACCESSORY (I) or ON (II) to
operate the audio system. Turn the
system on by pushing the PWR/
VOL knob or the AM/FM button.
Adjust the volume by turning the
knob.The band and f requency that the
radio was last tuned to is displayed.
To change bands, press the AM/FM
button. On the FM band, ST will be
displayed if the station is broadcast-
ing in stereo. Stereo reproduction on
AM is not available.
CONT INUED
On LX model
Audio System
AM/FM/CD Audio System
Operating the Radio
Comf ort and Convenience Feat ures137
Page 142 of 392

�µ�µ�µ
You can use any of f ive methods to
f ind radio stations on the selected
band: TUNE, SEEK, SCAN, AUTO
SELECT, and the Preset buttons.
Use the TUNE knob to
tune the radio to a desired f requency.
Turn the TUNE knob to the right to
tune to a higher f requency, or to the
lef t to tune to a lower f requency.
Turn the knob right or lef t until the
display reaches the desired
f requency. The SEEK f unction
searches the band for a station with
a strong signal. To activate it, press
theSEEKbaroneitherthe or side, then release it.
Depending on which side you press,
the system scans upward or down-
ward f rom the current f requency. It
stops when it finds a station with a
strong signal. The SCAN function
samples all the stations with strong
signals on the selected band. To
activate it, press the SCAN button,
then release it. You will see SCAN in
the display. The system will scan up
the band for a station with a strong
signal. When it f inds one, it will stop
and play that station for
approximately f ive seconds. If you do
nothing, the system will then scan
f or the next strong station and play
that f or f ive seconds. When it plays a
station that you want to continue
listening to, press the SCAN button
again.
Audio System
Comf ort and Convenience Feat ures
TUNE SEEK
SCA N
138
Page 143 of 392
�µ
Repeat steps 1 to 3 to store a total
of six stations on AM and twelve
on FM. Pick the Preset button you want
for that station. Press the button
and hold it until you hear a beep. Select the desired band, AM or
FM. FM1 and FM2 let you store
two f requencies with each Preset
button.
To store a f requency:
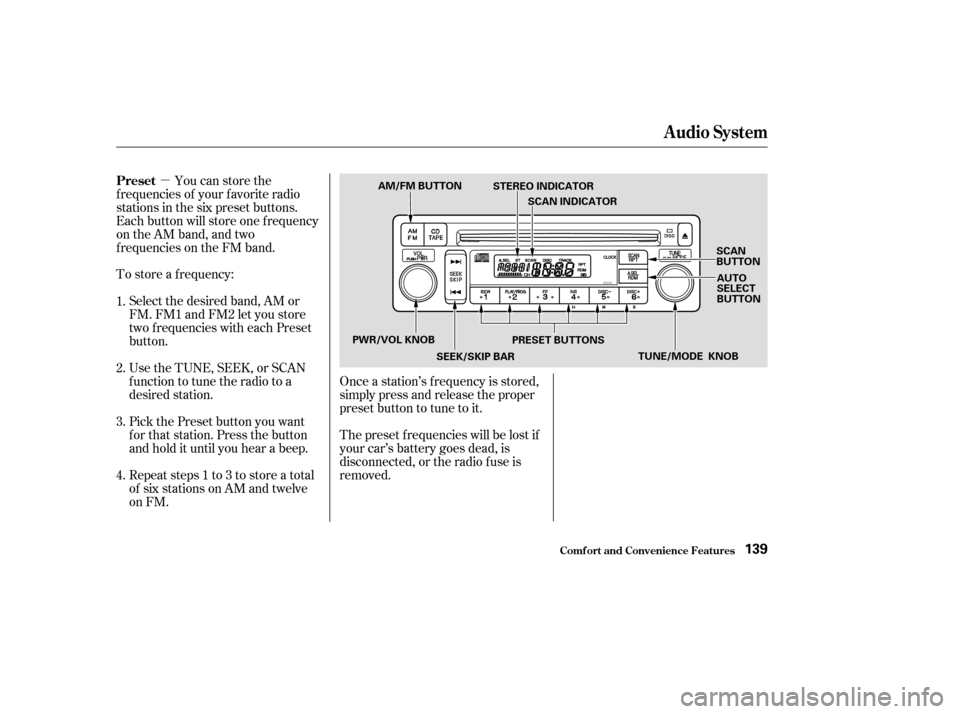
Once a station’s f requency is stored,
simply press and release the proper
preset button to tune to it.
The preset f requencies will be lost if
your car’s battery goes dead, is
disconnected, or the radio f use is
removed.
You can store the
f requencies of your f avorite radio
stations in the six preset buttons.
Each button will store one f requency
on the AM band, and two
f requencies on the FM band.
UsetheTUNE,SEEK,orSCAN
function to tune the radio to a
desired station.
1.
2.
3.
4. Preset
Audio System
Comf ort and Convenience Feat ures139
AM/FM BUTTON
STEREO INDICATOR
SCAN INDICATOR
SCAN
BUTTONAUTO
SELECT
BUTTON
PWR/VOL KNOB SEEK/SKIP BARPRESET BUTTONS
TUNE/MODE KNOB
. The smaller inner
numbers are the speed in kilometers
per hour (km/h).
This shows your speed in kilometers
per hour (km/h). Th")

 o")