Page 109 of 392
Spilled liquids can also damage the
upholstery, carpeting, and electrical
components in the interior. Be caref ul when you are using the
beverage holders. A spilled liquid
that is very hot can scald you or your
passengers. Liquid can also spill
f rom the rear door pocket beverage
holders when you close the rear
doors. Use only resealable
containers in the door pockets.
To open the f ront beverage holder,
push the lock lever and slide the lid
forward.
The second row seat has a beverage
holder and tray in the center armrest.
To use it, pivot the armrest down.
CONT INUED
Beverage Holders
Inst rument s and Cont rols
Second Row Center A rmrest
105
Page 117 of 392
The lights go out about six seconds
after all the doors and the tailgate
are closed.
With the light control switch in the
Door Activated position, all the
individual map lights come on when
you unlock the door with the remote
transmitter (see page ).
Withanydoororthetailgateleft
open, the lights stay on about three
minutes, then go out.When the switch is in the ON
position:
All the individual map lights come on
andstayonaslongastheswitch
remains in the ON position.
84
Interior Lights
Inst rument s and Cont rols113
Page 121 of 392

.....................
Heating and Cooling .118
.........
What Each Control Does . 118
............
How to Use the System . 122
..........
To Turn Everything Of f . 127
...............
Climate Control System . 128
(EX model) .......
Fully-automatic Operation . 130
.......
Semi-automatic Operation . 131
Sunlight Sensor/ ............
Temperature Sensor . 134
...........................
Rear A/C Unit .135
.......................
Audio System (LX) .137
AM/FM/CD ........................
Audio System .137
.................
Operating the Radio . 137
.................
Adjusting the Sound . 141
..............................
Digital Clock .142
............
Audio System Lighting . 143
.........
Operating the CD Player . 143
.....
Operating the CD Changer . 145
....
CD Player Error Indications . 147
CD Changer Error .............................
Indications .148
Operating the Cassette .....................................
Player .149
............
Tape Search Functions . 151.......................
Audio System (EX) .153
AM/FM/Cassette/CD Audio ....................................
System .153
.................
Operating the Radio . 154
.................
Adjusting the Sound . 158
..............................
Digital Clock .159
............
Audio System Lighting . 159
Operating the Cassette .....................................
Player .160
............
Tape Search Functions . 162
.........
Operating the CD Player . 163
.....
Operating the CD Changer . 165
....
CD Player Error Indications . 166
CD Changer Error .............................
Indications .167
Audio System (Optional on U.S. ..............................
EX model) .168
AM/FM/Cassette/CD/DVD ........................
Audio System .168
.................
Operating the Radio . 170
.................
Adjusting the Sound . 174
..............................
Digital Clock .175
............
Audio System Lighting . 175
....................
Radio Frequencies . 176
........................
Radio Reception .176 Operating the Cassette
.....................................
Player .178
Caring f or the Cassette .....................................
Player .181
.........
Operating the CD Player . 182
.....
Operating the CD Changer . 184
.......
Protecting Compact Discs . 185
....
CD Player Error Indications . 186
CD Changer Error .............................
Indications .187
...........
Remote Audio Controls . 188
.......................
Thef t Protection .189
........
Rear Entertainment System . 190
............................
Security System .206
...............................
Cruise Control .207
HomeLink Universal ................................
Transceiver .210
Comf ort and Convenience Features
Comf ort and Convenience Feat ures117
Page 122 of 392
Proper use of the Heating and
Cooling system can make the
interior dry and comf ortable, and
keep the windows clear f or best
visibility.
Turning this dial clockwise increases
the f an’s speed, which increases air
flow.
Turning this dial clockwise increases
the temperature of the air flow.
This button turns the air condi-
tioning ON and OFF. The indicator
in the button lights when the A/C is
on.
Comf ort and Convenience Feat ures
Heating and Cooling
What Each Control Does
Fan Control Dial
T emperature Control Dial
Air Conditioning (A/C) Button
On L X model
118
TEMPERATURE
CONTROL DIALRECIRCULATION
BUTTON
FAN CONTROL
DIAL
REAR WINDOW
DEFOGGER BUTTON
AIR CONDITIONING
BUTTON MODE CONTROL DIAL
Page 146 of 392
 or ON
(II). It shows the operation mode of
the radio, CD player, or optional
cassette player or CD changer")
The audio system display usually
shows the time when the ignition
switch is in ACCESSORY (I) or ON
(II). It shows the operation mode of
the radio, CD player, or optional
cassette player or CD changer when
you operate them, then goes back to
the time display af ter f ive seconds.You can quickly set the time to the
nearest hour. If the displayed time is
bef ore the half hour, pressing and
holding the clock button, then
pressing the RESET button (preset
6) sets the clock back to the previous
hour. If the displayed time is af ter
the half hour, the clock is set
f orward to the beginning of the next
hour.If your vehicle’s battery is
disconnected or goes dead, the time
setting will be lost. To set the time
again, follow the setting procedure. For example:
1:06 will reset to 1:00
1:52 will reset to 2:00
To set the clock, press and hold the
CLOCK (SCAN/RPT) button.
Change the hours by pressing the H
(preset 4) button until the numbers
advance to the desired time. Change
the minutes by pressing the M
(preset 5) button until the numbers
advance to the desired time.
Audio System
Comf ort and Convenience Feat ures
Digital Clock
142
RESET
MH
CLOCK BUTTON
Page 162 of 392
�µ
�µ
These two
modes adjust the strength of the
sound coming f rom each speaker.
BAL adjusts the side-to-side strength,
while FAD adjusts the f ront-to-back
strength. Bass, Treble, Balance, and Fader are
each adjustable. You select which of
these you want to adjust by pressing
the MODE knob. The mode changes
fromBAStoTREtoFADtoBAL,
and then back to the selected audio
mode, each time you press the
MODE knob.
Use these modes to
adjust the tone to your liking. Select
TRE or BAS by pressing the MODE
knob. Adjust the selected mode by
turning the MODE knob. The
displayed number shows you the
current setting. Adjusting the Sound
Balance/Fader Treble/Bass
Audio System
Comf ort and Convenience Feat ures158
ADJUSTMENT LEVEL DIGITAL CLOCK
SET
BUTTON
H BUTTON M BUTTON
MODE KNOB
Page 163 of 392

�µ
�´
The system will automatically return
the display to the selected audio
mode about f ive seconds af ter you
stop adjusting a mode with the
TUNE knob. Select BAL or FAD by pressing the
MODE knob. Adjust the Balance or
Fader to your liking by turning the
MODE knob.
The displayed number shows you
the current setting.
When the adjustment level reaches
the center, you will see ‘‘ ’’.
For inf ormation, see page . You can use the instrument panel
brightness control knob to adjust the
illumination of the audio system (see
page ). The audio system
illuminates when the parking lights
are on, even if the radio is turned of f .
Therightdisplayshowsthetime
when the ignition is in ACCESSORY
(I) or ON (II).
To set the clock, press and hold the
SET (TUNE) button until the
numbers f lash. Change the hours by
pressing the H ( ) button until the
numbers advance to the desired time.
Change the minutes by pressing the
M ( ) button until the numbers
advance to the desired time. When
you are f inished, press the SET
button again.
C
73
176
Audio System
Comf ort and Convenience Feat ures
A udio System L ighting
Radio Frequencies and Reception
Digital Clock
159
Page 178 of 392
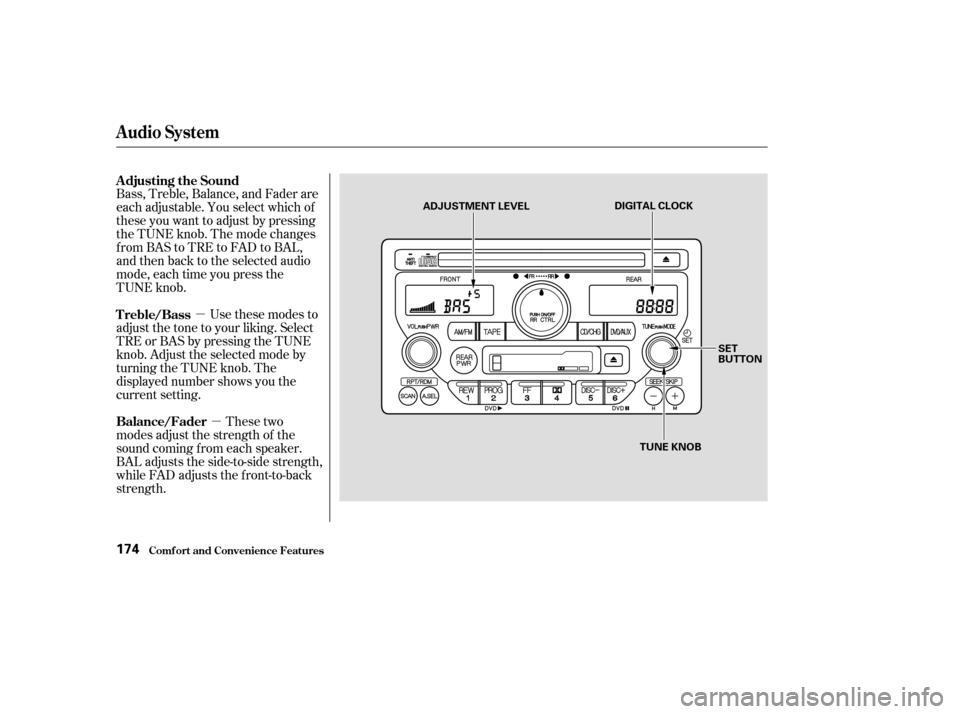
�µ�µ
Bass, Treble, Balance, and Fader are
each adjustable. You select which of
these you want to adjust by pressing
the TUNE knob. The mode changes
fromBAStoTREtoFADtoBAL,
and then back to the selected audio
mode, each time you press the
TUNE knob.
Use these modes to
adjust the tone to your liking. Select
TRE or BAS by pressing the TUNE
knob. Adjust the selected mode by
turning the TUNE knob. The
displayed number shows you the
current setting.
These two
modes adjust the strength of the
sound coming f rom each speaker.
BAL adjusts the side-to-side strength,
while FAD adjusts the f ront-to-back
strength. Adjusting the Sound
Treble/Bass
Balance/Fader
Audio System
Comf ort and Convenience Feat ures174
DIGITAL CLOCK
SET
BUTTON
TUNE KNOB
ADJUSTMENT LEVEL