Page 206 of 317

�´
�µ
CONT INUED
If your car’s battery is disconnected
or goes dead, the audio system will
disableitself.Thenexttimeyouturn
on the radio you will see ‘‘ ’’
in the f requency display. Use the
Preset buttons to enter the five-digit
code (see page ).
When the audio system disables
itself , the clock setting will cancel.
To reset the clock, ref er to the
Digital Clock in the audio system’s
operation.When the coolant stops draining,
tightenthedrainplugatthe
bottom of the radiator.
Put a new washer on the drain bolt,
then reinstall the drain bolt in the
engine block. Tighten it securely.
Tightening torque: Loosen the bleeder bolt on top of
the engine.
Put the tube back in the clips and
put the reserve tank back in place,
making sure its bottom tab is in
the holder. Reinstall and tighten
the mounting bolt securely.
Reinstall the tray, battery, stay,
battery case, and battery plate in
the reverse order of removal.
Reinstall and tighten the bolt and
nut securely.
Reconnect the battery cables to
the terminals. Connect the positive
( ) cable f irst, then the negative
()cable.
Battery posts,
terminals and related accessories
contain lead and lead compounds.
Reinstall the cover.137
12.
13.
11. 10. 9.
15.
14.
Cooling Syst em
Maint enance
WARNING:
Wash hands af ter handling.
203
BLEEDER BOLT
58 lbf·ft (78 N·m , 8.0 kgf·m)
Page 217 of 317
Put the new spark plug into the
socket, then screw it into the hole.
Screw it in by hand so you do not
crossthread it.
Use a wrench to remove the nut
holding the ignition coil. Remove
the ignition coil by pulling it
straight out.
Remove the spark plug with
a f ive-eighths inch (16 mm) spark
plug socket.
Disconnect the wire connector
f rom the ignition coil by pushing
on the lock tab and pulling on the
connector. Pull on the plastic
connector, not the wires.
4.
5.
6.7.
Spark Plugs
Maint enance214
IGNITION COIL
CONNECTOR LOCK TAB NUT
Page 218 of 317
�´
�µSpark Plug Gap:
Install the ignition coil. Reinstall
the nut.
Push the wire connector onto the
ignition coil. Make sure it locks in
place.
Repeat this procedure f or the
other seven spark plugs.
Reinstall the resonator chamber.
Tighten the two bolts securely on
it, then install the engine cover.
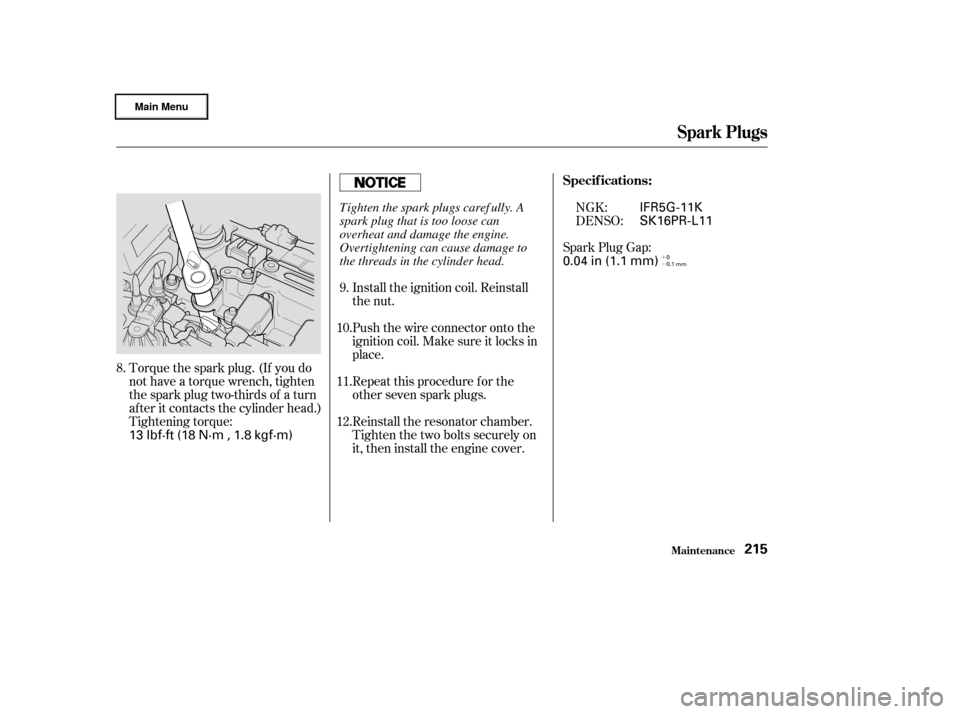
Torque the spark plug. (If you do
not have a torque wrench, tighten
the spark plug two-thirds of a turn
af ter it contacts the cylinder head.)
Tightening torque: NGK:
DENSO:
9.
10.
11.
12.
8.
Maint enance
Spark Plugs
Specif ications:
215
IFR5G-11K
SK16PR-L11
0.04 in (1.1 mm)
13 lbf·ft (18 N·m , 1.8 kgf·m)
0
0.1 mm
Tighten the spark plugs caref ully. A
spark plug that is too loose can
overheat and damage the engine.
Overtightening can cause damage to
the threads in the cylinder head.
Page 221 of 317
If your car’s battery is disconnected
or goes dead, the audio system will
disableitself.Thenexttimeyouturn
on the radio you will see ‘‘ ’’
in the f requency display. Use the
Preset buttons to enter the five-digit
code (see page ).
When the battery is disconnected,
the clock setting in the audio system
will be canceled. You will need to
reset the clock according to the
instructions of the audio system.
If your car’s 12 volt battery is
disconnected or goes dead, the IMA
battery level gauge reading may not
be correct the next time you turn the
ignition switch to ON (II). It may
show less than the actual level
temporarily. It will show the correct
level af ter you drive f or at least 30
minutes.
137
Battery
Maint enance218
Charging the battery with the cables
connected can seriously damage your
car’s electronic controls. Detach the
battery cables bef ore connecting the
battery to a charger.
Page 222 of 317
Disconnect the blade assembly
fromthewiperarmbypushingin
the lock tab. Hold it in while you
push the blade assembly toward
thebaseof thearm.
Raise the wiper arm of f the
windshield.
To replace the blade:
Check the condition of the wiper
blades at least every six months.
Look f or signs of cracking in the
rubber, or areas that are getting
hard. Replace the blades if you f ind
these signs, or if they leave streaks
and unwiped areas when used.
2.
1.
CONT INUED
Wiper Blades
Maint enance219
WIPER ARMS
LOCK TAB
Page 223 of 317
Remove the blade f rom its holder
by grasping the tabbed end of the
blade. Pull f irmly until the tabs
come out of the holder.Examine the new wiper blades. If
they have no plastic or metal rein-
f orcement along the back edge,
remove the metal reinf orcement
strips f rom the old wiper blade and
install them in the slots along the
edge of the new blade.Slide the new wiper blade into the
holder until the tabs lock.
Slide the wiper blade assembly
onto the wiper arm. Make sure it
locks in place.
Lower the wiper arm down against
the windshield.
3. 4. 5.
6.
7.
Wiper Blades
Maint enance220
BLADE
REINFORCEMENTBLADE
Page 224 of 317

Periodically check the engine’s
radiator and air conditioning
condenser f or leaves, insects, and
dirt stuck to the f ront surf ace. These
block the air f low and reduce cooling
ef f iciency. Use a light spray f rom a
hose or a sof t brush to remove them.If the air conditioning does not get as
cold as before, have your dealer
check the system. Recharge the
system with Ref rigerant HFC-134a
(R-134a). (See Specif ications on page
.)
Run the air conditioning at least once
a week during the cold weather
months. Run it f or at least ten
minutes while you are driving at a
steady speed with the engine at
normal operating temperature. This
circulates the lubricating oil con-
tained in the ref rigerant.
Your car’s air conditioning is a sealed
system. Any major maintenance,
such as recharging, should be done
by a qualif ied mechanic. You can do
a couple of things to make sure the
air conditioning works ef f iciently.
289
A ir Condit ioning Syst em
Maint enance221
AIR CONDITIONING CONDENSER
Whenever you have the air conditioning
system serviced, make sure the service
f acility uses a ref rigerant recycling
system. This system captures the
ref rigerant f or reuse. Releasing
ref rigerant into the atmosphere can
damage the environment.
The condenser and radiator f ins bend
easily. Only use a low-pressure spray
or sof t-bristle brush to clean them.
Page 225 of 317
To replace it:Open the glove box. Remove the
hooks on the side panels by pulling
out on the tabs. Pivot the glove
box out of the way.
The dust and pollen f ilter is located
behind the glove box.
Remove the dust and pollen f ilter
cover by pushing in on the lock tab,
then pulling the cover toward you.
The dust and pollen f ilter removes
pollen and dust that is brought in
f rom the outside through the heating
andcoolingsystem.
This f ilter should be replaced every
30,000 miles (48,000 km) under
normal conditions. It should be
replaced every 15,000 miles (24,000
km) if you drive primarily in urban
areas that have high concentrations
of soot in the air f rom industry and
diesel-powered vehicles. Replace it
more of ten if air f low f rom the
heating and cooling system becomes
less than usual.
1.2.
Dust and Pollen Filter
Maint enance
Replacement
222
HOOKS
COVER
TAB