Page 288 of 428
Engine Air Cleaner/Filter
The air cleanedfilter assembly has an indicator, if
equipped, that lets you know when the engine air
cleanedfilter is dirty and needs to be serviced. The air
cleanedfilter indicator is located on the air cleaner cover.
See
Engine Compartment Overview on page 5-12 for
more information on location.
See
Part B: Owner Checks and Services on page 6-10
to determine when to check the indicator.
- The service window A
with the percentage scale
shows the amount of
engine air cleanedfilter life
used. When both service
window
A and service
window
B turn orange,
replace the engine
air cleaner/filter.
lfter changing the air filter, press the top button on the
ndicator to reset it. The air
cleanedfilter assembly is located on the front
corner of the engine compartment on the passenger’s
side of the vehicle. See Engine Compartment Overview
on page 5-12
for more information on location.
5-1 9
Page 289 of 428

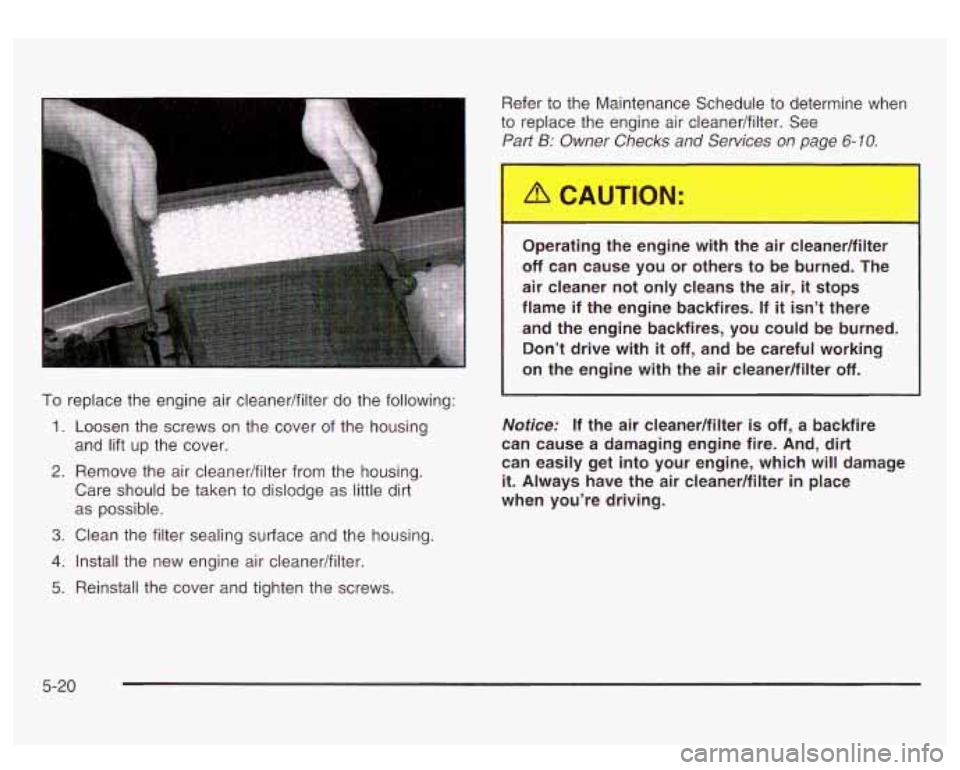
To replace the engine air cleaner/filter do the following:
1. Loosen the screws on the cover of the housing
and lift up the cover.
2. Remove the air cleaner/filter from the housing.
Care should be taken
to dislodge as little dirt
as possible.
3. Clean the filter sealing surface and the housing.
4. Install the new engine air cleanedfilter.
5. Reinstall the cover and tighten the screws. Refer
to the Maintenance Schedule to determine when
to replace the engine air cleaner/filter. See
Part B: Owner Checks and Services on page 6-10.
Operating the engine with the air cleanedfilter
off can cause you or others to be burned. The
air cleaner not only cleans the air,
it stops
flame
if the engine backfires. If it isn’t there
and the engine backfires, you could be burned. Don’t drive with
it off, and be careful working
on the engine with the air cleaner/filter
off.
Notice: If the air cleaner/filter is off, a backfire
can cause a damaging engine fire. And, dirt
can easily get into your engine, which will damage
it. Always have the air cleanedfilter in place
when you’re driving.
5-20
Page 290 of 428

Automatic Transmission Fluid
When to Check and Change
A good time to check your automatic transmission fluid
level
is when the engine oil is changed.
Change both the fluid and filter every
50,000 miles
(83
000 km) if the vehicle is mainly driven under one or
more
of these conditions:
In heavy city traffic where the outside temperature
regularly reaches 90°F (32°C) or higher.
In hilly or mountainous terrain.
When doing frequent trailer towing.
Uses such as found in taxi, police or delivery
If you do not use your vehicle under any of these
conditions, change the fluid and filter every
100,000 miles (1 66 000 km).
See
Part A: Scheduled Maintenance Services on
page
6-4.
service.
How to Check
Because this operation can be a little difficult, you may
choose to have this done at the dealership service
department.
If you do it yourself, be sure to follow all the instructions
here, or you could get a false reading on the dipstick.
Notice: Too much or too little fluid can damage
your transmission. Too much can mean that some
of the fluid could come out and fall on hot engine
part
or exhaust system parts, starting a fire.
Too little fluid could cause the transmission to overheat. Be sure to get an accurate reading if you
check your transmission fluid.
Wait at least
30 minutes before checking the
transmission fluid level
if you have been driving:
0 When outside temperatures are above 90°F (32°C).
At high speed for quite a while.
In heavy traffic - especially in hot weather.
While pulling a trailer.
To get the right reading, the fluid should be at normal
operating temperature, which is 180°F
to 200°F
(82°C to 93°C).
5-2
1
Page 298 of 428

If No Steam Is Coming From
Your Engine
An overheat warning, along with a low coolant message,
can indicate
a serious problem. See “Low Coolant”
under
DIC Warnings and Messages on page 3-53.
If you get an engine overheat warning with no low
coolant message, but see or hear no steam, the problem
may not be too serious. Sometimes the engine can
get a little
too hot when you:
Climb a long hill on a hot day.
Stop after high-speed driving.
Idle for long periods in traffic.
Tow a trailer. See “Driving on Grades” under
Towing a Trailer on page 4-51.
If you get the overheat warning with no sign of steam,
try this for a minute or
so:
1. If your air conditioner is on, turn it off.
2. Turn on your heater to full hot at the highest fan
speed and open the window as necessary.
3. If you’re in a traffic jam, shift to NEUTRAL (N);
otherwise, shift to the highest gear while
driving
- AUTOMATIC OVERDRIVE (@ ).
If you no longer have the overheat warning, you can
drive. Just
to be safe, drive slower for about 10 minutes.
If the warning doesn’t come back on, you can drive
normally.
If the warning continues, pull over, stop, and park your
vehicle right away.
If there’s still no sign of steam, push down the accelerator
until the engine speed
is about twice as fast as normal
idle speed for at least three minutes while you’re parked.
If you still have the warning, turn off the engine andget
everyone out
of the vehicle until it cools down. Also, see
Overheated Engine Protection Operating Mode listed
previously in this section.
You may decide not
to lift the hood but to get service
help right away.
5-29
Page 300 of 428

I
Heater and radiator hoses, and other engine
parts, can be very hot. Don’t touch them.
If you do, you can be burned.
Don’t run the engine if there
is a leak. If you
run the engine,
it could lose all coolant.
That could cause an engine fire, and you could
be burned. Get any leak fixed before you drive
the vehicle.
If there seems to be no leak, start the engine again.
The engine cooling fan speed should increase when idle
speed
is doubled by pushing the accelerator pedal
down.
If it doesn’t, your vehicle needs service. Turn off
the engine.
Notice: Engine damage from running your engine
without coolant isn’t covered by your warranty.
See “Overheated Engine Protection Operating
Mode”
in the Index for information on driving to
a safe place in an emergency.
Notice: When adding coolant, it is important that
you use only
DEX-COOL@ (silicate-free) coolant.
If coolant other than DEX-COOL@
is added to
the system, premature engine, heater core or
radiator corrosion may result.
In addition, the engine
coolant will require change sooner
- at 30,000 miles
(50 000 km) or 24 months, whichever occurs first.
Damage caused by the use of coolant other
than DEX-COOL@ is not covered by your new
vehicle warranty.
5-31
Page 316 of 428
I 10. Connect the other
end of the
negative
(-) cable
to the negative
(-)
terminal of the dead
battery or to a remote
negative
(-) terminal
if the vehicle has one.
11. Now start the vehicle with the good battery and run
the engine for a while.
12. Try to start the vehicle that had the dead battery.
If it won’t start after a few tries, it probably needs
service.
Notice: Damage to your vehicle may result from
electrical shorting if jumper cables are removed
incorrectly.
To prevent electrical shorting, take care
that the cables don’t touch each other or any
other metal. The repairs wouldn’t be covered by
your warranty.
5-47
Page 319 of 428
Rear Axle
When to Check Lubricant
Refer to the Maintenance Schedule to determine how
often to check the lubricant. See
PaHA: Scheduled
Maintenance Services on page
6-4.
How to Check Lubricant
To get an accurate reading, the vehicle should be on a
level surface. The
proper level is from
5/8 inch to 1 5/8 inch (1 5 mm to
40 mm) below the bottom of the filler plug hole. Add
only enough fluid to reach the proper level. The proper
level for vehicles with QUADRASTEERTM
(4 Wheel
Steer) is from
0 to 1/4 inch (0 to 6 mm) below the filler
plug hole. Add only enough fluid to reach the proper
level.
What to Use
Refer to the Maintenance Schedule to determine what
kind
of lubricant to use. See Part D: Recommended
Fluids and Lubricants on page
6- 16.
5-50
Page 320 of 428
Front Axle
When to Check Lubricant
Refer to the Maintenance Schedule to determine how
often to check the lubricant. See
Pat? A: Scheduled
Maintenance Services on page
6-4.
How to Check Lubricant
To get an accurate reading, the vehicle should be on a
level surface.
If the level is below the bottom
of the filler plug hole,
you may need to add some lubricant.
When the differential is cold, add enough lubricant to
raise the level to
0 to 3/8 inch (9.5 mm) below the filler
plug hole.
When the differential is at operating temperature
(warm), add enough lubricant to raise the level to the
bottom
of the filler plug hole.
What to Use
Refer to the Maintenance Schedule to determine what
kind of lubricant to use. See
Pat? D: Recommended
Fluids and Lubricants on page
6-16.
5-51