Page 1043 of 4378
IN-
VEHICLE REPAIR
Flexplate
Removal and Installation 1. Remove the transmission. For additional information, refer to Section 307 - 01 .
2. Remove the six bolts retaining the flexplate to crankshaft, and remove the flexplate.
3. To install, reverse the removal procedure.
SECTION 303-
01A: Engine — 3.8L 2003 Mustang Workshop Manual �K�l�j . 1 �b�a
12003 Mustang Workshop Manual
17. 11. 2011file:///C:/Ford/2000 - 2004/tsocache/SHEF_4464/S3B~us~en~ ...
Page 1044 of 4378
IN-
VEHICLE REPAIR
Crankshaft Rear Seal
Removal 1. Remove the flywheel or the flexplate. For additional information, refer to Flexplate in this
section.
SECTION 303-
01A: Engine — 3.8L 2003 Mustang Workshop Manual Special Tool(s)
Impact Slide Hammer
100-
001 (T50T-100- A) Remover, Crankshaft Rear
Seal
303-
519 (T95P-6701- EH) Replacer, Rear Crankshaft
Seal
303-
516 (T95P-6701- BH) Spacer, Rear Crank Seal
Replacer
303-
561 (T96T-6701- B) Adapter, Crankshaft Rear Seal
(Use only the adapter retaining
bolts)
303-
518 (T95P-6701- DH) Adapter, Crankshaft Rear Seal
(Use only the adapter and the
center jack screw)
303-
S560 (T96T-6701- A)
Material Item Specification
SAE 5W-
20 Premium Synthetic
Blend Motor Oil
XO- 5W20-QSP or equivalent WSS-
M2C153-
H �K�l�j . 1 �b�a
32003 Mustang Workshop Manual
17. 11. 2011file:///C:/Ford/2000 - 2004/tsocache/SHEF_4464/S3B~us~en~ ...
Page 1045 of 4378
2. Using the special tools, remove the crankshaft rear seal.
Installation 1. Clean and inspect the mating surface.
2. NOTE: Lubricate the crankshaft rear seal lips with clean engine oil prior to installation.
Assemble the special tools and the crankshaft rear seal.
3. Install the special tools on the rear of the crankshaft.
4. Install the crankshaft rear seal. Tighten the center jack screw (303- S560) until the spacer (303-561) contacts the engine block. �K�l�j . 2 �b�a
32003 Mustang Workshop Manual
17. 11. 2011file:///C:/Ford/2000 - 2004/tsocache/SHEF_4464/S3B~us~en~ ...
Page 1047 of 4378
IN-
VEHICLE REPAIR
Engine Support Insulators
Removal 1. Disconnect the battery ground cable (14301). For additional information, refer to Section 414 -
01 .
2. Remove the air cleaner outlet tube (9B659). For additional information, refer to Section 303 - 12 .
3. Remove the radiator sight shield (8C291).
4. Remove the coolant recovery reservoir (8A080). 1. Disconnect the hose.
2. Remove the bolts. 3. Remove the coolant recovery reservoir. SECTION 303-
01A: Engine — 3.8L 2003 Mustang Workshop Manual Special Tool(s)
3 Bar Engine Support Kit
303-
F072 Engine Lift Bracket Set
303-
D095 (D94L-6001- A) or
equivalent �K�l�j . 1 �b�a
82003 Mustang Workshop Manual
17. 11. 2011file:///C:/Ford/2000 - 2004/tsocache/SHEF_4464/S3B~us~en~ ...
Page 1048 of 4378
5. Install the special tool.
6. Install the special tool.
7. Install the special tool.
8. Raise the vehicle on a hoist. For additional information, refer to
Section 100 - 02 .
9. Remove the LH engine mount nut. �K�l�j . 2 �b�a
82003 Mustang Workshop Manual
17. 11. 2011file:///C:/Ford/2000 - 2004/tsocache/SHEF_4464/S3B~us~en~ ...
Page 1049 of 4378
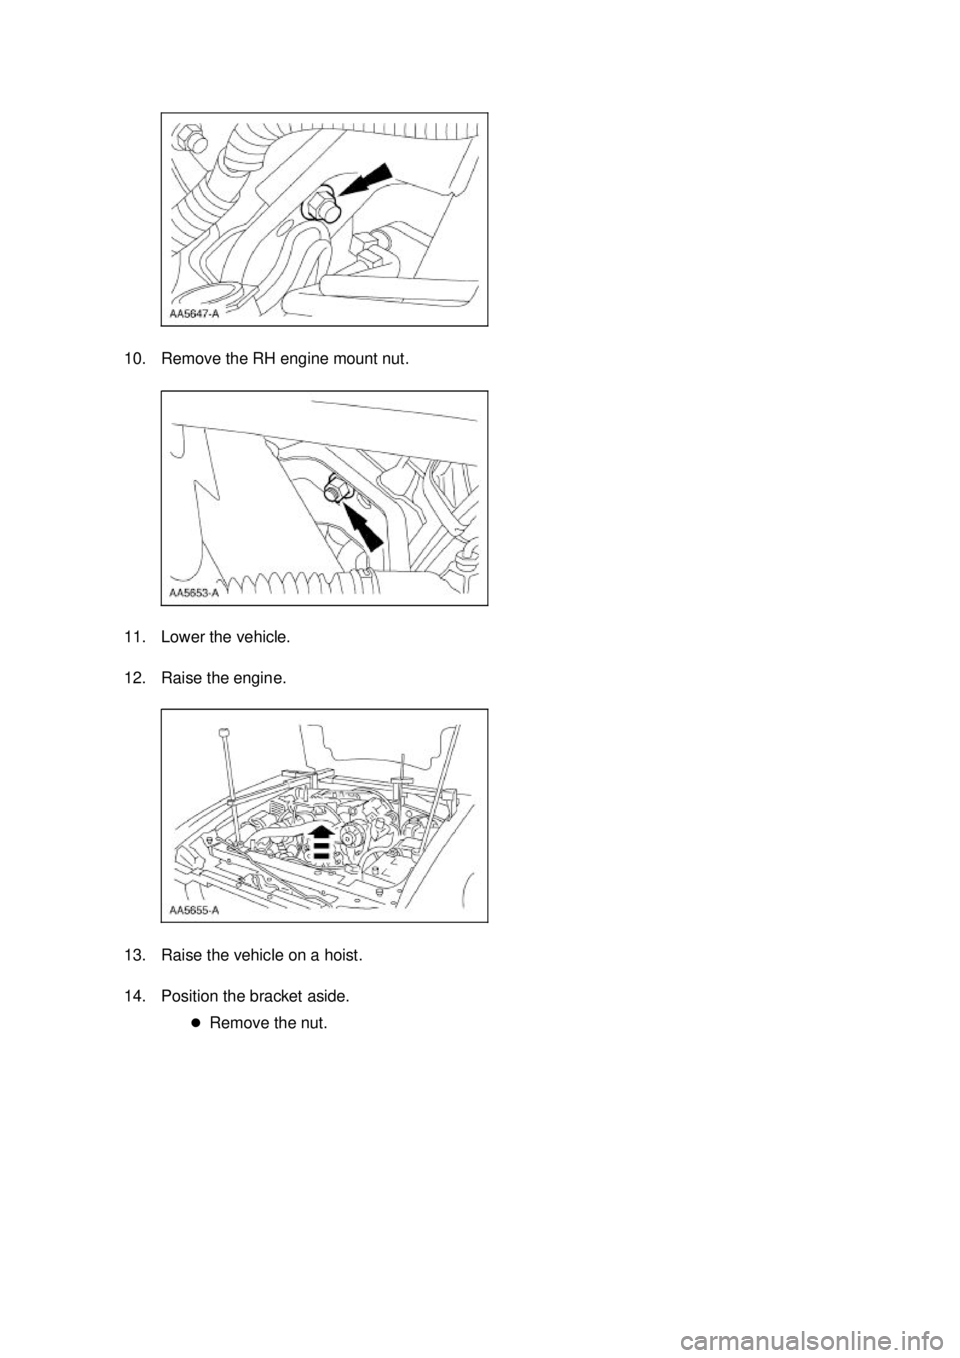
10. Remove the RH engine mount nut.
11. Lower the vehicle.
12. Raise the engine.
13. Raise the vehicle on a hoist.
14. Position the bracket aside.
�zRemove the nut. �K�l�j . 3 �b�a
82003 Mustang Workshop Manual
17. 11. 2011file:///C:/Ford/2000 - 2004/tsocache/SHEF_4464/S3B~us~en~ ...
Page 1050 of 4378
15. Disconnect the engine ground strap.
�zRemove the nut.
16. Remove the LH engine insulator (6038). �zRemove the bolts.
17. Remove the RH engine insulator. �zRemove the bolts.
�z Remove the nuts. �K�l�j . 4 �b�a
82003 Mustang Workshop Manual
17. 11. 2011file:///C:/Ford/2000 - 2004/tsocache/SHEF_4464/S3B~us~en~ ...
Page 1051 of 4378
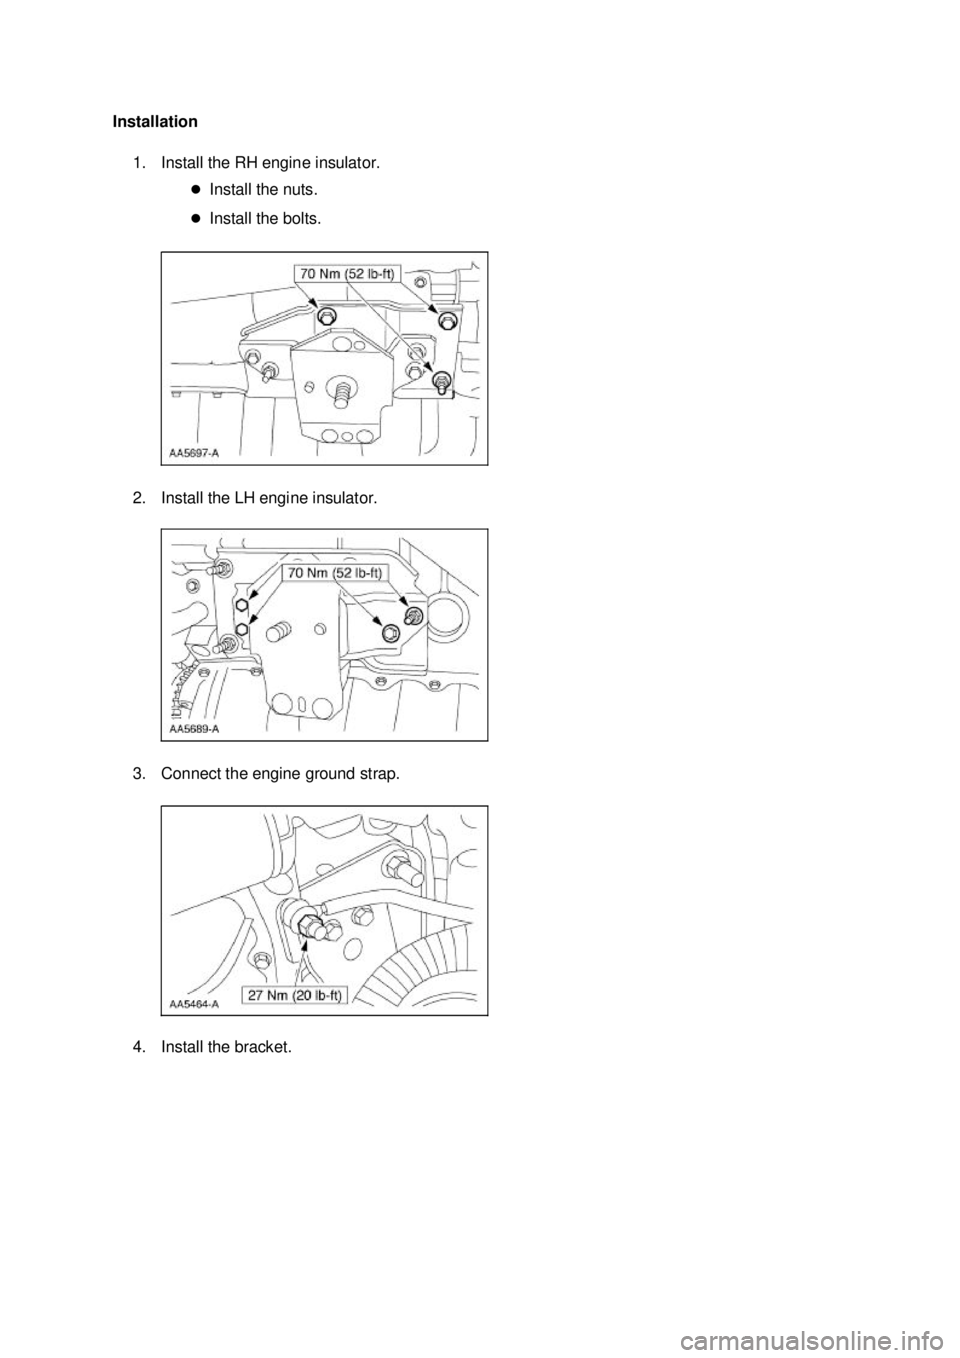
Installation
1. Install the RH engine insulator. �zInstall the nuts.
�z Install the bolts.
2. Install the LH engine insulator.
3. Connect the engine ground strap.
4. Install the bracket. �K�l�j . 5 �b�a
82003 Mustang Workshop Manual
17. 11. 2011file:///C:/Ford/2000 - 2004/tsocache/SHEF_4464/S3B~us~en~ ...


. For additional information, refer to Section 414 -
01 .
2. Remove the air cleaner outlet tube")

. �zRemove the bolts.
17. Remove the RH engine insulator. �zRemove the bolts.
�z Remove the nut")