2003 DODGE RAM electrical
[x] Cancel search: electricalPage 2803 of 2895
(3) Recover the refrigerant from the refrigerant
system. (Refer to 24 - HEATING & AIR CONDI-
TIONING/PLUMBING - STANDARD PROCEDURE -
REFRIGERANT RECOVERY)
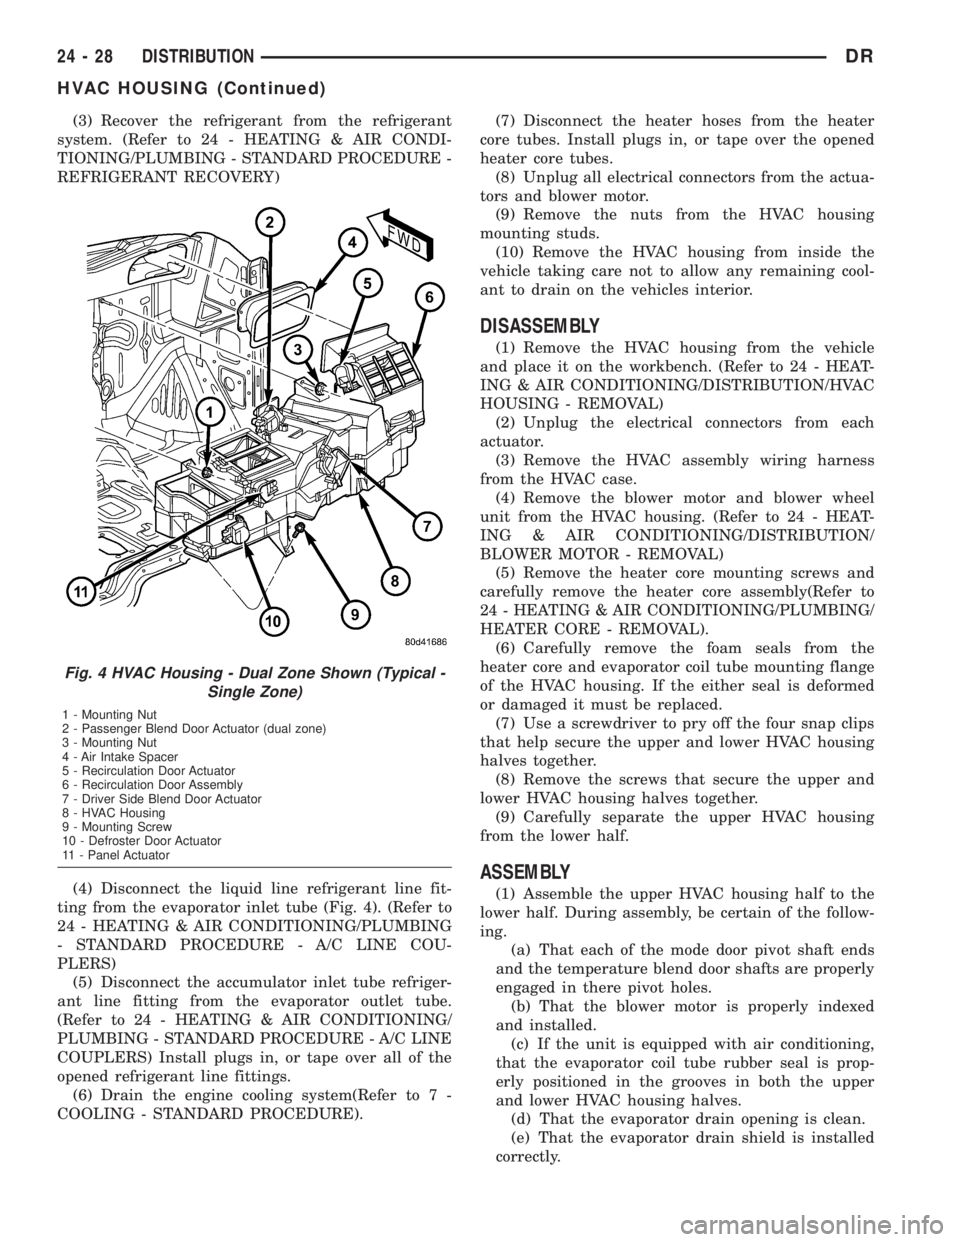
(4) Disconnect the liquid line refrigerant line fit-
ting from the evaporator inlet tube (Fig. 4). (Refer to
24 - HEATING & AIR CONDITIONING/PLUMBING
- STANDARD PROCEDURE - A/C LINE COU-
PLERS)
(5) Disconnect the accumulator inlet tube refriger-
ant line fitting from the evaporator outlet tube.
(Refer to 24 - HEATING & AIR CONDITIONING/
PLUMBING - STANDARD PROCEDURE - A/C LINE
COUPLERS) Install plugs in, or tape over all of the
opened refrigerant line fittings.
(6) Drain the engine cooling system(Refer to 7 -
COOLING - STANDARD PROCEDURE).(7) Disconnect the heater hoses from the heater
core tubes. Install plugs in, or tape over the opened
heater core tubes.
(8) Unplug all electrical connectors from the actua-
tors and blower motor.
(9) Remove the nuts from the HVAC housing
mounting studs.
(10) Remove the HVAC housing from inside the
vehicle taking care not to allow any remaining cool-
ant to drain on the vehicles interior.
DISASSEMBLY
(1) Remove the HVAC housing from the vehicle
and place it on the workbench. (Refer to 24 - HEAT-
ING & AIR CONDITIONING/DISTRIBUTION/HVAC
HOUSING - REMOVAL)
(2) Unplug the electrical connectors from each
actuator.
(3) Remove the HVAC assembly wiring harness
from the HVAC case.
(4) Remove the blower motor and blower wheel
unit from the HVAC housing. (Refer to 24 - HEAT-
ING & AIR CONDITIONING/DISTRIBUTION/
BLOWER MOTOR - REMOVAL)
(5) Remove the heater core mounting screws and
carefully remove the heater core assembly(Refer to
24 - HEATING & AIR CONDITIONING/PLUMBING/
HEATER CORE - REMOVAL).
(6) Carefully remove the foam seals from the
heater core and evaporator coil tube mounting flange
of the HVAC housing. If the either seal is deformed
or damaged it must be replaced.
(7) Use a screwdriver to pry off the four snap clips
that help secure the upper and lower HVAC housing
halves together.
(8) Remove the screws that secure the upper and
lower HVAC housing halves together.
(9) Carefully separate the upper HVAC housing
from the lower half.
ASSEMBLY
(1) Assemble the upper HVAC housing half to the
lower half. During assembly, be certain of the follow-
ing.
(a) That each of the mode door pivot shaft ends
and the temperature blend door shafts are properly
engaged in there pivot holes.
(b) That the blower motor is properly indexed
and installed.
(c) If the unit is equipped with air conditioning,
that the evaporator coil tube rubber seal is prop-
erly positioned in the grooves in both the upper
and lower HVAC housing halves.
(d) That the evaporator drain opening is clean.
(e) That the evaporator drain shield is installed
correctly.
Fig. 4 HVAC Housing - Dual Zone Shown (Typical -
Single Zone)
1 - Mounting Nut
2 - Passenger Blend Door Actuator (dual zone)
3 - Mounting Nut
4 - Air Intake Spacer
5 - Recirculation Door Actuator
6 - Recirculation Door Assembly
7 - Driver Side Blend Door Actuator
8 - HVAC Housing
9 - Mounting Screw
10 - Defroster Door Actuator
11 - Panel Actuator
24 - 28 DISTRIBUTIONDR
HVAC HOUSING (Continued)
Page 2804 of 2895
(2) Install the screws and snap clips that secure
the upper and lower HVAC housing halves to each
other. Tighten the screws to 2.2 N´m (20 in. lbs.).
(3) Install the blower motor and wheel unit in the
HVAC housing. (Refer to 24 - HEATING & AIR CON-
DITIONING/DISTRIBUTION/BLOWER MOTOR -
INSTALLATION)
(4) Install the foam seals on the flanges around
the heater core and evaporator coil tube mounting
flange of the HVAC housing. Repair or replace any
seals as required.
(5) Install the electrical wiring harness for the
acutators. Make sure the wires are routed through
all wiring retainers, replace any retainers that are
damaged or missing.
(6) Connect the wiring harness to each actuator,
making sure each connector is securely attached.
INSTALLATION
WARNING: IF THE VEHICLE IS EQUIPPED WITH AIR
CONDITIONING, REVIEW THE WARNINGS AND
CAUTIONS IN PLUMBING BEFORE PERFORMING
THE FOLLOWING OPERATION. (Refer to 24 - HEAT-
ING & AIR CONDITIONING/PLUMBING - WARNING)
(Refer to 24 - HEATING & AIR CONDITIONING/
PLUMBING - CAUTION) (Refer to 24 - HEATING &
AIR CONDITIONING/PLUMBING - CAUTION -
REFRIGERANT HOSES/LINES/TUBES PRECAU-
TIONS)
(1) Position the HVAC housing to the dash panel.
Be certain that the evaporator condensate drain tube
and the housing mounting studs are inserted into
their correct mounting holes.
(2) Install and tighten the nuts onto the HVAC
housing mounting studs. Tighten the nuts to 6.2 N´m
(55 in.lbs.).
(3) Connect the HVAC system electrical connec-
tors.
(4) Unplug or remove the tape from the heater
core tubes. Connect the heater hoses to the heater
core tubes and fill the engine cooling system(Refer to
7 - COOLING/ENGINE - STANDARD PROCE-
DURE).
(5) Unplug or remove the tape from the liquid line
and the evaporator inlet tube fittings. Connect the
liquid line coupler to the evaporator inlet tube. (Refer
to 24 - HEATING & AIR CONDITIONING/PLUMB-
ING - STANDARD PROCEDURE - A/C LINE COU-
PLERS)(6) Evacuate the refrigerant system. (Refer to 24 -
HEATING & AIR CONDITIONING/PLUMBING -
STANDARD PROCEDURE - REFRIGERANT SYS-
TEM EVACUATE)
(7) Charge the refrigerant system. (Refer to 24 -
HEATING & AIR CONDITIONING/PLUMBING -
STANDARD PROCEDURE - REFRIGERANT SYS-
TEM CHARGE)
(8) Install the instrument panel in the vehicle(Re-
fer to 23 - BODY/INSTRUMENT PANEL - INSTAL-
LATION).
(9) Connect the battery negative cable.
(10) Start the engine and check for proper opera-
tion of the heating and air conditioning systems.
(11) Run the calibration procedure.
INSTRUMENT PANEL DUCTS
REMOVAL
(1) Disconnect and isolate the battery negative
cable.
(2) Remove the HVAC assembly from the vehi-
cle(Refer to 24 - HEATING & AIR CONDITIONING/
DISTRIBUTION/HVAC HOUSING - REMOVAL).
(3) Disasemble the HVAC housing(Refer to 24 -
HEATING & AIR CONDITIONING/DISTRIBUTION/
HVAC HOUSING - DISASSEMBLY).
(4) Remove the panel door actuator from the hous-
ing if not already removed.
(5) With the actuator removed you can take the
door and shift it so that one pivot point will clear the
housing. You can then tilt the door and remove it
from the housing.
INSTALLATION
(1) Take the door and tilt it so one pivot point is
installed. The carfully install the second pivot point.
Check to be sure no binding of the door is occuring,
repair as required.
(2) Reassemble the HVAC housing(Refer to 24 -
HEATING & AIR CONDITIONING/DISTRIBUTION/
HVAC HOUSING - ASSEMBLY).
(3) Install the HVAC assembly into the vehicle(Re-
fer to 24 - HEATING & AIR CONDITIONING/DIS-
TRIBUTION/INSTRUMENT PANEL DUCTS -
INSTALLATION).
(4) Connect the battery negative cable.
DRDISTRIBUTION 24 - 29
HVAC HOUSING (Continued)
Page 2820 of 2895
STANDARD PROCEDURE - REFRIGERANT SYS-
TEM EVACUATE)
(7) Charge the refrigerant system. (Refer to 24 -
HEATING & AIR CONDITIONING/PLUMBING -
STANDARD PROCEDURE - REFRIGERANT SYS-
TEM CHARGE)
LIQUID LINE
REMOVAL
WARNING: REVIEW THE WARNINGS AND CAU-
TIONS IN THE FRONT OF THIS SECTION BEFORE
PERFORMING THE FOLLOWING OPERATION.
(Refer to 24 - HEATING & AIR CONDITIONING/
PLUMBING - WARNING) (Refer to 24 - HEATING &
AIR CONDITIONING/PLUMBING - CAUTION)
(1) Disconnect and isolate the battery negative
cable.
NOTE: Removal of the second battery and battery
tray is required on the diesel equipped vehicles.
(2) Remove rightside battery(Refer to 8 - ELEC-
TRICAL/BATTERY SYSTEM/BATTERY - REMOV-
AL).
(3) Remove rightside battery tray(Refer to 8 -
ELECTRICAL/BATTERY SYSTEM/TRAY - REMOV-
AL).
(4) Recover the refrigerant from the refrigerant
system. (Refer to 24 - HEATING & AIR CONDI-
TIONING/PLUMBING - STANDARD PROCEDURE -
REFRIGERANT RECOVERY)
(5) Disconnect the liquid line refrigerant line cou-
plers at the condenser outlet the mid point connec-
tion and the evaporator inlet. (Refer to 24 -
HEATING & AIR CONDITIONING/PLUMBING -
STANDARD PROCEDURE - A/C LINE COUPLERS)
Install plugs in, or tape over all of the opened refrig-
erant line fittings.
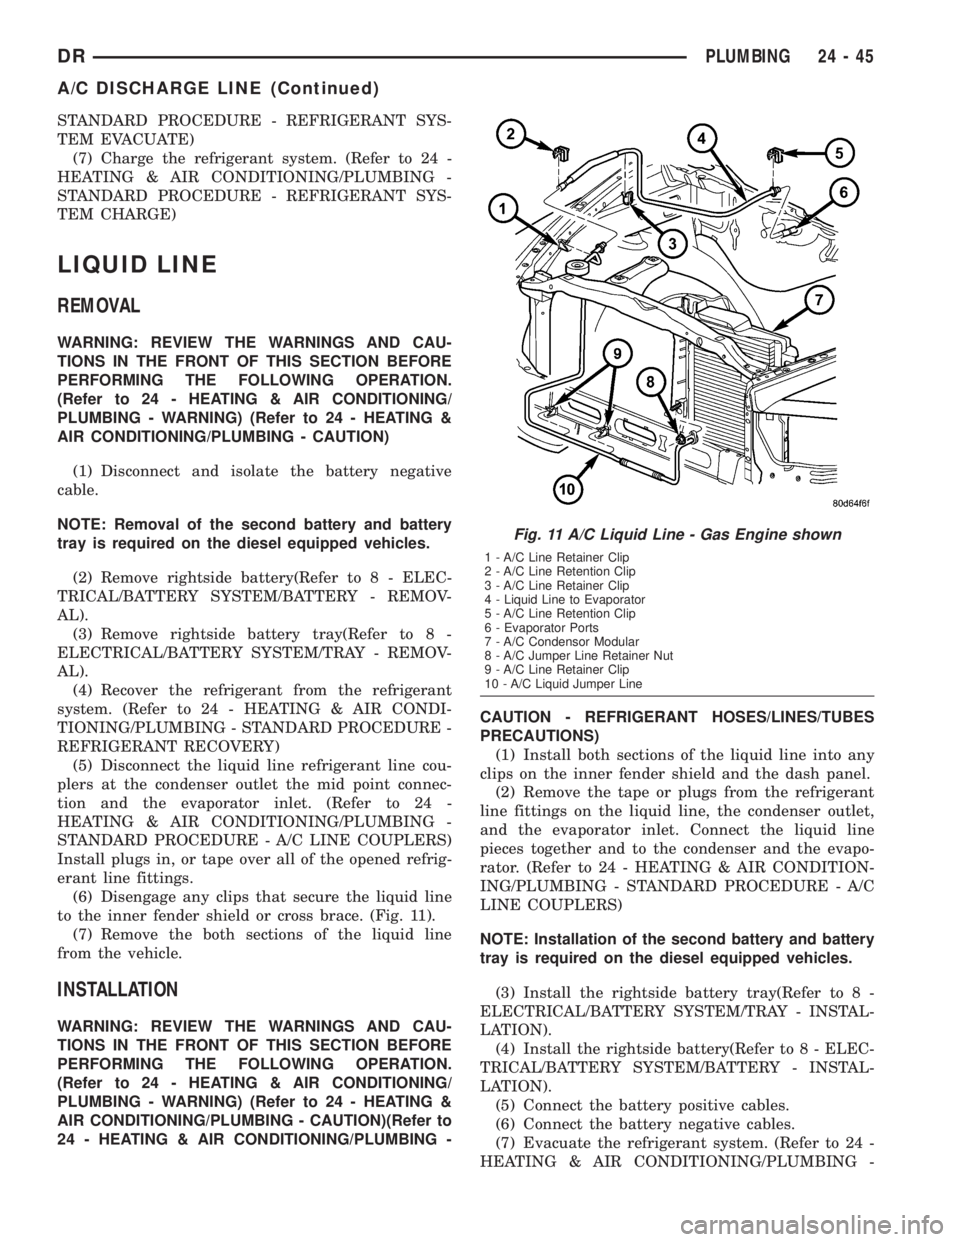
(6) Disengage any clips that secure the liquid line
to the inner fender shield or cross brace. (Fig. 11).
(7) Remove the both sections of the liquid line
from the vehicle.
INSTALLATION
WARNING: REVIEW THE WARNINGS AND CAU-
TIONS IN THE FRONT OF THIS SECTION BEFORE
PERFORMING THE FOLLOWING OPERATION.
(Refer to 24 - HEATING & AIR CONDITIONING/
PLUMBING - WARNING) (Refer to 24 - HEATING &
AIR CONDITIONING/PLUMBING - CAUTION)(Refer to
24 - HEATING & AIR CONDITIONING/PLUMBING -CAUTION - REFRIGERANT HOSES/LINES/TUBES
PRECAUTIONS)
(1) Install both sections of the liquid line into any
clips on the inner fender shield and the dash panel.
(2) Remove the tape or plugs from the refrigerant
line fittings on the liquid line, the condenser outlet,
and the evaporator inlet. Connect the liquid line
pieces together and to the condenser and the evapo-
rator. (Refer to 24 - HEATING & AIR CONDITION-
ING/PLUMBING - STANDARD PROCEDURE - A/C
LINE COUPLERS)
NOTE: Installation of the second battery and battery
tray is required on the diesel equipped vehicles.
(3) Install the rightside battery tray(Refer to 8 -
ELECTRICAL/BATTERY SYSTEM/TRAY - INSTAL-
LATION).
(4) Install the rightside battery(Refer to 8 - ELEC-
TRICAL/BATTERY SYSTEM/BATTERY - INSTAL-
LATION).
(5) Connect the battery positive cables.
(6) Connect the battery negative cables.
(7) Evacuate the refrigerant system. (Refer to 24 -
HEATING & AIR CONDITIONING/PLUMBING -
Fig. 11 A/C Liquid Line - Gas Engine shown
1 - A/C Line Retainer Clip
2 - A/C Line Retention Clip
3 - A/C Line Retainer Clip
4 - Liquid Line to Evaporator
5 - A/C Line Retention Clip
6 - Evaporator Ports
7 - A/C Condensor Modular
8 - A/C Jumper Line Retainer Nut
9 - A/C Line Retainer Clip
10 - A/C Liquid Jumper Line
DRPLUMBING 24 - 45
A/C DISCHARGE LINE (Continued)
Page 2833 of 2895
verter. The PCM calculates the A/F mixture from the
output of the O2S. A low voltage indicates high oxy-
gen content (lean mixture). A high voltage indicates a
low content of oxygen (rich mixture).
When the upstream O2S detects a lean condition,
there is an abundance of oxygen in the exhaust gas.
A functioning converter would store this oxygen so it
can use it for the oxidation of HC and CO. As the
converter absorbs the oxygen, there will be a lack of
oxygen downstream of the converter. The output of
the downstream O2S will indicate limited activity in
this condition.
As the converter loses the ability to store oxygen,
the condition can be detected from the behavior of
the downstream O2S. When the efficiency drops, no
chemical reaction takes place. This means the con-
centration of oxygen will be the same downstream as
upstream. The output voltage of the downstream
O2S copies the voltage of the upstream sensor. The
only difference is a time lag (seen by the PCM)
between the switching of the O2S's.
To monitor the system, the number of lean-to-rich
switches of upstream and downstream O2S's is
counted. The ratio of downstream switches to
upstream switches is used to determine whether the
catalyst is operating properly. An effective catalyst
will have fewer downstream switches than it has
upstream switches i.e., a ratio closer to zero. For a
totally ineffective catalyst, this ratio will be one-to-
one, indicating that no oxidation occurs in the device.
The system must be monitored so that when cata-
lyst efficiency deteriorates and exhaust emissions
increase to over the legal limit, the MIL will be illu-
minated.
DESCRIPTION - TRIP DEFINITION
The term ªTripº has different meanings depending
on what the circumstances are. If the MIL (Malfunc-
tion Indicator Lamp) is OFF, a Trip is defined as
when the Oxygen Sensor Monitor and the Catalyst
Monitor have been completed in the same drive cycle.
When any Emission DTC is set, the MIL on the
dash is turned ON. When the MIL is ON, it takes 3
good trips to turn the MIL OFF. In this case, it
depends on what type of DTC is set to know what a
ªTripº is.
For the Fuel Monitor or Mis-Fire Monitor (contin-
uous monitor), the vehicle must be operated in the
ªSimilar Condition Windowº for a specified amount of
time to be considered a Good Trip.
If a Non-Contiuous OBDII Monitor fails twice in a
row and turns ON the MIL, re-running that monitor
which previously failed, on the next start-up and
passing the monitor, is considered to be a Good Trip.
These will include the following:
²Oxygen Sensor²Catalyst Monitor
²Purge Flow Monitor
²Leak Detection Pump Monitor (if equipped)
²EGR Monitor (if equipped)
²Oxygen Sensor Heater Monitor
If any other Emission DTC is set (not an OBDII
Monitor), a Good Trip is considered to be when the
Oxygen Sensor Monitor and Catalyst Monitor have
been completed; or 2 Minutes of engine run time if
the Oxygen Sensor Monitor or Catalyst Monitor have
been stopped from running.
It can take up to 2 Failures in a row to turn on the
MIL. After the MIL is ON, it takes 3 Good Trips to
turn the MIL OFF. After the MIL is OFF, the PCM
will self-erase the DTC after 40 Warm-up cycles. A
Warm-up cycle is counted when the ECT (Engine
Coolant Temperature Sensor) has crossed 160ÉF and
has risen by at least 40ÉF since the engine has been
started.
DESCRIPTION - COMPONENT MONITORS
There are several components that will affect vehi-
cle emissions if they malfunction. If one of these com-
ponents malfunctions the Malfunction Indicator
Lamp (MIL) will illuminate.
Some of the component monitors are checking for
proper operation of the part. Electrically operated
components now have input (rationality) and output
(functionality) checks. Previously, a component like
the Throttle Position sensor (TPS) was checked by
the PCM for an open or shorted circuit. If one of
these conditions occurred, a DTC was set. Now there
is a check to ensure that the component is working.
This is done by watching for a TPS indication of a
greater or lesser throttle opening than MAP and
engine rpm indicate. In the case of the TPS, if engine
vacuum is high and engine rpm is 1600 or greater,
and the TPS indicates a large throttle opening, a
DTC will be set. The same applies to low vacuum if
the TPS indicates a small throttle opening.
All open/short circuit checks, or any component
that has an associated limp-in, will set a fault after 1
trip with the malfunction present. Components with-
out an associated limp-in will take two trips to illu-
minate the MIL.
OPERATION
OPERATION
The Powertrain Control Module (PCM) monitors
many different circuits in the fuel injection, ignition,
emission and engine systems. If the PCM senses a
problem with a monitored circuit often enough to
indicate an actual problem, it stores a Diagnostic
Trouble Code (DTC) in the PCM's memory. If the
25 - 4 EMISSIONS CONTROLDR
EMISSIONS CONTROL (Continued)
Page 2842 of 2895
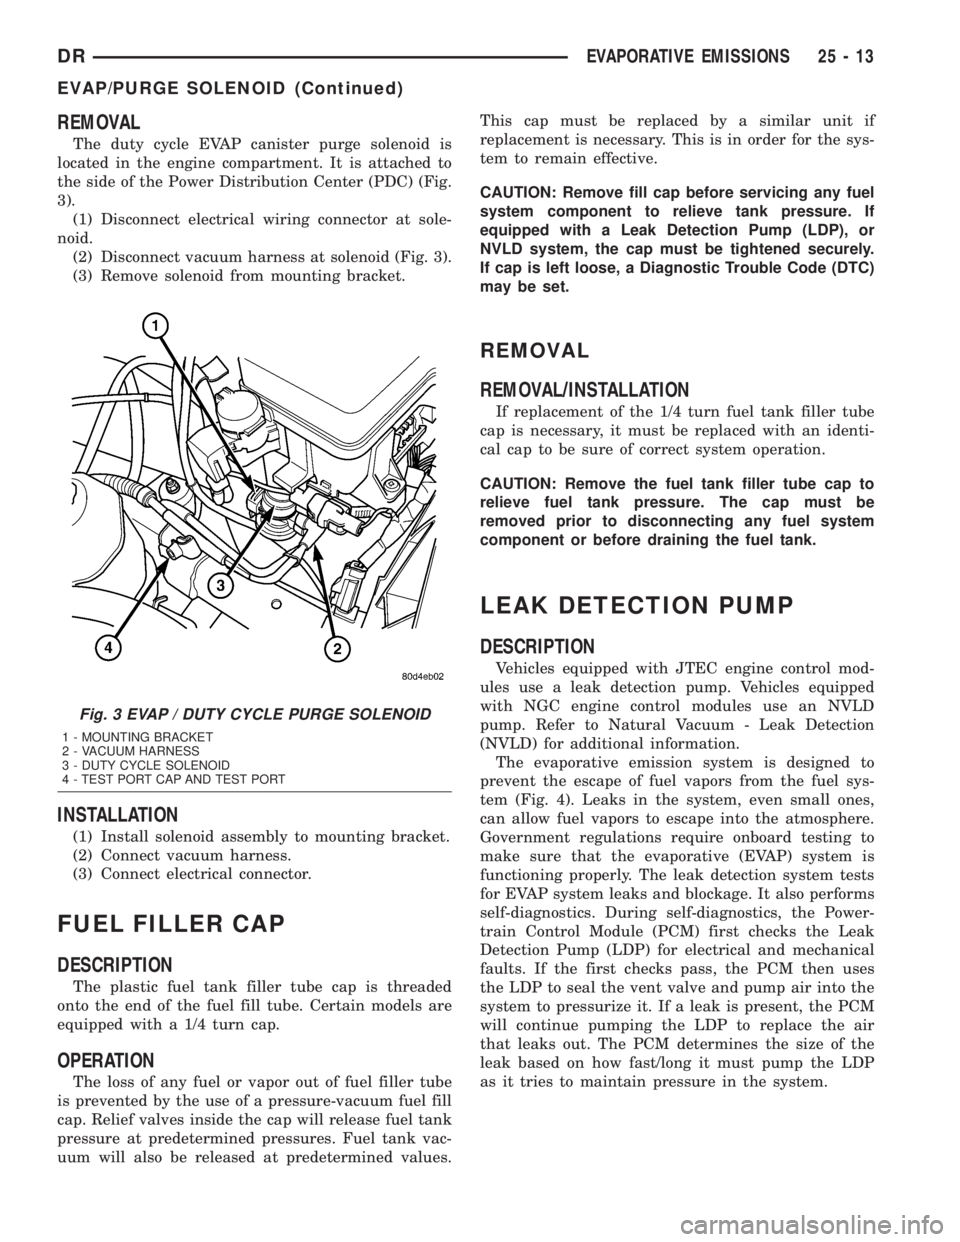
REMOVAL
The duty cycle EVAP canister purge solenoid is
located in the engine compartment. It is attached to
the side of the Power Distribution Center (PDC) (Fig.
3).
(1) Disconnect electrical wiring connector at sole-
noid.
(2) Disconnect vacuum harness at solenoid (Fig. 3).
(3) Remove solenoid from mounting bracket.
INSTALLATION
(1) Install solenoid assembly to mounting bracket.
(2) Connect vacuum harness.
(3) Connect electrical connector.
FUEL FILLER CAP
DESCRIPTION
The plastic fuel tank filler tube cap is threaded
onto the end of the fuel fill tube. Certain models are
equipped with a 1/4 turn cap.
OPERATION
The loss of any fuel or vapor out of fuel filler tube
is prevented by the use of a pressure-vacuum fuel fill
cap. Relief valves inside the cap will release fuel tank
pressure at predetermined pressures. Fuel tank vac-
uum will also be released at predetermined values.This cap must be replaced by a similar unit if
replacement is necessary. This is in order for the sys-
tem to remain effective.
CAUTION: Remove fill cap before servicing any fuel
system component to relieve tank pressure. If
equipped with a Leak Detection Pump (LDP), or
NVLD system, the cap must be tightened securely.
If cap is left loose, a Diagnostic Trouble Code (DTC)
may be set.
REMOVAL
REMOVAL/INSTALLATION
If replacement of the 1/4 turn fuel tank filler tube
cap is necessary, it must be replaced with an identi-
cal cap to be sure of correct system operation.
CAUTION: Remove the fuel tank filler tube cap to
relieve fuel tank pressure. The cap must be
removed prior to disconnecting any fuel system
component or before draining the fuel tank.
LEAK DETECTION PUMP
DESCRIPTION
Vehicles equipped with JTEC engine control mod-
ules use a leak detection pump. Vehicles equipped
with NGC engine control modules use an NVLD
pump. Refer to Natural Vacuum - Leak Detection
(NVLD) for additional information.
The evaporative emission system is designed to
prevent the escape of fuel vapors from the fuel sys-
tem (Fig. 4). Leaks in the system, even small ones,
can allow fuel vapors to escape into the atmosphere.
Government regulations require onboard testing to
make sure that the evaporative (EVAP) system is
functioning properly. The leak detection system tests
for EVAP system leaks and blockage. It also performs
self-diagnostics. During self-diagnostics, the Power-
train Control Module (PCM) first checks the Leak
Detection Pump (LDP) for electrical and mechanical
faults. If the first checks pass, the PCM then uses
the LDP to seal the vent valve and pump air into the
system to pressurize it. If a leak is present, the PCM
will continue pumping the LDP to replace the air
that leaks out. The PCM determines the size of the
leak based on how fast/long it must pump the LDP
as it tries to maintain pressure in the system.
Fig. 3 EVAP / DUTY CYCLE PURGE SOLENOID
1 - MOUNTING BRACKET
2 - VACUUM HARNESS
3 - DUTY CYCLE SOLENOID
4 - TEST PORT CAP AND TEST PORT
DREVAPORATIVE EMISSIONS 25 - 13
EVAP/PURGE SOLENOID (Continued)
Page 2843 of 2895
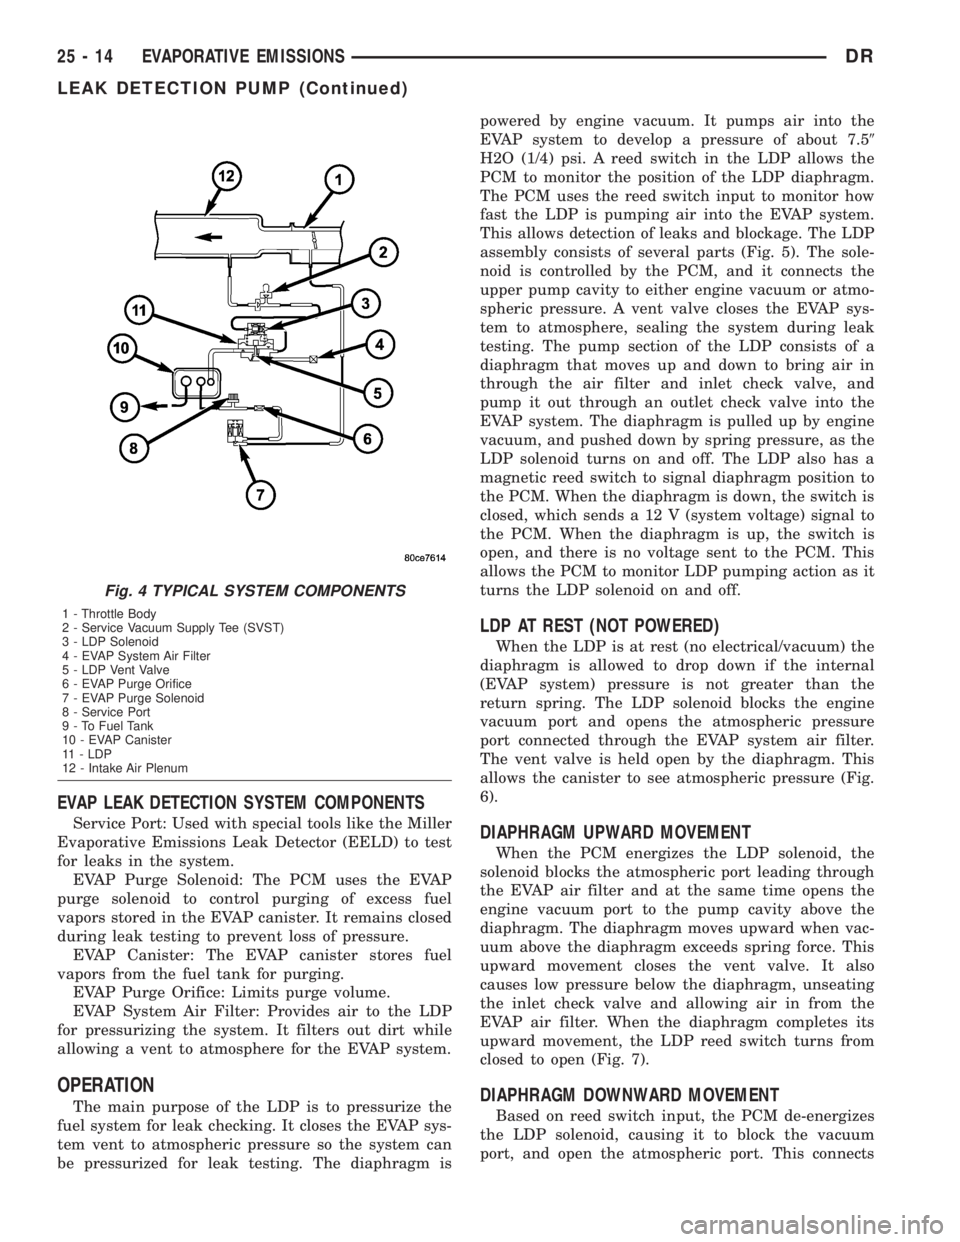
EVAP LEAK DETECTION SYSTEM COMPONENTS
Service Port: Used with special tools like the Miller
Evaporative Emissions Leak Detector (EELD) to test
for leaks in the system.
EVAP Purge Solenoid: The PCM uses the EVAP
purge solenoid to control purging of excess fuel
vapors stored in the EVAP canister. It remains closed
during leak testing to prevent loss of pressure.
EVAP Canister: The EVAP canister stores fuel
vapors from the fuel tank for purging.
EVAP Purge Orifice: Limits purge volume.
EVAP System Air Filter: Provides air to the LDP
for pressurizing the system. It filters out dirt while
allowing a vent to atmosphere for the EVAP system.
OPERATION
The main purpose of the LDP is to pressurize the
fuel system for leak checking. It closes the EVAP sys-
tem vent to atmospheric pressure so the system can
be pressurized for leak testing. The diaphragm ispowered by engine vacuum. It pumps air into the
EVAP system to develop a pressure of about 7.59
H2O (1/4) psi. A reed switch in the LDP allows the
PCM to monitor the position of the LDP diaphragm.
The PCM uses the reed switch input to monitor how
fast the LDP is pumping air into the EVAP system.
This allows detection of leaks and blockage. The LDP
assembly consists of several parts (Fig. 5). The sole-
noid is controlled by the PCM, and it connects the
upper pump cavity to either engine vacuum or atmo-
spheric pressure. A vent valve closes the EVAP sys-
tem to atmosphere, sealing the system during leak
testing. The pump section of the LDP consists of a
diaphragm that moves up and down to bring air in
through the air filter and inlet check valve, and
pump it out through an outlet check valve into the
EVAP system. The diaphragm is pulled up by engine
vacuum, and pushed down by spring pressure, as the
LDP solenoid turns on and off. The LDP also has a
magnetic reed switch to signal diaphragm position to
the PCM. When the diaphragm is down, the switch is
closed, which sends a 12 V (system voltage) signal to
the PCM. When the diaphragm is up, the switch is
open, and there is no voltage sent to the PCM. This
allows the PCM to monitor LDP pumping action as it
turns the LDP solenoid on and off.
LDP AT REST (NOT POWERED)
When the LDP is at rest (no electrical/vacuum) the
diaphragm is allowed to drop down if the internal
(EVAP system) pressure is not greater than the
return spring. The LDP solenoid blocks the engine
vacuum port and opens the atmospheric pressure
port connected through the EVAP system air filter.
The vent valve is held open by the diaphragm. This
allows the canister to see atmospheric pressure (Fig.
6).
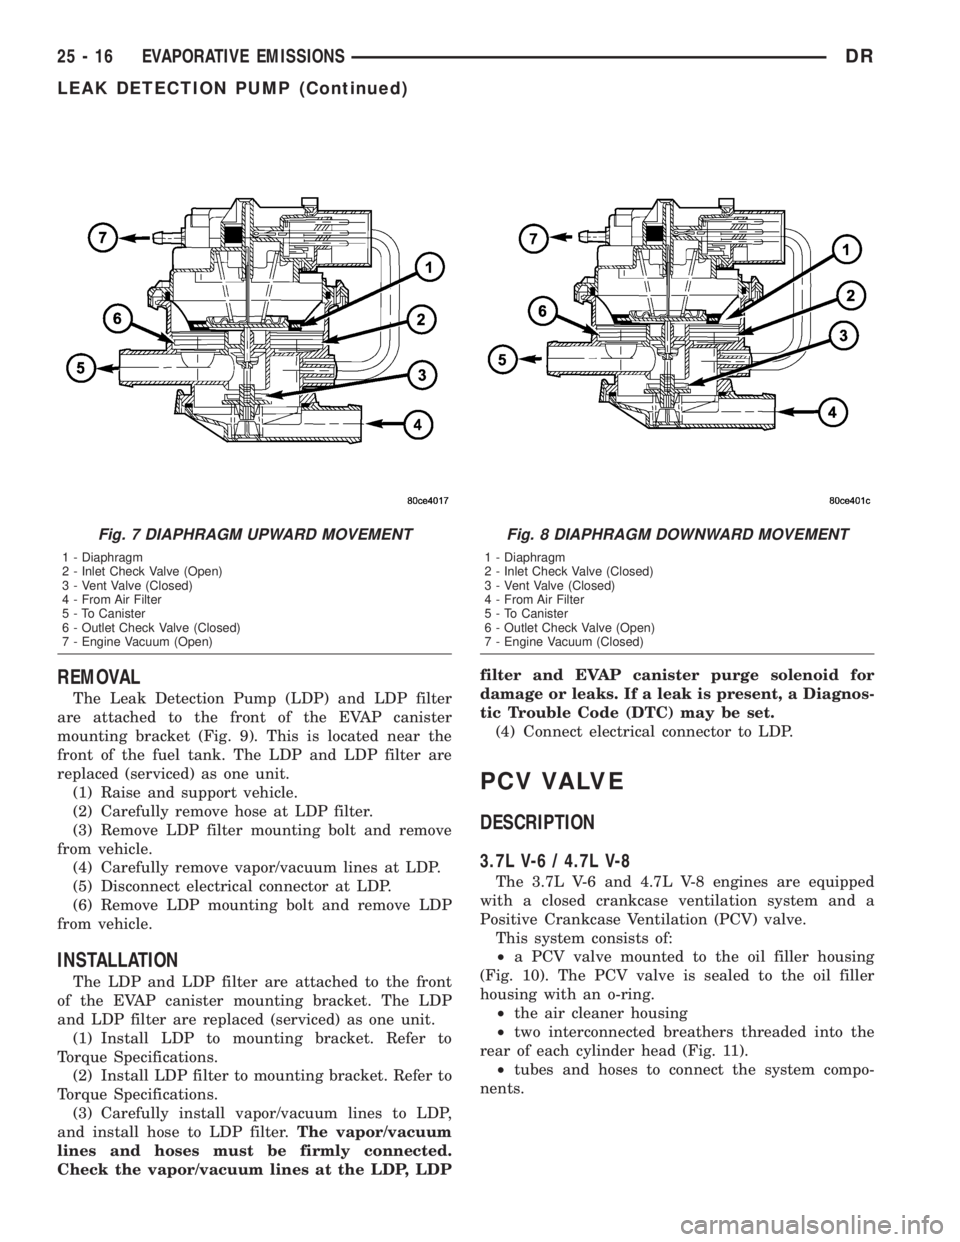
DIAPHRAGM UPWARD MOVEMENT
When the PCM energizes the LDP solenoid, the
solenoid blocks the atmospheric port leading through
the EVAP air filter and at the same time opens the
engine vacuum port to the pump cavity above the
diaphragm. The diaphragm moves upward when vac-
uum above the diaphragm exceeds spring force. This
upward movement closes the vent valve. It also
causes low pressure below the diaphragm, unseating
the inlet check valve and allowing air in from the
EVAP air filter. When the diaphragm completes its
upward movement, the LDP reed switch turns from
closed to open (Fig. 7).
DIAPHRAGM DOWNWARD MOVEMENT
Based on reed switch input, the PCM de-energizes
the LDP solenoid, causing it to block the vacuum
port, and open the atmospheric port. This connects
Fig. 4 TYPICAL SYSTEM COMPONENTS
1 - Throttle Body
2 - Service Vacuum Supply Tee (SVST)
3 - LDP Solenoid
4 - EVAP System Air Filter
5 - LDP Vent Valve
6 - EVAP Purge Orifice
7 - EVAP Purge Solenoid
8 - Service Port
9 - To Fuel Tank
10 - EVAP Canister
11 - LDP
12 - Intake Air Plenum
25 - 14 EVAPORATIVE EMISSIONSDR
LEAK DETECTION PUMP (Continued)
Page 2845 of 2895
REMOVAL
The Leak Detection Pump (LDP) and LDP filter
are attached to the front of the EVAP canister
mounting bracket (Fig. 9). This is located near the
front of the fuel tank. The LDP and LDP filter are
replaced (serviced) as one unit.
(1) Raise and support vehicle.
(2) Carefully remove hose at LDP filter.
(3) Remove LDP filter mounting bolt and remove
from vehicle.
(4) Carefully remove vapor/vacuum lines at LDP.
(5) Disconnect electrical connector at LDP.
(6) Remove LDP mounting bolt and remove LDP
from vehicle.
INSTALLATION
The LDP and LDP filter are attached to the front
of the EVAP canister mounting bracket. The LDP
and LDP filter are replaced (serviced) as one unit.
(1) Install LDP to mounting bracket. Refer to
Torque Specifications.
(2) Install LDP filter to mounting bracket. Refer to
Torque Specifications.
(3) Carefully install vapor/vacuum lines to LDP,
and install hose to LDP filter.The vapor/vacuum
lines and hoses must be firmly connected.
Check the vapor/vacuum lines at the LDP, LDPfilter and EVAP canister purge solenoid for
damage or leaks. If a leak is present, a Diagnos-
tic Trouble Code (DTC) may be set.
(4) Connect electrical connector to LDP.
PCV VALVE
DESCRIPTION
3.7L V-6 / 4.7L V-8
The 3.7L V-6 and 4.7L V-8 engines are equipped
with a closed crankcase ventilation system and a
Positive Crankcase Ventilation (PCV) valve.
This system consists of:
²a PCV valve mounted to the oil filler housing
(Fig. 10). The PCV valve is sealed to the oil filler
housing with an o-ring.
²the air cleaner housing
²two interconnected breathers threaded into the
rear of each cylinder head (Fig. 11).
²tubes and hoses to connect the system compo-
nents.
Fig. 7 DIAPHRAGM UPWARD MOVEMENT
1 - Diaphragm
2 - Inlet Check Valve (Open)
3 - Vent Valve (Closed)
4 - From Air Filter
5 - To Canister
6 - Outlet Check Valve (Closed)
7 - Engine Vacuum (Open)
Fig. 8 DIAPHRAGM DOWNWARD MOVEMENT
1 - Diaphragm
2 - Inlet Check Valve (Closed)
3 - Vent Valve (Closed)
4 - From Air Filter
5 - To Canister
6 - Outlet Check Valve (Open)
7 - Engine Vacuum (Closed)
25 - 16 EVAPORATIVE EMISSIONSDR
LEAK DETECTION PUMP (Continued)
Page 2853 of 2895
detection of very small leaks, this system has the
capability of detecting medium as well as large evap-
orative system leaks.
A vent valve seals the canister vent during engine
off conditions. If the vapor system has a leak of less
than the failure threshold, the evaporative system
will be pulled into a vacuum, either due to the cool
down from operating temperature or diurnal ambient
temperature cycling. The diurnal effect is considered
one of the primary contributors to the leak determi-
nation by this diagnostic. When the vacuum in the
system exceeds about 19H2O (0.25 KPA), a vacuum
switch closes. The switch closure sends a signal to
the NGC. The NGC, via appropriate logic strategies,
utilizes the switch signal, or lack thereof, to make a
determination of whether a leak is present.
The NVLD device is designed with a normally open
vacuum switch, a normally closed solenoid, and a
seal, which is actuated by both the solenoid and a
diaphragm. The NVLD is located on the atmospheric
vent side of the canister. The NVLD assembly may
be mounted on top of the canister outlet, or in-line
between the canister and atmospheric vent filter. The
normally open vacuum switch will close with about 19
H2O (0.25 KPA) vacuum in the evaporative system.
The diaphragm actuates the switch. This is above the
opening point of the fuel inlet check valve in the fill
tube so cap off leaks can be detected. Submerged fill
systems must have recirculation lines that do not
have the in-line normally closed check valve that pro-
tects the system from failed nozzle liquid ingestion,
in order to detect cap off conditions.
The normally closed valve in the NVLD is intended
to maintain the seal on the evaporative system dur-
ing the engine off condition. If vacuum in the evapo-
rative system exceeds 39to 69H2O (0.75 to 1.5 KPA),
the valve will be pulled off the seat, opening the seal.
This will protect the system from excessive vacuum
as well as allowing sufficient purge flow in the event
that the solenoid was to become inoperative.
The solenoid actuates the valve to unseal the can-
ister vent while the engine is running. It also will be
used to close the vent during the medium and large
leak tests and during the purge flow check. This sole-
noid requires initial 1.5 amps of current to pull the
valve open but after 100 ms. will be duty cycled down
to an average of about 150 mA for the remainder of
the drive cycle.
Another feature in the device is a diaphragm that
will open the seal in the NVLD with pressure in the
evaporative system. The device will9blow off9at
about 0.59H2O (0.12 KPA) pressure to permit the
venting of vapors during refueling. An added benefit
to this is that it will also allow the tank to9breathe9
during increasing temperatures, thus limiting the
pressure in the tank to this low level. This is benefi-cial because the induced vacuum during a subse-
quent declining temperature will achieve the switch
closed (pass threshold) sooner than if the tank had to
decay from a built up pressure.
The device itself has 3 wires: Switch sense, sole-
noid driver and ground. It also includes a resistor to
protect the switch from a short to battery or a short
to ground. The NGC utilizes a high-side driver to
energize and duty-cycle the solenoid.
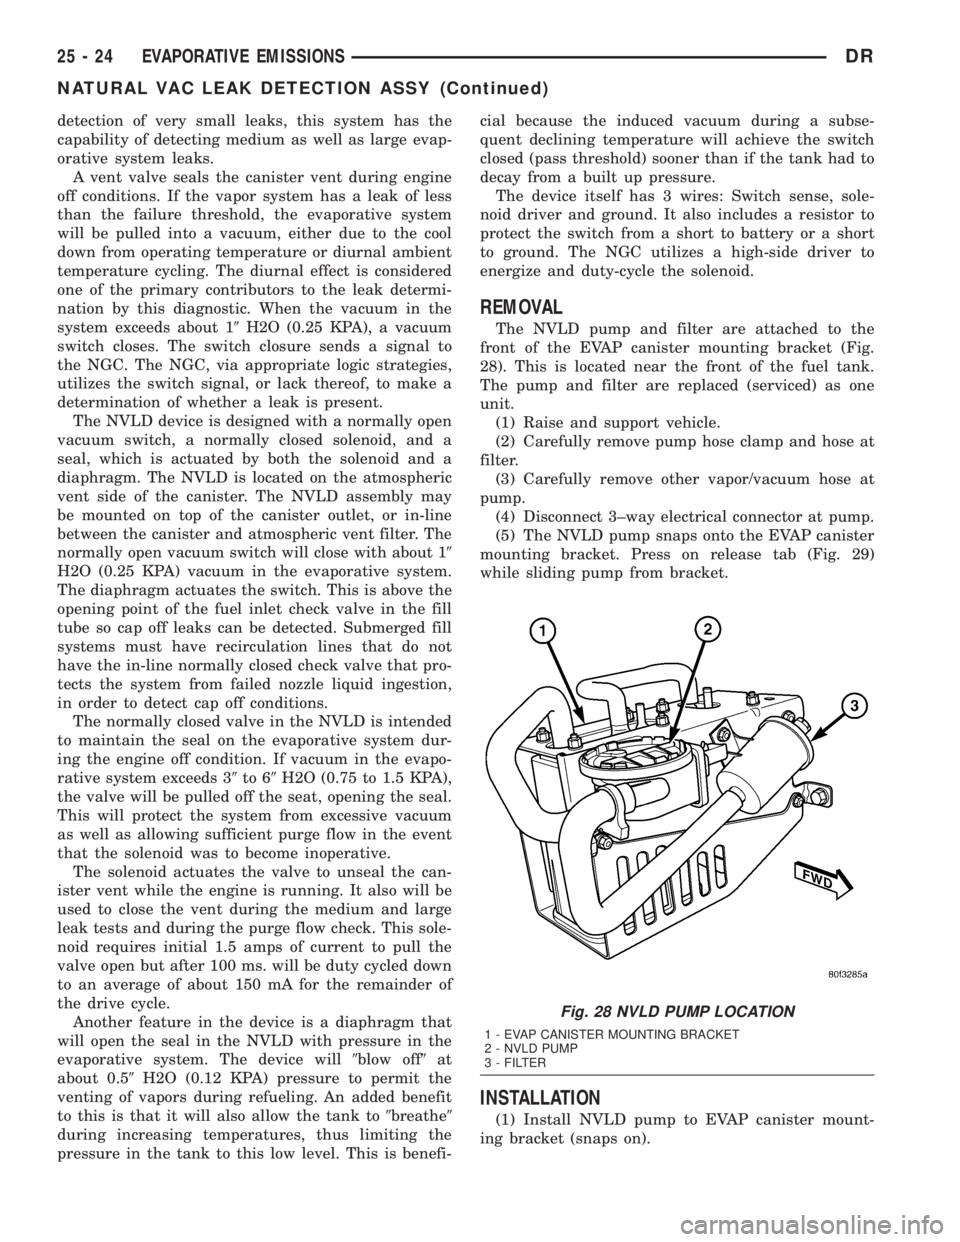
REMOVAL
The NVLD pump and filter are attached to the
front of the EVAP canister mounting bracket (Fig.
28). This is located near the front of the fuel tank.
The pump and filter are replaced (serviced) as one
unit.
(1) Raise and support vehicle.
(2) Carefully remove pump hose clamp and hose at
filter.
(3) Carefully remove other vapor/vacuum hose at
pump.
(4) Disconnect 3±way electrical connector at pump.
(5) The NVLD pump snaps onto the EVAP canister
mounting bracket. Press on release tab (Fig. 29)
while sliding pump from bracket.
INSTALLATION
(1) Install NVLD pump to EVAP canister mount-
ing bracket (snaps on).
Fig. 28 NVLD PUMP LOCATION
1 - EVAP CANISTER MOUNTING BRACKET
2 - NVLD PUMP
3 - FILTER
25 - 24 EVAPORATIVE EMISSIONSDR
NATURAL VAC LEAK DETECTION ASSY (Continued)