2003 DODGE RAM hood release
[x] Cancel search: hood releasePage 271 of 2895

then opens the outlet valve, which also opens the
return circuit to the accumulators. Fluid pressure is
allowed to bleed off (decrease) as needed to prevent
wheel lock.
Once the period of high wheel slip has ended, the
CAB closes the outlet valve and begins a pressure
increase or hold cycle as needed.
PRESSURE HOLD
Both solenoid valves are closed in the pressure
hold cycle but only the inlet valve is energized. Fluid
apply pressure in the control channel is maintained
at a constant rate. The CAB maintains the hold cycle
until sensor inputs indicate a pressure change is nec-
essary.
PRESSURE INCREASE
The inlet valve is open and the outlet valve is
closed during the pressure increase cycle. The pres-
sure increase cycle is used to reapply thew brakes.
This cycle controls re-application of fluid apply pres-
sure.
REMOVAL
(1) Install a prop rod on the brake pedal to keep
pressure on the brake system.
(2) Disconnect the battery cables from the battery.
(3) Remove the battery.
(4) Disconnect the two electrical harness connec-
tors (Fig. 5).
(5) Remove the five brake lines from the HCU
(Fig. 5).
(6) Remove HCU/CAB mounting bolts and remove
the HCU/CAB (Fig. 5).
INSTALLATION
NOTE: If the CAB is being replaced with a new CAB
is must be reprogrammed with the use of a DRB III.
(1) Install HCU/CAB on the mounts and Tighten
the bolts to 15N´m (11 ft. lbs.) (Fig. 5).
(2) Install the five brake lines to the HCU and
tighten to 19 N´m (170 in. lbs.) (Fig. 5).
(3) Install the two electrical harness connectors to
the HCU/CAB and push down on the release to
secure the connectors.
(4) Install the battery.
(5) Install the battery cables to the battery.
(6) Remove the prop rod on the brake pedal.
(7) Bleed ABS brake system (Refer to 5 - BRAKES
- STANDARD PROCEDURE).
RWAL VALVE
DESCRIPTION
Rear Wheel Antilock (RWAL) brake system is stan-
dard equipment on 1500 series vehicles. The RWAL
brake system is designed to prevent rear wheel
lock-up on virtually all types of road surfaces. RWAL
braking is desirable because a vehicle which is
stopped without locking the rear wheels will retain
directional stability. This allows the driver to retain
greater control of the vehicle during braking.
The valve is located on the drivers side inner
fender under the hood. The valve modulates hydrau-
lic pressure to the rear brakes.
The RWAL components include:
²RWAL Valve
²Controller Antilock brake (CAB)
²Rear Wheel Speed Sensor (WSS)
OPERATION
When the brakes are applied, hydraulic fluid is
routed from the master cylinder's secondary circuit to
the RWAL valve. From there hydraulic fluid is routed
to the rear brakes. The Controller Antilock Brake
(CAB) contains an Electronic Variable Brake Propor-
tioning (EVBP) control algorithm, which proportions
the applied braking force to the rear wheels during
braking. The EVBP function of the RWAL system
takes the place of a conventional hydraulic propor-
tioning valve. The CAB monitors the rear wheel
speed through the rear wheel speed sensor and cal-
culates an estimated vehicle deceleration. When an
established deceleration threshold is exceeded, an
isolation valve is closed to hold the applied brake
pressure to the rear brakes constant. Upon further
increases in the estimated vehicle deceleration, the
isolation valve is selectively opened to increase rear
Fig. 5 HYDRAULIC CONTROL UNIT
1 - HYDRAULIC CONTROL UNIT
2 - MOUNTING BOLTS
5 - 44 BRAKES - ABSDR
HCU (HYDRAULIC CONTROL UNIT) (Continued)
Page 559 of 2895
TRAILER TOW WIRING
DESCRIPTION
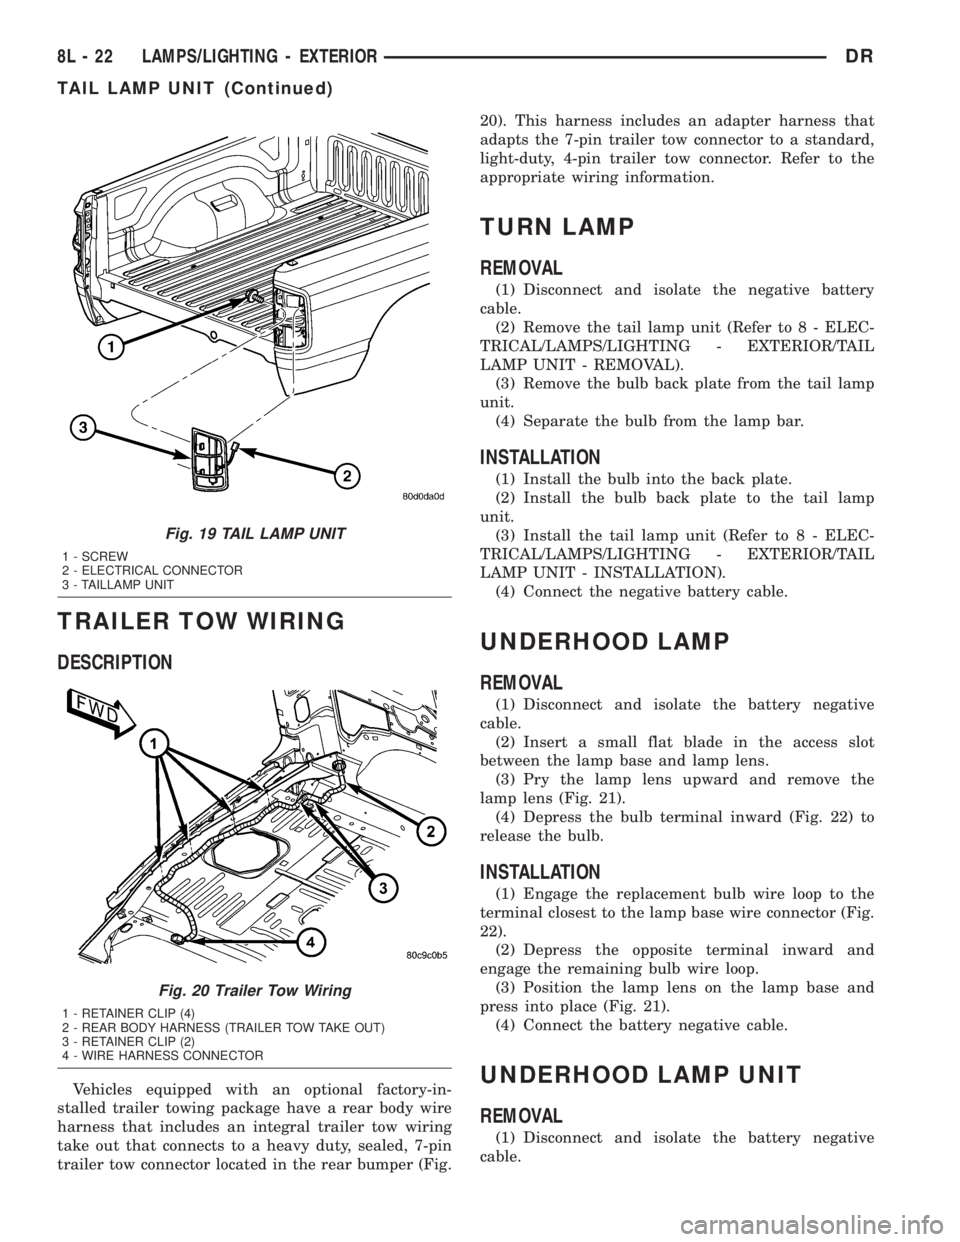
Vehicles equipped with an optional factory-in-
stalled trailer towing package have a rear body wire
harness that includes an integral trailer tow wiring
take out that connects to a heavy duty, sealed, 7-pin
trailer tow connector located in the rear bumper (Fig.20). This harness includes an adapter harness that
adapts the 7-pin trailer tow connector to a standard,
light-duty, 4-pin trailer tow connector. Refer to the
appropriate wiring information.
TURN LAMP
REMOVAL
(1) Disconnect and isolate the negative battery
cable.
(2) Remove the tail lamp unit (Refer to 8 - ELEC-
TRICAL/LAMPS/LIGHTING - EXTERIOR/TAIL
LAMP UNIT - REMOVAL).
(3) Remove the bulb back plate from the tail lamp
unit.
(4) Separate the bulb from the lamp bar.
INSTALLATION
(1) Install the bulb into the back plate.
(2) Install the bulb back plate to the tail lamp
unit.
(3) Install the tail lamp unit (Refer to 8 - ELEC-
TRICAL/LAMPS/LIGHTING - EXTERIOR/TAIL
LAMP UNIT - INSTALLATION).
(4) Connect the negative battery cable.
UNDERHOOD LAMP
REMOVAL
(1) Disconnect and isolate the battery negative
cable.
(2) Insert a small flat blade in the access slot
between the lamp base and lamp lens.
(3) Pry the lamp lens upward and remove the
lamp lens (Fig. 21).
(4) Depress the bulb terminal inward (Fig. 22) to
release the bulb.
INSTALLATION
(1) Engage the replacement bulb wire loop to the
terminal closest to the lamp base wire connector (Fig.
22).
(2) Depress the opposite terminal inward and
engage the remaining bulb wire loop.
(3) Position the lamp lens on the lamp base and
press into place (Fig. 21).
(4) Connect the battery negative cable.
UNDERHOOD LAMP UNIT
REMOVAL
(1) Disconnect and isolate the battery negative
cable.
Fig. 19 TAIL LAMP UNIT
1 - SCREW
2 - ELECTRICAL CONNECTOR
3 - TAILLAMP UNIT
Fig. 20 Trailer Tow Wiring
1 - RETAINER CLIP (4)
2 - REAR BODY HARNESS (TRAILER TOW TAKE OUT)
3 - RETAINER CLIP (2)
4 - WIRE HARNESS CONNECTOR
8L - 22 LAMPS/LIGHTING - EXTERIORDR
TAIL LAMP UNIT (Continued)
Page 687 of 2895
WASHER NOZZLE
DESCRIPTION
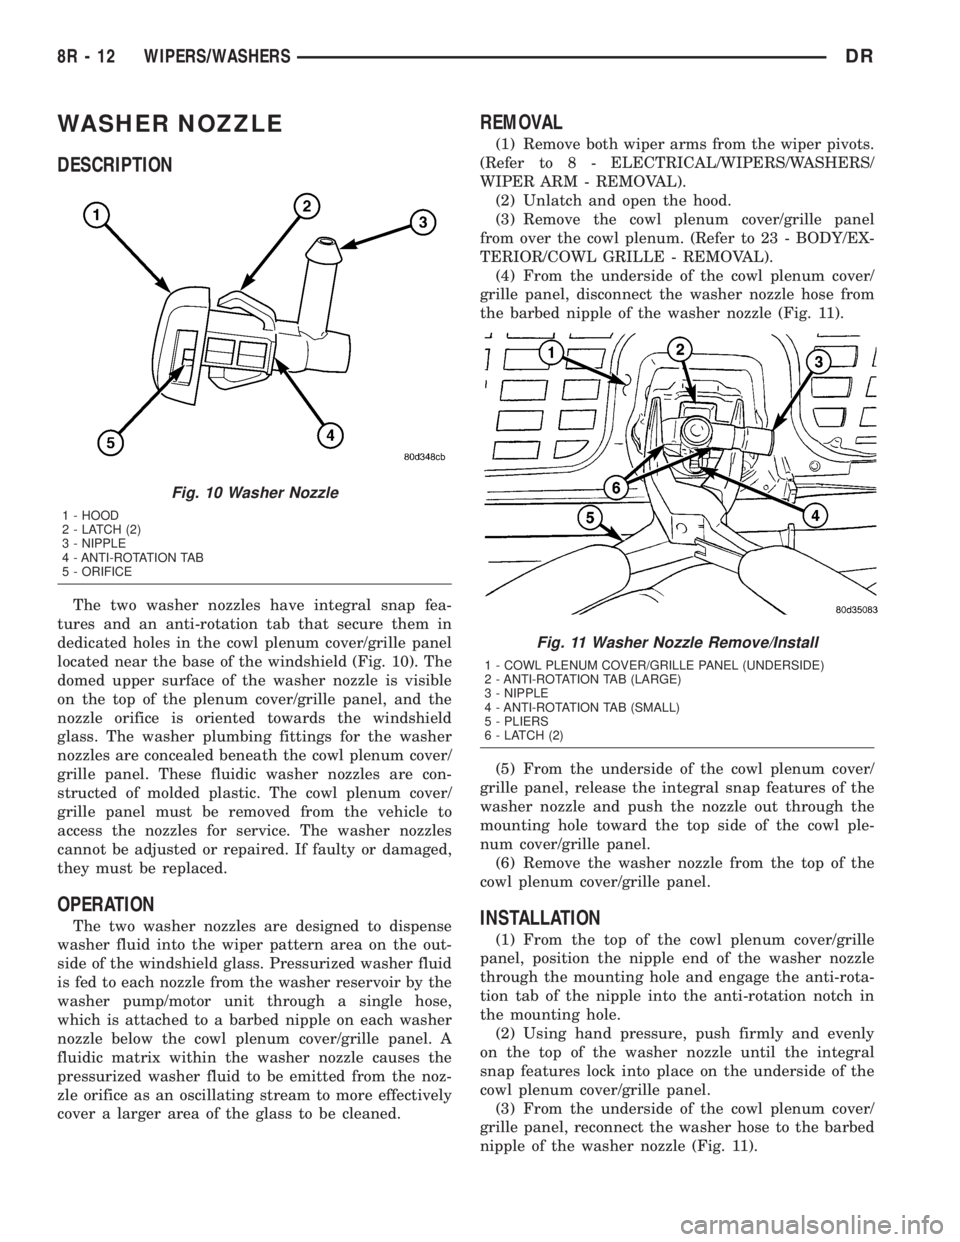
The two washer nozzles have integral snap fea-
tures and an anti-rotation tab that secure them in
dedicated holes in the cowl plenum cover/grille panel
located near the base of the windshield (Fig. 10). The
domed upper surface of the washer nozzle is visible
on the top of the plenum cover/grille panel, and the
nozzle orifice is oriented towards the windshield
glass. The washer plumbing fittings for the washer
nozzles are concealed beneath the cowl plenum cover/
grille panel. These fluidic washer nozzles are con-
structed of molded plastic. The cowl plenum cover/
grille panel must be removed from the vehicle to
access the nozzles for service. The washer nozzles
cannot be adjusted or repaired. If faulty or damaged,
they must be replaced.
OPERATION
The two washer nozzles are designed to dispense
washer fluid into the wiper pattern area on the out-
side of the windshield glass. Pressurized washer fluid
is fed to each nozzle from the washer reservoir by the
washer pump/motor unit through a single hose,
which is attached to a barbed nipple on each washer
nozzle below the cowl plenum cover/grille panel. A
fluidic matrix within the washer nozzle causes the
pressurized washer fluid to be emitted from the noz-
zle orifice as an oscillating stream to more effectively
cover a larger area of the glass to be cleaned.
REMOVAL
(1) Remove both wiper arms from the wiper pivots.
(Refer to 8 - ELECTRICAL/WIPERS/WASHERS/
WIPER ARM - REMOVAL).
(2) Unlatch and open the hood.
(3) Remove the cowl plenum cover/grille panel
from over the cowl plenum. (Refer to 23 - BODY/EX-
TERIOR/COWL GRILLE - REMOVAL).
(4) From the underside of the cowl plenum cover/
grille panel, disconnect the washer nozzle hose from
the barbed nipple of the washer nozzle (Fig. 11).
(5) From the underside of the cowl plenum cover/
grille panel, release the integral snap features of the
washer nozzle and push the nozzle out through the
mounting hole toward the top side of the cowl ple-
num cover/grille panel.
(6) Remove the washer nozzle from the top of the
cowl plenum cover/grille panel.
INSTALLATION
(1) From the top of the cowl plenum cover/grille
panel, position the nipple end of the washer nozzle
through the mounting hole and engage the anti-rota-
tion tab of the nipple into the anti-rotation notch in
the mounting hole.
(2) Using hand pressure, push firmly and evenly
on the top of the washer nozzle until the integral
snap features lock into place on the underside of the
cowl plenum cover/grille panel.
(3) From the underside of the cowl plenum cover/
grille panel, reconnect the washer hose to the barbed
nipple of the washer nozzle (Fig. 11).
Fig. 10 Washer Nozzle
1 - HOOD
2 - LATCH (2)
3 - NIPPLE
4 - ANTI-ROTATION TAB
5 - ORIFICE
Fig. 11 Washer Nozzle Remove/Install
1 - COWL PLENUM COVER/GRILLE PANEL (UNDERSIDE)
2 - ANTI-ROTATION TAB (LARGE)
3 - NIPPLE
4 - ANTI-ROTATION TAB (SMALL)
5 - PLIERS
6 - LATCH (2)
8R - 12 WIPERS/WASHERSDR
Page 2578 of 2895
ROAD TESTING WIND NOISE
(1) Drive the vehicle to verify the general location
of the wind noise.
(2) Apply 50 mm (2 in.) masking tape in 150 mm
(6 in.) lengths along weatherstrips, weld seams or
moldings. After each length is applied, drive the vehi-
cle. If noise goes away after a piece of tape is applied,
remove tape, locate, and repair defect.
POSSIBLE CAUSE OF WIND NOISE
²Moldings standing away from body surface can
catch wind and whistle.
²Gaps in sealed areas behind overhanging body
flanges can cause wind-rushing sounds.
²Misaligned movable components.
²Missing or improperly installed plugs in pillars.
²Weld burn through holes.
STANDARD PROCEDURE
STANDARD PROCEDURE - BODY LUBRICATION
All mechanisms and linkages should be lubricated
when necessary. This will maintain ease of operation
and provide protection against rust and excessive
wear. The weatherstrip seals should be lubricated to
prolong their life as well as to improve door sealing.
All applicable exterior and interior vehicle operat-
ing mechanisms should be inspected and cleaned.
Pivot/sliding contact areas on the mechanisms should
then be lubricated.
(1) When necessary, lubricate the operating mech-
anisms with the specified lubricants.
(2) Apply silicone lubricant to a cloth and wipe it
on door seals to avoid over-spray that can soil pas-
senger's clothing.
(3) Before applying lubricant, the component
should be wiped clean. After lubrication, any excess
lubricant should be removed.
(4) The hood latch, latch release mechanism, latch
striker, and safety latch should be lubricated period-
ically.
(5) The door lock cylinders should be lubricated
twice each year (preferably autumn and spring).
²Spray a small amount of lock cylinder lubricant
directly into the lock cylinder.
²Apply a small amount to the key and insert it
into the lock cylinder.
²Rotate it to the locked position and then back to
the unlocked position several times.
²Remove the key. Wipe the lubricant from it with
a clean cloth to avoid soiling of clothing.
STANDARD PROCEDURE - HEAT STAKING
(1) Remove trim panel.(2) Bend or move the trim panel components at
the heat staked joints. Observe the heat staked loca-
tions and/or component seams for looseness.
(3) Heat stake the components.
(a) If the heat staked or component seam loca-
tion is loose, hold the two components tightly
together and using a soldering gun with a flat tip,
melt the material securing the components
together. Do not over heat the affected area, dam-
age to the exterior of the trim panel may occur.
(b) If the heat staked material is broken or miss-
ing, use a hot glue gun to apply new material to
the area to be repaired. The panels that are being
heat staked must be held together while the apply-
ing the glue. Once the new material is in place, it
may be necessary to use a soldering gun to melt
the newly applied material. Do not over heat the
affected area, damage to the exterior of the trim
panel may occur.
(4) Allow the repaired area to cool and verify the
repair.
(5) Install trim panel.
STANDARD PROCEDURE - PLASTIC BODY
PANEL REPAIR
There are many different types of plastics used in
today's automotive environment. We group plastics in
three different categories: Rigid, Semi-Rigid, and
Flexible. Any of these plastics may require the use of
an adhesion promoter for repair. These types of plas-
tic are used extensively on DaimlerChrysler Motors
vehicles. Always follow repair material manufactur-
er's plastic identification and repair procedures.
Rigid Plastics:
Examples of rigid plastic use: Fascias, Hoods,
Doors, and other Body Panels, which include SMC,
ABS, and Polycarbonates.
Semi-Rigid Plastics:
Examples of semi-rigid plastic use: Interior Panels,
Under Hood Panels, and other Body Trim Panels.
Flexible Plastics:
Examples of flexible plastic use: Fascias, Body
Moldings, and upper and lower Fascia Covers.
Repair Procedure:
The repair procedure for all three categories of
plastics is basically the same. The one difference is
the material used for the repair. The materials must
be specific for each substrate, rigid repair material
for rigid plastic repair, semi-rigid repair material for
semi-rigid plastic repair and flexible repair material
for flexible plastic repair.
DRBODY 23 - 3
BODY (Continued)
Page 2621 of 2895
HOOD
TABLE OF CONTENTS
page page
HINGE
REMOVAL.............................46
INSTALLATION.........................46
HOOD
REMOVAL.............................47
INSTALLATION.........................47
LATCH
REMOVAL.............................47
INSTALLATION.........................47LATCH RELEASE CABLE/HANDLE ASSEMBLY
REMOVAL.............................47
INSTALLATION.........................47
LATCH STRIKER / SECONDARY CATCH
REMOVAL.............................48
INSTALLATION.........................48
SUPPORT CYLINDER
REMOVAL.............................48
INSTALLATION.........................49
HINGE
REMOVAL
NOTE: It is not necessary to remove the hood to
replace one or both hinges. The hinges can be
replaced one at a time.
(1) Remove the cowl grille. (Refer to 23 - BODY/
EXTERIOR/COWL GRILLE - REMOVAL)
(2) Using a grease pencil or equivalent, mark the
position of the hinge on the hood.
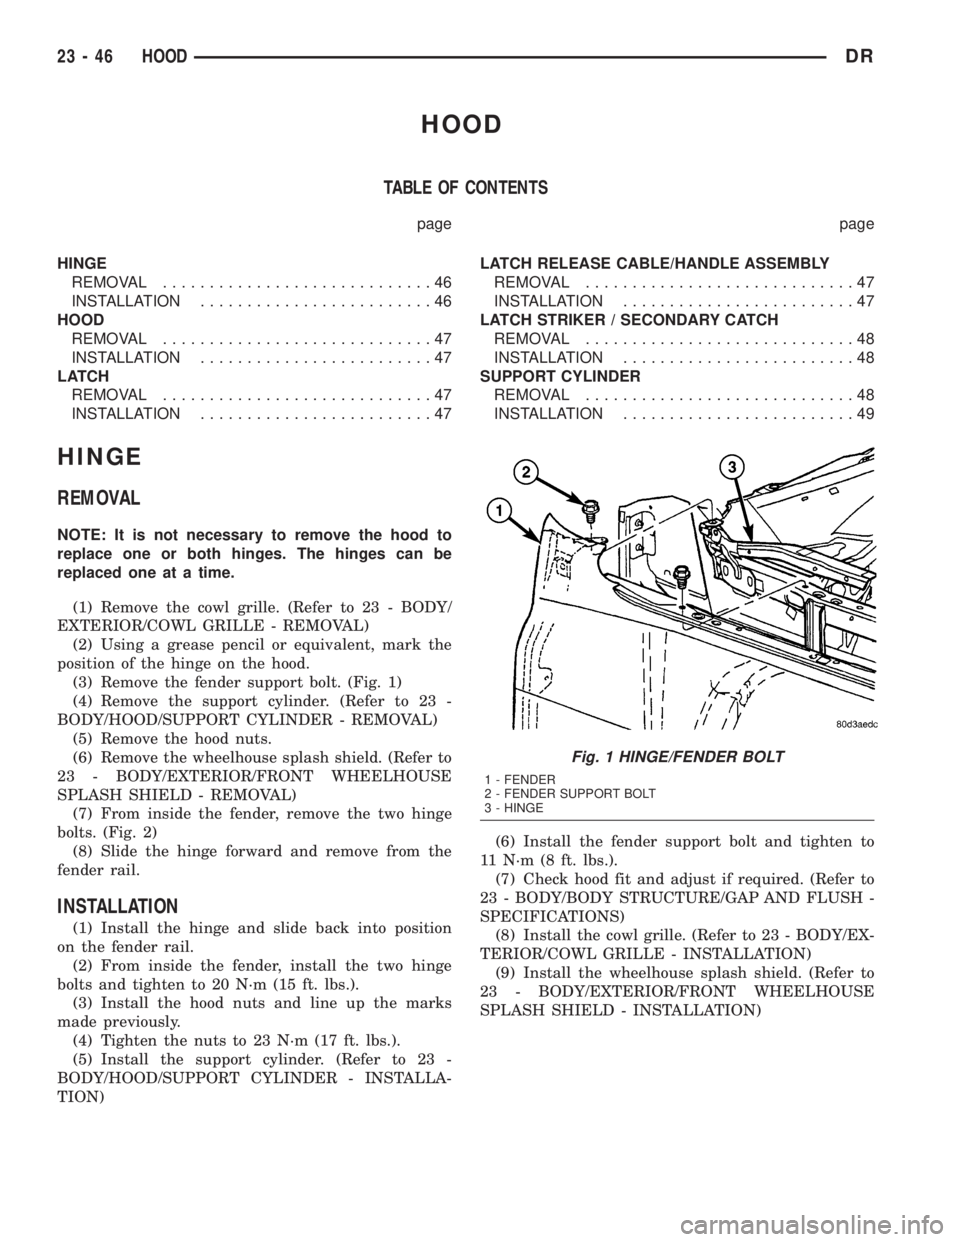
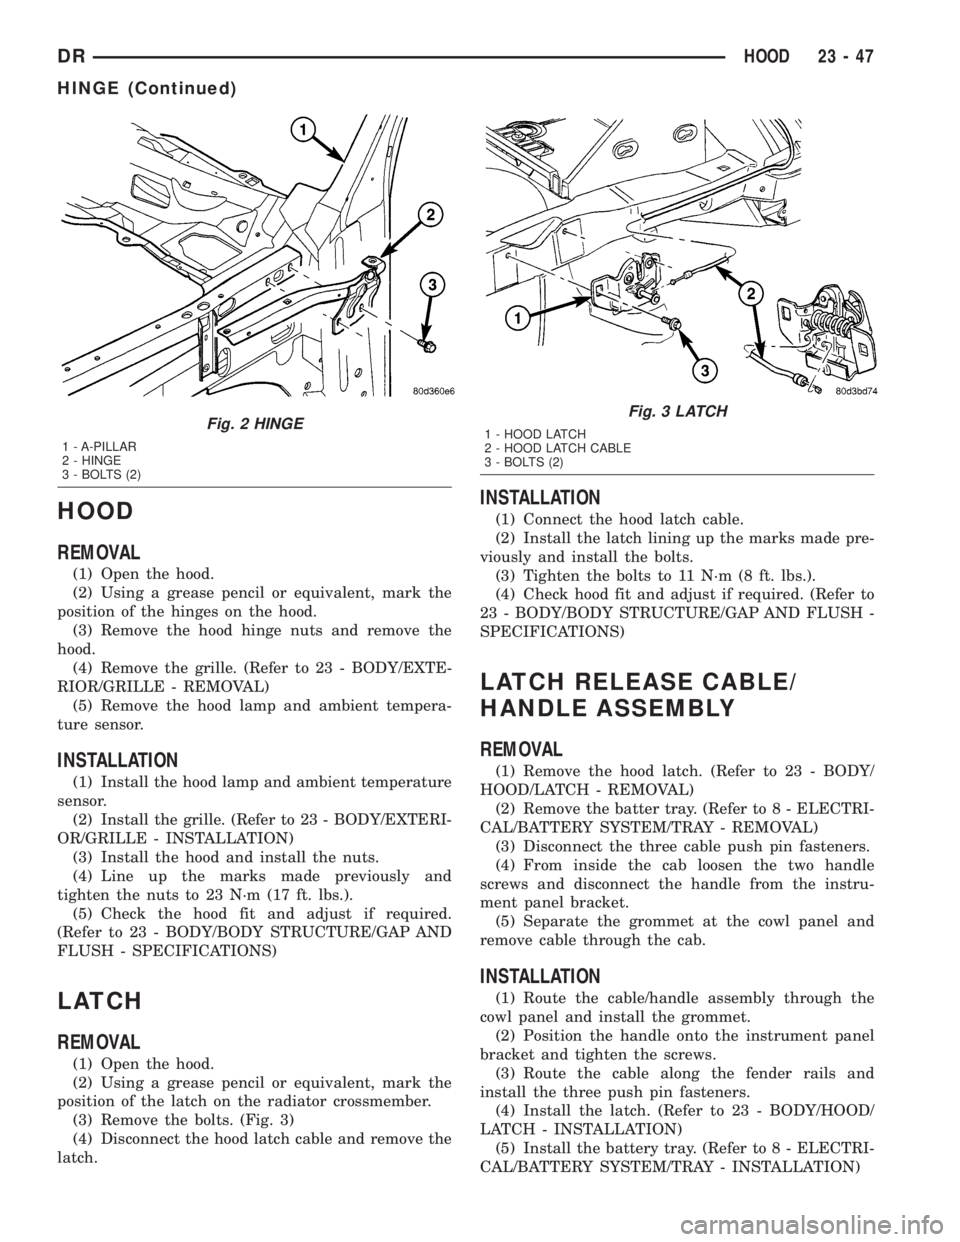
(3) Remove the fender support bolt. (Fig. 1)
(4) Remove the support cylinder. (Refer to 23 -
BODY/HOOD/SUPPORT CYLINDER - REMOVAL)
(5) Remove the hood nuts.
(6) Remove the wheelhouse splash shield. (Refer to
23 - BODY/EXTERIOR/FRONT WHEELHOUSE
SPLASH SHIELD - REMOVAL)
(7) From inside the fender, remove the two hinge
bolts. (Fig. 2)
(8) Slide the hinge forward and remove from the
fender rail.
INSTALLATION
(1) Install the hinge and slide back into position
on the fender rail.
(2) From inside the fender, install the two hinge
bolts and tighten to 20 N´m (15 ft. lbs.).
(3) Install the hood nuts and line up the marks
made previously.
(4) Tighten the nuts to 23 N´m (17 ft. lbs.).
(5) Install the support cylinder. (Refer to 23 -
BODY/HOOD/SUPPORT CYLINDER - INSTALLA-
TION)(6) Install the fender support bolt and tighten to
11 N´m (8 ft. lbs.).
(7) Check hood fit and adjust if required. (Refer to
23 - BODY/BODY STRUCTURE/GAP AND FLUSH -
SPECIFICATIONS)
(8) Install the cowl grille. (Refer to 23 - BODY/EX-
TERIOR/COWL GRILLE - INSTALLATION)
(9) Install the wheelhouse splash shield. (Refer to
23 - BODY/EXTERIOR/FRONT WHEELHOUSE
SPLASH SHIELD - INSTALLATION)
Fig. 1 HINGE/FENDER BOLT
1 - FENDER
2 - FENDER SUPPORT BOLT
3 - HINGE
23 - 46 HOODDR
Page 2622 of 2895
HOOD
REMOVAL
(1) Open the hood.
(2) Using a grease pencil or equivalent, mark the
position of the hinges on the hood.
(3) Remove the hood hinge nuts and remove the
hood.
(4) Remove the grille. (Refer to 23 - BODY/EXTE-
RIOR/GRILLE - REMOVAL)
(5) Remove the hood lamp and ambient tempera-
ture sensor.
INSTALLATION
(1) Install the hood lamp and ambient temperature
sensor.
(2) Install the grille. (Refer to 23 - BODY/EXTERI-
OR/GRILLE - INSTALLATION)
(3) Install the hood and install the nuts.
(4) Line up the marks made previously and
tighten the nuts to 23 N´m (17 ft. lbs.).
(5) Check the hood fit and adjust if required.
(Refer to 23 - BODY/BODY STRUCTURE/GAP AND
FLUSH - SPECIFICATIONS)
LATCH
REMOVAL
(1) Open the hood.
(2) Using a grease pencil or equivalent, mark the
position of the latch on the radiator crossmember.
(3) Remove the bolts. (Fig. 3)
(4) Disconnect the hood latch cable and remove the
latch.
INSTALLATION
(1) Connect the hood latch cable.
(2) Install the latch lining up the marks made pre-
viously and install the bolts.
(3) Tighten the bolts to 11 N´m (8 ft. lbs.).
(4) Check hood fit and adjust if required. (Refer to
23 - BODY/BODY STRUCTURE/GAP AND FLUSH -
SPECIFICATIONS)
LATCH RELEASE CABLE/
HANDLE ASSEMBLY
REMOVAL
(1) Remove the hood latch. (Refer to 23 - BODY/
HOOD/LATCH - REMOVAL)
(2) Remove the batter tray. (Refer to 8 - ELECTRI-
CAL/BATTERY SYSTEM/TRAY - REMOVAL)
(3) Disconnect the three cable push pin fasteners.
(4) From inside the cab loosen the two handle
screws and disconnect the handle from the instru-
ment panel bracket.
(5) Separate the grommet at the cowl panel and
remove cable through the cab.
INSTALLATION
(1) Route the cable/handle assembly through the
cowl panel and install the grommet.
(2) Position the handle onto the instrument panel
bracket and tighten the screws.
(3) Route the cable along the fender rails and
install the three push pin fasteners.
(4) Install the latch. (Refer to 23 - BODY/HOOD/
LATCH - INSTALLATION)
(5) Install the battery tray. (Refer to 8 - ELECTRI-
CAL/BATTERY SYSTEM/TRAY - INSTALLATION)
Fig. 2 HINGE
1 - A-PILLAR
2 - HINGE
3 - BOLTS (2)
Fig. 3 LATCH
1 - HOOD LATCH
2 - HOOD LATCH CABLE
3 - BOLTS (2)
DRHOOD 23 - 47
HINGE (Continued)
Page 2623 of 2895
LATCH STRIKER /
SECONDARY CATCH
REMOVAL
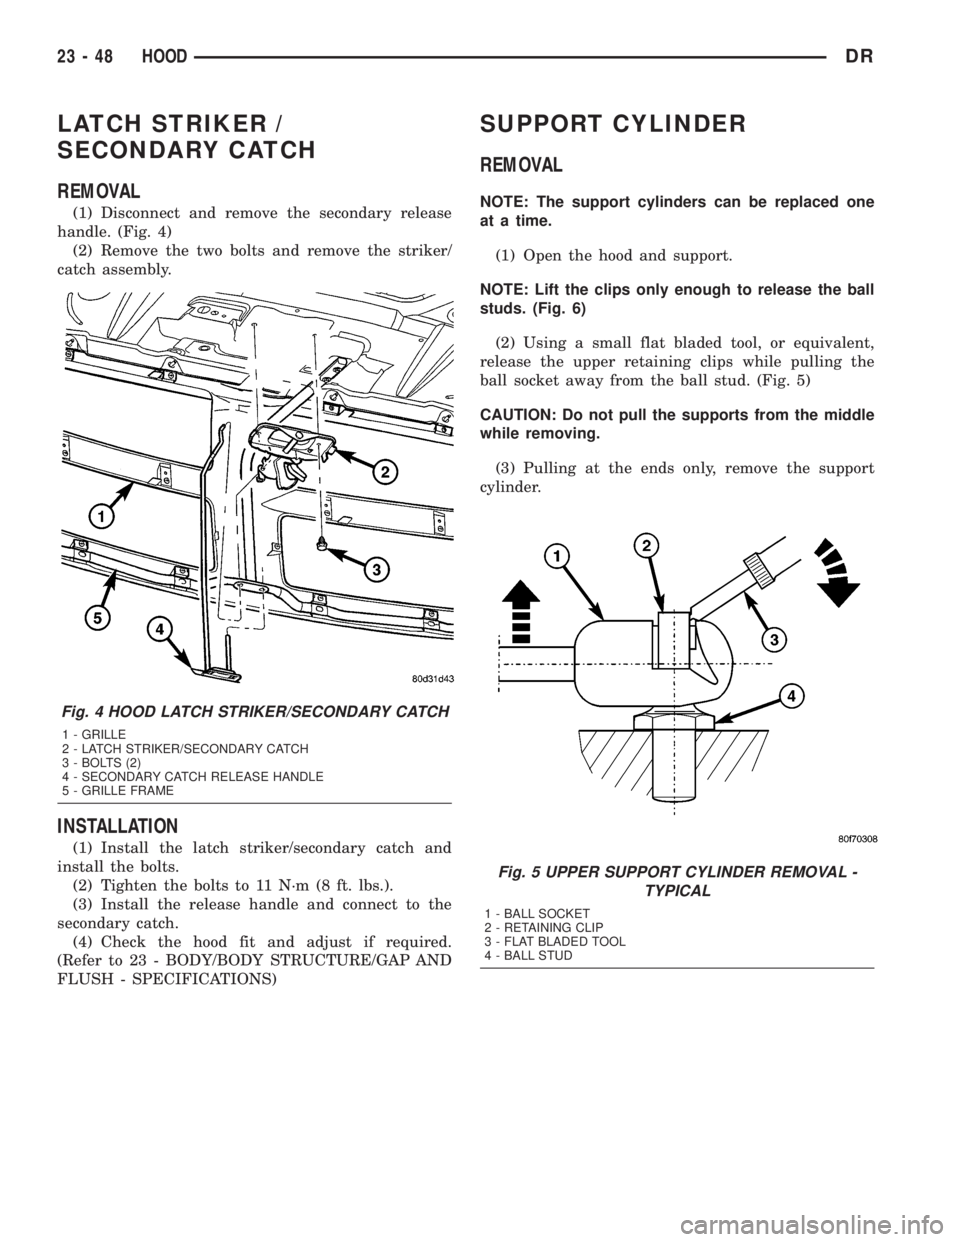
(1) Disconnect and remove the secondary release
handle. (Fig. 4)
(2) Remove the two bolts and remove the striker/
catch assembly.
INSTALLATION
(1) Install the latch striker/secondary catch and
install the bolts.
(2) Tighten the bolts to 11 N´m (8 ft. lbs.).
(3) Install the release handle and connect to the
secondary catch.
(4) Check the hood fit and adjust if required.
(Refer to 23 - BODY/BODY STRUCTURE/GAP AND
FLUSH - SPECIFICATIONS)
SUPPORT CYLINDER
REMOVAL
NOTE: The support cylinders can be replaced one
at a time.
(1) Open the hood and support.
NOTE: Lift the clips only enough to release the ball
studs. (Fig. 6)
(2) Using a small flat bladed tool, or equivalent,
release the upper retaining clips while pulling the
ball socket away from the ball stud. (Fig. 5)
CAUTION: Do not pull the supports from the middle
while removing.
(3) Pulling at the ends only, remove the support
cylinder.
Fig. 4 HOOD LATCH STRIKER/SECONDARY CATCH
1 - GRILLE
2 - LATCH STRIKER/SECONDARY CATCH
3 - BOLTS (2)
4 - SECONDARY CATCH RELEASE HANDLE
5 - GRILLE FRAME
Fig. 5 UPPER SUPPORT CYLINDER REMOVAL -
TYPICAL
1 - BALL SOCKET
2 - RETAINING CLIP
3 - FLAT BLADED TOOL
4 - BALL STUD
23 - 48 HOODDR
Page 2629 of 2895
(2) Remove the top cover. (Refer to 23 - BODY/IN-
STRUMENT PANEL/INSTRUMENT PANEL TOP
COVER - REMOVAL)
(3) Disconnect the headliner harness electrical con-
nector at the a-pillar.
(4) Using a trim stick C-4755 or equivalent, from
the notch on the bottom, remove the left side cover.
(Fig. 20)
(5) Remove the steering column. (Refer to 19 -
STEERING/COLUMN - REMOVAL)
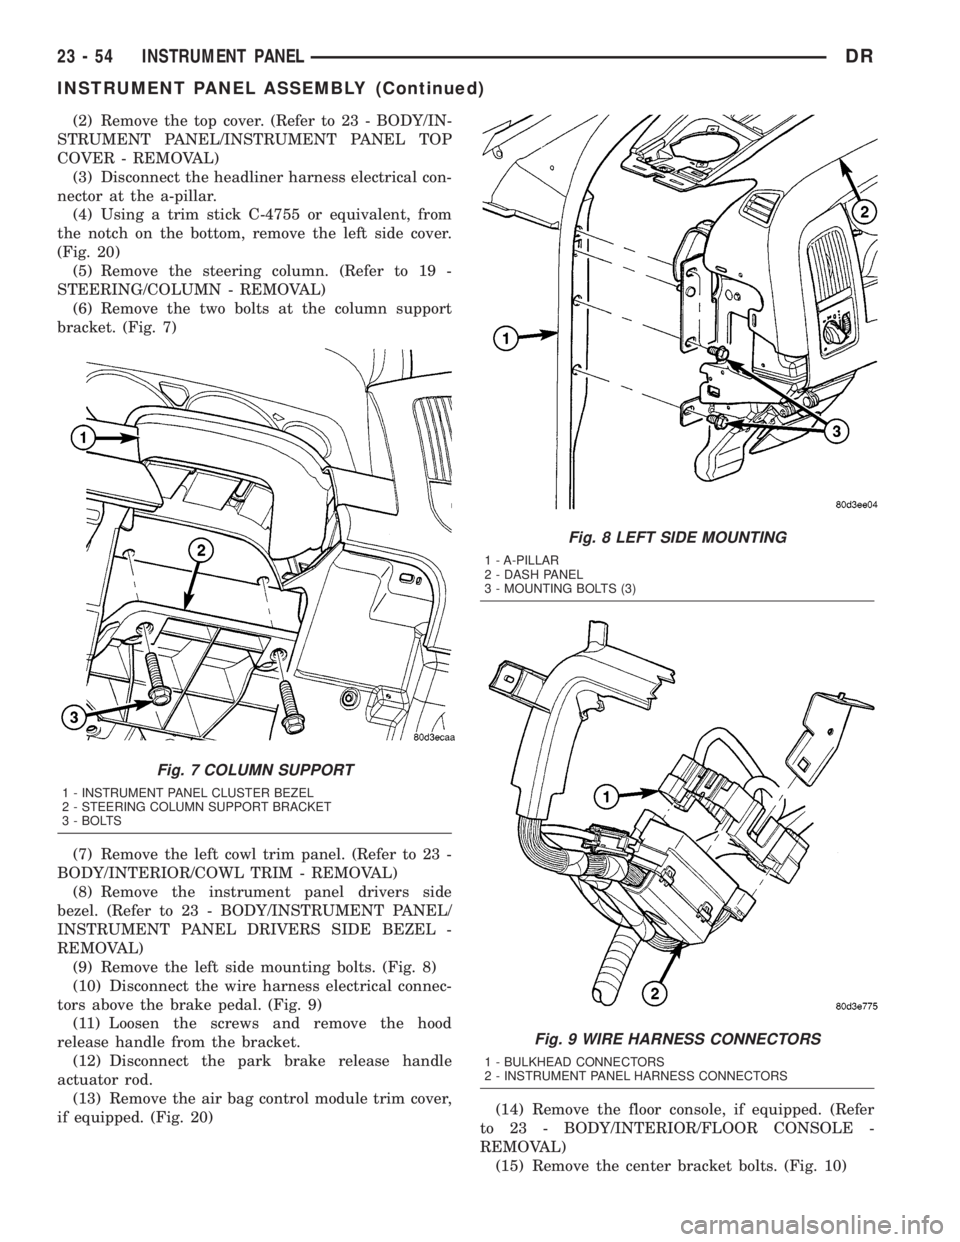
(6) Remove the two bolts at the column support
bracket. (Fig. 7)
(7) Remove the left cowl trim panel. (Refer to 23 -
BODY/INTERIOR/COWL TRIM - REMOVAL)
(8) Remove the instrument panel drivers side
bezel. (Refer to 23 - BODY/INSTRUMENT PANEL/
INSTRUMENT PANEL DRIVERS SIDE BEZEL -
REMOVAL)
(9) Remove the left side mounting bolts. (Fig. 8)
(10) Disconnect the wire harness electrical connec-
tors above the brake pedal. (Fig. 9)
(11) Loosen the screws and remove the hood
release handle from the bracket.
(12) Disconnect the park brake release handle
actuator rod.
(13) Remove the air bag control module trim cover,
if equipped. (Fig. 20)(14) Remove the floor console, if equipped. (Refer
to 23 - BODY/INTERIOR/FLOOR CONSOLE -
REMOVAL)
(15) Remove the center bracket bolts. (Fig. 10)
Fig. 7 COLUMN SUPPORT
1 - INSTRUMENT PANEL CLUSTER BEZEL
2 - STEERING COLUMN SUPPORT BRACKET
3 - BOLTS
Fig. 8 LEFT SIDE MOUNTING
1 - A-PILLAR
2 - DASH PANEL
3 - MOUNTING BOLTS (3)
Fig. 9 WIRE HARNESS CONNECTORS
1 - BULKHEAD CONNECTORS
2 - INSTRUMENT PANEL HARNESS CONNECTORS
23 - 54 INSTRUMENT PANELDR
INSTRUMENT PANEL ASSEMBLY (Continued)