2003 DODGE RAM water pump
[x] Cancel search: water pumpPage 325 of 2895
CAUTION: Do not use coolant additives that are
claimed to improve engine cooling.
OPERATION
Coolant flows through the engine block absorbing
the heat from the engine, then flows to the radiator
where the cooling fins in the radiator transfers the
heat from the coolant to the atmosphere. During cold
weather the ethylene-glycol or propylene-glycol cool-
ant prevents water present in the cooling system
from freezing within temperatures indicated by mix-
ture ratio of coolant to water.
COOLANT RECOVERY
CONTAINER-5.9L
DESCRIPTION
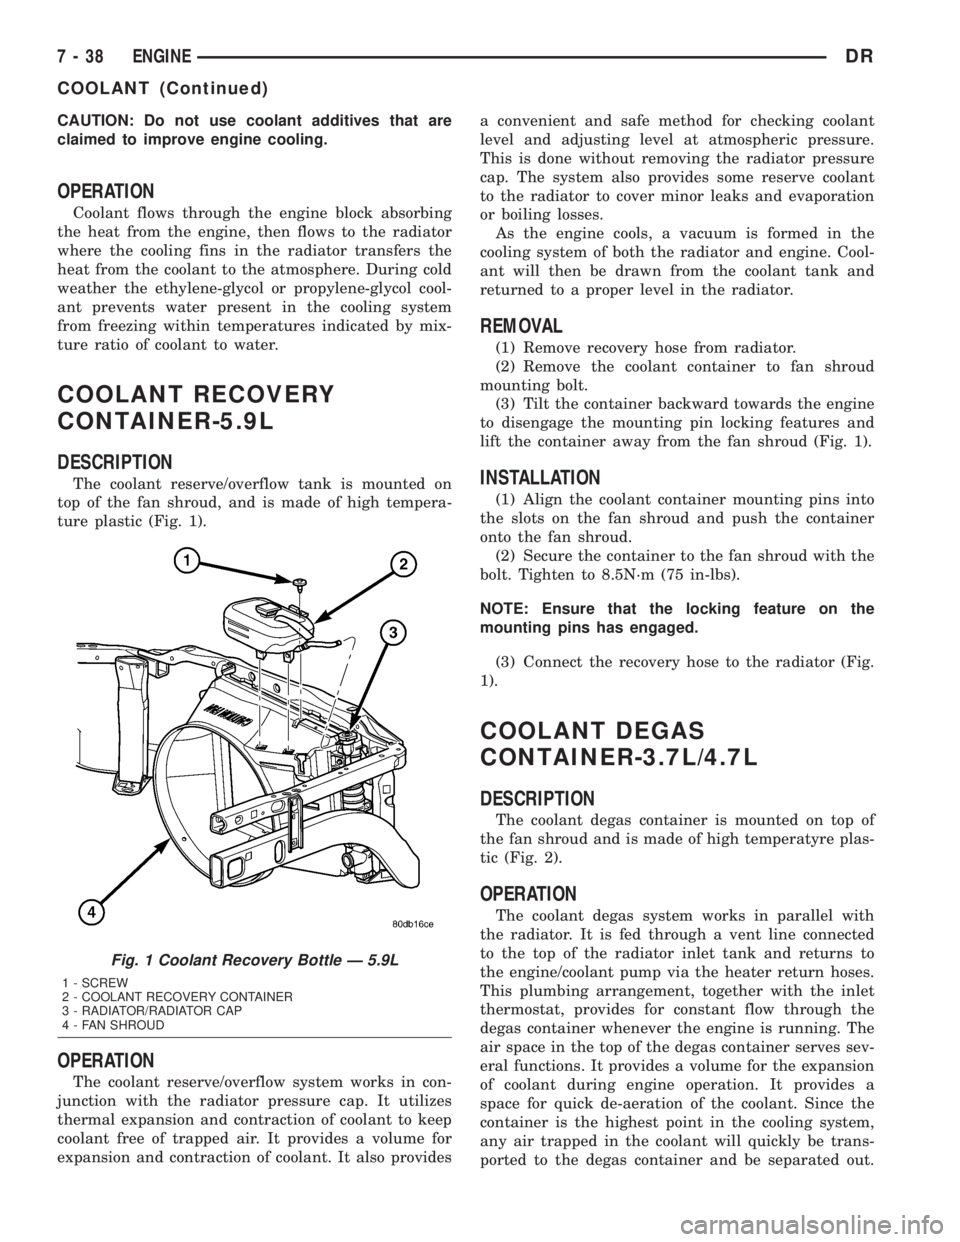
The coolant reserve/overflow tank is mounted on
top of the fan shroud, and is made of high tempera-
ture plastic (Fig. 1).
OPERATION
The coolant reserve/overflow system works in con-
junction with the radiator pressure cap. It utilizes
thermal expansion and contraction of coolant to keep
coolant free of trapped air. It provides a volume for
expansion and contraction of coolant. It also providesa convenient and safe method for checking coolant
level and adjusting level at atmospheric pressure.
This is done without removing the radiator pressure
cap. The system also provides some reserve coolant
to the radiator to cover minor leaks and evaporation
or boiling losses.
As the engine cools, a vacuum is formed in the
cooling system of both the radiator and engine. Cool-
ant will then be drawn from the coolant tank and
returned to a proper level in the radiator.
REMOVAL
(1) Remove recovery hose from radiator.
(2) Remove the coolant container to fan shroud
mounting bolt.
(3) Tilt the container backward towards the engine
to disengage the mounting pin locking features and
lift the container away from the fan shroud (Fig. 1).
INSTALLATION
(1) Align the coolant container mounting pins into
the slots on the fan shroud and push the container
onto the fan shroud.
(2) Secure the container to the fan shroud with the
bolt. Tighten to 8.5N´m (75 in-lbs).
NOTE: Ensure that the locking feature on the
mounting pins has engaged.
(3) Connect the recovery hose to the radiator (Fig.
1).
COOLANT DEGAS
CONTAINER-3.7L/4.7L
DESCRIPTION
The coolant degas container is mounted on top of
the fan shroud and is made of high temperatyre plas-
tic (Fig. 2).
OPERATION
The coolant degas system works in parallel with
the radiator. It is fed through a vent line connected
to the top of the radiator inlet tank and returns to
the engine/coolant pump via the heater return hoses.
This plumbing arrangement, together with the inlet
thermostat, provides for constant flow through the
degas container whenever the engine is running. The
air space in the top of the degas container serves sev-
eral functions. It provides a volume for the expansion
of coolant during engine operation. It provides a
space for quick de-aeration of the coolant. Since the
container is the highest point in the cooling system,
any air trapped in the coolant will quickly be trans-
ported to the degas container and be separated out.
Fig. 1 Coolant Recovery Bottle Ð 5.9L
1 - SCREW
2 - COOLANT RECOVERY CONTAINER
3 - RADIATOR/RADIATOR CAP
4 - FAN SHROUD
7 - 38 ENGINEDR
COOLANT (Continued)
Page 326 of 2895

The air space also acts as sort of a spring that pro-
vides constant system pressurization in conjunction
with the radiator cap on top of the container. By
returning coolant to the pump side of the inlet ther-
mostat, the degas container also supplies greater
pressure to the coolant pump, providing for enhanced
coolant flow at high engine speeds.
The degas container also provides a convenient and
safe method for checking the coolant level with out
removing the radiator pressure cap. The degas con-
tainer does not require a separate overflow container
since it was designed with enough volume to provide
a coolant reserve and also protect for any after-boil
conditions.
REMOVAL
(1) Drain enough coolant from the system so that
the degas container is empty. Refer to Draining Cool-
ing System 3.7L/4.7L Engines in this group
(2) Loosen the clamps securing the supply and
return hoses to the container and remove the hoses.
(3) Remove the coolant container to fan shroud
mounting bolts.
(4) Tilt the container back towards the engine to
disengage the mounting pin locking features and lift
the container away from the fan shroud.
INSTALLATION
(1) Align the mounting pins into the slots on the
fan shroud and push the container into the fan
shroud.
(2) Secure the coolant container to the fan shroud
with bolts. Tighten to 8.5 N-m (75 in. lbs).
NOTE: Ensure the locking feature on the mounting
pins has engaged.
(3) Connect the supply and return hoses to the
container and ensure that the hose clamps are posi-
tioned properly.
(4) Refill the cooling system(Refer to 7 - COOLING
- STANDARD PROCEDURE).
RADIATOR FAN
REMOVAL
CAUTION: If the viscous fan drive is replaced
because of mechanical damage, the cooling fan
blades should also be inspected. Inspect for fatigue
cracks, loose blades, or loose rivets that could
have resulted from excessive vibration. Replace fan
blade assembly if any of these conditions are
found. Also inspect water pump bearing and shaft
assembly for any related damage due to a viscous
fan drive malfunction.
(1) Disconnect negative battery cable from battery.
(2) Remove coolant reserve/overflow container from
fan shroud and lay aside.Do Notdisconnect the
hoses or drain coolant from the container.
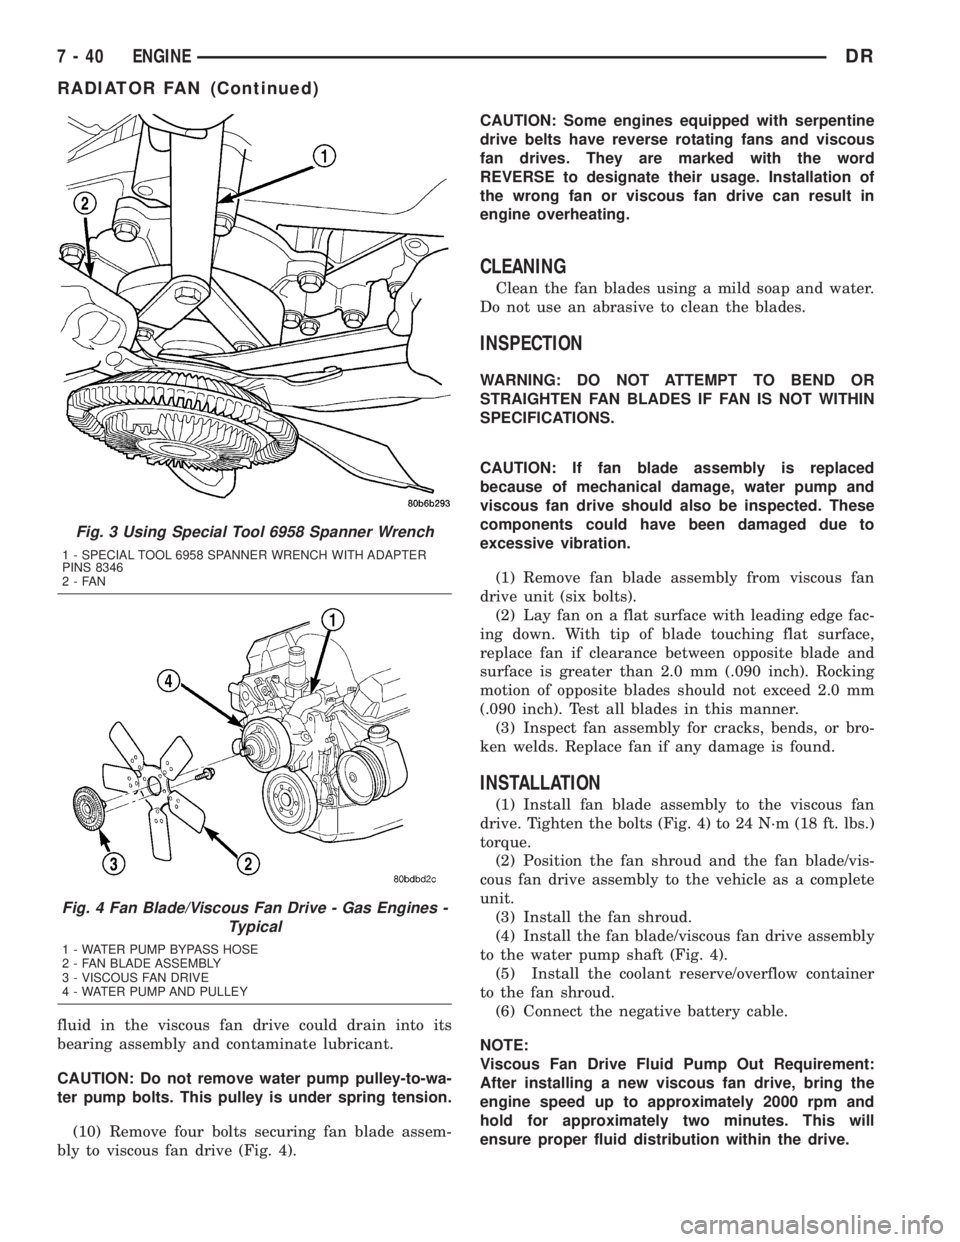
(3) The thermal viscous fan drive/fan blade assem-
bly is attached (threaded) to the water pump hub
shaft (Fig. 4). Remove the fan blade/viscous fan drive
assembly from the water pump by turning the
mounting nut counterclockwise as viewed from the
front. Threads on the viscous fan drive areRIGHT-
HAND.A 36 MM Fan Wrench should be used to pre-
vent pulley from rotating (Fig. 3).
(4)Do Notattempt to remove the fan/viscous fan
drive assembly from the vehicle at this time.
(5)Do Notunbolt the fan blade assembly (Fig. 4)
from viscous fan drive at this time.
(6) Remove the fan shroud-to-radiator mounting
bolts.
(7) Pull the lower shroud mounts out of the radia-
tor tank clips.
(8) Remove the fan shroud and fan blade/viscous
fan drive assembly as a complete unit from vehicle.
(9) After removing the fan blade/viscous fan drive
assembly,do notplace the viscous fan drive in a
horizontal position. If stored horizontally, silicone
Fig. 2 Coolant Degas Container
1 - SCREWS
2 - COOLANT DEGAS CONTAINER
3 - FAN SHROUD
4 - RADIATOR
DRENGINE 7 - 39
COOLANT DEGAS CONTAINER-3.7L/4.7L (Continued)
Page 327 of 2895
fluid in the viscous fan drive could drain into its
bearing assembly and contaminate lubricant.
CAUTION: Do not remove water pump pulley-to-wa-
ter pump bolts. This pulley is under spring tension.
(10) Remove four bolts securing fan blade assem-
bly to viscous fan drive (Fig. 4).CAUTION: Some engines equipped with serpentine
drive belts have reverse rotating fans and viscous
fan drives. They are marked with the word
REVERSE to designate their usage. Installation of
the wrong fan or viscous fan drive can result in
engine overheating.
CLEANING
Clean the fan blades using a mild soap and water.
Do not use an abrasive to clean the blades.
INSPECTION
WARNING: DO NOT ATTEMPT TO BEND OR
STRAIGHTEN FAN BLADES IF FAN IS NOT WITHIN
SPECIFICATIONS.
CAUTION: If fan blade assembly is replaced
because of mechanical damage, water pump and
viscous fan drive should also be inspected. These
components could have been damaged due to
excessive vibration.
(1) Remove fan blade assembly from viscous fan
drive unit (six bolts).
(2) Lay fan on a flat surface with leading edge fac-
ing down. With tip of blade touching flat surface,
replace fan if clearance between opposite blade and
surface is greater than 2.0 mm (.090 inch). Rocking
motion of opposite blades should not exceed 2.0 mm
(.090 inch). Test all blades in this manner.
(3) Inspect fan assembly for cracks, bends, or bro-
ken welds. Replace fan if any damage is found.
INSTALLATION
(1) Install fan blade assembly to the viscous fan
drive. Tighten the bolts (Fig. 4) to 24 N´m (18 ft. lbs.)
torque.
(2) Position the fan shroud and the fan blade/vis-
cous fan drive assembly to the vehicle as a complete
unit.
(3) Install the fan shroud.
(4) Install the fan blade/viscous fan drive assembly
to the water pump shaft (Fig. 4).
(5) Install the coolant reserve/overflow container
to the fan shroud.
(6) Connect the negative battery cable.
NOTE:
Viscous Fan Drive Fluid Pump Out Requirement:
After installing a new viscous fan drive, bring the
engine speed up to approximately 2000 rpm and
hold for approximately two minutes. This will
ensure proper fluid distribution within the drive.
Fig. 3 Using Special Tool 6958 Spanner Wrench
1 - SPECIAL TOOL 6958 SPANNER WRENCH WITH ADAPTER
PINS 8346
2-FAN
Fig. 4 Fan Blade/Viscous Fan Drive - Gas Engines -
Typical
1 - WATER PUMP BYPASS HOSE
2 - FAN BLADE ASSEMBLY
3 - VISCOUS FAN DRIVE
4 - WATER PUMP AND PULLEY
7 - 40 ENGINEDR
RADIATOR FAN (Continued)
Page 328 of 2895
RADIATOR FAN - 5.9L DIESEL
REMOVAL
CAUTION: If the electronically controlled viscous
fan drive is replaced because of mechanical dam-
age, the cooling fan blades should also be
inspected. Inspect for fatigue cracks, or loose rivets
that could have resulted from excessive vibration.
Replace fan blade assembly if any of these condi-
tions are found. Also inspect wiring harness and
connectors for damage.
(1) Disconnect the battery negative cables.
(2) Remove the fan shroud lower half. by unsnap-
ping the fastening tabs.
CAUTION: Do not remove the fan pulley bolts. This
pulley is under spring tension.
(3) Disconnect electrical connector.
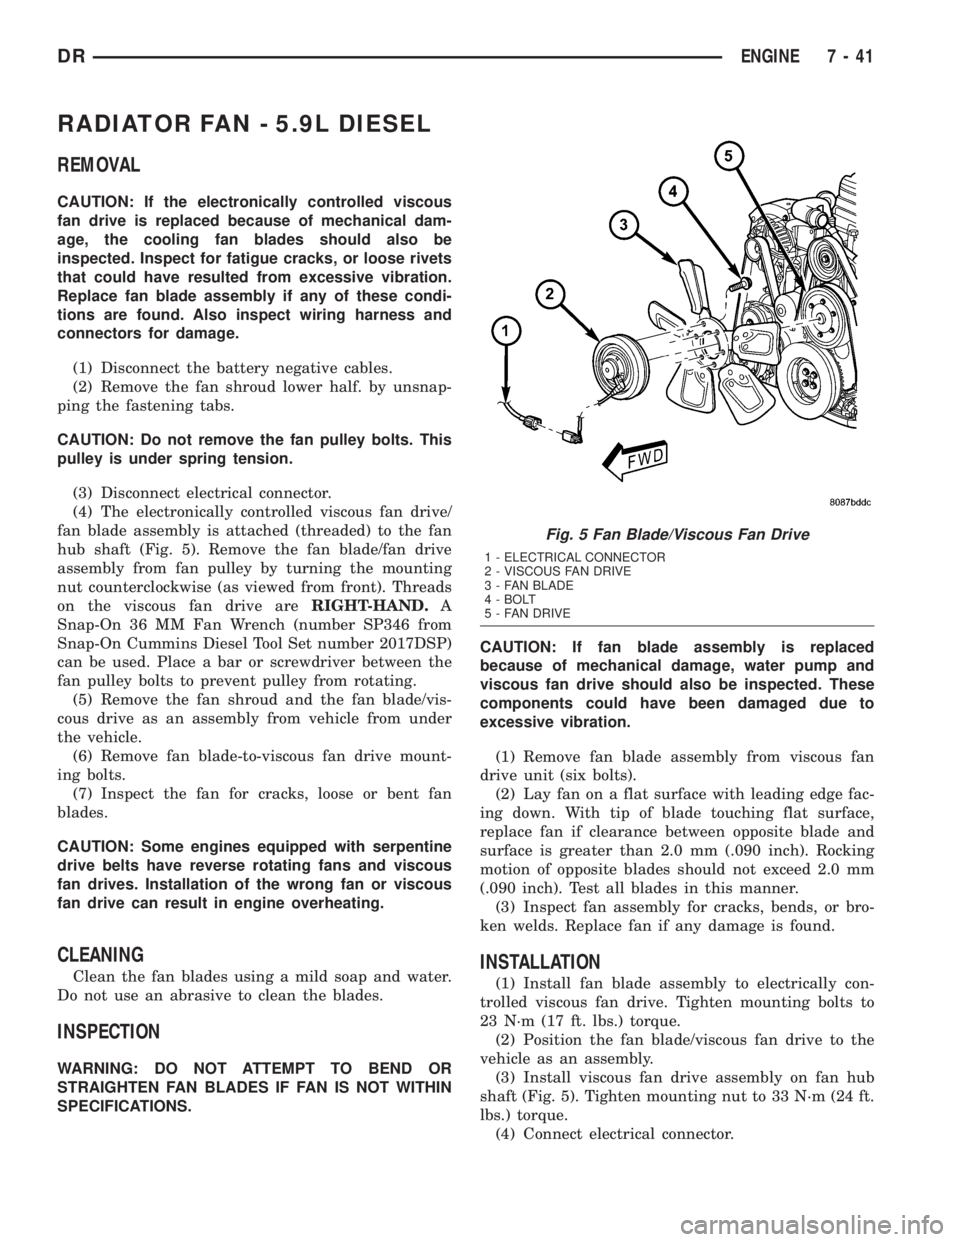
(4) The electronically controlled viscous fan drive/
fan blade assembly is attached (threaded) to the fan
hub shaft (Fig. 5). Remove the fan blade/fan drive
assembly from fan pulley by turning the mounting
nut counterclockwise (as viewed from front). Threads
on the viscous fan drive areRIGHT-HAND.A
Snap-On 36 MM Fan Wrench (number SP346 from
Snap-On Cummins Diesel Tool Set number 2017DSP)
can be used. Place a bar or screwdriver between the
fan pulley bolts to prevent pulley from rotating.
(5) Remove the fan shroud and the fan blade/vis-
cous drive as an assembly from vehicle from under
the vehicle.
(6) Remove fan blade-to-viscous fan drive mount-
ing bolts.
(7) Inspect the fan for cracks, loose or bent fan
blades.
CAUTION: Some engines equipped with serpentine
drive belts have reverse rotating fans and viscous
fan drives. Installation of the wrong fan or viscous
fan drive can result in engine overheating.
CLEANING
Clean the fan blades using a mild soap and water.
Do not use an abrasive to clean the blades.
INSPECTION
WARNING: DO NOT ATTEMPT TO BEND OR
STRAIGHTEN FAN BLADES IF FAN IS NOT WITHIN
SPECIFICATIONS.CAUTION: If fan blade assembly is replaced
because of mechanical damage, water pump and
viscous fan drive should also be inspected. These
components could have been damaged due to
excessive vibration.
(1) Remove fan blade assembly from viscous fan
drive unit (six bolts).
(2) Lay fan on a flat surface with leading edge fac-
ing down. With tip of blade touching flat surface,
replace fan if clearance between opposite blade and
surface is greater than 2.0 mm (.090 inch). Rocking
motion of opposite blades should not exceed 2.0 mm
(.090 inch). Test all blades in this manner.
(3) Inspect fan assembly for cracks, bends, or bro-
ken welds. Replace fan if any damage is found.
INSTALLATION
(1) Install fan blade assembly to electrically con-
trolled viscous fan drive. Tighten mounting bolts to
23 N´m (17 ft. lbs.) torque.
(2) Position the fan blade/viscous fan drive to the
vehicle as an assembly.
(3) Install viscous fan drive assembly on fan hub
shaft (Fig. 5). Tighten mounting nut to 33 N´m (24 ft.
lbs.) torque.
(4) Connect electrical connector.
Fig. 5 Fan Blade/Viscous Fan Drive
1 - ELECTRICAL CONNECTOR
2 - VISCOUS FAN DRIVE
3 - FAN BLADE
4 - BOLT
5 - FAN DRIVE
DRENGINE 7 - 41
Page 331 of 2895
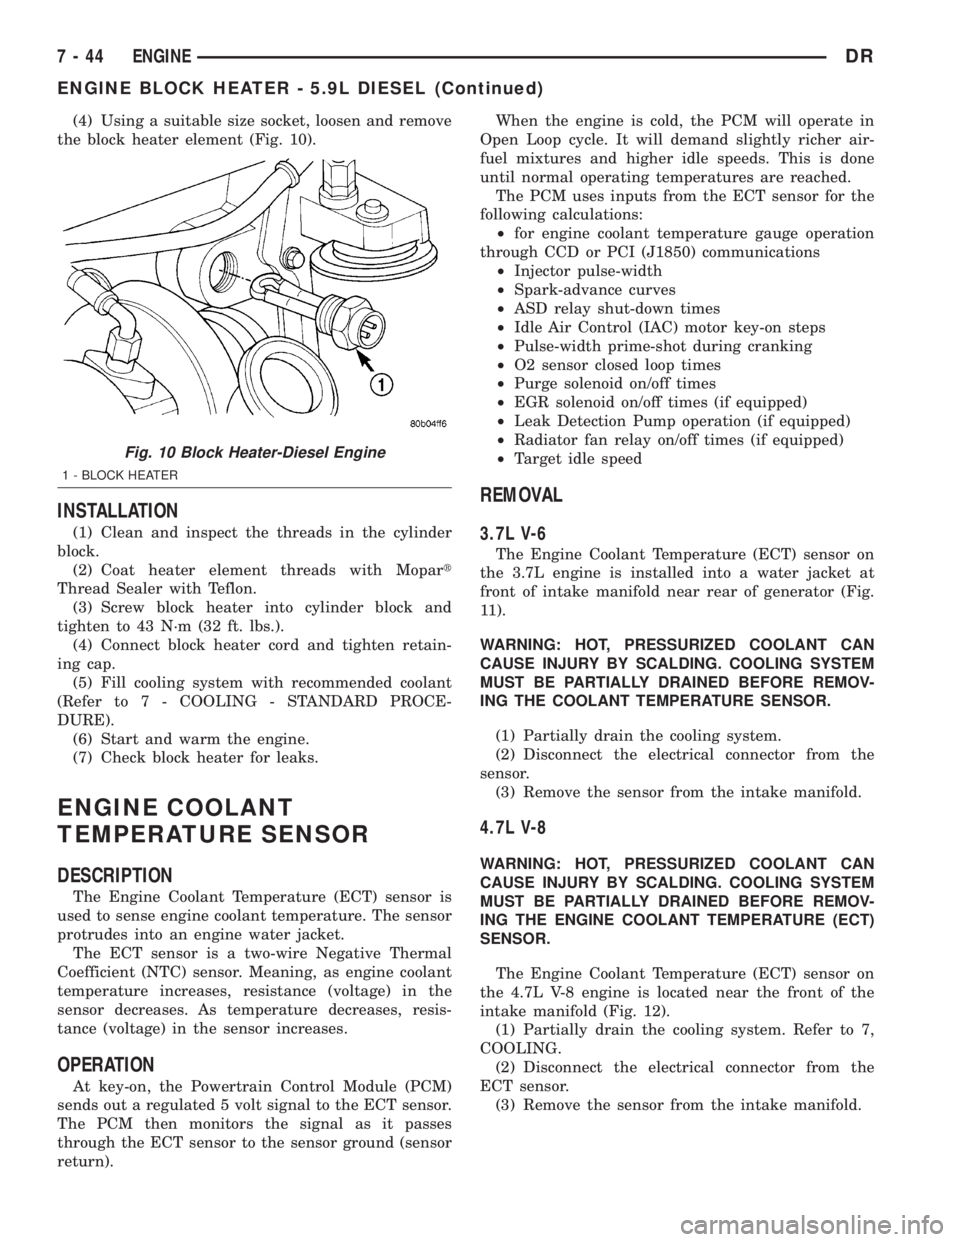
(4) Using a suitable size socket, loosen and remove
the block heater element (Fig. 10).
INSTALLATION
(1) Clean and inspect the threads in the cylinder
block.
(2) Coat heater element threads with Mopart
Thread Sealer with Teflon.
(3) Screw block heater into cylinder block and
tighten to 43 N´m (32 ft. lbs.).
(4) Connect block heater cord and tighten retain-
ing cap.
(5) Fill cooling system with recommended coolant
(Refer to 7 - COOLING - STANDARD PROCE-
DURE).
(6) Start and warm the engine.
(7) Check block heater for leaks.
ENGINE COOLANT
TEMPERATURE SENSOR
DESCRIPTION
The Engine Coolant Temperature (ECT) sensor is
used to sense engine coolant temperature. The sensor
protrudes into an engine water jacket.
The ECT sensor is a two-wire Negative Thermal
Coefficient (NTC) sensor. Meaning, as engine coolant
temperature increases, resistance (voltage) in the
sensor decreases. As temperature decreases, resis-
tance (voltage) in the sensor increases.
OPERATION
At key-on, the Powertrain Control Module (PCM)
sends out a regulated 5 volt signal to the ECT sensor.
The PCM then monitors the signal as it passes
through the ECT sensor to the sensor ground (sensor
return).When the engine is cold, the PCM will operate in
Open Loop cycle. It will demand slightly richer air-
fuel mixtures and higher idle speeds. This is done
until normal operating temperatures are reached.
The PCM uses inputs from the ECT sensor for the
following calculations:
²for engine coolant temperature gauge operation
through CCD or PCI (J1850) communications
²Injector pulse-width
²Spark-advance curves
²ASD relay shut-down times
²Idle Air Control (IAC) motor key-on steps
²Pulse-width prime-shot during cranking
²O2 sensor closed loop times
²Purge solenoid on/off times
²EGR solenoid on/off times (if equipped)
²Leak Detection Pump operation (if equipped)
²Radiator fan relay on/off times (if equipped)
²Target idle speed
REMOVAL
3.7L V-6
The Engine Coolant Temperature (ECT) sensor on
the 3.7L engine is installed into a water jacket at
front of intake manifold near rear of generator (Fig.
11).
WARNING: HOT, PRESSURIZED COOLANT CAN
CAUSE INJURY BY SCALDING. COOLING SYSTEM
MUST BE PARTIALLY DRAINED BEFORE REMOV-
ING THE COOLANT TEMPERATURE SENSOR.
(1) Partially drain the cooling system.
(2) Disconnect the electrical connector from the
sensor.
(3) Remove the sensor from the intake manifold.
4.7L V-8
WARNING: HOT, PRESSURIZED COOLANT CAN
CAUSE INJURY BY SCALDING. COOLING SYSTEM
MUST BE PARTIALLY DRAINED BEFORE REMOV-
ING THE ENGINE COOLANT TEMPERATURE (ECT)
SENSOR.
The Engine Coolant Temperature (ECT) sensor on
the 4.7L V-8 engine is located near the front of the
intake manifold (Fig. 12).
(1) Partially drain the cooling system. Refer to 7,
COOLING.
(2) Disconnect the electrical connector from the
ECT sensor.
(3) Remove the sensor from the intake manifold.
Fig. 10 Block Heater-Diesel Engine
1 - BLOCK HEATER
7 - 44 ENGINEDR
ENGINE BLOCK HEATER - 5.9L DIESEL (Continued)
Page 335 of 2895

OPERATION
The wax pellet is located in a sealed container at
the spring end of the thermostat. When heated, the
pellet expands, overcoming closing spring tension
and water pump pressure to force the valve to open.
DIAGNOSIS AND TESTINGÐTHERMOSTAT
ON-BOARD DIAGNOSTICS
Allgasoline powered modelsare equipped with
On-Board Diagnostics for certain cooling system com-
ponents. Refer to On-Board Diagnostics (OBD) in the
Diagnosis section of this group for additional infor-
mation. If the powertrain control module (PCM)
detects low engine coolant temperature, it will record
a Diagnostic Trouble Code (DTC) in the PCM mem-
ory. Do not change a thermostat for lack of heat as
indicated by the instrument panel gauge or by poor
heater performance unless a DTC is present. Refer to
the Diagnosis section of this group for other probable
causes.
The DTC can also be accessed through the
DRBIIItscan tool. Refer to the appropriate Power-
train Diagnostic Procedures information for diagnos-
tic information and operation of the DRBIIItscan
tool.
REMOVAL
WARNING: DO NOT LOOSEN THE RADIATOR
DRAINCOCK WITH THE COOLING SYSTEM HOT
AND PRESSURIZED. SERIOUS BURNS FROM THE
COOLANT CAN OCCUR.
Do not waste reusable coolant. If the solution is
clean, drain the coolant into a clean container for
reuse.
If the thermostat is being replaced, be sure that
the replacement is the specified thermostat for the
vehicle model and engine type.
Factory installed thermostat housings on 5.9L
engine is installed on a gasket with an anti-stick
coating. This will aid in gasket removal and clean-up.
(1) Disconnect the negative battery cable.
(2) Drain the cooling system until the coolant level
is below the thermostat (Refer to 7 - COOLING -
STANDARD PROCEDURE).
(3) Air Conditioned vehicles: Remove the support
bracket (generator mounting bracket-to-intake mani-
fold) located near the rear of the generator (Fig. 19).
NOTE: On air conditioning equipped vehicles, the
generator must be partially removed.
(4) Remove the accessory drive belt (Refer to 7 -
COOLING/ACCESSORY DRIVE/DRIVE BELTS -
REMOVAL) (Fig. 20).
(5) Remove the generator mounting bolts. Do not
remove any of the wiring at the generator. If
equipped with 4WD, unplug the 4WD indicator lamp
wiring harness (located near rear of generator).
(6) Remove the generator. Position the generator
to gain access for the thermostat gasket removal.
Fig. 18 Thermostat - 5.7L/5.9L Gas Powered
Engines
1 - THERMOSTAT HOUSING
2 - GASKET
3 - INTAKE MANIFOLD
4 - THERMOSTAT
5 - MACHINED GROOVE
Fig. 19 Generator Support Bracket ± 5.9L Engine
1 - IDLER PULLEY BUSHING
2 - A/C AND/OR GENERATOR MOUNTING BRACKET
3 - IDLER PULLEY
4 - SCREW AND WASHER
7 - 48 ENGINEDR
ENGINE COOLANT THERMOSTAT- 5.7L/5.9L (Continued)
Page 337 of 2895
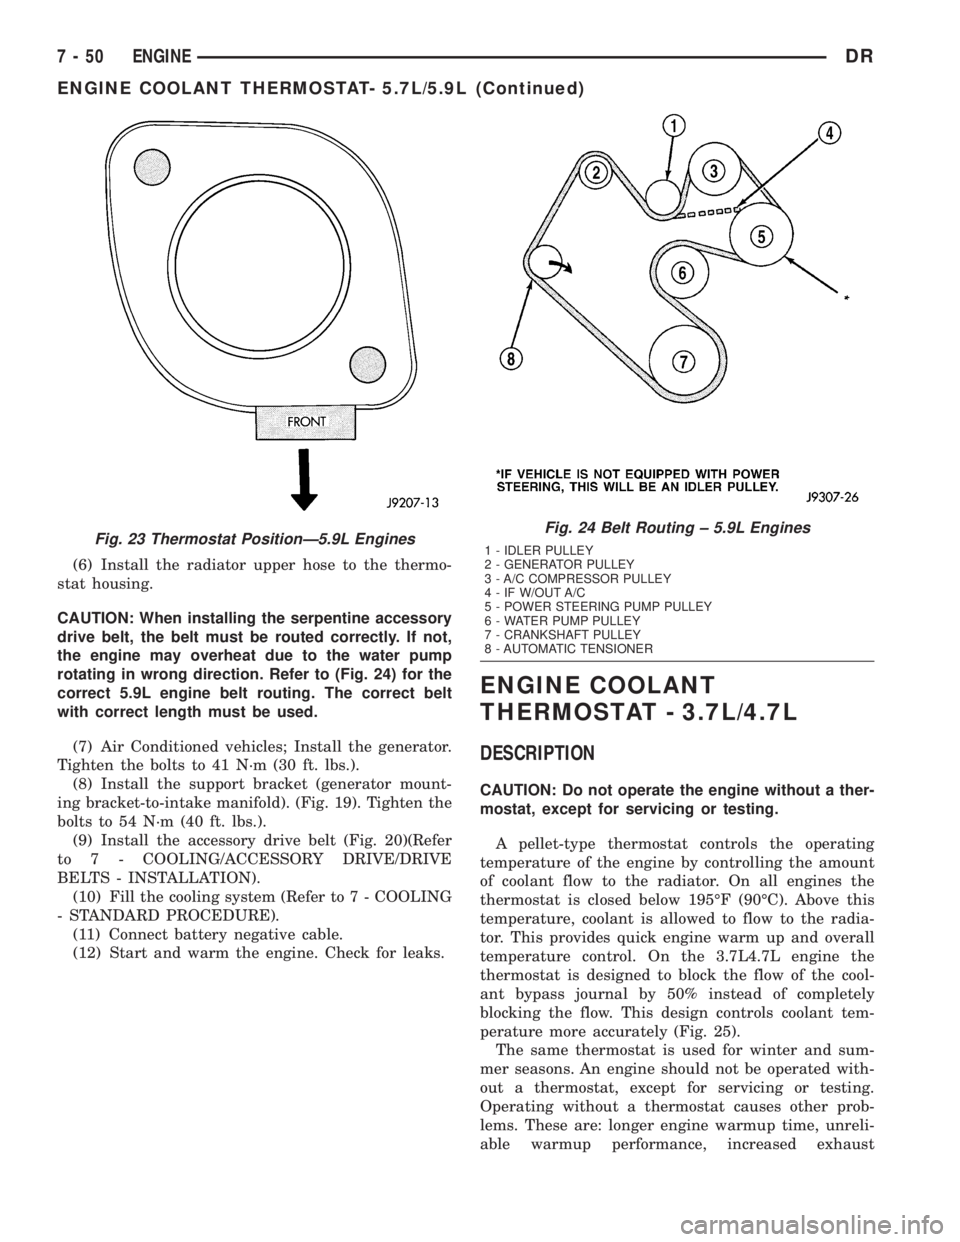
(6) Install the radiator upper hose to the thermo-
stat housing.
CAUTION: When installing the serpentine accessory
drive belt, the belt must be routed correctly. If not,
the engine may overheat due to the water pump
rotating in wrong direction. Refer to (Fig. 24) for the
correct 5.9L engine belt routing. The correct belt
with correct length must be used.
(7) Air Conditioned vehicles; Install the generator.
Tighten the bolts to 41 N´m (30 ft. lbs.).
(8) Install the support bracket (generator mount-
ing bracket-to-intake manifold). (Fig. 19). Tighten the
bolts to 54 N´m (40 ft. lbs.).
(9) Install the accessory drive belt (Fig. 20)(Refer
to 7 - COOLING/ACCESSORY DRIVE/DRIVE
BELTS - INSTALLATION).
(10) Fill the cooling system (Refer to 7 - COOLING
- STANDARD PROCEDURE).
(11) Connect battery negative cable.
(12) Start and warm the engine. Check for leaks.
ENGINE COOLANT
THERMOSTAT - 3.7L/4.7L
DESCRIPTION
CAUTION: Do not operate the engine without a ther-
mostat, except for servicing or testing.
A pellet-type thermostat controls the operating
temperature of the engine by controlling the amount
of coolant flow to the radiator. On all engines the
thermostat is closed below 195ÉF (90ÉC). Above this
temperature, coolant is allowed to flow to the radia-
tor. This provides quick engine warm up and overall
temperature control. On the 3.7L4.7L engine the
thermostat is designed to block the flow of the cool-
ant bypass journal by 50% instead of completely
blocking the flow. This design controls coolant tem-
perature more accurately (Fig. 25).
The same thermostat is used for winter and sum-
mer seasons. An engine should not be operated with-
out a thermostat, except for servicing or testing.
Operating without a thermostat causes other prob-
lems. These are: longer engine warmup time, unreli-
able warmup performance, increased exhaust
Fig. 23 Thermostat PositionÐ5.9L EnginesFig. 24 Belt Routing ± 5.9L Engines
1 - IDLER PULLEY
2 - GENERATOR PULLEY
3 - A/C COMPRESSOR PULLEY
4 - IF W/OUT A/C
5 - POWER STEERING PUMP PULLEY
6 - WATER PUMP PULLEY
7 - CRANKSHAFT PULLEY
8 - AUTOMATIC TENSIONER
7 - 50 ENGINEDR
ENGINE COOLANT THERMOSTAT- 5.7L/5.9L (Continued)
Page 338 of 2895

emissions and crankcase condensation. This conden-
sation can result in sludge formation.
OPERATION
The wax pellet is located in a sealed container at
the spring end of the thermostat. When heated, the
pellet expands, overcoming closing spring tension
and water pump pressure to force the valve to open.
DIAGNOSIS AND TESTINGÐTHERMOSTAT
ON-BOARD DIAGNOSTICS
Allgasoline powered modelsare equipped with
On-Board Diagnostics for certain cooling system com-
ponents. Refer to On-Board Diagnostics (OBD) in the
Diagnosis section of this group for additional infor-
mation. If the powertrain control module (PCM)
detects low engine coolant temperature, it will record
a Diagnostic Trouble Code (DTC) in the PCM mem-
ory. Do not change a thermostat for lack of heat as
indicated by the instrument panel gauge or by poor
heater performance unless a DTC is present. Refer tothe Diagnosis section of this group for other probable
causes.
The DTC can also be accessed through the
DRBIIItscan tool. Refer to the appropriate Power-
train Diagnostic Procedures information for diagnos-
tic information and operation of the DRBIIItscan
tool.
REMOVAL
WARNING: DO NOT LOOSEN THE RADIATOR
DRAINCOCK WITH THE COOLING SYSTEM HOT
AND PRESSURIZED. SERIOUS BURNS FROM THE
COOLANT CAN OCCUR.
Do not waste reusable coolant. If the solution is
clean, drain the coolant into a clean container for
reuse.
If the thermostat is being replaced, be sure that
the replacement is the specified thermostat for the
vehicle model and engine type.
(1) Disconnect the negative battery cable.
(2) Drain the cooling system (Refer to 7 - COOL-
ING - STANDARD PROCEDURE).
(3) Raise and support the vehicle.
(4) Remove the splash shield.
(5) Remove the lower radiator hose clamp and the
lower radiator hose at the thermostat housing.
(6) Remove the thermostat housing mounting
bolts, thermostat housing and thermostat (Fig. 26).
INSTALLATION
(1) Clean the mating areas of the timing chain
cover and the thermostat housing.
(2) Install the thermostat (spring side down) into
the recessed machined groove on the timing chain
cover (Fig. 26).
(3) Position the thermostat housing on the timing
chain cover.
(4) Install the housing-to-timing chain cover bolts.
Tighten the bolts to 13 N´m (112 in. lbs.).
CAUTION: The housing must be tightened evenly
and the thermostat must be centered into the
recessed groove in the timimg chain cover. If not, it
may result in a cracked housing, damaged timing
chain cover threads or coolant leaks.
(5) Install the lower radiator hose on the thermo-
stat housing.
(6) Install the splash shield.
(7) Lower the vehicle.
(8) Fill the cooling system (Refer to 7 - COOLING
- STANDARD PROCEDURE).
(9) Connect negative battery cable.
(10) Start and warm the engine. Check for leaks.
Fig. 25 Thermostat Cross Section View 3.7L/4.7L
1 - FROM HEATER AND DEGAS CONTAINER
2 - FROM RADIATOR
3 - TO WATER PUMP
4 - ENGINE BYPASS
5 - THERMOSTAT
DRENGINE 7 - 51
ENGINE COOLANT THERMOSTAT - 3.7L/4.7L (Continued)