Page 17 of 114

3-1
EAU00029
Main switch/steering lockMain switch/steering lockThe main switch/steering lock con-
trols the ignition and lighting systems,
and is used to lock the steering. The
various positions are described
below.
EAU04580
ON
All electrical circuits are supplied with
power, the meter lighting, taillight,
license plate light and auxiliary light
come on, and the engine can be
started. The key cannot be removed.
EAU00027
INSTRUMENT AND CONTROL FUNCTIONS
3
IGNITION
P
LOCK
ON
OFF
OPENPUSHPUSH
NOTE:
The headlight comes on automatical-
ly when the engine is started and
stays on until the key is turned to
“OFF” or the sidestand is moved
down.
EAU00038
OFF
All electrical systems are off. The key
can be removed.
EAU00040
LOCK
The steering is locked, and all electri-
cal systems are off. The key can be
removed.To lock the steering
1. Turn the handlebars all the way
to the left.
2. Push the key in from the “OFF”
position, and then turn it to
“LOCK” while still pushing it.
3. Remove the key.
To unlock the steeringPush the key in, and then turn it to
“OFF” while still pushing it.
EW000016
wNever turn the key to “OFF” or
“LOCK” while the scooter is mov-
ing, otherwise the electrical sys-
tems will be switched off, which
may result in loss of control or an
accident. Make sure that the scoot-
er is stopped before turning the
key to “OFF” or “LOCK”.
5SJ-28199-E0 1/24/02 6:14 PM Page 16
Page 18 of 114

The steering is locked, and the tail-
light, license light and auxiliary light
are on, but all other electrical sys-
tems are off. The key c")
3-2
INSTRUMENT AND CONTROL FUNCTIONS
3
EAU03733
.
(Parking)
The steering is locked, and the tail-
light, license light and auxiliary light
are on, but all other electrical sys-
tems are off. The key can be
removed.
To turn the main switch to “
.
”:
1. Turn the key to “LOCK”.
2. Slightly turn the key counter-
clockwise until it stops.
3. While still turning the key coun-
terclockwise, push it in until it
snaps into place.
ECA00043
cCDo not use the parking position for
an extended length of time, other-
wise the battery may discharge.
EAU03734
Oil change indicator light “
7
”
Oil change indicator lightThis indicator light comes on at the
initial 1,000 km and every 3,000 km
thereafter to indicate that the engine
oil should be changed.
If the engine oil is changed before the
oil change indicator comes on (i.e.
before the periodic oil change interval
has been reached), the indicator light
must be reset after the oil change for
the next periodic oil change to be
indicated at the correct time. (See
page 6-17 for the resetting proce-
dure.)
The electrical circuit of the indicator
light can be checked according to the
following procedure.
1. Set the engine stop switch to “#”
and turn the key to “ON”.
2. Check that the indicator comes
on for a few seconds and then
goes off.
3. If the indicator light does not
come on, have a Yamaha dealer
check the electrical circuit.
EAU00056
Indicator lightsIndicator lights
EAU04121
Turn signal indicator lights “4”
and “6”Turn signal indicator lightsThe corresponding indicator light
flashes when the turn signal switch is
pushed to the left or right.
EAU00063
High beam indicator light “&”High beam indicator lightThis indicator light comes on when
the high beam of the headlight is
switched on.
1
2
3
4
1. Left turn signal indicator light “4”
2. High beam indicator light “&”
3. Oil change indicator light “
7
”
4. Right turn signal indicator light “6”
5SJ-28199-E0 1/24/02 6:14 PM Page 17
Page 19 of 114
3-3
NOTE:
The oil change indicator light may
flash when the engine is revved with
the scooter on the centerstand, but
this does not indicate a malfunction.INSTRUMENT AND CONTROL FUNCTIONS
3
EAU04582
TachometerTachometerThe electric tachometer allows the
rider to monitor the engine speed and
keep it within the ideal power range.
When the key is turned to “ON”, the
tachometer needle will move to the
10,000 r/min and back to zero r/min
in order to test the electrical circuit.
1
1. Tachometer
EAU04581
SpeedometerSpeedometerThe speedometer shows the riding
speed.
When the key is turned to “ON”, the
speedometer needle will move to
160 km/h and back to zero in order to
test the electrical circuit.
1
1. Speedometer
5SJ-28199-E0 1/24/02 6:14 PM Page 18
Page 20 of 114
3-4
INSTRUMENT AND CONTROL FUNCTIONS
3
EAU00110
Fuel gaugeFuel gaugeThe fuel gauge indicates the amount
of fuel in the fuel tank. The needle
moves towards “E” (Empty) as the
fuel level decreases. When the nee-
dle reaches “E”, approximately 2 L of
fuel remain in the fuel tank. If this
occurs, refuel as soon as possible.NOTE:
Do not allow the fuel tank to empty
itself completely.
1
1. Fuel gauge
ECA00134
cC8Do not operate the engine
above 8,500 r/min.
8This scooter is equipped with
an engine speed limiter, which
prevents the engine speed
from exceeding approximately
9,000 r/min.
5SJ-28199-E0 1/24/02 6:14 PM Page 19
Page 21 of 114

3-5
INSTRUMENT AND CONTROL FUNCTIONS
3
EAU03124
Coolant temperature gaugeCoolant temperature gaugeThis gauge indicates the coolant tem-
perature when the main switch is on.
The engine operating temperature
will vary with changes in weather and
engine load. If the needle points to
the red mark, stop your scooter and
let the engine cool. (See page
6-19 for details.)
EC000002
cCDo not operate the engine if it is
overheated.
1
2
1. Coolant temperature gauge
2. Red mark
EAU04589
Multi-function displayDisplay, multi-functionThe multi-function display is
equipped with the following:
8a tripmeter (which shows the dis-
tance traveled since it was last
set to zero)
8a fuel tripmeter (which shows the
distance traveled when the fuel
level reaches approximately 2.0 L)
8an odometer (which shows the
total distance traveled)
8a clock
8an outside temperature display8a voltage display (which shows
the battery voltage)
NOTE:
8When the key is turned to “ON”,
all segments of the display come
on for a few seconds. During this
time, the multi-function display is
performing a self-test.
8Be sure to turn the key to “ON”
before using the “SELECT” and
“RESET” buttons.
1
23
1. Tripmeter
2. Odometer, fuel tripmeter
3. Clock, outside temperature and voltage
meter display
5SJ-28199-E0 1/24/02 6:14 PM Page 20
Page 22 of 114

3-6
INSTRUMENT AND CONTROL FUNCTIONS
3
Tripmeter “Trip”
To reset the tripmeter:
1. Push the “SELECT” button until
the voltage display appears, then
push the “SELECT” button one
more time and “Trip” starts flash-
ing.
2. Push the “RESET” button for at
least one second to reset the
tripmeter to zero.
NOTE:
8The tripmeter reset mode auto-
matically cancels after five sec-
onds. To return to the reset
mode, push the “SELECT” but-
ton again until “Trip” begins
flashing.
8To cancel the tripmeter reset
mode, push the “SELECT” but-
ton.
8If the tripmeter indicates “––––”,
have a Yamaha dealer check or
repair the multi-function display
as it may be faulty.
Odometer “Odo”
The odometer has two functions.
8It shows the total distance trav-
eled.
8It automatically changes to the
fuel tripmeter mode “Trip F”
when the fuel level reaches
approximately 2.0 L. (See “Fuel
tripmeter” for details.)NOTE:
If the odometer indicates “––––––”,
have a Yamaha dealer check or
repair the multi-function display as it
may be faulty.
5SJ-28199-E0 1/24/02 6:14 PM Page 21
Page 23 of 114
3-7
INSTRUMENT AND CONTROL FUNCTIONS
3
Fuel tripmeter “Trip F”
When the fuel level reaches approxi-
mately 2.0 L, the odometer display
automatically changes to the fuel trip-
meter mode “Trip F” and starts count-
ing the distance traveled from that
point. After refueling and traveling
5 km, the odometer display returns to
“Odo”.
To return to the odometer mode
before refueling, push the “SELECT”
button until “Trip F” begins flashing
(“Trip F” will only flash for five sec-
onds). While “Trip F” is flashing, push
the “RESET” button for at least one
second and the display will return to
the odometer mode. From that time,
both “Trip” and “Odo” are displayed
until you refuel and travel 5 km.NOTE:
The display cannot be changed back
to “Trip F” after pushing the “RESET”
button.
Clock
To set the clock1. Push the “SELECT” button until
the clock is displayed.
2. Push the “SELECT” button and
“RESET” button together for at
least two seconds.
5SJ-28199-E0 1/24/02 6:14 PM Page 22
Page 24 of 114
3-8
INSTRUMENT AND CONTROL FUNCTIONS
3
3. When the hour digits start flash-
ing, push the “RESET” button to
set the hours.
4. Push the “SELECT” button, and
the minute digits will start flash-
ing.
5. Push the “RESET” button to set
the minutes.
6. Push the “SELECT” button and
then release it to start the clock.
Outside temperature display
This display shows the outside tem-
perature from –10.0 °C to 50.0 °C in
0.5 °increments.
5SJ-28199-E0 1/24/02 6:14 PM Page 23
 1
1 2
2 3
3 4
4 5
5 6
6 7
7 8
8 9
9 10
10 11
11 12
12 13
13 14
14 15
15 16
16 17
17 18
18 19
19 20
20 21
21 22
22 23
23 24
24 25
25 26
26 27
27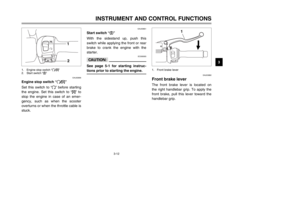 28
28 29
29 30
30 31
31 32
32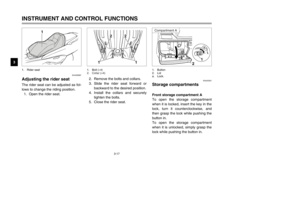 33
33 34
34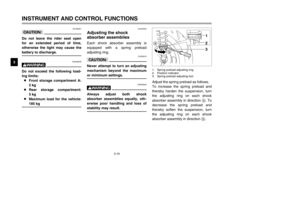 35
35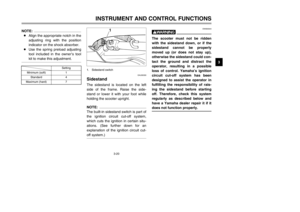 36
36 37
37 38
38 39
39 40
40 41
41 42
42 43
43 44
44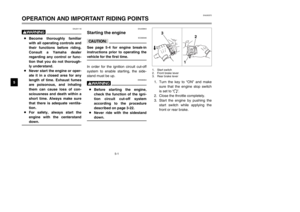 45
45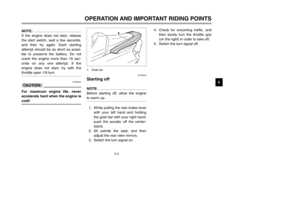 46
46 47
47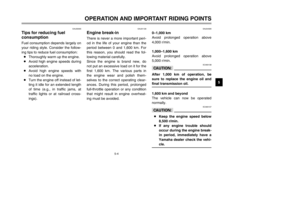 48
48 49
49 50
50 51
51 52
52 53
53 54
54 55
55 56
56 57
57 58
58 59
59 60
60 61
61 62
62 63
63 64
64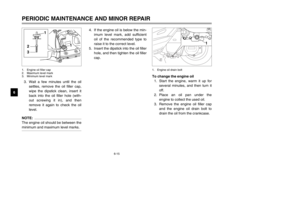 65
65 66
66 67
67 68
68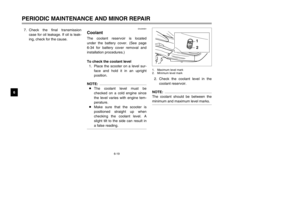 69
69 70
70 71
71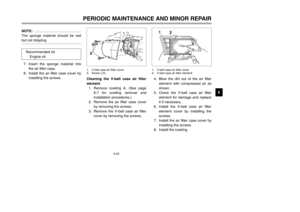 72
72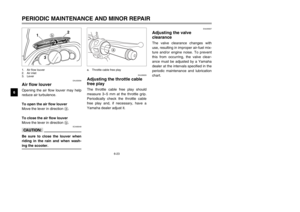 73
73 74
74 75
75 76
76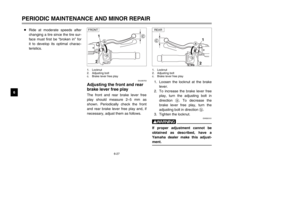 77
77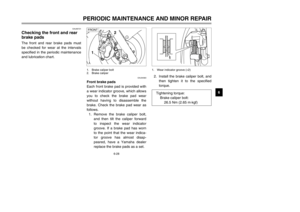 78
78 79
79 80
80 81
81 82
82 83
83 84
84 85
85 86
86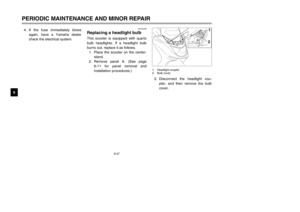 87
87 88
88 89
89 90
90 91
91 92
92 93
93 94
94 95
95 96
96 97
97 98
98 99
99 100
100 101
101 102
102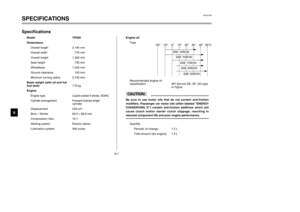 103
103 104
104 105
105 106
106 107
107 108
108 109
109 110
110 111
111 112
112 113
113
 as the
fuel level decreases.")

