Page 111 of 1690
4206D±01
D30782
RHD Steering Position Type:
LHD Steering Position Type:
D26300
LHD Steering
Position Type:RHD Steering
Position Type:
42±6
±
CLUTCH CLUTCH PEDAL SUB±ASSY (MTM)
AVENSIS REPAIR MANUAL (RM1018E)
REPLACEMENT
1. REMOVE INSTRUMENT PANEL SUB±ASSY LOWER (LHD STEERING POSITION TYPE) (See page 71±11)
2.REMOVE COMBINATION METER ASSY (RHD STEERING POSITION TYPE) (See page 71±21)
3. REMOVE CLUTCH PEDAL SPRING
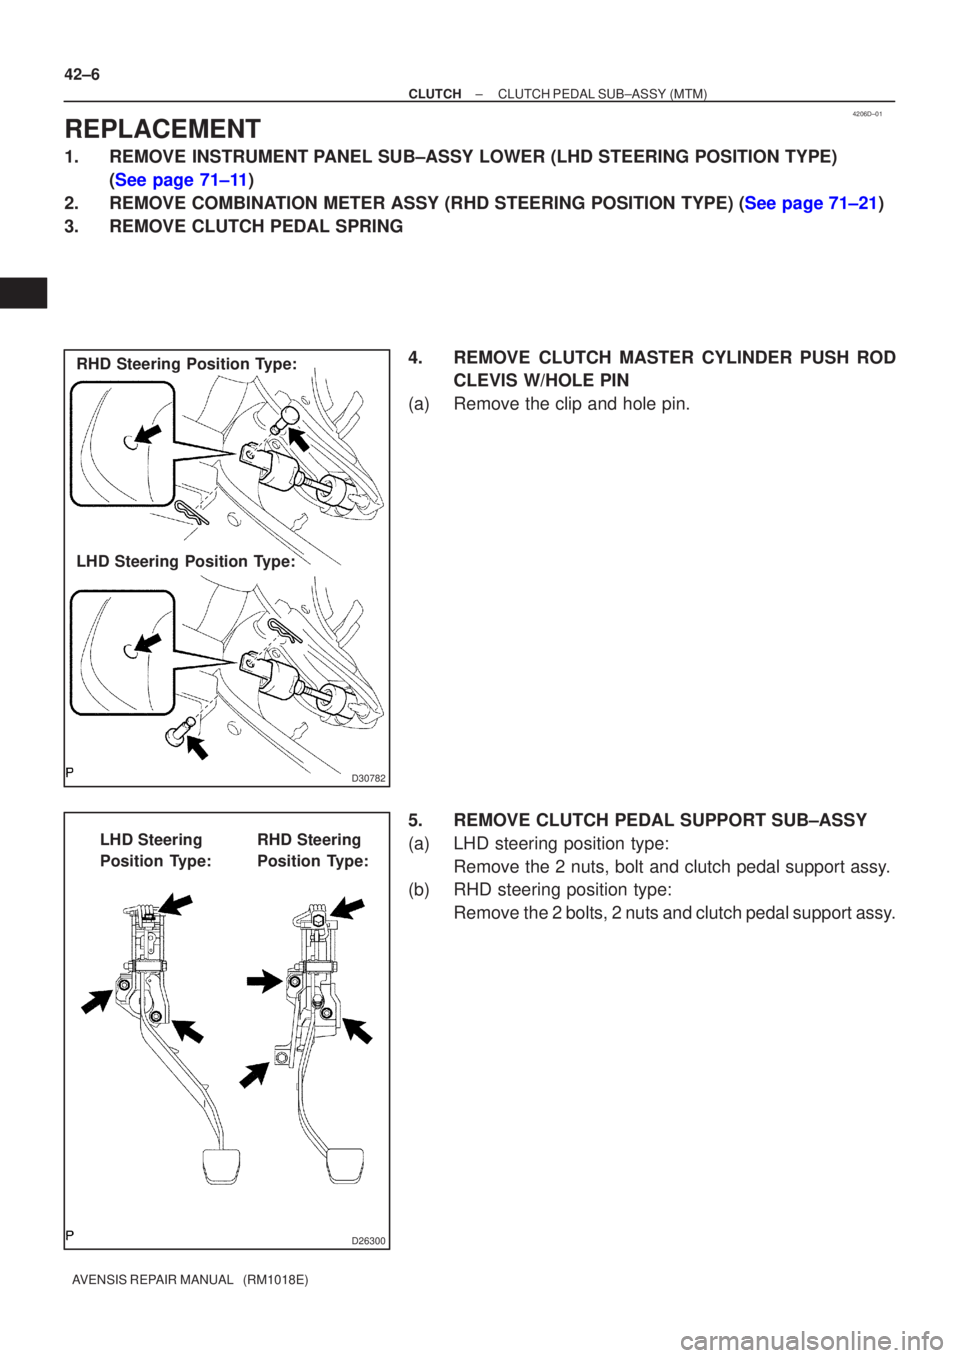
4. REMOVE CLUTCH MASTER CYLINDER PUSH RODCLEVIS W/HOLE PIN
(a) Remove the clip and hole pin.
5. REMOVE CLUTCH PEDAL SUPPORT SUB±ASSY
(a) LHD steering position type: Remove the 2 nuts, bolt and clutch pedal support assy.
(b) RHD steering position type:
Remove the 2 bolts, 2 nuts and clutch pedal support assy.
Page 113 of 1690
D30779
LHD Steering Position Type:
RHD Steering Position Type:
D30777
D30778MP Grease 42±8
± CLUTCHCLUTCH PEDAL SUB±ASSY (MTM)
AVENSIS REPAIR MANUAL (RM1018E)
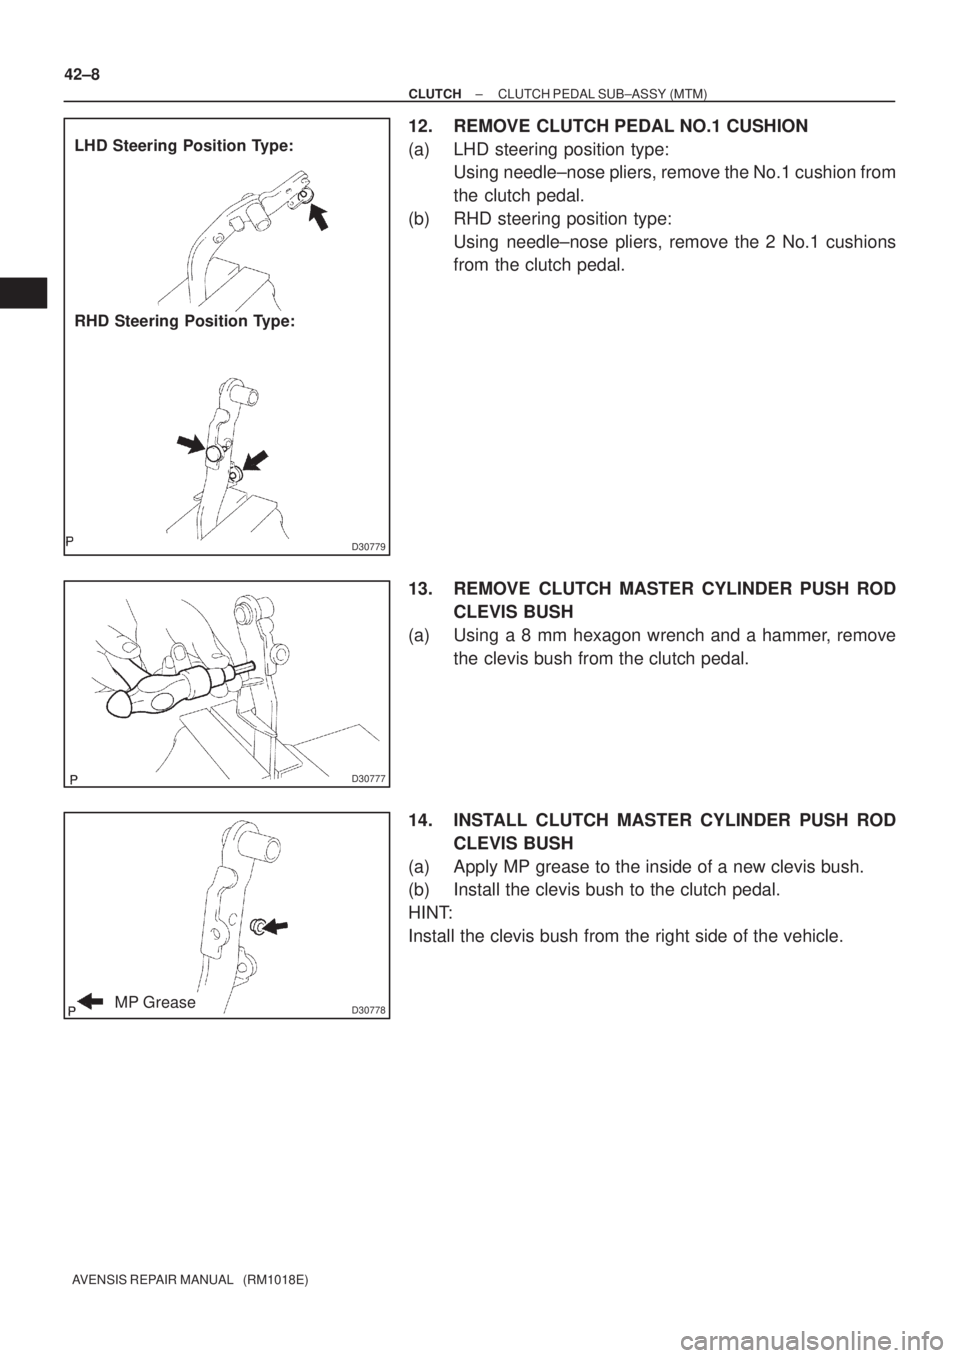
12. REMOVE CLUTCH PEDAL NO.1 CUSHION
(a) LHD steering position type:
Using needle±nose pliers, remove the No.1 cushion from
the clutch pedal.
(b) RHD steering position type:
Using needle±nose pliers, remove the 2 No.1 cushions
from the clutch pedal.
13. REMOVE CLUTCH MASTER CYLINDER PUSH ROD
CLEVIS BUSH
(a) Using a 8 mm hexagon wrench and a hammer, remove
the clevis bush from the clutch pedal.
14. INSTALL CLUTCH MASTER CYLINDER PUSH ROD
CLEVIS BUSH
(a) Apply MP grease to the inside of a new clevis bush.
(b) Install the clevis bush to the clutch pedal.
HINT:
Install the clevis bush from the right side of the vehicle.
Page 114 of 1690
D30779
LHD Steering Position Type:
RHD Steering Position Type:
D30780MP Grease
D30781
± CLUTCHCLUTCH PEDAL SUB±ASSY (MTM)
42±9
AVENSIS REPAIR MANUAL (RM1018E)
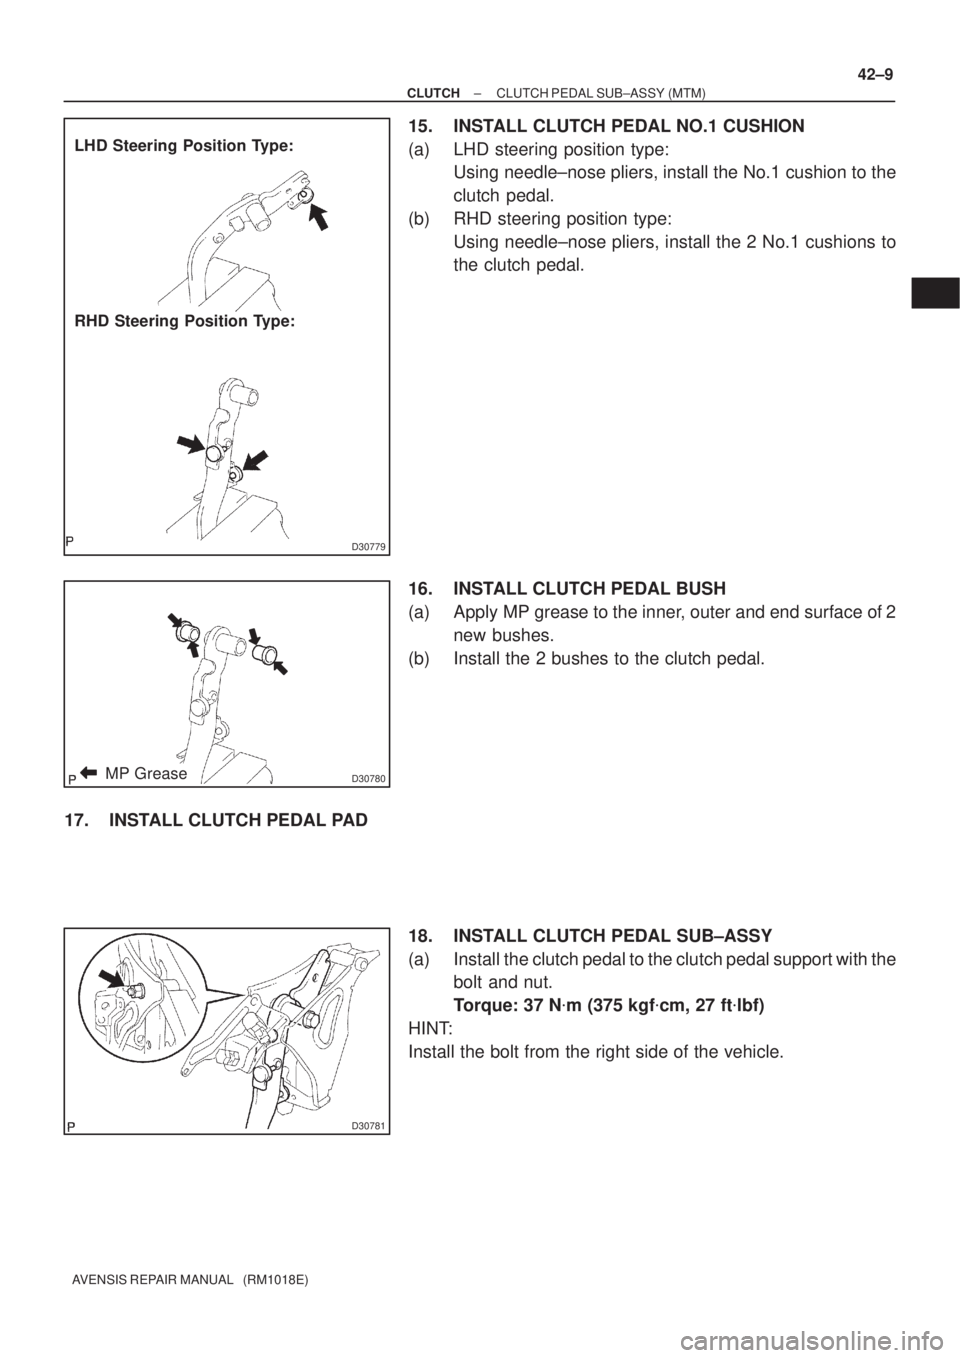
15. INSTALL CLUTCH PEDAL NO.1 CUSHION
(a) LHD steering position type:
Using needle±nose pliers, install the No.1 cushion to the
clutch pedal.
(b) RHD steering position type:
Using needle±nose pliers, install the 2 No.1 cushions to
the clutch pedal.
16. INSTALL CLUTCH PEDAL BUSH
(a) Apply MP grease to the inner, outer and end surface of 2
new bushes.
(b) Install the 2 bushes to the clutch pedal.
17. INSTALL CLUTCH PEDAL PAD
18. INSTALL CLUTCH PEDAL SUB±ASSY
(a) Install the clutch pedal to the clutch pedal support with the
bolt and nut.
Torque: 37 N�m (375 kgf�cm, 27 ft�lbf)
HINT:
Install the bolt from the right side of the vehicle.
Page 115 of 1690
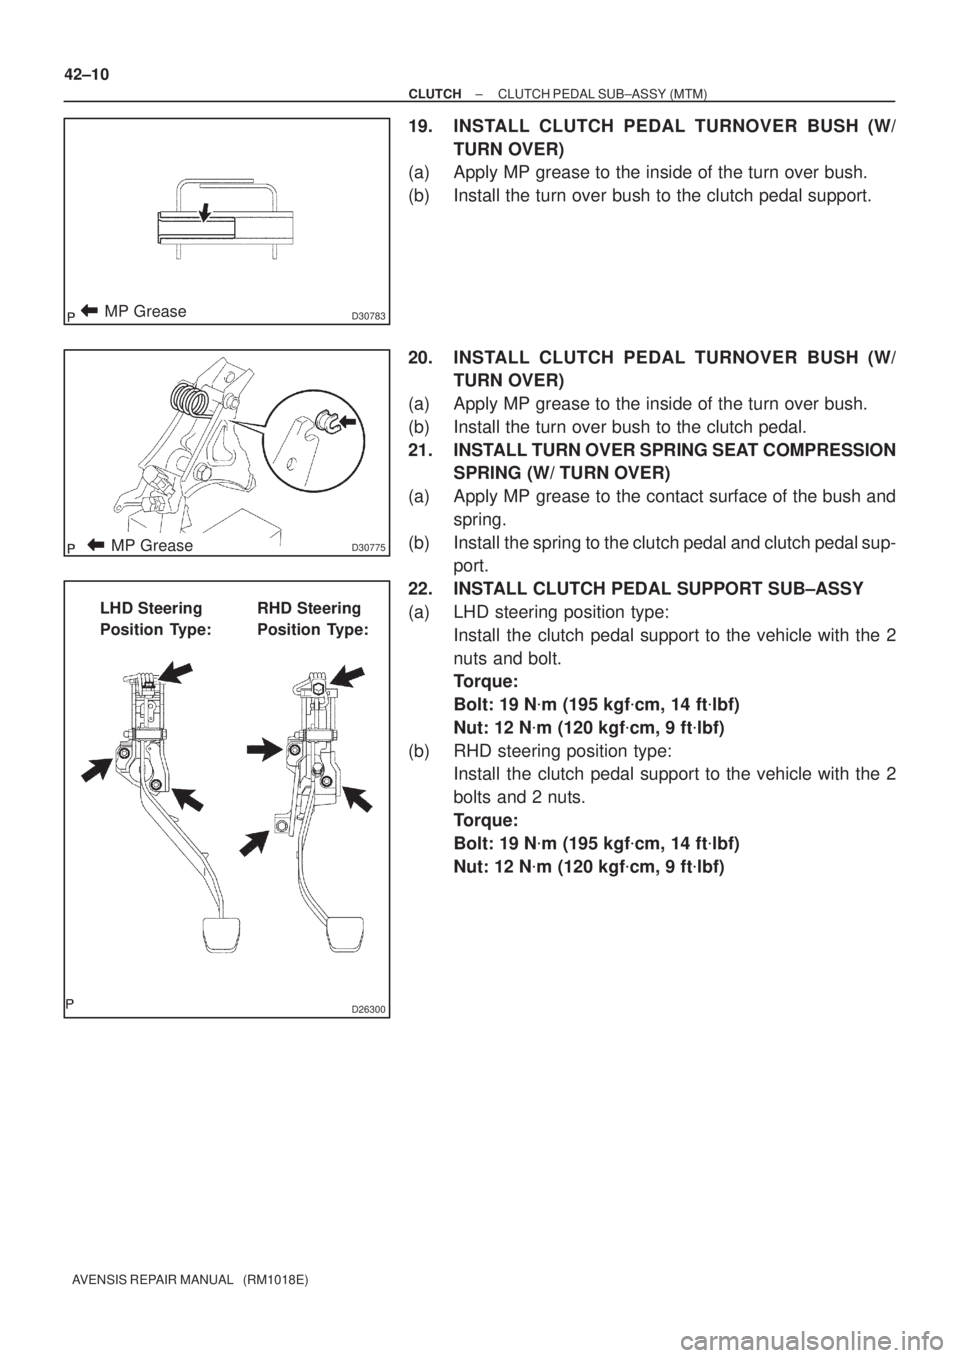
D30783MP Grease
D30775MP Grease
D26300
LHD Steering
Position Type:RHD Steering
Position Type: 42±10
± CLUTCHCLUTCH PEDAL SUB±ASSY (MTM)
AVENSIS REPAIR MANUAL (RM1018E)
19. INSTALL CLUTCH PEDAL TURNOVER BUSH (W/
TURN OVER)
(a) Apply MP grease to the inside of the turn over bush.
(b) Install the turn over bush to the clutch pedal support.
20. INSTALL CLUTCH PEDAL TURNOVER BUSH (W/
TURN OVER)
(a) Apply MP grease to the inside of the turn over bush.
(b) Install the turn over bush to the clutch pedal.
21. INSTALL TURN OVER SPRING SEAT COMPRESSION
SPRING (W/ TURN OVER)
(a) Apply MP grease to the contact surface of the bush and
spring.
(b) Install the spring to the clutch pedal and clutch pedal sup-
port.
22. INSTALL CLUTCH PEDAL SUPPORT SUB±ASSY
(a) LHD steering position type:
Install the clutch pedal support to the vehicle with the 2
nuts and bolt.
Torque:
Bolt: 19 N�m (195 kgf�cm, 14 ft�lbf)
Nut: 12 N�m (120 kgf�cm, 9 ft�lbf)
(b) RHD steering position type:
Install the clutch pedal support to the vehicle with the 2
bolts and 2 nuts.
Torque:
Bolt: 19 N�m (195 kgf�cm, 14 ft�lbf)
Nut: 12 N�m (120 kgf�cm, 9 ft�lbf)
Page 116 of 1690
D30782
LHD Steering Position Type:
RHD Steering Position Type:MP Grease
±
CLUTCH CLUTCH PEDAL SUB±ASSY (MTM)
42±11
AVENSIS REPAIR MANUAL (RM1018E)
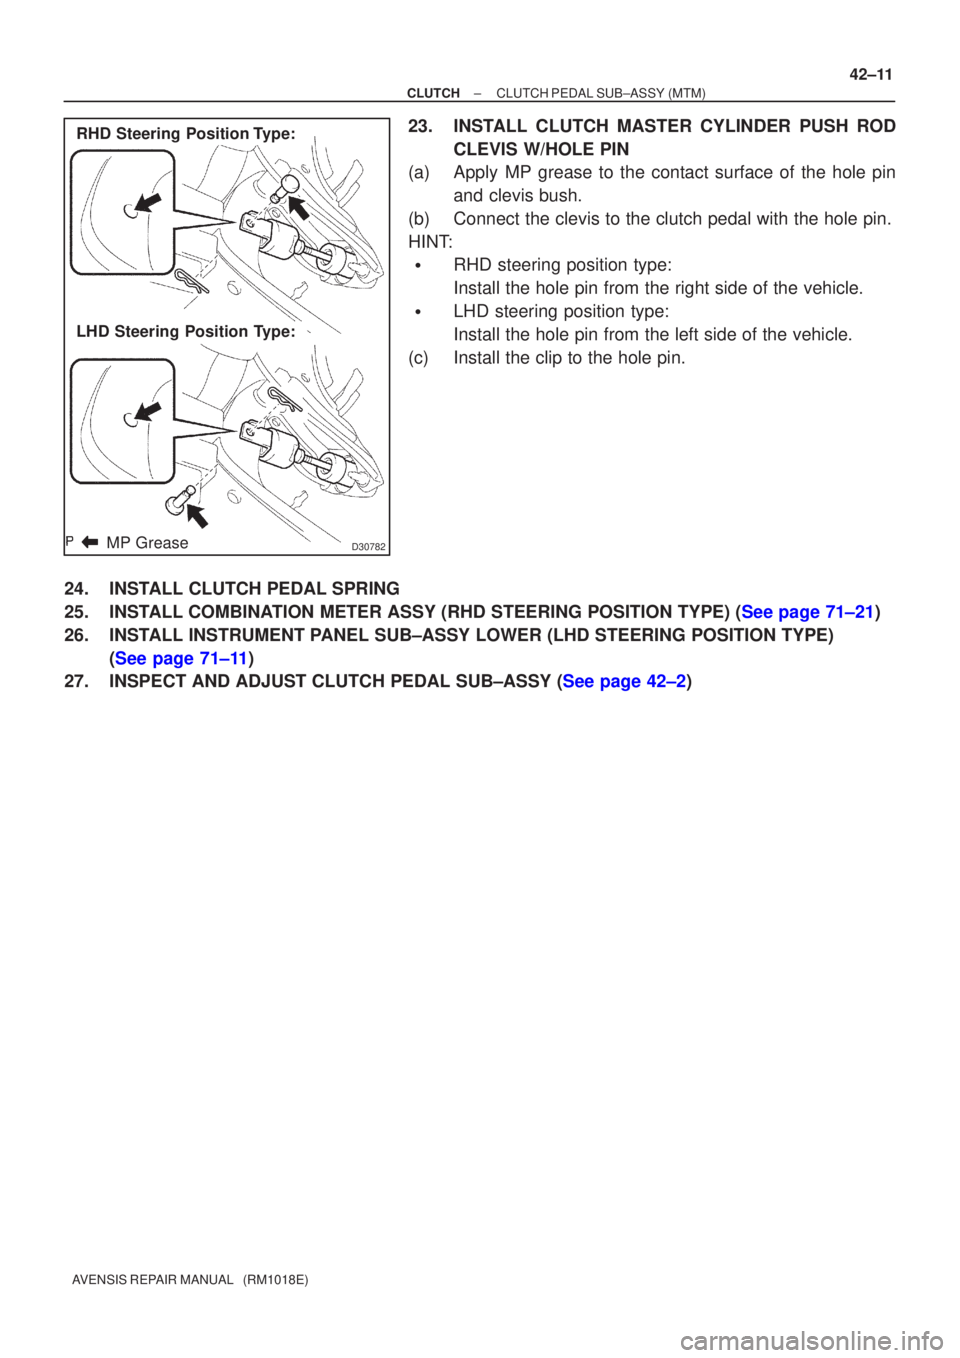
23. INSTALL CLUTCH MASTER CYLINDER PUSH ROD
CLEVIS W/HOLE PIN
(a) Apply MP grease to the contact surface of the hole pin
and clevis bush.
(b) Connect the clevis to the clutch pedal with the hole pin.
HINT:
�RHD steering position type:
Install the hole pin from the right side of the vehicle.
�LHD steering position type:
Install the hole pin from the left side of the vehicle.
(c) Install the clip to the hole pin.
24. INSTALL CLUTCH PEDAL SPRING
25.INSTALL COMBINATION METER ASSY (RHD STEERING POSITION TYPE) (See page 71±21)
26. INSTALL INSTRUMENT PANEL SUB±ASSY LOWER (LHD STEERING POSITION TYPE) (See page 71±11)
27.INSPECT AND ADJUST CLUTCH PEDAL SUB±ASSY (See page 42±2)
Page 163 of 1690

AVENSIS REPAIR MANUAL (RM1018E)
2.ADD ENGINE COOLANT
(a)Tighten the radiator drain plug, and pour coolant into radiator until it \
overflows. Capacity:
Tran")
16±20
±
COOLING ENGINE COOLANT(1AZ±FE)
AVENSIS REPAIR MANUAL (RM1018E)
2.ADD ENGINE COOLANT
(a)Tighten the radiator drain plug, and pour coolant into radiator until it \
overflows. Capacity:
Transmission typeSteeringCoolant Capacity
[liters (US gts, lmp. gts)]
M/TLHD6.0 (6.3, 5.3)
M/TRHD6.1 (6.4, 5.4)
A/TLHD6.3 (6.7, 5.5)
A/TRHD6.4 (6.8, 5.6)
NOTICE:
�Do not use an alcohol type coolant or plain water alone.
�The coolant should be mixed with plain water (preferably demineralized wat\
er or distilled wa-
ter).
HINT:
�Use of improper coolants may damage engine cooling system.
�Use ºToyota Long Life Coolantº or equivalent and mix it with plain water ac\
cording to the manufactur-
er's directions.
�Using of coolant with includes more than 50 % (freezing protection down to ±\
35 �C (±31 �F)) or 60 %
(freezing protection down to ±50 �C (±58 �F)) of ethylene±glycol is recommended but not more than
70 %.
�Press the radiator inlet and outlet hose several times with hard.
�If the coolant level gets lower, pour coolant.
(b)Reinstall the radiator cap.
(c)Pour engine coolant into the reservoir tank until it reaches full line.
(d)Warm up the engine until the thermostat valve begins to open.
HINT:
Press the radiator inlet and outlet hose several times with hard during \
the warming up.
(e)Stop the engine and wait until the coolant temp. Gets cold. Then remove the radiator cap to check the coolant level.
HINT:
�If the level gets lower, perform the procedures above again.
�If the level does not gets lower, adjust the reservoir tank coolant level.
3.CHECK FOR ENGINE COOLANT LEAKS (See page 16±13)
Page 165 of 1690

AVENSIS REPAIR MANUAL (RM1018E)
2.ADD ENGINE COOLANT
(a)Tighten the radiator drain plug, and pour coolant into radiator until it \
overflows. Capacity:
Tra")
16±32
±
COOLING ENGINE COOLANT(1AZ±FSE)
AVENSIS REPAIR MANUAL (RM1018E)
2.ADD ENGINE COOLANT
(a)Tighten the radiator drain plug, and pour coolant into radiator until it \
overflows. Capacity:
Transmission typeSteeringCoolant Capacity
[liters (US gts, lmp. gts)]
M/TLHD6.0 (6.3, 5.3)
M/TRHD6.1 (6.4, 5.4)
A/TLHD6.3 (6.7, 5.5)
A/TRHD6.4 (6.8, 5.6)
NOTICE:
�Do not use an alcohol type coolant or plain water alone.
�The coolant should be mixed with plain water (preferably demineralized wat\
er or distilled wa-
ter).
HINT:
�Use of improper coolants may damage engine cooling system.
�Use ºToyota Long Life Coolantº or equivalent and mix it with plain water ac\
cording to the manufactur-
er's directions.
�Using of coolant with includes more than 50 % (freezing protection down to ±\
35 �C (±31 �F)) or 60 %
(freezing protection down to ±50 �C (±58 �F)) of ethylene±glycol is recommended but not more than
70 %.
�Press the radiator inlet and outlet hose several times with hard.
�If the coolant level gets lower, pour coolant.
(b)Reinstall the radiator cap.
(c)Pour engine coolant into the reservoir tank until it reaches full line.
(d)Warm up the engine until the thermostat valve begins to open.
HINT:
Press the radiator inlet and outlet hose several times with hard during \
the warming up.
(e)Stop the engine and wait until the coolant temp. Gets cold. Then remove the radiator cap to check the coolant level.
HINT:
�If the level gets lower, perform the procedures above again.
�If the level does not gets lower, adjust the reservoir tank coolant level.
3.CHECK FOR ENGINE COOLANT LEAKS(See page 16±25)
Page 168 of 1690
160MH±01
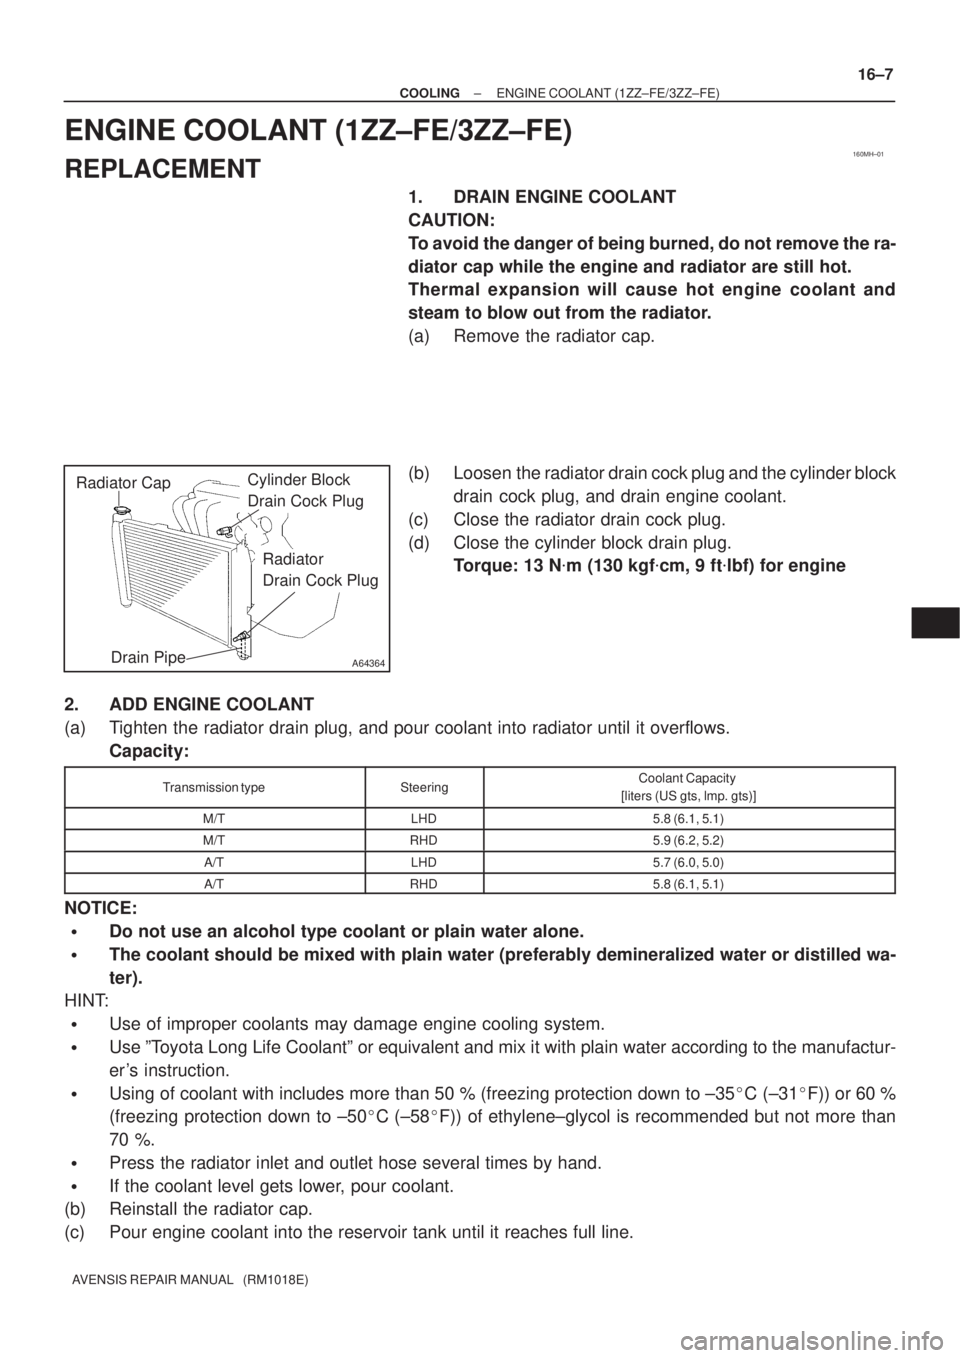
A64364
Radiator CapCylinder Block
Drain Cock Plug
Drain Pipe
Radiator
Drain Cock Plug
± COOLINGENGINE COOLANT (1ZZ±FE/3ZZ±FE)
16±7
AVENSIS REPAIR MANUAL (RM1018E)
ENGINE COOLANT (1ZZ±FE/3ZZ±FE)
REPLACEMENT
1. DRAIN ENGINE COOLANT
CAUTION:
To avoid the danger of being burned, do not remove the ra-
diator cap while the engine and radiator are still hot.
Thermal expansion will cause hot engine coolant and
steam to blow out from the radiator.
(a) Remove the radiator cap.
(b) Loosen the radiator drain cock plug and the cylinder block
drain cock plug, and drain engine coolant.
(c) Close the radiator drain cock plug.
(d) Close the cylinder block drain plug.
Torque: 13 N�m (130 kgf�cm, 9 ft�lbf) for engine
2. ADD ENGINE COOLANT
(a) Tighten the radiator drain plug, and pour coolant into radiator until it overflows.
Capacity:
Transmission typeSteeringCoolant Capacity
[liters (US gts, lmp. gts)]
M/TLHD5.8 (6.1, 5.1)
M/TRHD5.9 (6.2, 5.2)
A/TLHD5.7 (6.0, 5.0)
A/TRHD5.8 (6.1, 5.1)
NOTICE:
�Do not use an alcohol type coolant or plain water alone.
�The coolant should be mixed with plain water (preferably demineralized water or distilled wa-
ter).
HINT:
�Use of improper coolants may damage engine cooling system.
�Use ºToyota Long Life Coolantº or equivalent and mix it with plain water according to the manufactur-
er's instruction.
�Using of coolant with includes more than 50 % (freezing protection down to ±35�C (±31�F)) or 60 %
(freezing protection down to ±50�C (±58�F)) of ethylene±glycol is recommended but not more than
70 %.
�Press the radiator inlet and outlet hose several times by hand.
�If the coolant level gets lower, pour coolant.
(b) Reinstall the radiator cap.
(c) Pour engine coolant into the reservoir tank until it reaches full line.