2002 NISSAN TERRANO warning
[x] Cancel search: warningPage 279 of 1767
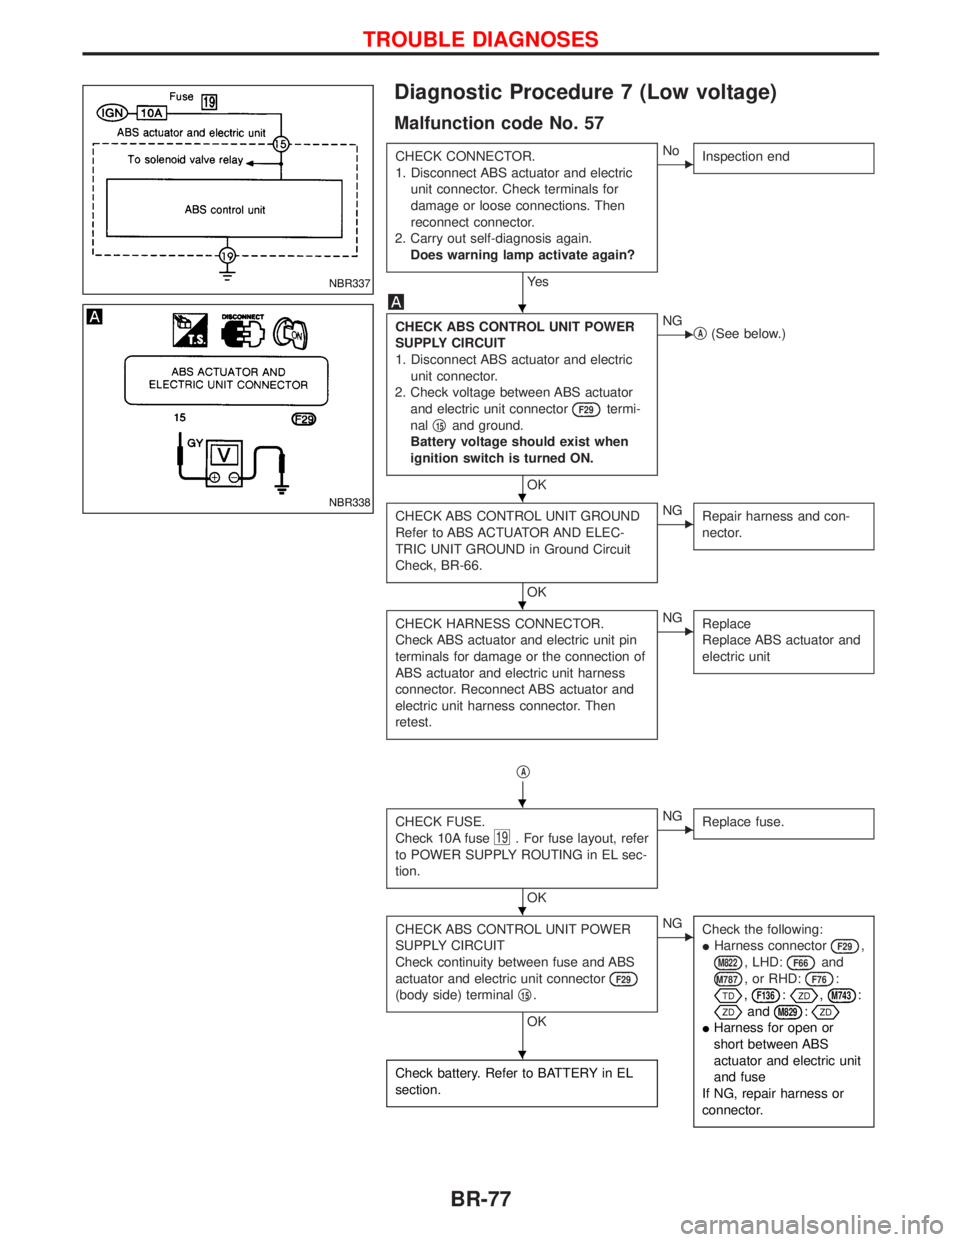
Diagnostic Procedure 7 (Low voltage)
Malfunction code No. 57
CHECK CONNECTOR.
1. Disconnect ABS actuator and electric
unit connector. Check terminals for
damage or loose connections. Then
reconnect connector.
2. Carry out self-diagnosis again.
Does warning lamp activate again?
Ye s
ENo
Inspection end
CHECK ABS CONTROL UNIT POWER
SUPPLY CIRCUIT
1. Disconnect ABS actuator and electric
unit connector.
2. Check voltage between ABS actuator
and electric unit connector
F29termi-
nalq
15and ground.
Battery voltage should exist when
ignition switch is turned ON.
OK
ENG
qA(See below.)
CHECK ABS CONTROL UNIT GROUND
Refer to ABS ACTUATOR AND ELEC-
TRIC UNIT GROUND in Ground Circuit
Check, BR-66.
OK
ENG
Repair harness and con-
nector.
CHECK HARNESS CONNECTOR.
Check ABS actuator and electric unit pin
terminals for damage or the connection of
ABS actuator and electric unit harness
connector. Reconnect ABS actuator and
electric unit harness connector. Then
retest.ENG
Replace
Replace ABS actuator and
electric unit
qA
CHECK FUSE.
Check 10A fuse
19. For fuse layout, refer
to POWER SUPPLY ROUTING in EL sec-
tion.
OK
ENG
Replace fuse.
CHECK ABS CONTROL UNIT POWER
SUPPLY CIRCUIT
Check continuity between fuse and ABS
actuator and electric unit connector
F29
(body side) terminalq15.
OK
ENG
Check the following:
IHarness connector
F29,
M822, LHD:F66and
M787, or RHD:F76:
,F136:,M743:
andM829:
IHarness for open or
short between ABS
actuator and electric unit
and fuse
If NG, repair harness or
connector.
Check battery. Refer to BATTERY in EL
section.
NBR337
NBR338
H
H
H
H
H
H
TROUBLE DIAGNOSES
BR-77
Page 280 of 1767
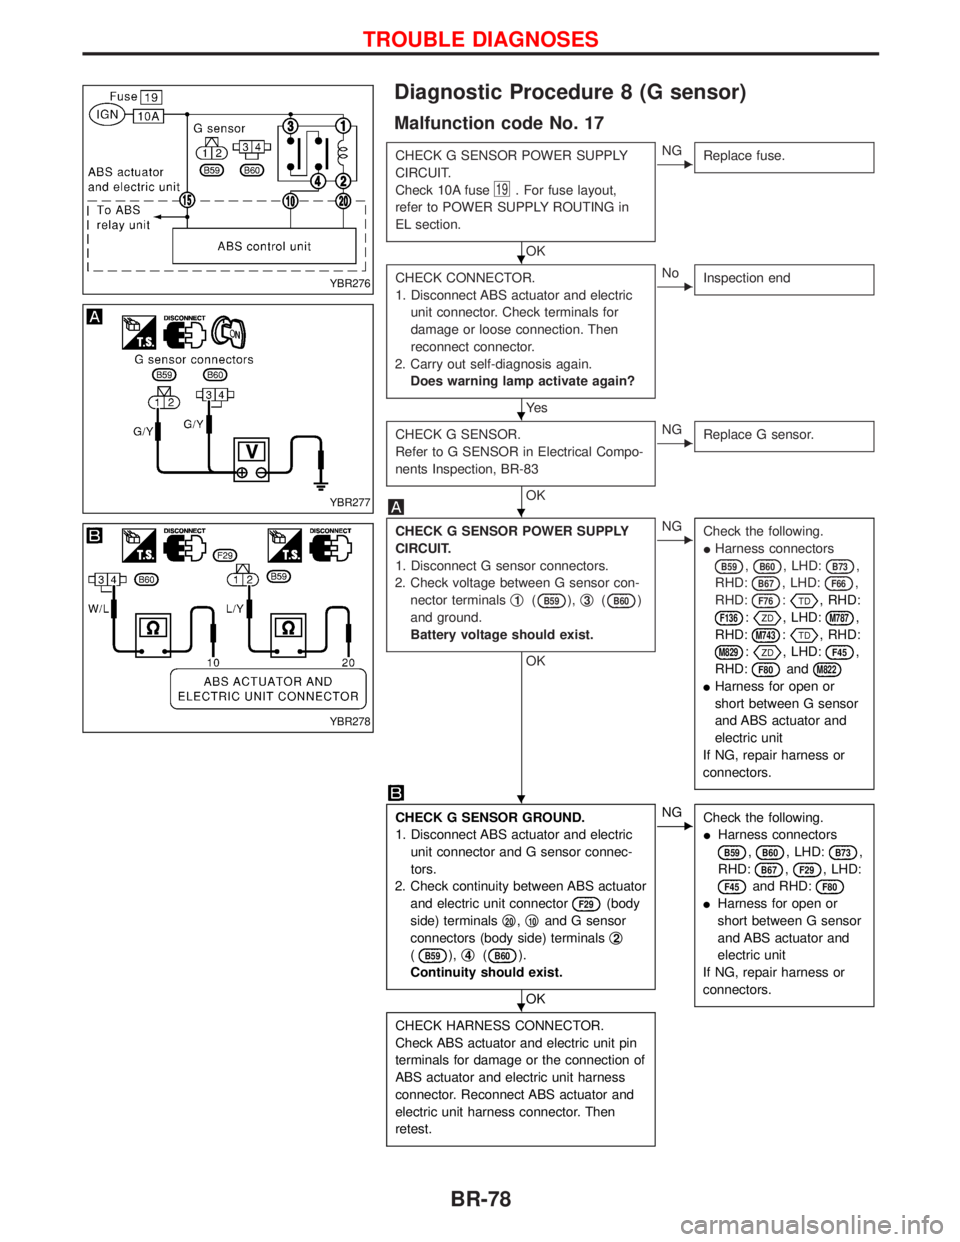
Diagnostic Procedure 8 (G sensor)
Malfunction code No. 17
CHECK G SENSOR POWER SUPPLY
CIRCUIT.
Check 10A fuse
19. For fuse layout,
refer to POWER SUPPLY ROUTING in
EL section.
OK
ENG
Replace fuse.
CHECK CONNECTOR.
1. Disconnect ABS actuator and electric
unit connector. Check terminals for
damage or loose connection. Then
reconnect connector.
2. Carry out self-diagnosis again.
Does warning lamp activate again?
Ye s
ENo
Inspection end
CHECK G SENSOR.
Refer to G SENSOR in Electrical Compo-
nents Inspection, BR-83
OK
ENG
Replace G sensor.
CHECK G SENSOR POWER SUPPLY
CIRCUIT.
1. Disconnect G sensor connectors.
2. Check voltage between G sensor con-
nector terminalsq
1(B59),q3(B60)
and ground.
Battery voltage should exist.
OK
ENG
Check the following.
IHarness connectors
B59,B60, LHD:B73,
RHD:
B67, LHD:F66,
RHD:
F76:, RHD:
F136:, LHD:M787,
RHD:
M743:, RHD:
M829:, LHD:F45,
RHD:
F80andM822
IHarness for open or
short between G sensor
and ABS actuator and
electric unit
If NG, repair harness or
connectors.
CHECK G SENSOR GROUND.
1. Disconnect ABS actuator and electric
unit connector and G sensor connec-
tors.
2. Check continuity between ABS actuator
and electric unit connector
F29(body
side) terminalsq
20,q10and G sensor
connectors (body side) terminalsq
2
(B59),q4(B60).
Continuity should exist.
OK
ENG
Check the following.
IHarness connectors
B59,B60, LHD:B73,
RHD:
B67,F29, LHD:
F45and RHD:F80
IHarness for open or
short between G sensor
and ABS actuator and
electric unit
If NG, repair harness or
connectors.
CHECK HARNESS CONNECTOR.
Check ABS actuator and electric unit pin
terminals for damage or the connection of
ABS actuator and electric unit harness
connector. Reconnect ABS actuator and
electric unit harness connector. Then
retest.
YBR276
YBR277
YBR278
H
H
H
H
H
TROUBLE DIAGNOSES
BR-78
Page 281 of 1767
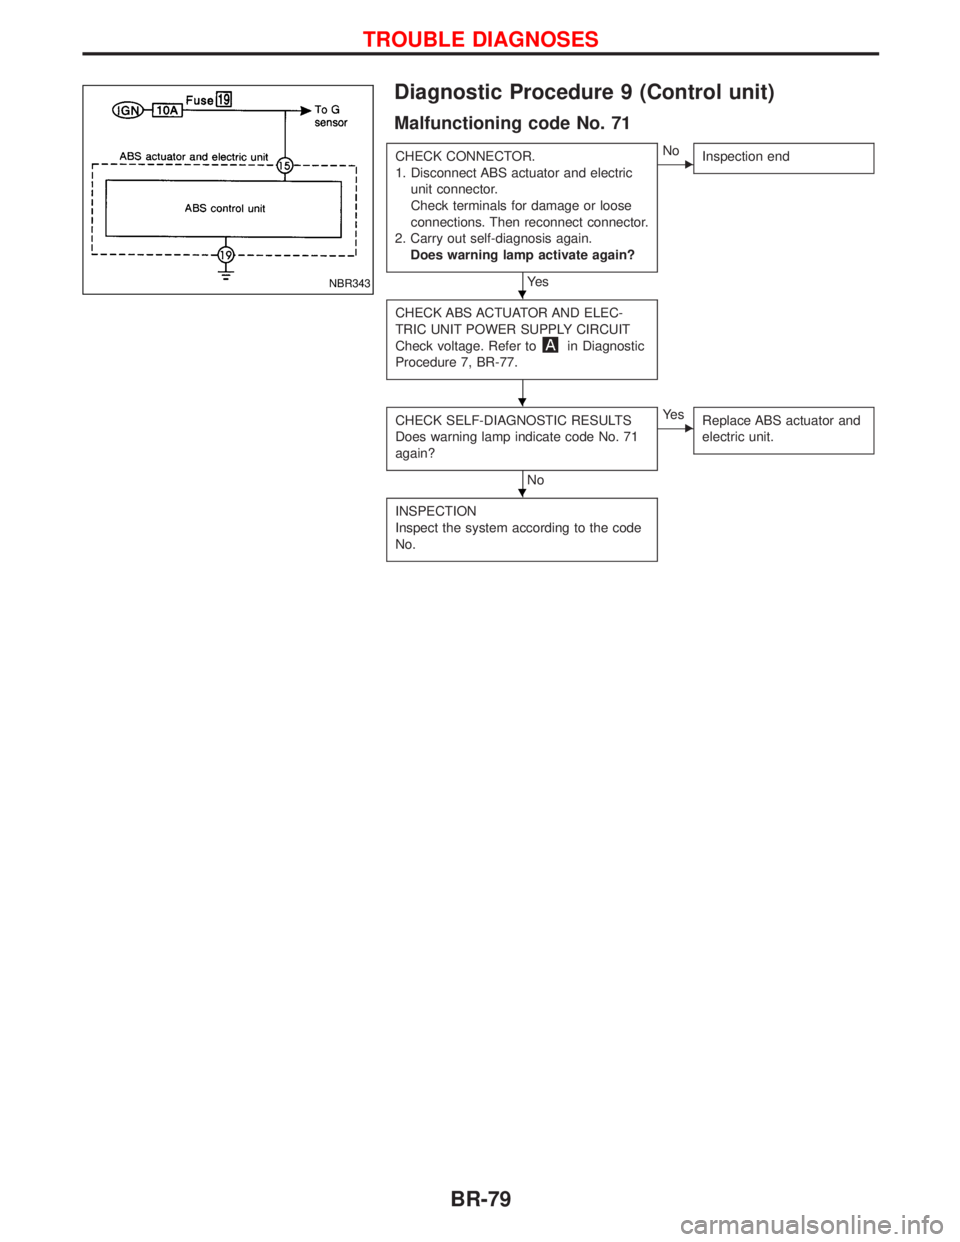
Diagnostic Procedure 9 (Control unit)
Malfunctioning code No. 71
CHECK CONNECTOR.
1. Disconnect ABS actuator and electric
unit connector.
Check terminals for damage or loose
connections. Then reconnect connector.
2. Carry out self-diagnosis again.
Does warning lamp activate again?
Ye s
ENo
Inspection end
CHECK ABS ACTUATOR AND ELEC-
TRIC UNIT POWER SUPPLY CIRCUIT
Check voltage. Refer to
in Diagnostic
Procedure 7, BR-77.
CHECK SELF-DIAGNOSTIC RESULTS
Does warning lamp indicate code No. 71
again?
No
EYe s
Replace ABS actuator and
electric unit.
INSPECTION
Inspect the system according to the code
No.
NBR343H
H
H
TROUBLE DIAGNOSES
BR-79
Page 283 of 1767
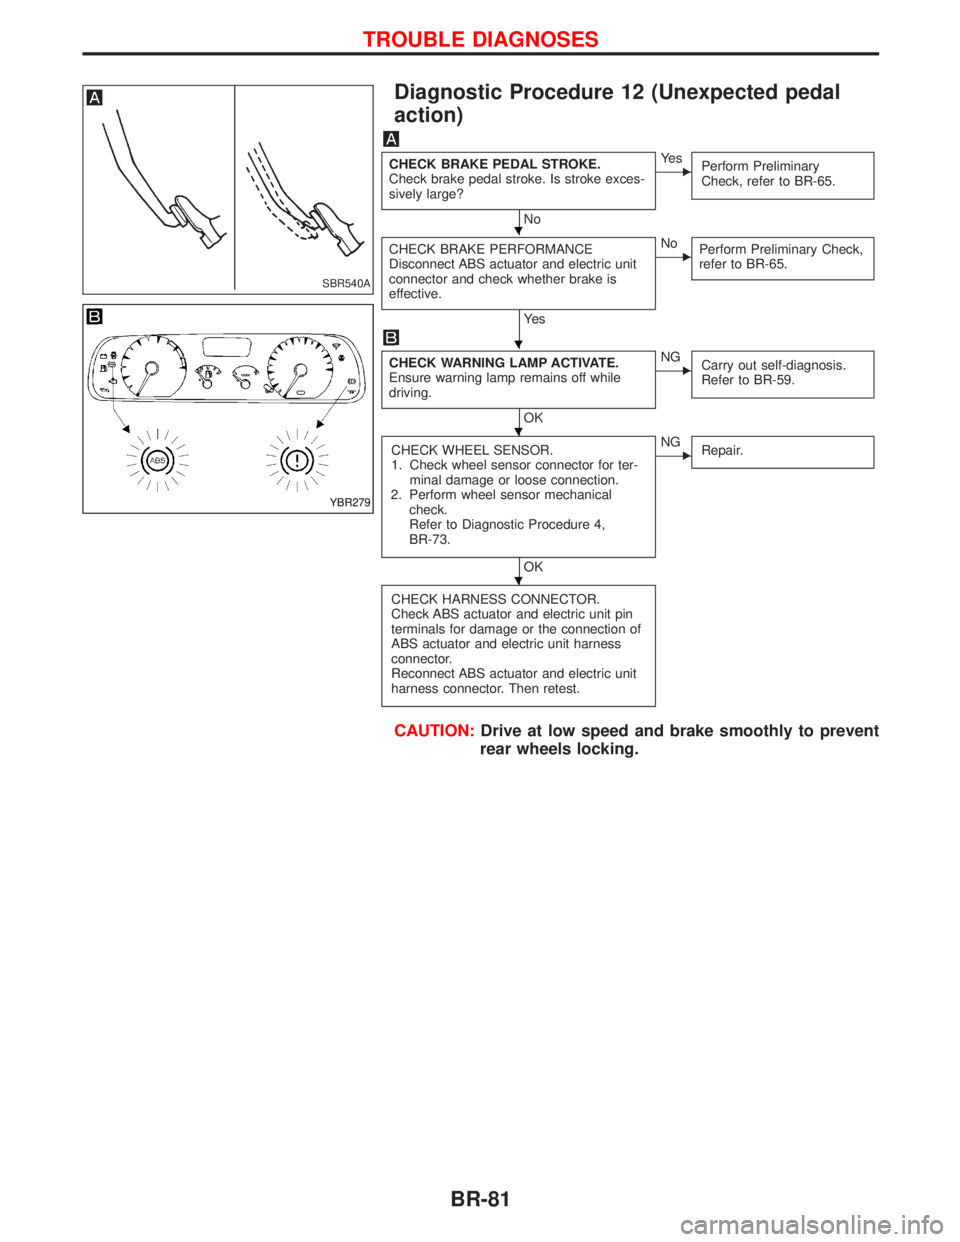
Diagnostic Procedure 12 (Unexpected pedal
action)
CHECK BRAKE PEDAL STROKE.
Check brake pedal stroke. Is stroke exces-
sively large?
No
EYe s
Perform Preliminary
Check, refer to BR-65.
CHECK BRAKE PERFORMANCE
Disconnect ABS actuator and electric unit
connector and check whether brake is
effective.
Ye s
ENo
Perform Preliminary Check,
refer to BR-65.
CHECK WARNING LAMP ACTIVATE.
Ensure warning lamp remains off while
driving.
OK
ENG
Carry out self-diagnosis.
Refer to BR-59.
CHECK WHEEL SENSOR.
1. Check wheel sensor connector for ter-
minal damage or loose connection.
2. Perform wheel sensor mechanical
check.
Refer to Diagnostic Procedure 4,
BR-73.
OK
ENG
Repair.
CHECK HARNESS CONNECTOR.
Check ABS actuator and electric unit pin
terminals for damage or the connection of
ABS actuator and electric unit harness
connector.
Reconnect ABS actuator and electric unit
harness connector. Then retest.
CAUTION:Drive at low speed and brake smoothly to prevent
rear wheels locking.
SBR540A
YBR279
H
H
H
H
TROUBLE DIAGNOSES
BR-81
Page 284 of 1767
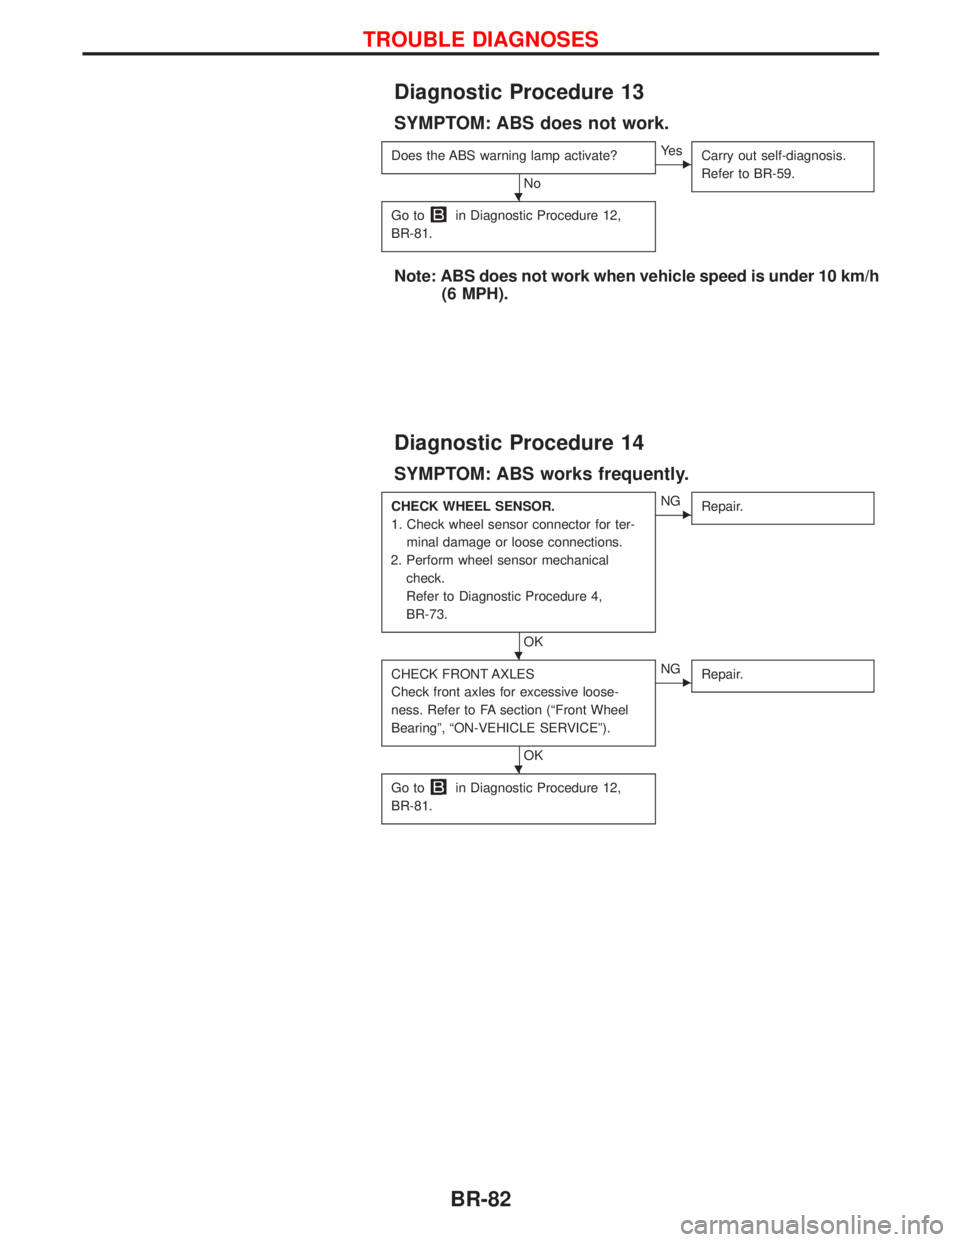
Diagnostic Procedure 13
SYMPTOM: ABS does not work.
Does the ABS warning lamp activate?
No
EYe s
Carry out self-diagnosis.
Refer to BR-59.
Go toin Diagnostic Procedure 12,
BR-81.
Note: ABS does not work when vehicle speed is under 10 km/h
(6 MPH).
Diagnostic Procedure 14
SYMPTOM: ABS works frequently.
CHECK WHEEL SENSOR.
1. Check wheel sensor connector for ter-
minal damage or loose connections.
2. Perform wheel sensor mechanical
check.
Refer to Diagnostic Procedure 4,
BR-73.
OK
ENG
Repair.
CHECK FRONT AXLES
Check front axles for excessive loose-
ness. Refer to FA section (ªFront Wheel
Bearingº, ªON-VEHICLE SERVICEº).
OK
ENG
Repair.
Go toin Diagnostic Procedure 12,
BR-81.
H
H
H
TROUBLE DIAGNOSES
BR-82
Page 287 of 1767
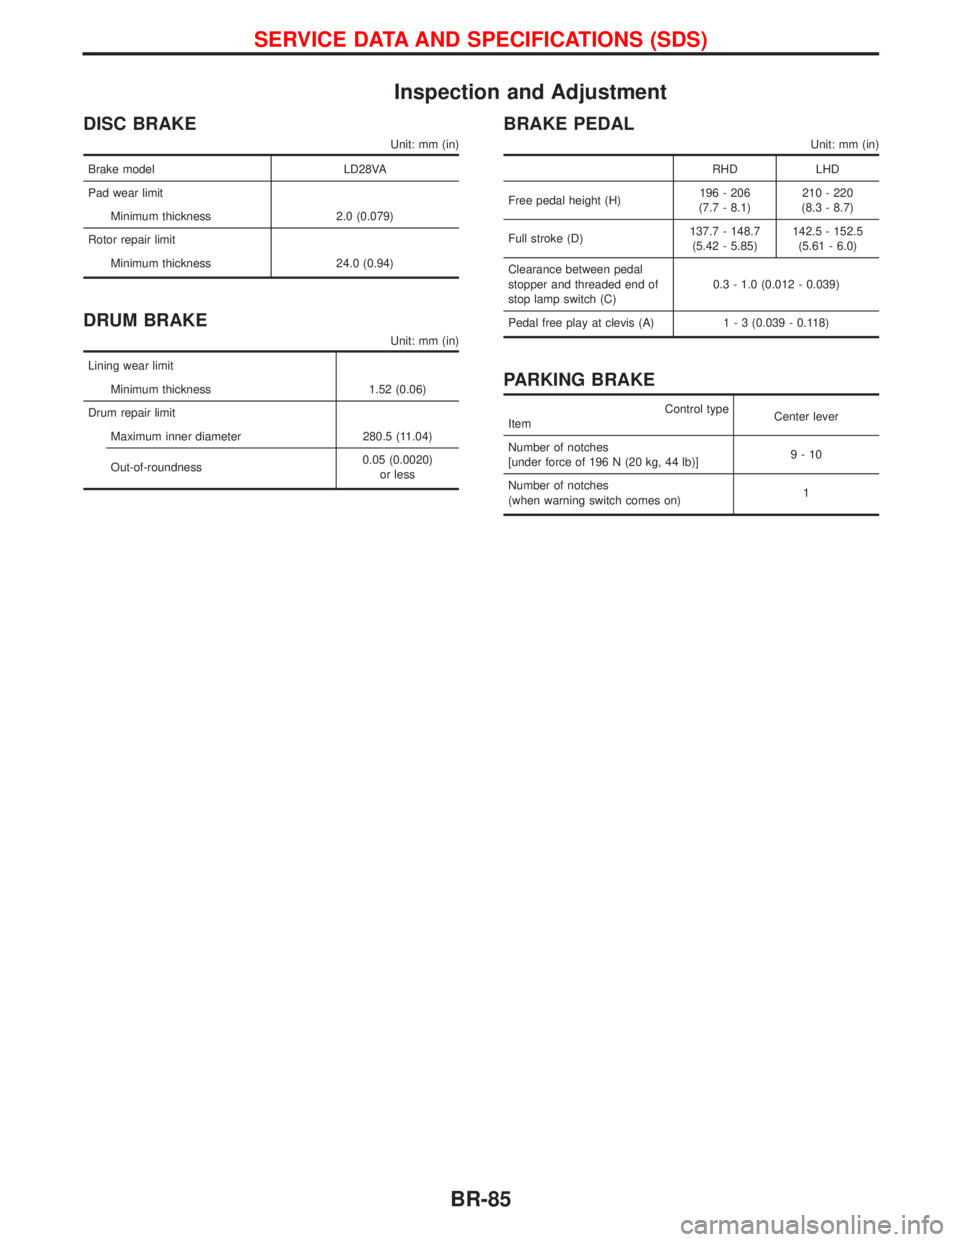
Inspection and Adjustment
DISC BRAKE
Unit: mm (in)
Brake model LD28VA
Pad wear limit
Minimum thickness 2.0 (0.079)
Rotor repair limit
Minimum thickness 24.0 (0.94)
DRUM BRAKE
Unit: mm (in)
Lining wear limit
Minimum thickness 1.52 (0.06)
Drum repair limit
Maximum inner diameter 280.5 (11.04)
Out-of-roundness0.05 (0.0020)
or less
BRAKE PEDAL
Unit: mm (in)
RHD LHD
Free pedal height (H)196 - 206
(7.7 - 8.1)210 - 220
(8.3 - 8.7)
Full stroke (D)137.7 - 148.7
(5.42 - 5.85)142.5 - 152.5
(5.61 - 6.0)
Clearance between pedal
stopper and threaded end of
stop lamp switch (C)0.3 - 1.0 (0.012 - 0.039)
Pedal free play at clevis (A)1 - 3 (0.039 - 0.118)
PARKING BRAKE
Control type
ItemCenter lever
Number of notches
[under force of 196 N (20 kg, 44 lb)]9-10
Number of notches
(when warning switch comes on)1
SERVICE DATA AND SPECIFICATIONS (SDS)
BR-85
Page 290 of 1767
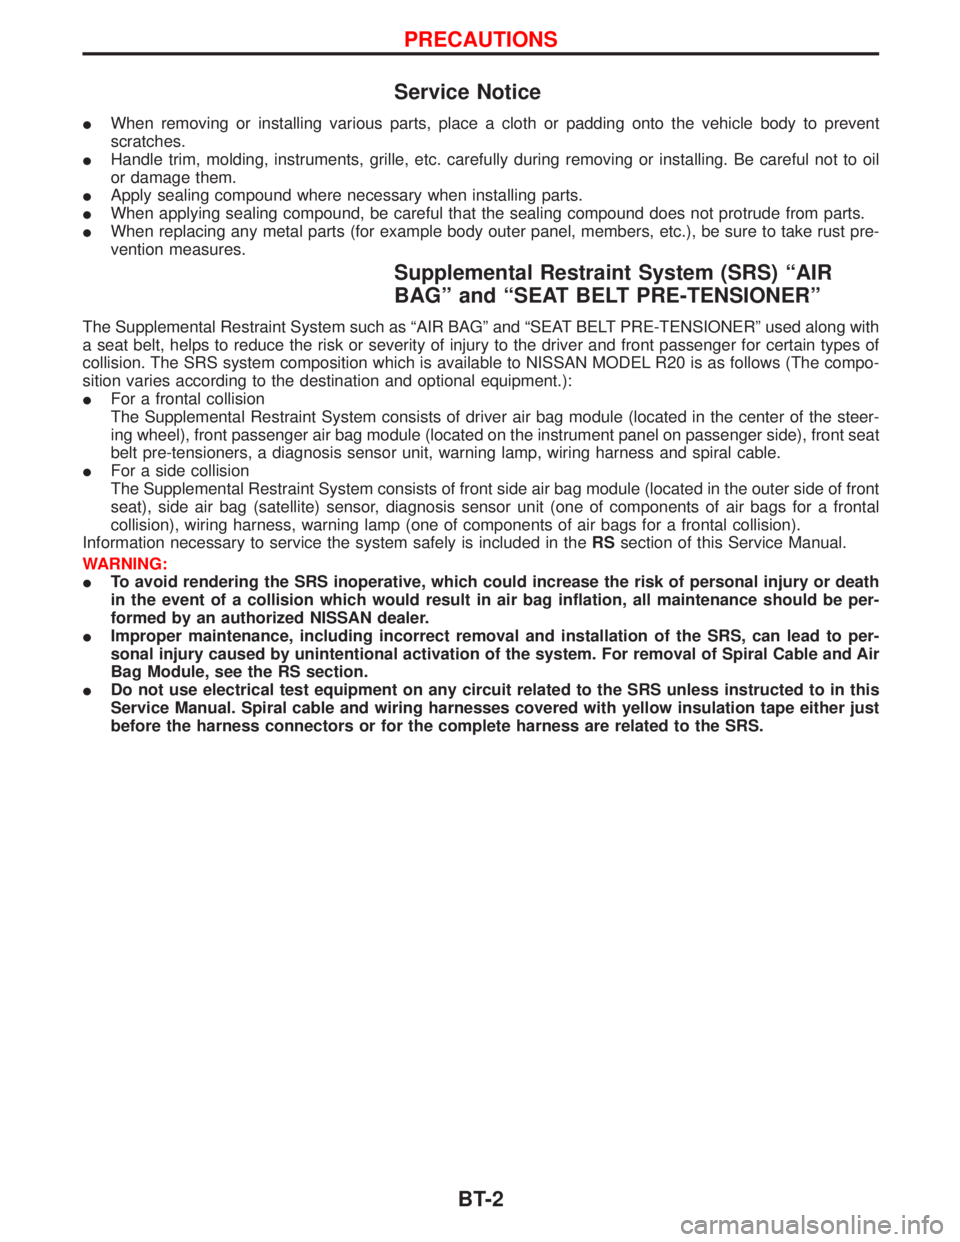
Service Notice
IWhen removing or installing various parts, place a cloth or padding onto the vehicle body to prevent
scratches.
IHandle trim, molding, instruments, grille, etc. carefully during removing or installing. Be careful not to oil
or damage them.
IApply sealing compound where necessary when installing parts.
IWhen applying sealing compound, be careful that the sealing compound does not protrude from parts.
IWhen replacing any metal parts (for example body outer panel, members, etc.), be sure to take rust pre-
vention measures.
Supplemental Restraint System (SRS) ªAIR
BAGº and ªSEAT BELT PRE-TENSIONERº
The Supplemental Restraint System such as ªAIR BAGº and ªSEAT BELT PRE-TENSIONERº used along with
a seat belt, helps to reduce the risk or severity of injury to the driver and front passenger for certain types of
collision. The SRS system composition which is available to NISSAN MODEL R20 is as follows (The compo-
sition varies according to the destination and optional equipment.):
IFor a frontal collision
The Supplemental Restraint System consists of driver air bag module (located in the center of the steer-
ing wheel), front passenger air bag module (located on the instrument panel on passenger side), front seat
belt pre-tensioners, a diagnosis sensor unit, warning lamp, wiring harness and spiral cable.
IFor a side collision
The Supplemental Restraint System consists of front side air bag module (located in the outer side of front
seat), side air bag (satellite) sensor, diagnosis sensor unit (one of components of air bags for a frontal
collision), wiring harness, warning lamp (one of components of air bags for a frontal collision).
Information necessary to service the system safely is included in theRSsection of this Service Manual.
WARNING:
ITo avoid rendering the SRS inoperative, which could increase the risk of personal injury or death
in the event of a collision which would result in air bag inflation, all maintenance should be per-
formed by an authorized NISSAN dealer.
IImproper maintenance, including incorrect removal and installation of the SRS, can lead to per-
sonal injury caused by unintentional activation of the system. For removal of Spiral Cable and Air
Bag Module, see the RS section.
IDo not use electrical test equipment on any circuit related to the SRS unless instructed to in this
Service Manual. Spiral cable and wiring harnesses covered with yellow insulation tape either just
before the harness connectors or for the complete harness are related to the SRS.
PRECAUTIONS
BT-2
Page 330 of 1767
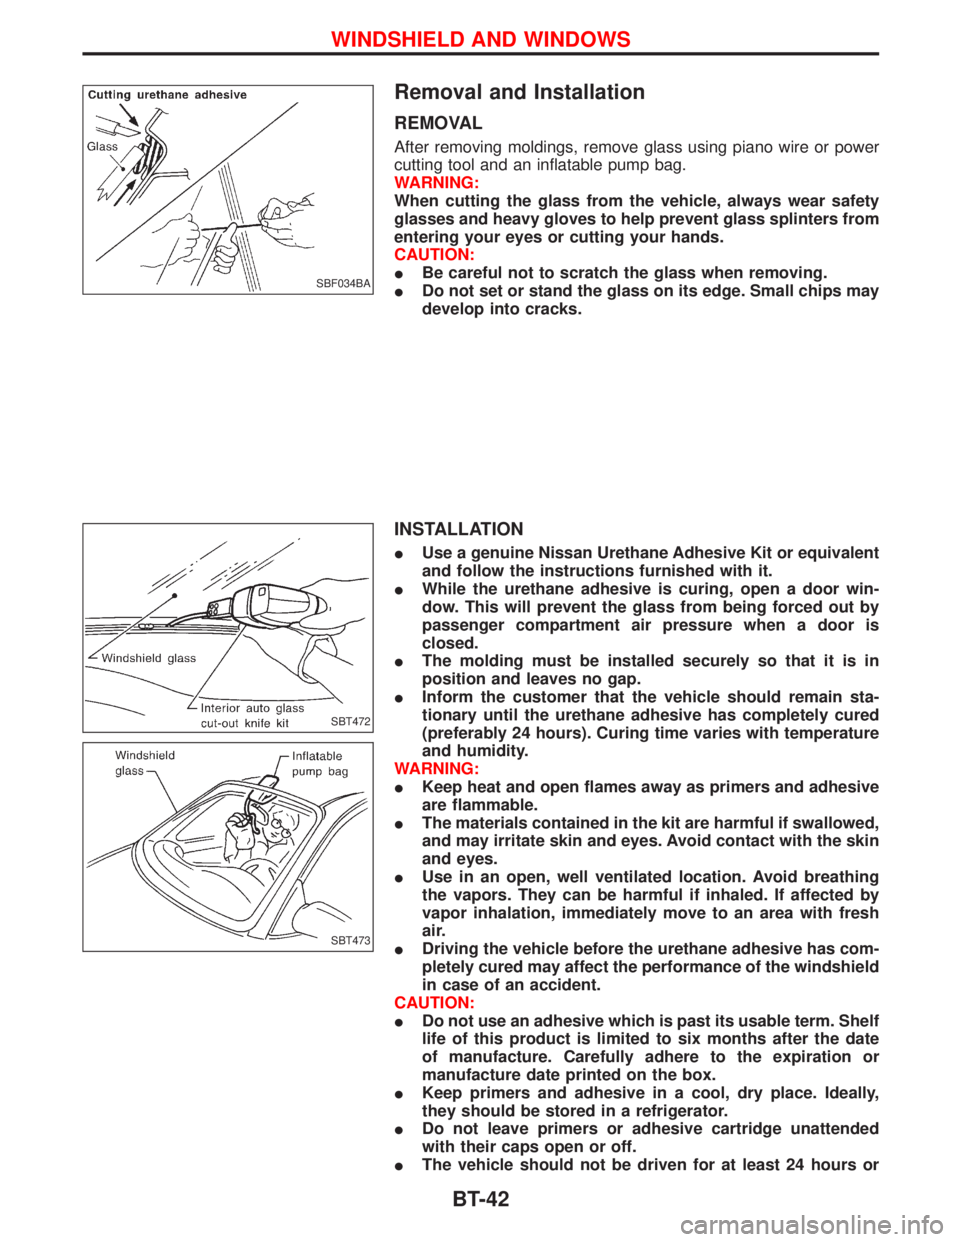
Removal and Installation
REMOVAL
After removing moldings, remove glass using piano wire or power
cutting tool and an inflatable pump bag.
WARNING:
When cutting the glass from the vehicle, always wear safety
glasses and heavy gloves to help prevent glass splinters from
entering your eyes or cutting your hands.
CAUTION:
IBe careful not to scratch the glass when removing.
IDo not set or stand the glass on its edge. Small chips may
develop into cracks.
INSTALLATION
IUse a genuine Nissan Urethane Adhesive Kit or equivalent
and follow the instructions furnished with it.
IWhile the urethane adhesive is curing, open a door win-
dow. This will prevent the glass from being forced out by
passenger compartment air pressure when a door is
closed.
IThe molding must be installed securely so that it is in
position and leaves no gap.
IInform the customer that the vehicle should remain sta-
tionary until the urethane adhesive has completely cured
(preferably 24 hours). Curing time varies with temperature
and humidity.
WARNING:
IKeep heat and open flames away as primers and adhesive
are flammable.
IThe materials contained in the kit are harmful if swallowed,
and may irritate skin and eyes. Avoid contact with the skin
and eyes.
IUse in an open, well ventilated location. Avoid breathing
the vapors. They can be harmful if inhaled. If affected by
vapor inhalation, immediately move to an area with fresh
air.
IDriving the vehicle before the urethane adhesive has com-
pletely cured may affect the performance of the windshield
in case of an accident.
CAUTION:
IDo not use an adhesive which is past its usable term. Shelf
life of this product is limited to six months after the date
of manufacture. Carefully adhere to the expiration or
manufacture date printed on the box.
IKeep primers and adhesive in a cool, dry place. Ideally,
they should be stored in a refrigerator.
IDo not leave primers or adhesive cartridge unattended
with their caps open or off.
IThe vehicle should not be driven for at least 24 hours or
SBF034BA
SBT472
SBT473
WINDSHIELD AND WINDOWS
BT-42