Page 742 of 1767
Component Description
INJECTION TIMING CONTROL VALVE
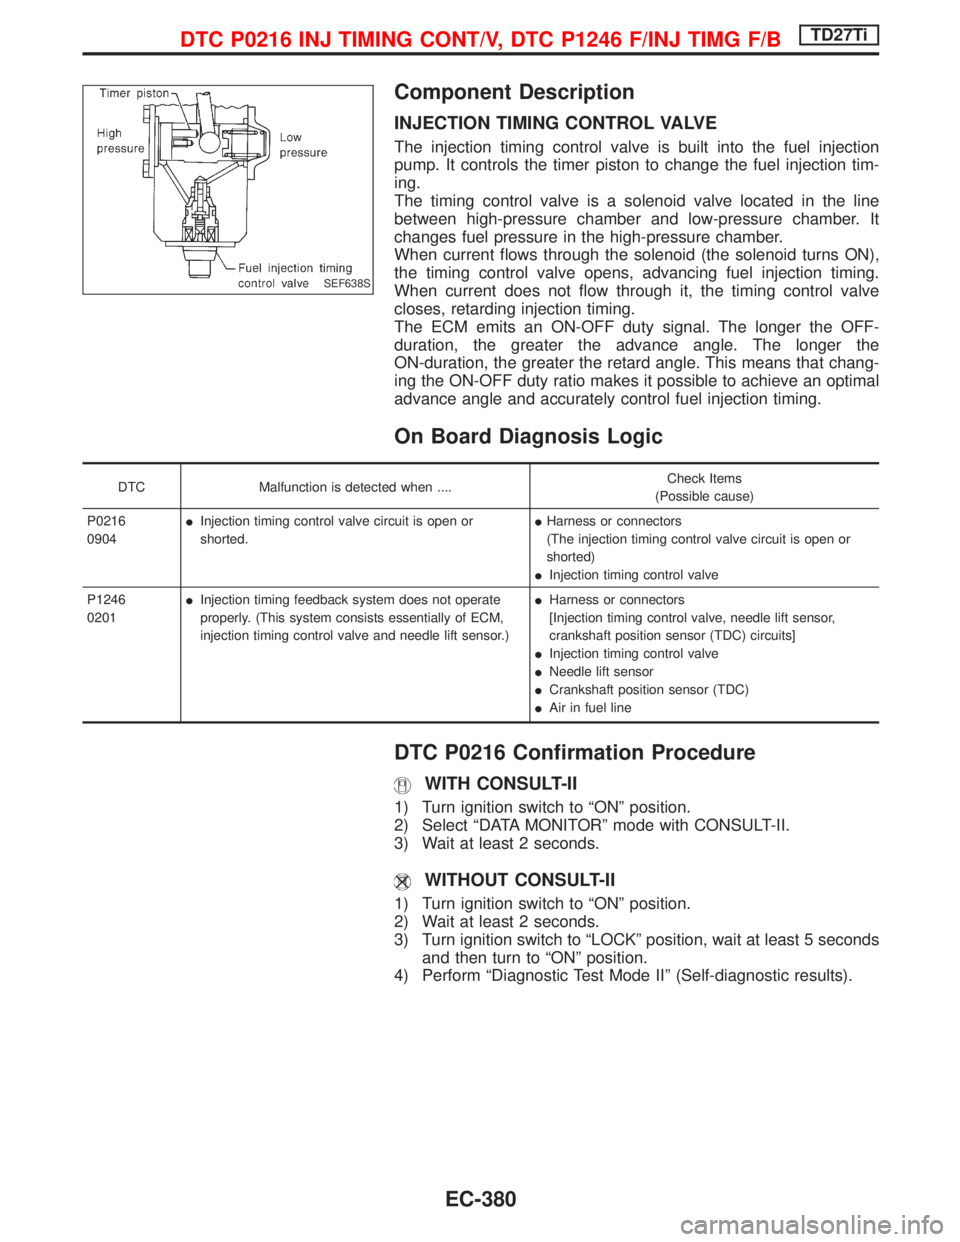
The injection timing control valve is built into the fuel injection
pump. It controls the timer piston to change the fuel injection tim-
ing.
The timing control valve is a solenoid valve located in the line
between high-pressure chamber and low-pressure chamber. It
changes fuel pressure in the high-pressure chamber.
When current flows through the solenoid (the solenoid turns ON),
the timing control valve opens, advancing fuel injection timing.
When current does not flow through it, the timing control valve
closes, retarding injection timing.
The ECM emits an ON-OFF duty signal. The longer the OFF-
duration, the greater the advance angle. The longer the
ON-duration, the greater the retard angle. This means that chang-
ing the ON-OFF duty ratio makes it possible to achieve an optimal
advance angle and accurately control fuel injection timing.
On Board Diagnosis Logic
DTC Malfunction is detected when ....Check Items
(Possible cause)
P0216
0904IInjection timing control valve circuit is open or
shorted.IHarness or connectors
(The injection timing control valve circuit is open or
shorted)
IInjection timing control valve
P1246
0201IInjection timing feedback system does not operate
properly. (This system consists essentially of ECM,
injection timing control valve and needle lift sensor.)IHarness or connectors
[Injection timing control valve, needle lift sensor,
crankshaft position sensor (TDC) circuits]
IInjection timing control valve
INeedle lift sensor
ICrankshaft position sensor (TDC)
IAir in fuel line
DTC P0216 Confirmation Procedure
WITH CONSULT-II
1) Turn ignition switch to ªONº position.
2) Select ªDATA MONITORº mode with CONSULT-II.
3) Wait at least 2 seconds.
WITHOUT CONSULT-II
1) Turn ignition switch to ªONº position.
2) Wait at least 2 seconds.
3) Turn ignition switch to ªLOCKº position, wait at least 5 seconds
and then turn to ªONº position.
4) Perform ªDiagnostic Test Mode IIº (Self-diagnostic results).
SEF638S
DTC P0216 INJ TIMING CONT/V, DTC P1246 F/INJ TIMG F/BTD27Ti
EC-380
Page 747 of 1767
Component Description
CRANKSHAFT POSITION SENSOR (TDC)
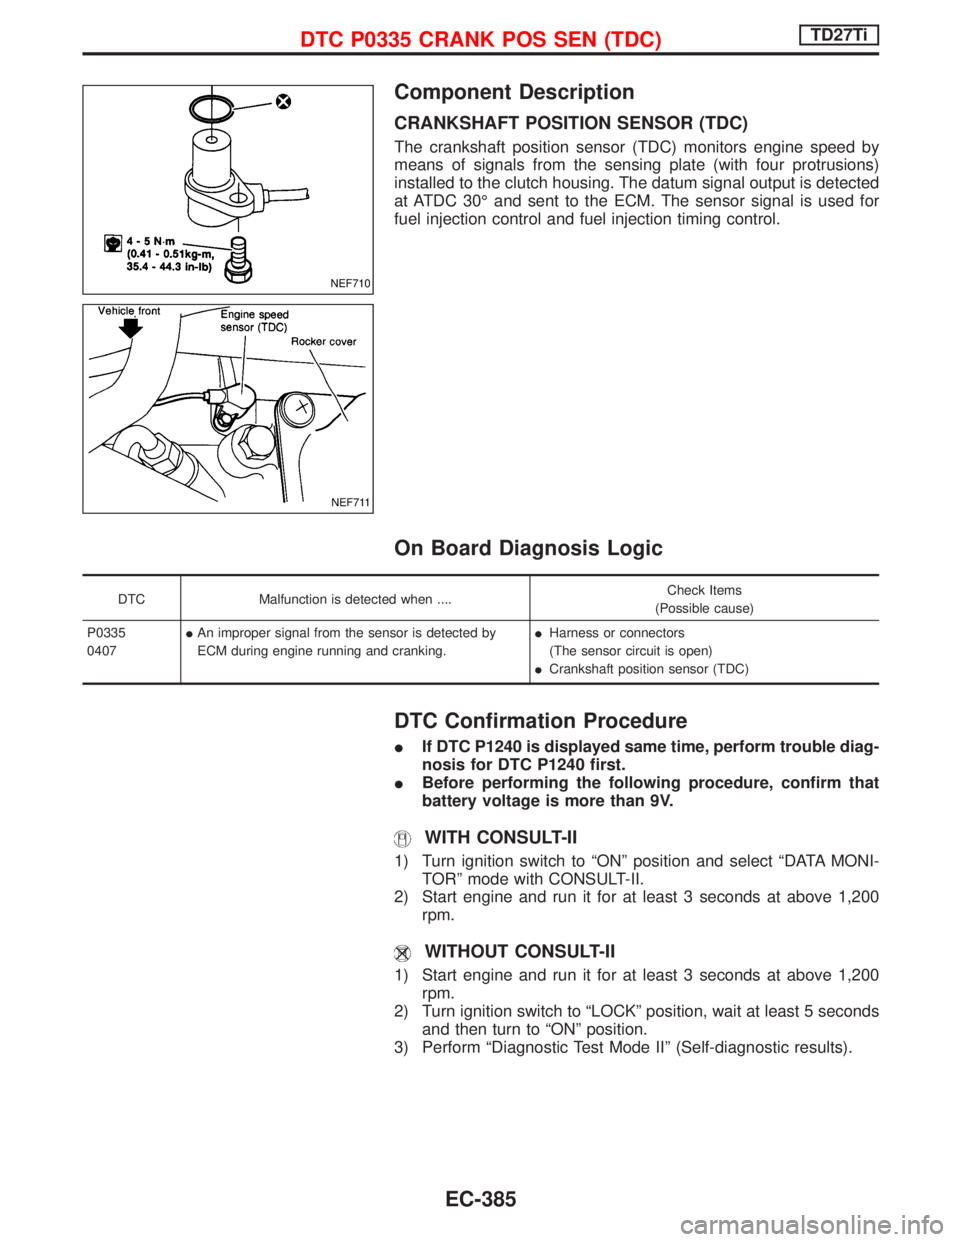
The crankshaft position sensor (TDC) monitors engine speed by
means of signals from the sensing plate (with four protrusions)
installed to the clutch housing. The datum signal output is detected
at ATDC 30É and sent to the ECM. The sensor signal is used for
fuel injection control and fuel injection timing control.
On Board Diagnosis Logic
DTC Malfunction is detected when ....Check Items
(Possible cause)
P0335
0407IAn improper signal from the sensor is detected by
ECM during engine running and cranking.IHarness or connectors
(The sensor circuit is open)
ICrankshaft position sensor (TDC)
DTC Confirmation Procedure
IIf DTC P1240 is displayed same time, perform trouble diag-
nosis for DTC P1240 first.
IBefore performing the following procedure, confirm that
battery voltage is more than 9V.
WITH CONSULT-II
1) Turn ignition switch to ªONº position and select ªDATA MONI-
TORº mode with CONSULT-II.
2) Start engine and run it for at least 3 seconds at above 1,200
rpm.
WITHOUT CONSULT-II
1) Start engine and run it for at least 3 seconds at above 1,200
rpm.
2) Turn ignition switch to ªLOCKº position, wait at least 5 seconds
and then turn to ªONº position.
3) Perform ªDiagnostic Test Mode IIº (Self-diagnostic results).
NEF710
NEF711
DTC P0335 CRANK POS SEN (TDC)TD27Ti
EC-385
Page 749 of 1767
Diagnostic Procedure
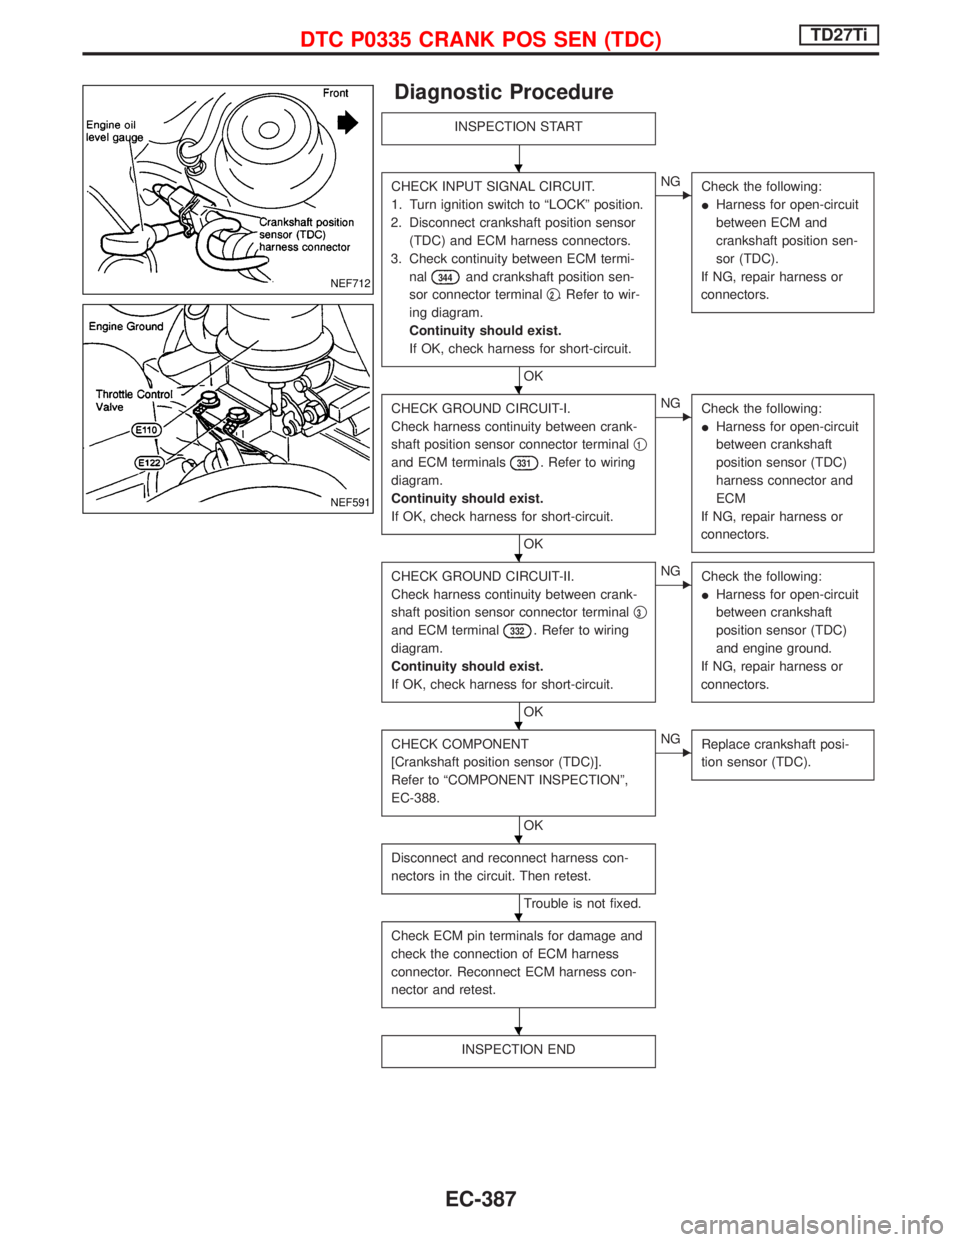
INSPECTION START
CHECK INPUT SIGNAL CIRCUIT.
1. Turn ignition switch to ªLOCKº position.
2. Disconnect crankshaft position sensor
(TDC) and ECM harness connectors.
3. Check continuity between ECM termi-
nal
344and crankshaft position sen-
sor connector terminalq
2. Refer to wir-
ing diagram.
Continuity should exist.
If OK, check harness for short-circuit.
OK
ENG
Check the following:
IHarness for open-circuit
between ECM and
crankshaft position sen-
sor (TDC).
If NG, repair harness or
connectors.
CHECK GROUND CIRCUIT-I.
Check harness continuity between crank-
shaft position sensor connector terminalq
1
and ECM terminals331. Refer to wiring
diagram.
Continuity should exist.
If OK, check harness for short-circuit.
OK
ENG
Check the following:
IHarness for open-circuit
between crankshaft
position sensor (TDC)
harness connector and
ECM
If NG, repair harness or
connectors.
CHECK GROUND CIRCUIT-II.
Check harness continuity between crank-
shaft position sensor connector terminalq
3
and ECM terminal332. Refer to wiring
diagram.
Continuity should exist.
If OK, check harness for short-circuit.
OK
ENG
Check the following:
IHarness for open-circuit
between crankshaft
position sensor (TDC)
and engine ground.
If NG, repair harness or
connectors.
CHECK COMPONENT
[Crankshaft position sensor (TDC)].
Refer to ªCOMPONENT INSPECTIONº,
EC-388.
OK
ENG
Replace crankshaft posi-
tion sensor (TDC).
Disconnect and reconnect harness con-
nectors in the circuit. Then retest.
Trouble is not fixed.
Check ECM pin terminals for damage and
check the connection of ECM harness
connector. Reconnect ECM harness con-
nector and retest.
INSPECTION END
NEF712
NEF591
H
H
H
H
H
H
H
DTC P0335 CRANK POS SEN (TDC)TD27Ti
EC-387
Page 750 of 1767
Component Inspection
CRANKSHAFT POSITION SENSOR (TDC)
1. Disconnect crankshaft position sensor (TDC) harness connec-
tor.
2. Loosen the fixing bolt of the sensor.
3. Remove the sensor.
4. Visually check the sensor for chipping.
5. Check resistance between terminalsq
1andq2.
Resistance: Approximately 900W
[at 25ÉC (77ÉF)]
If NG, replace crankshaft position sensor (TDC).
CAUTION
Do not use any crankshaft position sensor (TDC) that has been
dropped or physically damaged.
Use only new one.
NEF716
MEC965D
DTC P0335 CRANK POS SEN (TDC)TD27Ti
EC-388
Page 751 of 1767
System Description
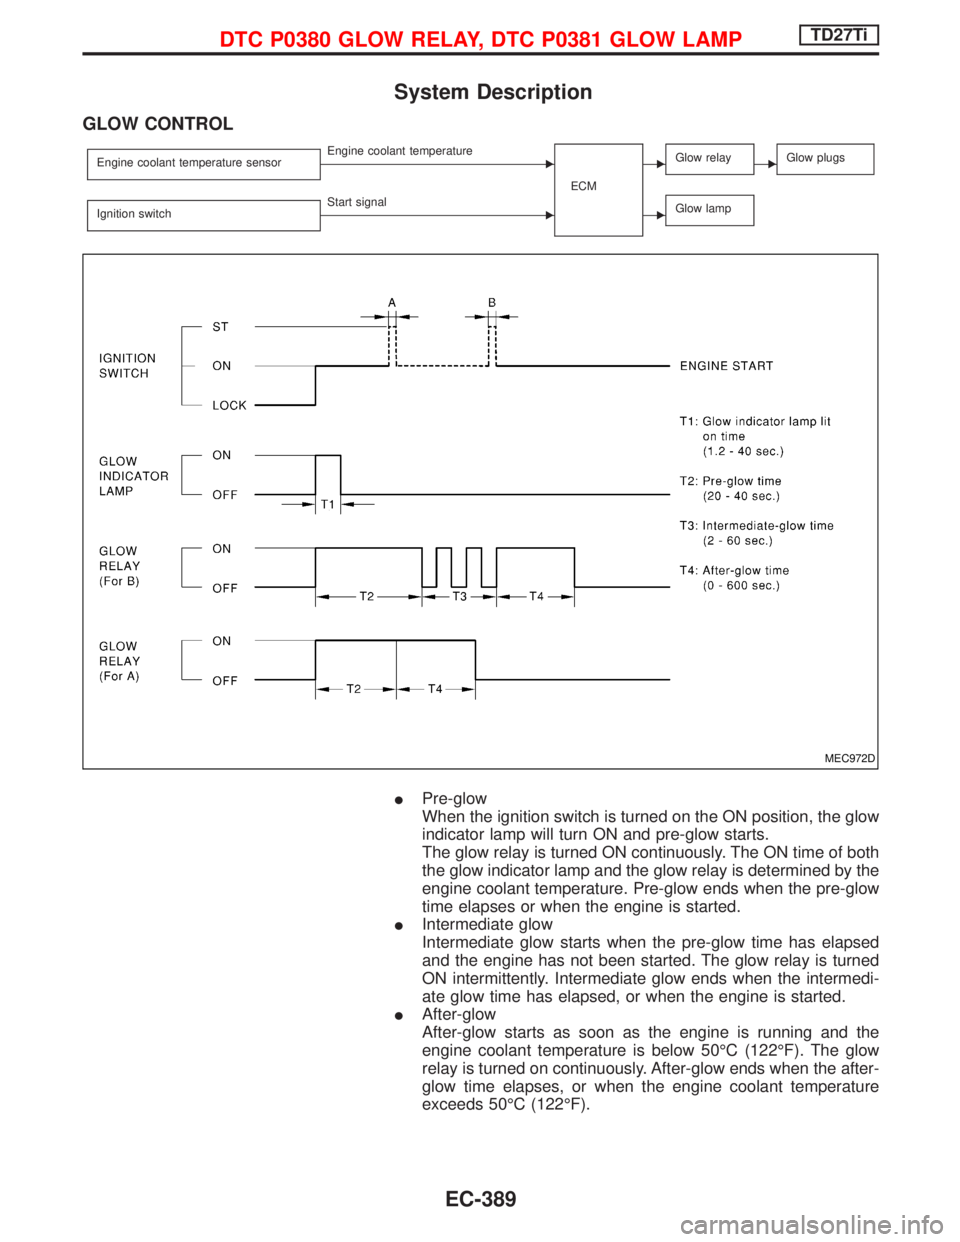
GLOW CONTROL
Engine coolant temperature sensorEEngine coolant temperature
ECMEGlow relayEGlow plugs
Ignition switchEStart signalEGlow lamp
IPre-glow
When the ignition switch is turned on the ON position, the glow
indicator lamp will turn ON and pre-glow starts.
The glow relay is turned ON continuously. The ON time of both
the glow indicator lamp and the glow relay is determined by the
engine coolant temperature. Pre-glow ends when the pre-glow
time elapses or when the engine is started.
IIntermediate glow
Intermediate glow starts when the pre-glow time has elapsed
and the engine has not been started. The glow relay is turned
ON intermittently. Intermediate glow ends when the intermedi-
ate glow time has elapsed, or when the engine is started.
IAfter-glow
After-glow starts as soon as the engine is running and the
engine coolant temperature is below 50ÉC (122ÉF). The glow
relay is turned on continuously. After-glow ends when the after-
glow time elapses, or when the engine coolant temperature
exceeds 50ÉC (122ÉF).
MEC972D
DTC P0380 GLOW RELAY, DTC P0381 GLOW LAMPTD27Ti
EC-389
Page 759 of 1767
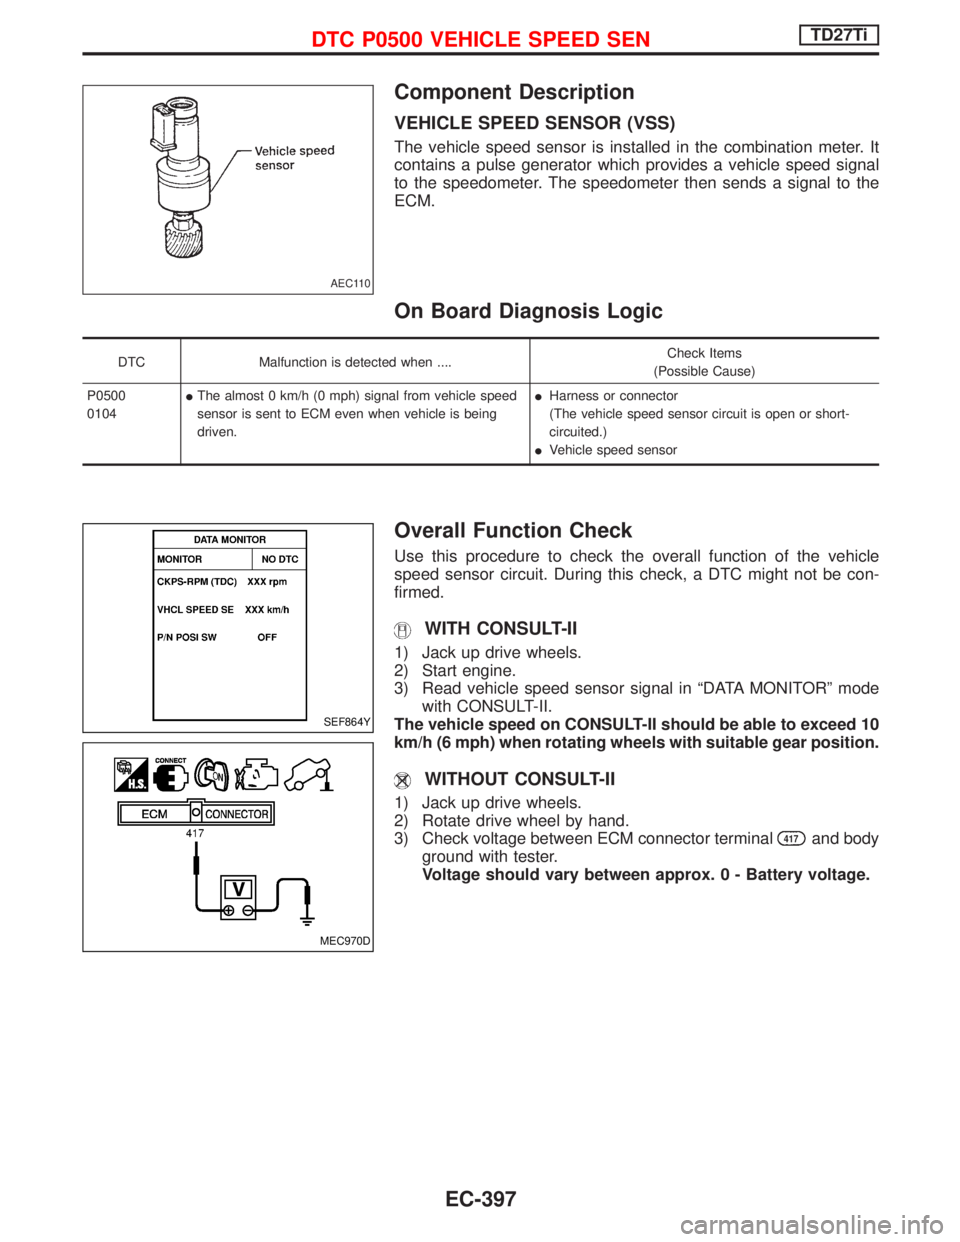
Component Description
VEHICLE SPEED SENSOR (VSS)
The vehicle speed sensor is installed in the combination meter. It
contains a pulse generator which provides a vehicle speed signal
to the speedometer. The speedometer then sends a signal to the
ECM.
On Board Diagnosis Logic
DTC Malfunction is detected when ....Check Items
(Possible Cause)
P0500
0104IThe almost 0 km/h (0 mph) signal from vehicle speed
sensor is sent to ECM even when vehicle is being
driven.IHarness or connector
(The vehicle speed sensor circuit is open or short-
circuited.)
IVehicle speed sensor
Overall Function Check
Use this procedure to check the overall function of the vehicle
speed sensor circuit. During this check, a DTC might not be con-
firmed.
WITH CONSULT-II
1) Jack up drive wheels.
2) Start engine.
3) Read vehicle speed sensor signal in ªDATA MONITORº mode
with CONSULT-II.
The vehicle speed on CONSULT-II should be able to exceed 10
km/h (6 mph) when rotating wheels with suitable gear position.
WITHOUT CONSULT-II
1) Jack up drive wheels.
2) Rotate drive wheel by hand.
3) Check voltage between ECM connector terminal
417and body
ground with tester.
Voltage should vary between approx. 0 - Battery voltage.
AEC110
SEF864Y
MEC970D
DTC P0500 VEHICLE SPEED SENTD27Ti
EC-397
Page 761 of 1767
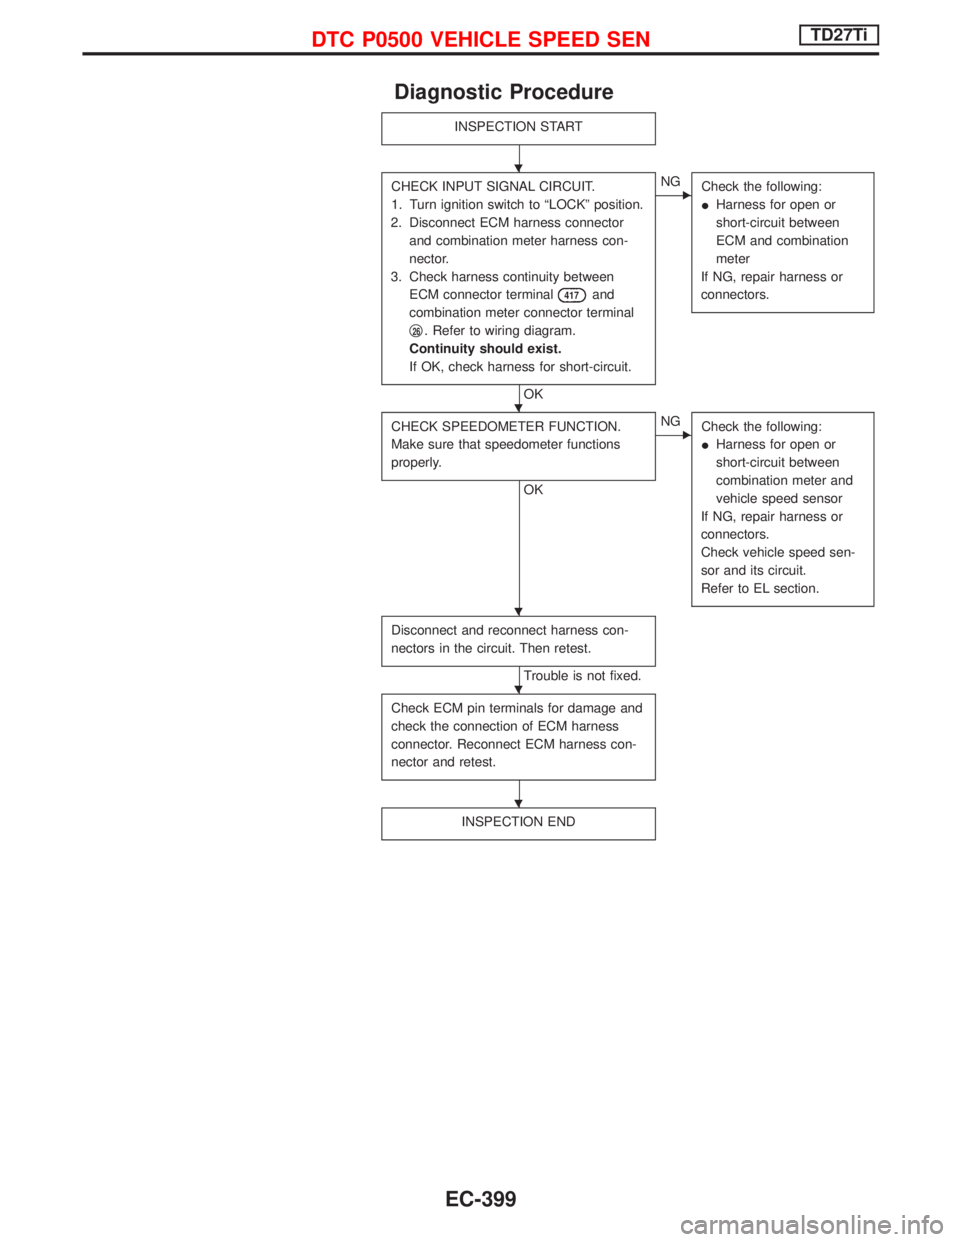
Diagnostic Procedure
INSPECTION START
CHECK INPUT SIGNAL CIRCUIT.
1. Turn ignition switch to ªLOCKº position.
2. Disconnect ECM harness connector
and combination meter harness con-
nector.
3. Check harness continuity between
ECM connector terminal
417and
combination meter connector terminal
q
26. Refer to wiring diagram.
Continuity should exist.
If OK, check harness for short-circuit.
OK
ENG
Check the following:
IHarness for open or
short-circuit between
ECM and combination
meter
If NG, repair harness or
connectors.
CHECK SPEEDOMETER FUNCTION.
Make sure that speedometer functions
properly.
OK
ENG
Check the following:
IHarness for open or
short-circuit between
combination meter and
vehicle speed sensor
If NG, repair harness or
connectors.
Check vehicle speed sen-
sor and its circuit.
Refer to EL section.
Disconnect and reconnect harness con-
nectors in the circuit. Then retest.
Trouble is not fixed.
Check ECM pin terminals for damage and
check the connection of ECM harness
connector. Reconnect ECM harness con-
nector and retest.
INSPECTION END
H
H
H
H
H
DTC P0500 VEHICLE SPEED SENTD27Ti
EC-399
Page 769 of 1767
Description
The ECM consists of a microcomputer and connectors for signal
input and output and for power supply. The unit controls the engine.
On Board Diagnosis Logic
DTC Malfunction is detected when ... Check Items (Possible Cause)
P1107
0802IAn excessively high or low voltage from
the absolute pressure sensor (built-into
ECM) is sent to ECM.IECM
DTC Confirmation Procedure
WITH CONSULT-II
1) Turn ignition switch ªONº.
2) Select ªDATA MONITORº mode with CONSULT-II.
3) Start engine and wait at least 2 seconds.
WITHOUT CONSULT-II
1) Turn ignition switch ªONº and wait at least 2 seconds.
2) Start engine and wait at least 2 seconds.
3) Turn ignition switch ªOFFº, wait at least 5 seconds and then turn
ªONº.
4) Perform ªDiagnostic Test Mode II (Self-diagnostic results)º with
ECM.
SEC220B
SEF817Y
DTC P1107 ECM 10TD27Ti
EC-407