2002 LAND ROVER DISCOVERY belt
[x] Cancel search: beltPage 1265 of 1672
PANEL REPAIRS
77-2-16 PROCEDURES
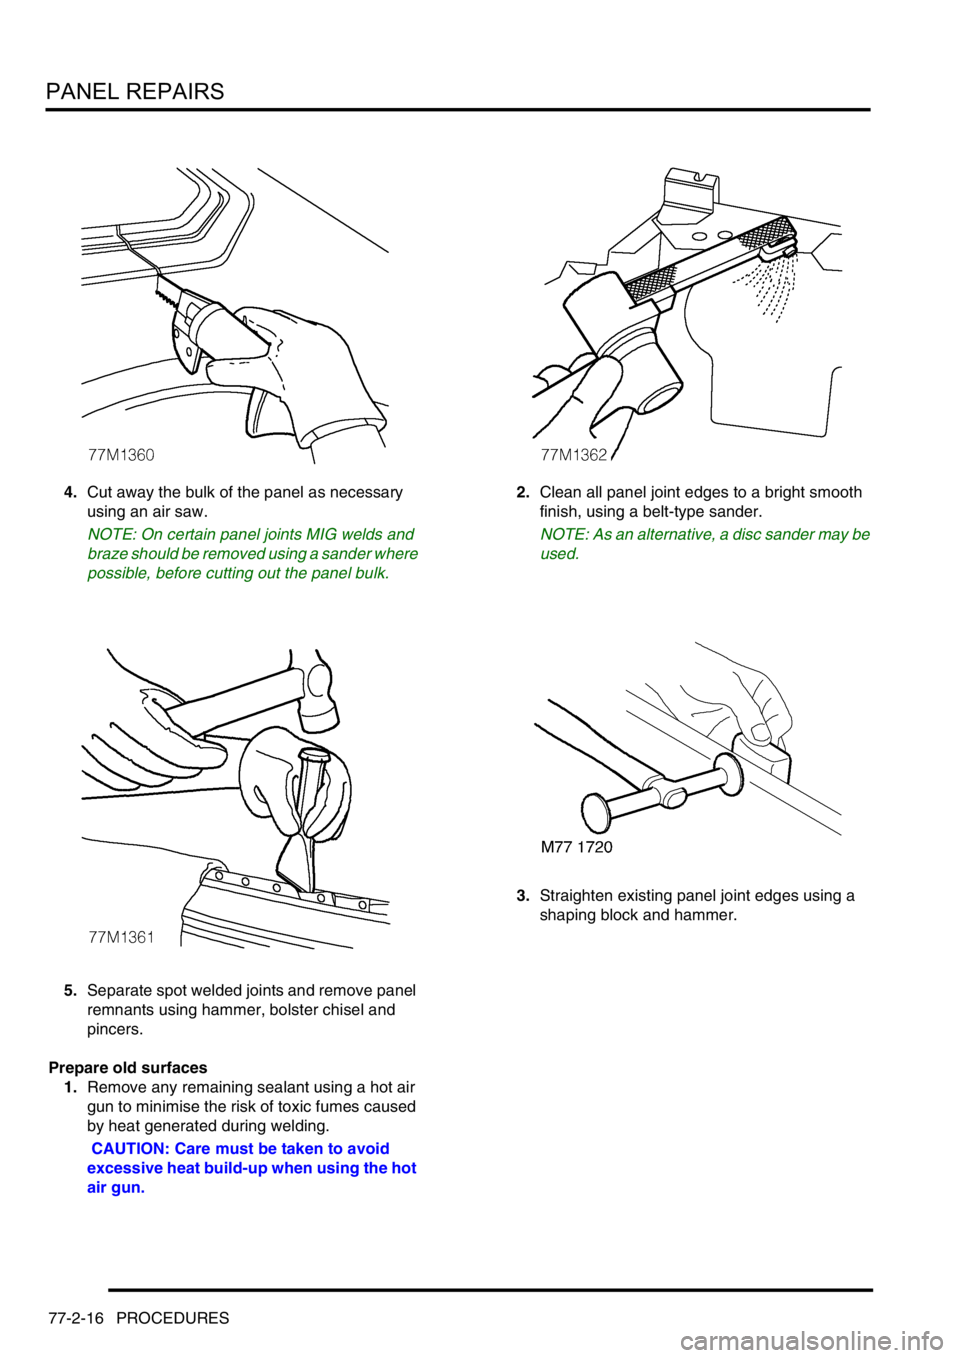
4.Cut away the bulk of the panel as necessary
using an air saw.
NOTE: On certain panel joints MIG welds and
braze should be removed using a sander where
possible, before cutting out the panel bulk.
5.Separate spot welded joints and remove panel
remnants using hammer, bolster chisel and
pincers.
Prepare old surfaces
1.Remove any remaining sealant using a hot air
gun to minimise the risk of toxic fumes caused
by heat generated during welding.
CAUTION: Care must be taken to avoid
excessive heat build-up when using the hot
air gun.2.Clean all panel joint edges to a bright smooth
finish, using a belt-type sander.
NOTE: As an alternative, a disc sander may be
used.
3.Straighten existing panel joint edges using a
shaping block and hammer.
Page 1268 of 1672
PANEL REPAIRS
PROCEDURES 77-2-19
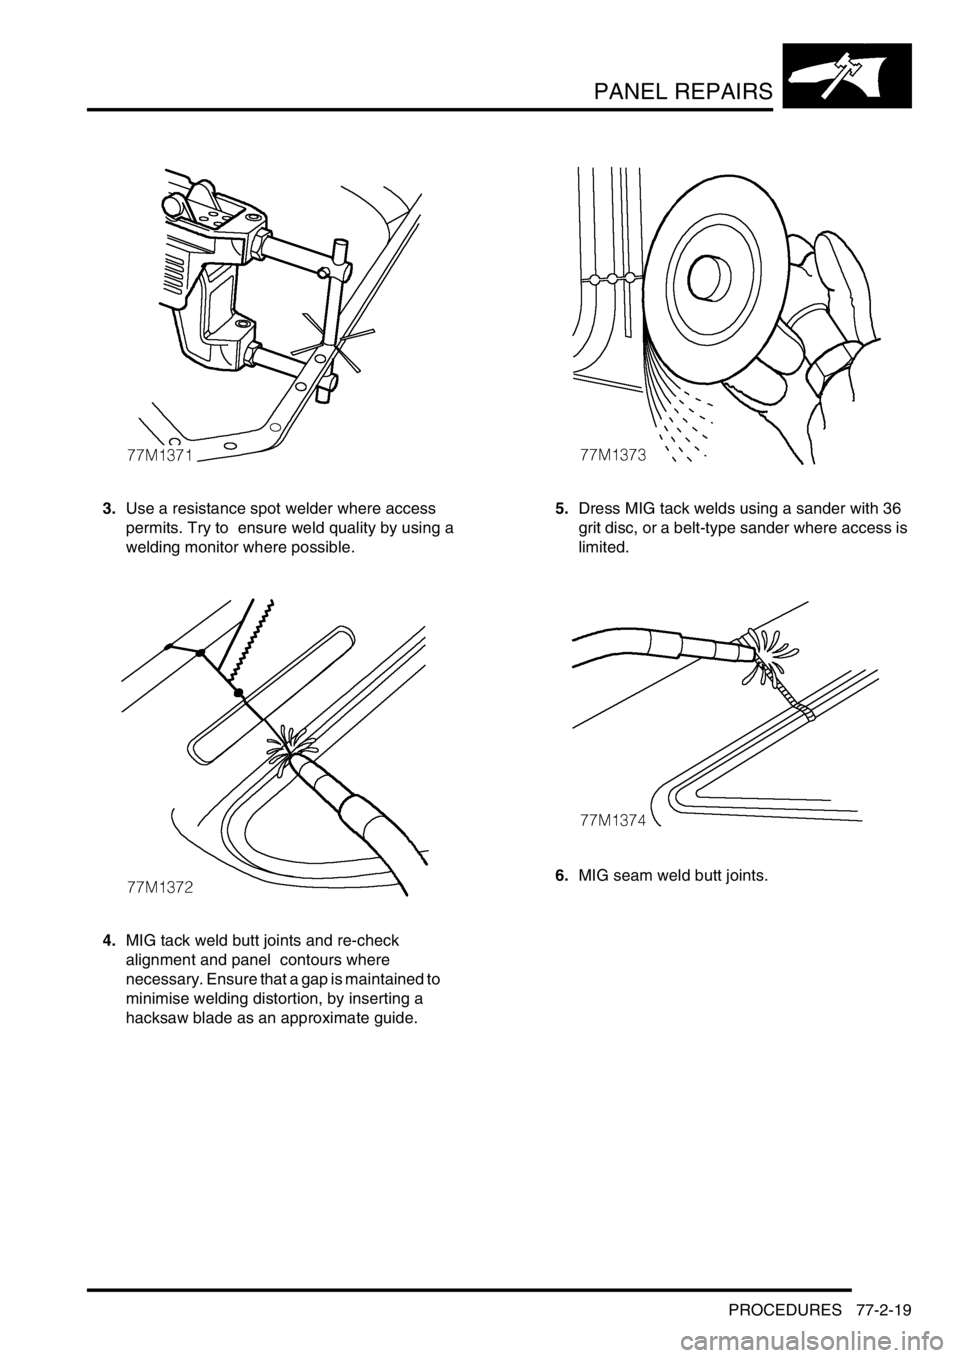
3.Use a resistance spot welder where access
permits. Try to ensure weld quality by using a
welding monitor where possible.
4.MIG tack weld butt joints and re-check
alignment and panel contours where
necessary. Ensure that a gap is maintained to
minimise welding distortion, by inserting a
hacksaw blade as an approximate guide.5.Dress MIG tack welds using a sander with 36
grit disc, or a belt-type sander where access is
limited.
6.MIG seam weld butt joints.
Page 1269 of 1672
PANEL REPAIRS
77-2-20 PROCEDURES
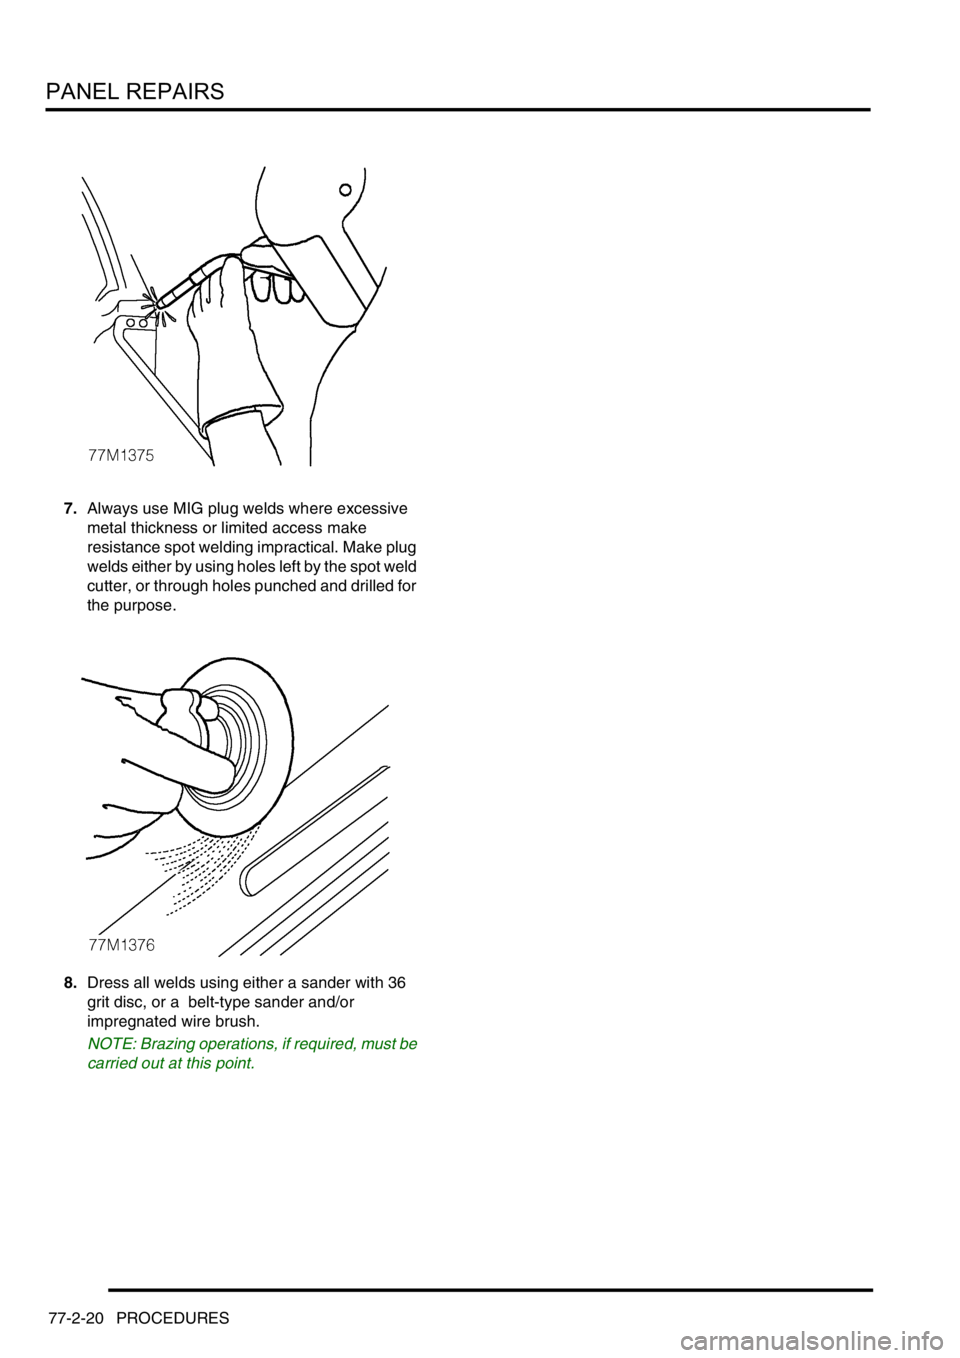
7.Always use MIG plug welds where excessive
metal thickness or limited access make
resistance spot welding impractical. Make plug
welds either by using holes left by the spot weld
cutter, or through holes punched and drilled for
the purpose.
8.Dress all welds using either a sander with 36
grit disc, or a belt-type sander and/or
impregnated wire brush.
NOTE: Brazing operations, if required, must be
carried out at this point.
Page 1286 of 1672
PANEL REPAIRS
REPAIRS 77-2-37
Sill outer assembly
Remove
1.Disconnect both battery leads, negative lead
first.
2.Disconnect leads/multiplug from alternator.
3.Remove RH or LH front wing.
+ EXTERIOR FITTINGS, REPAIRS,
Wing - front - up to 03MY.
4.Remove RH or LH front door.
+ DOORS, REPAIRS, Door - front.
5.Remove RH or LH rear door.
+ DOORS, REPAIRS, Door - rear.
6.Remove RH or LH sill finisher.
7.Remove RH or LH 'A' post inner lower
finishers.
8.Remove RH or LH front seat.
+ SEATS, REPAIRS, Seat - front.
9. LH side: Remove power amplifier and EAT
ECU.
+ IN CAR ENTERTAINMENT,
REPAIRS, Amplifier - power.
10. RH side: Remove CD autochanger.
+ IN CAR ENTERTAINMENT,
REPAIRS, CD autochanger.
11.Remove rear seats.
+ SEATS, REPAIRS, Seat - rear.
12.Remove RH or LH front seat belt.
+ RESTRAINT SYSTEMS, REPAIRS,
Seat belt - front.
13.Remove tread plates from front and rear door
apertures.
14.Release carpet and position aside.
15.Remove front and rear door aperture seals.
16.Release relevant wiring from 'A' post, 'B/C' post
and sill areas, and position aside.
17.Remove loadspace lower trim casing.
+ INTERIOR TRIM COMPONENTS,
REPAIRS, Trim casing - side - loadspace.
18. RH side: Remove lower ACE accelerometer.
+ FRONT SUSPENSION, REPAIRS,
Accelerometer - ACE - lower.
19. LH side: Remove SLS air compressor unit.
+ REAR SUSPENSION, REPAIRS,
Compressor unit - air - SLS.
20. Models with rear A/C: Recover refrigerant
from A/C system and remove A/C pipes from
LH sill.
+ AIR CONDITIONING, REFRIGERANT
RECOVERY, RECYCLING AND
RECHARGING, Refrigerant recovery,
recycling and recharging.
21.Remove 2 bolts securing body to chassis.Repair
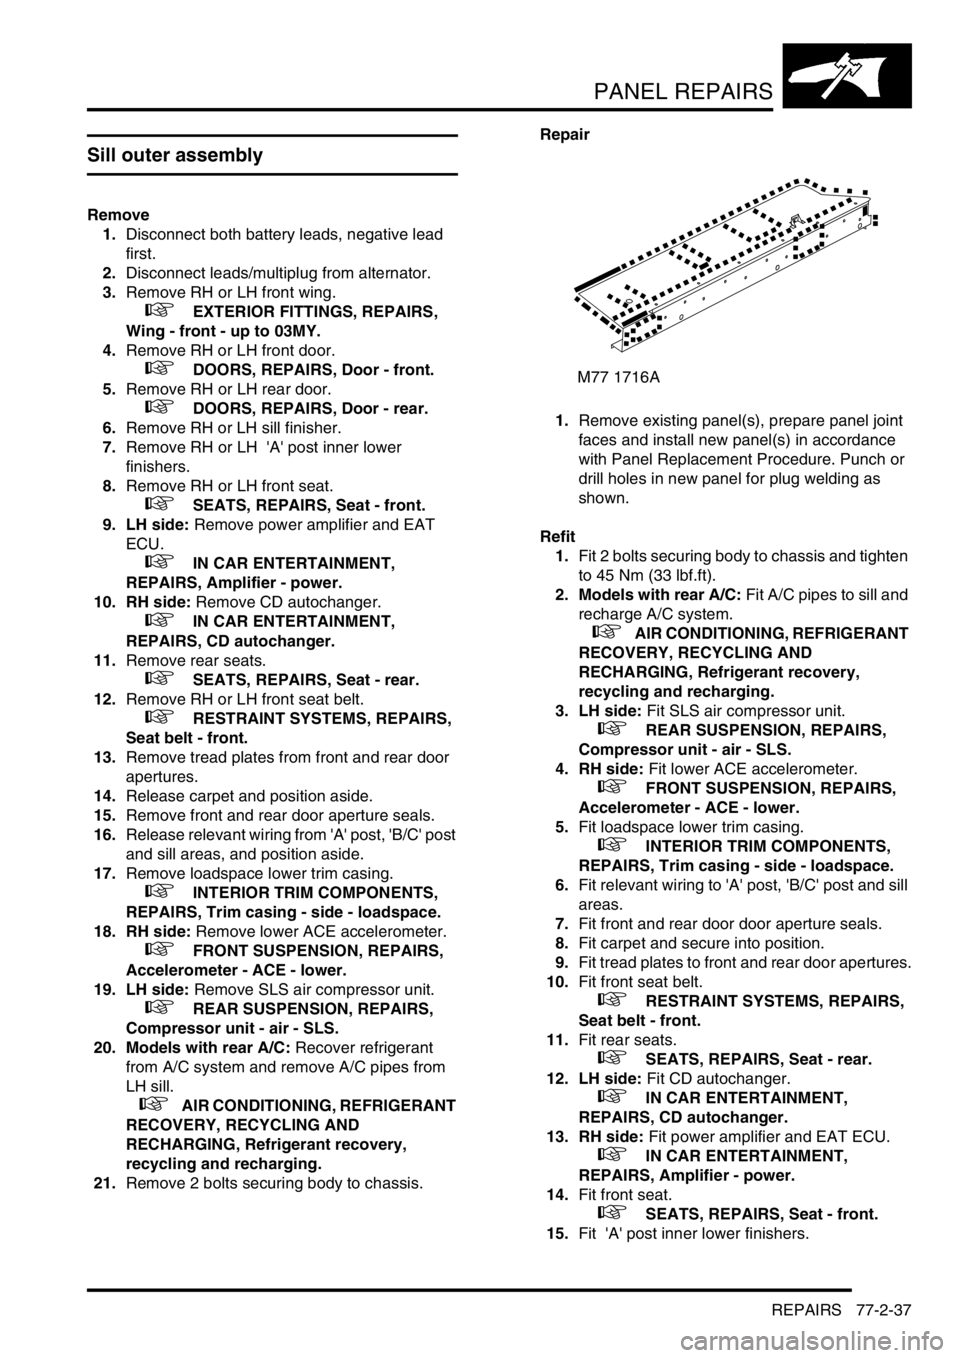
1.Remove existing panel(s), prepare panel joint
faces and install new panel(s) in accordance
with Panel Replacement Procedure. Punch or
drill holes in new panel for plug welding as
shown.
Refit
1.Fit 2 bolts securing body to chassis and tighten
to 45 Nm (33 lbf.ft).
2. Models with rear A/C: Fit A/C pipes to sill and
recharge A/C system.
+ AIR CONDITIONING, REFRIGERANT
RECOVERY, RECYCLING AND
RECHARGING, Refrigerant recovery,
recycling and recharging.
3. LH side: Fit SLS air compressor unit.
+ REAR SUSPENSION, REPAIRS,
Compressor unit - air - SLS.
4. RH side: Fit lower ACE accelerometer.
+ FRONT SUSPENSION, REPAIRS,
Accelerometer - ACE - lower.
5.Fit loadspace lower trim casing.
+ INTERIOR TRIM COMPONENTS,
REPAIRS, Trim casing - side - loadspace.
6.Fit relevant wiring to 'A' post, 'B/C' post and sill
areas.
7.Fit front and rear door door aperture seals.
8.Fit carpet and secure into position.
9.Fit tread plates to front and rear door apertures.
10.Fit front seat belt.
+ RESTRAINT SYSTEMS, REPAIRS,
Seat belt - front.
11.Fit rear seats.
+ SEATS, REPAIRS, Seat - rear.
12. LH side: Fit CD autochanger.
+ IN CAR ENTERTAINMENT,
REPAIRS, CD autochanger.
13. RH side: Fit power amplifier and EAT ECU.
+ IN CAR ENTERTAINMENT,
REPAIRS, Amplifier - power.
14.Fit front seat.
+ SEATS, REPAIRS, Seat - front.
15.Fit 'A' post inner lower finishers.
M77 1716A
Page 1288 of 1672
PANEL REPAIRS
REPAIRS 77-2-39
'B/C' post assembly
Remove
1.Disconnect both battery leads, negative lead
first.
2.Disconnect leads/multiplug from alternator.
3.Remove RH or LH rear door.
+ DOORS, REPAIRS, Door - rear.
4.Remove front door striker from 'B/C' post.
5.Remove RH or LH sill finisher.
6.Remove RH or LH front seat.
+ SEATS, REPAIRS, Seat - front.
7. RH side: Remove power amplifier.
+ IN CAR ENTERTAINMENT,
REPAIRS, Amplifier - power.
8. LH side: Remove CD autochanger.
+ IN CAR ENTERTAINMENT,
REPAIRS, CD autochanger.
9.Remove RH or LH front seat belt.
+ RESTRAINT SYSTEMS, REPAIRS,
Seat belt - front.
10.Remove RH or LH rear seat.
+ SEATS, REPAIRS, Seat - rear.
11.Remove head lining.
+ INTERIOR TRIM COMPONENTS,
REPAIRS, Headlining.
12.Remove tread plate from front and rear door
apertures.
13.Release carpet from fixings and position aside.
14.Remove front and rear door door aperture
seals.
15.Release relevant wiring from 'B/C' post and sill
areas and position aside.
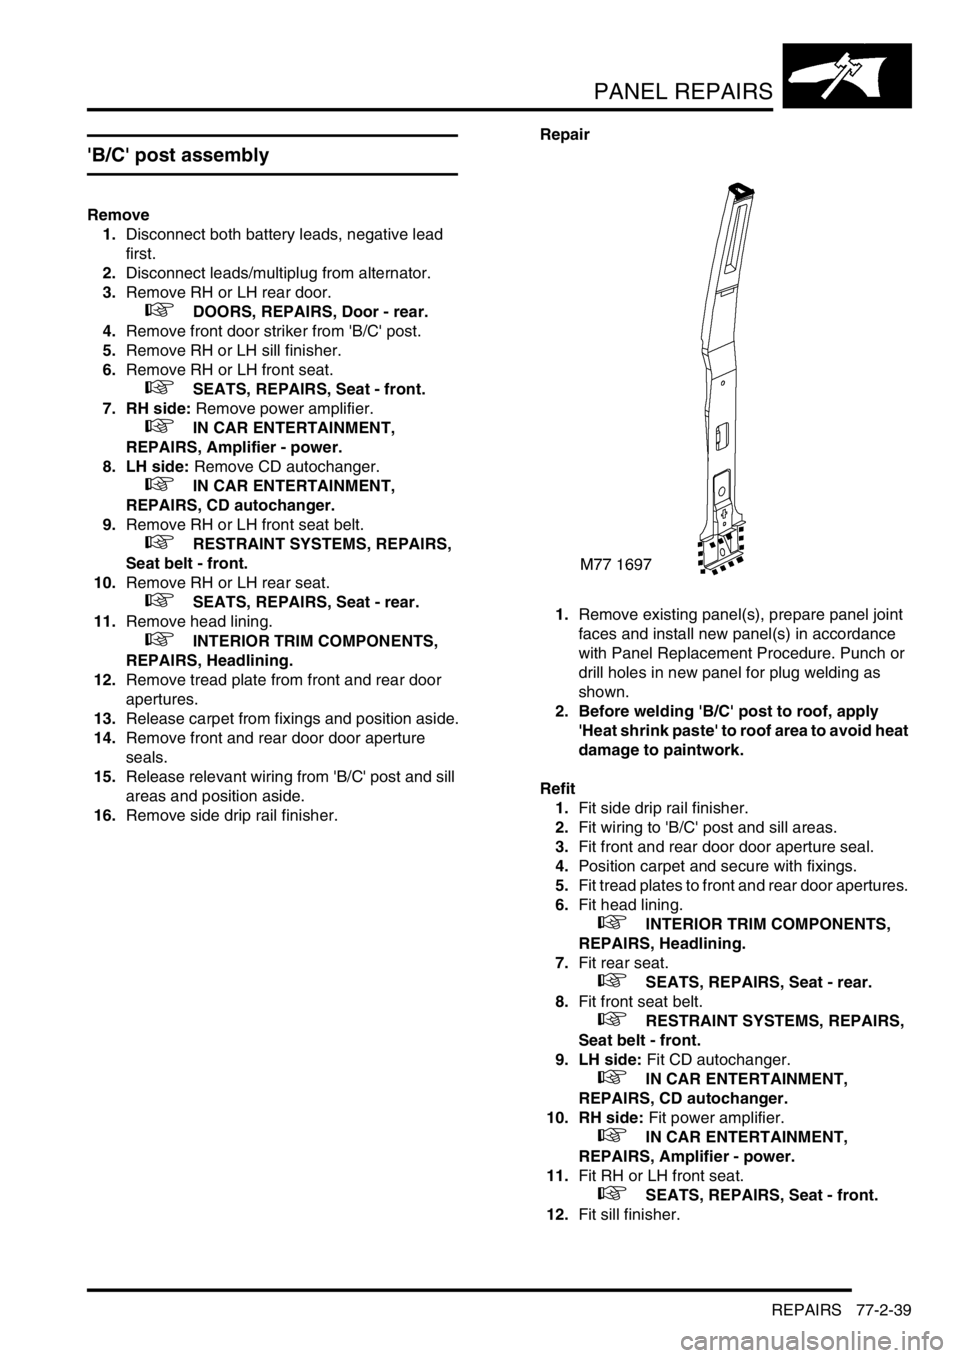
16.Remove side drip rail finisher.Repair
1.Remove existing panel(s), prepare panel joint
faces and install new panel(s) in accordance
with Panel Replacement Procedure. Punch or
drill holes in new panel for plug welding as
shown.
2. Before welding 'B/C' post to roof, apply
'Heat shrink paste' to roof area to avoid heat
damage to paintwork.
Refit
1.Fit side drip rail finisher.
2.Fit wiring to 'B/C' post and sill areas.
3.Fit front and rear door door aperture seal.
4.Position carpet and secure with fixings.
5.Fit tread plates to front and rear door apertures.
6.Fit head lining.
+ INTERIOR TRIM COMPONENTS,
REPAIRS, Headlining.
7.Fit rear seat.
+ SEATS, REPAIRS, Seat - rear.
8.Fit front seat belt.
+ RESTRAINT SYSTEMS, REPAIRS,
Seat belt - front.
9. LH side: Fit CD autochanger.
+ IN CAR ENTERTAINMENT,
REPAIRS, CD autochanger.
10. RH side: Fit power amplifier.
+ IN CAR ENTERTAINMENT,
REPAIRS, Amplifier - power.
11.Fit RH or LH front seat.
+ SEATS, REPAIRS, Seat - front.
12.Fit sill finisher.
Page 1291 of 1672
PANEL REPAIRS
77-2-42 REPAIRS
Body side inner rear assembly
In this procedure, the panel body side assembly is
replaced in conjunction with the body side inner rear
assembly.
Remove
1.Disconnect battery eath lead.
2.Disconnect leads/multiplug from alternator.
3.Remove panel body side assembly.
+ PANEL REPAIRS, REPAIRS, Panel
body side assembly.
4.Remove RH or LH rear seat.
+ SEATS, REPAIRS, Seat - rear.
5.Remove loadspace carpet.
+ INTERIOR TRIM COMPONENTS,
REPAIRS, Carpet - loadspace.
6.Remove rear side seat belt.
+ RESTRAINT SYSTEMS, REPAIRS,
Seat belt - rear - side.
7.Remove third row seat belt.
+ RESTRAINT SYSTEMS, REPAIRS,
Seat belts - third row.
8.Remove fuel tank.
+ FUEL DELIVERY SYSTEM - V8,
REPAIRS, Tank - fuel.
+ FUEL DELIVERY SYSTEM - Td5,
REPAIRS, Tank - fuel.
9.Remove fuel filler tube.
+ FUEL DELIVERY SYSTEM - V8,
REPAIRS, Filler tube - fuel.
10. RH side: Remove fuel flap release solenoid.
+ FUEL DELIVERY SYSTEM - Td5,
REPAIRS, Solenoid - fuel filler flap release.
+ FUEL DELIVERY SYSTEM - V8,
REPAIRS, Solenoid - fuel filler flap release.
11. RH side: Remove air extractor vent.
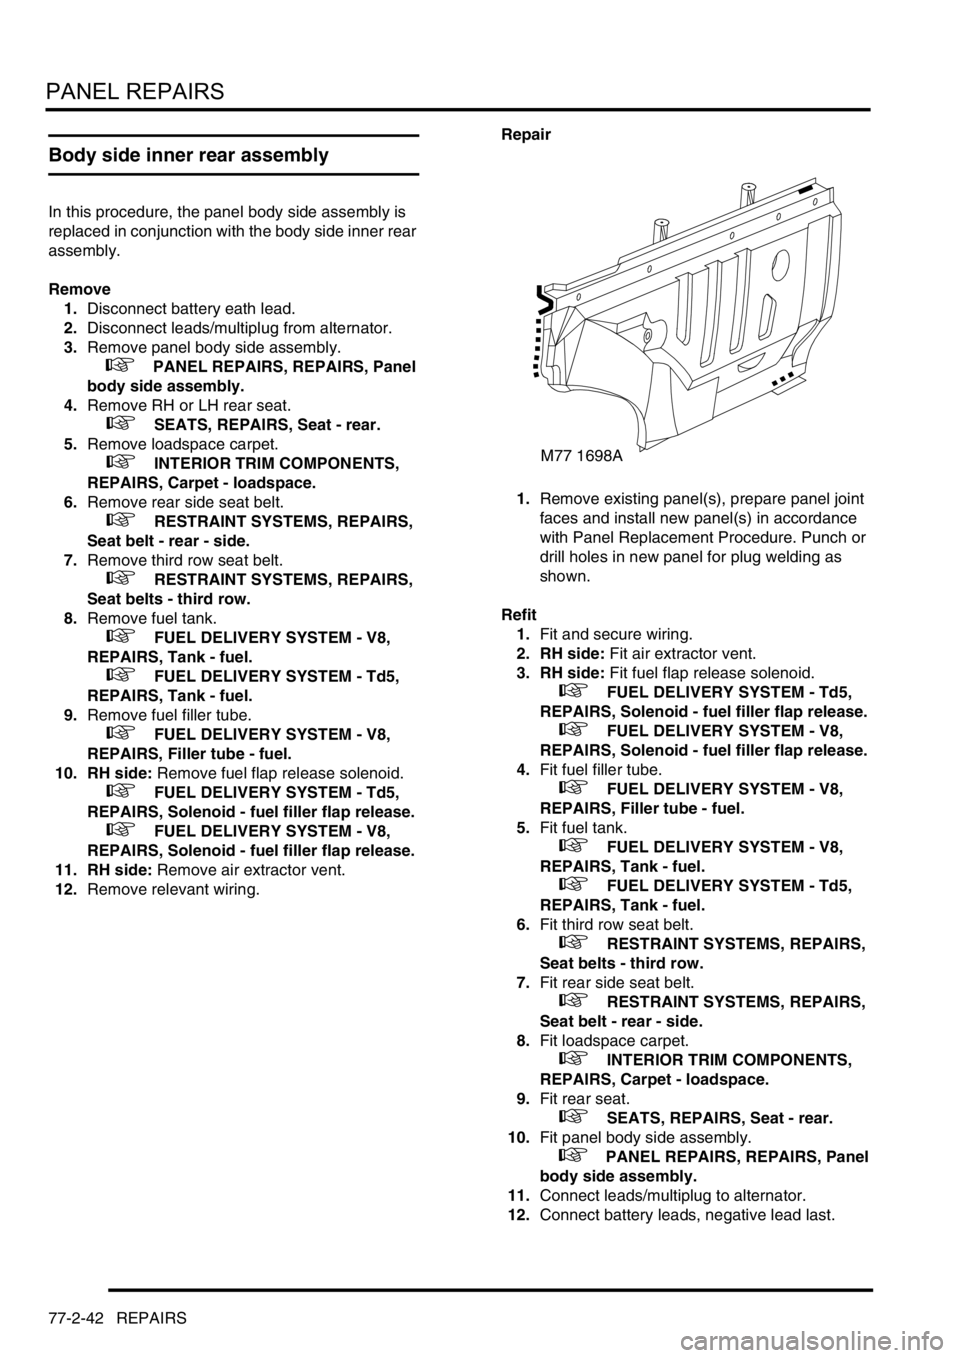
12.Remove relevant wiring.Repair
1.Remove existing panel(s), prepare panel joint
faces and install new panel(s) in accordance
with Panel Replacement Procedure. Punch or
drill holes in new panel for plug welding as
shown.
Refit
1.Fit and secure wiring.
2. RH side: Fit air extractor vent.
3. RH side: Fit fuel flap release solenoid.
+ FUEL DELIVERY SYSTEM - Td5,
REPAIRS, Solenoid - fuel filler flap release.
+ FUEL DELIVERY SYSTEM - V8,
REPAIRS, Solenoid - fuel filler flap release.
4.Fit fuel filler tube.
+ FUEL DELIVERY SYSTEM - V8,
REPAIRS, Filler tube - fuel.
5.Fit fuel tank.
+ FUEL DELIVERY SYSTEM - V8,
REPAIRS, Tank - fuel.
+ FUEL DELIVERY SYSTEM - Td5,
REPAIRS, Tank - fuel.
6.Fit third row seat belt.
+ RESTRAINT SYSTEMS, REPAIRS,
Seat belts - third row.
7.Fit rear side seat belt.
+ RESTRAINT SYSTEMS, REPAIRS,
Seat belt - rear - side.
8.Fit loadspace carpet.
+ INTERIOR TRIM COMPONENTS,
REPAIRS, Carpet - loadspace.
9.Fit rear seat.
+ SEATS, REPAIRS, Seat - rear.
10.Fit panel body side assembly.
+ PANEL REPAIRS, REPAIRS, Panel
body side assembly.
11.Connect leads/multiplug to alternator.
12.Connect battery leads, negative lead last.
M77 1698A
Page 1294 of 1672
PANEL REPAIRS
REPAIRS 77-2-45
'E' post assembly
In this procedure, the panel body side assembly and
tail door are replaced in conjunction with the 'E' post
assembly. If required the 'E' post closing assembly
can also be replaced.
Remove
1.Disconnect both battery leads, negative lead
first.
2.Disconnect leads/multiplug from alternator.
3.Remove panel body side assembly.
+ PANEL REPAIRS, REPAIRS, Panel
body side assembly.
4.Remove rear seats.
+ SEATS, REPAIRS, Seat - rear.
5.Remove loadspace carpet.
+ INTERIOR TRIM COMPONENTS,
REPAIRS, Carpet - loadspace.
6.Remove third row seat belts.
+ RESTRAINT SYSTEMS, REPAIRS,
Seat belts - third row.
7.Remove relevant wiring.
8.Remove rear drip rail finisher.
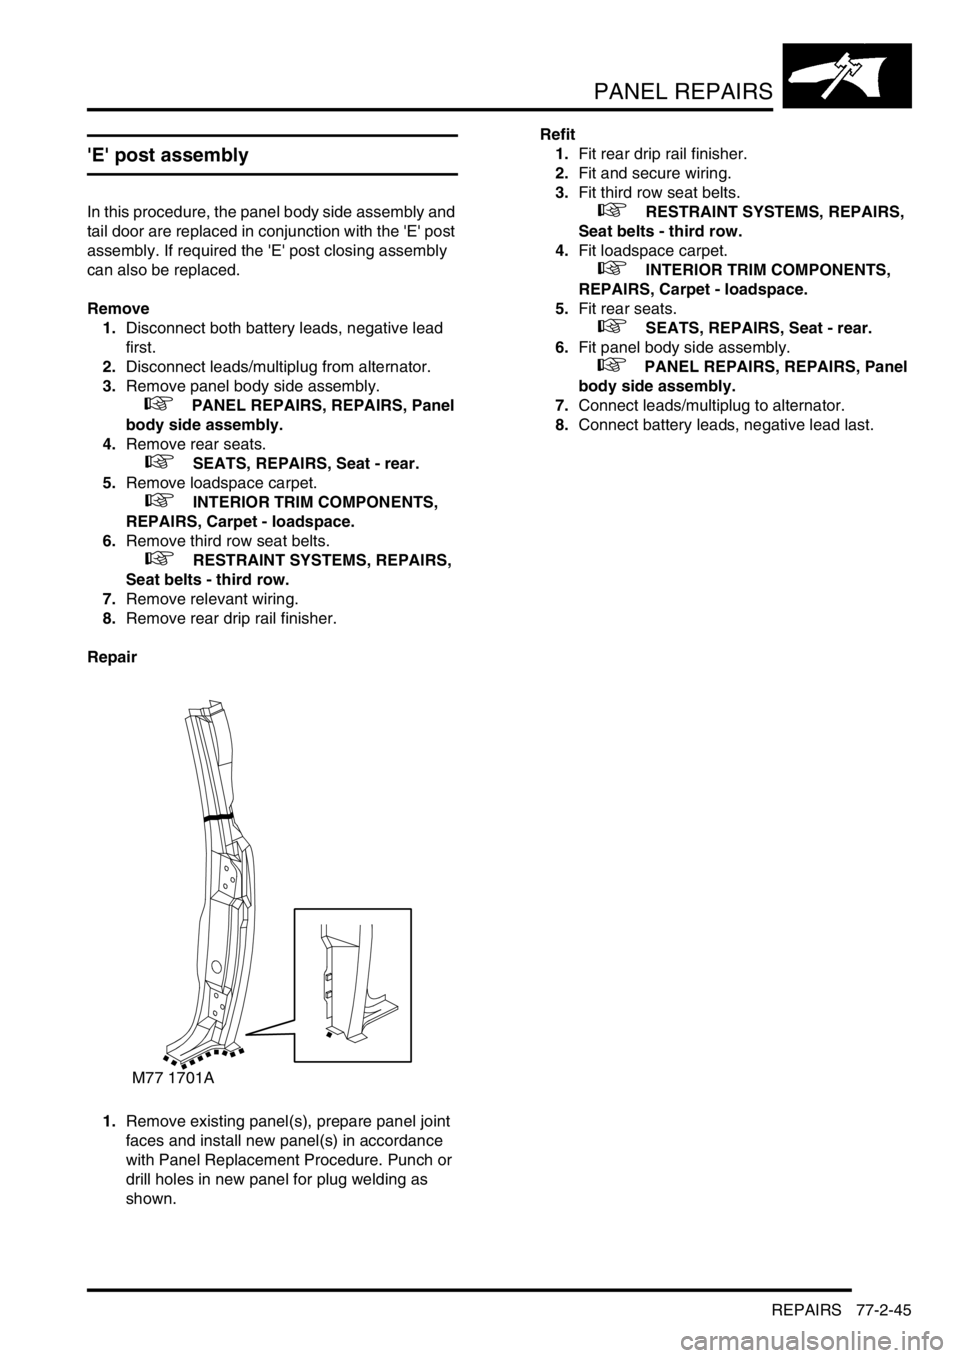
Repair
1.Remove existing panel(s), prepare panel joint
faces and install new panel(s) in accordance
with Panel Replacement Procedure. Punch or
drill holes in new panel for plug welding as
shown.Refit
1.Fit rear drip rail finisher.
2.Fit and secure wiring.
3.Fit third row seat belts.
+ RESTRAINT SYSTEMS, REPAIRS,
Seat belts - third row.
4.Fit loadspace carpet.
+ INTERIOR TRIM COMPONENTS,
REPAIRS, Carpet - loadspace.
5.Fit rear seats.
+ SEATS, REPAIRS, Seat - rear.
6.Fit panel body side assembly.
+ PANEL REPAIRS, REPAIRS, Panel
body side assembly.
7.Connect leads/multiplug to alternator.
8.Connect battery leads, negative lead last.
M77 1701A
Page 1323 of 1672
CORROSION PREVENTION AND SEALING
77-4-8 CORROSION PREVENTION
After refitting mechanical components, including hoses and pipes and other fixtures, mask off the brake discs and
apply a coat of approved underbody wax.
NOTE: Where repairs include the application of finish paint coats in the areas requiring underbody wax, carry out paint
operations before applying wax.
Cavity wax injection
Areas treated with cavity wax are shown in the previous figures. After repairs, always re-treat these areas with an
approved cavity wax. In addition, treat all interior surfaces which have been disturbed during repairs whether they
have been treated in production or not. This includes all box members, cavities and door interiors. It is permissible to
drill extra holes for access where necessary, provided these are not positioned in load-bearing members. Ensure that
such holes are treated with a suitable zinc rich primer, brushed with wax and then sealed with a rubber grommet.
Before wax injection, ensure that the cavity to be treated is free from any contamination or foreign matter. Where
necessary, clear out any debris using compressed air.
Ensure that cavity wax is applied AFTER the final paint process and BEFORE refitting any trim components.
During application, ensure that the wax covers all flange and seam areas and that it is adequately applied to all
repaired areas of both new and existing panels.
It should be noted that new panel assemblies and complete body shells are supplied without wax injection treatment.
Ensure that such treatment is carried out after repairs.
Effective cavity wax protection is vital. Always observe the following points:
lComplete all paint refinish operations before wax application;
lClean body panel areas and blow-clean cavities if necessary, before treatment;
lMaintain a temperature of 18
° C (64° F) during application and drying;
lCheck the spray pattern of injection equipment;
lMask off all areas not to be wax coated and which could be contaminated by wax overspray;
lRemove body fixings, such as seat belt retractors, if contamination is at all likely;
lMove door glasses to fully closed position before treating door interiors;
lTreat body areas normally covered by trim before refitting items;
lCheck that body and door drain holes are clear after the protective wax has dried;
lKeep all equipment clean, especially wax injection nozzles.
Underbody wax
The underbody wax must be reinstated following all repairs affecting floor panels. The wax is applied over paints and
underbody sealers.
Remove old underbody wax completely from a zone extending at least 200 mm (7.874 in) beyond the area where new
underbody sealer is to be applied.
Engine bay wax
Reinstate all protective engine bay wax disturbed during repairs using an approved material.
Where repairs have involved replacement of engine bay panels, treat the entire engine compartment including all
components, clips and other fixtures with an approved underbonnet lacquer or wax.
+ BODY SEALING MATERIALS, MATERIALS AND APPLICATIONS, Approved materials.