Page 1110 of 1672
RESTRAINT SYSTEMS
REPAIRS 75-15
Seat belt - rear - side
$% 76.73.23
Remove
1.Remove 'D' post trim casing.
+ INTERIOR TRIM COMPONENTS,
REPAIRS, Trim casing - 'D' post.
2.Remove loadspace side trim casing.
+ INTERIOR TRIM COMPONENTS,
REPAIRS, Trim casing - side - loadspace.
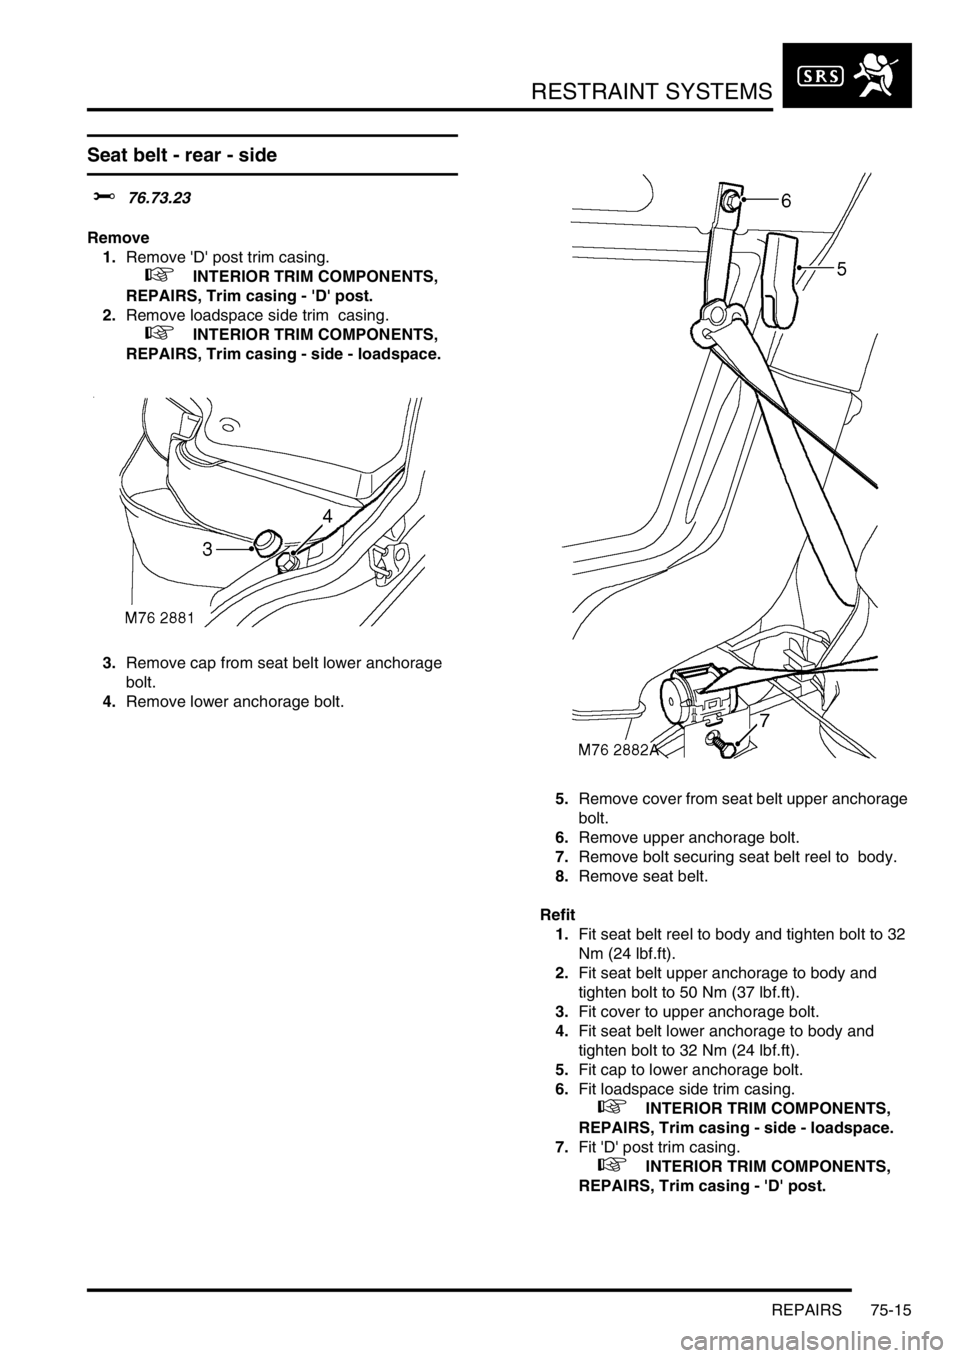
3.Remove cap from seat belt lower anchorage
bolt.
4.Remove lower anchorage bolt.
5.Remove cover from seat belt upper anchorage
bolt.
6.Remove upper anchorage bolt.
7.Remove bolt securing seat belt reel to body.
8.Remove seat belt.
Refit
1.Fit seat belt reel to body and tighten bolt to 32
Nm (24 lbf.ft).
2.Fit seat belt upper anchorage to body and
tighten bolt to 50 Nm (37 lbf.ft).
3.Fit cover to upper anchorage bolt.
4.Fit seat belt lower anchorage to body and
tighten bolt to 32 Nm (24 lbf.ft).
5.Fit cap to lower anchorage bolt.
6.Fit loadspace side trim casing.
+ INTERIOR TRIM COMPONENTS,
REPAIRS, Trim casing - side - loadspace.
7.Fit 'D' post trim casing.
+ INTERIOR TRIM COMPONENTS,
REPAIRS, Trim casing - 'D' post.
Page 1111 of 1672
RESTRAINT SYSTEMS
75-16 REPAIRS
Mounting - seat belt - 'B' post
$% 76.73.26
Remove
1.Release front door aperture seal from 'B' post.
2.Release rear door aperture seal from 'B' post.
3.Release clip securing upper 'B' post trim.
4.Remove 'B' post upper trim.
5.Remove nut securing seat belt upper
anchorage to mounting. 6.Remove 2 Torx bolts securing mounting to 'B'
post.
7.Remove mounting.
Refit
1.Fit mounting to upper 'B' post and tighten Torx
bolts to 22 Nm (16 lbf.ft).
2.Fit seat belt upper anchorage to mounting and
tighten nut to 32 Nm (24 lbf.ft).
3.Secure trim casing to 'B' post with clip.
4.Fit front and rear door aperture seals to 'B'
post.
Page 1112 of 1672
RESTRAINT SYSTEMS
REPAIRS 75-17
Seat belts - third row
$% 76.73.28/21
Remove
1.Remove 'D' post trim casing.
+ INTERIOR TRIM COMPONENTS,
REPAIRS, Trim casing - 'D' post.
2.Remove seat belt upper anchorage bolt and
collect spacer.
3.Release access panel from loadspace side trim
casing.
4.Remove access panel.
5.Remove bolt securing seat belt reel to body.
6.Remove cap from seat belt lower anchorage
bolt.
7.Remove lower anchorage bolt and collect
washers.
8.Remove seat belt.Refit
1.Fit seat belt lower anchorage to body and
tighten bolt to 32 Nm (24 lbf.ft). Fit cap to bolt.
2.Fit seat belt reel to body and tighten bolt to 50
Nm (37 lbf.ft).
3.Fit seat belt upper anchorage and tighten bolt
to 50 Nm (37 lbf.ft).
4.Fit access panel to luggage compartment side
trim casing.
5.Fit 'D' post trim casing.
+ INTERIOR TRIM COMPONENTS,
REPAIRS, Trim casing - 'D' post.
Page 1113 of 1672
RESTRAINT SYSTEMS
75-18 REPAIRS
Pre-tensioner - front seat belt
$% 76.73.30
WARNING: It is imperative that before any work
is undertaken on the SRS system the appropriate
information is read thoroughly.
WARNING: Always disconnect both battery leads
before beginning work on the SRS system.
Disconnect the negative battery lead first. Never
reverse connect the battery.
Remove
1.Remove the key from the starter switch.
Disconnect both battery leads, negative lead
first. Wait ten minutes before starting work.
2.Remove front seat.
+ SEATS, REPAIRS, Seat - front.
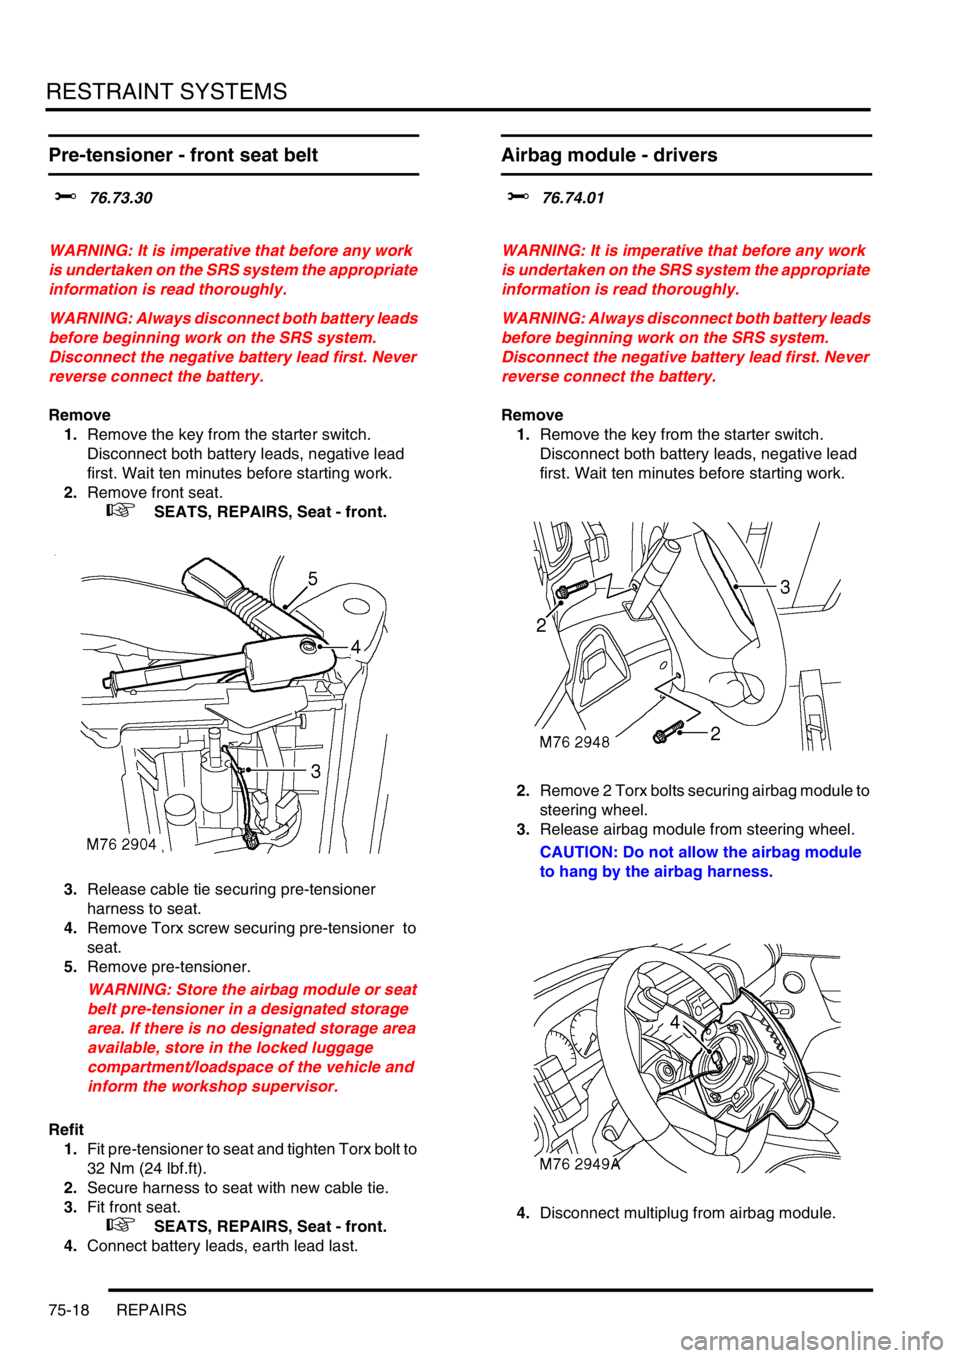
3.Release cable tie securing pre-tensioner
harness to seat.
4.Remove Torx screw securing pre-tensioner to
seat.
5.Remove pre-tensioner.
WARNING: Store the airbag module or seat
belt pre-tensioner in a designated storage
area. If there is no designated storage area
available, store in the locked luggage
compartment/loadspace of the vehicle and
inform the workshop supervisor.
Refit
1.Fit pre-tensioner to seat and tighten Torx bolt to
32 Nm (24 lbf.ft).
2.Secure harness to seat with new cable tie.
3.Fit front seat.
+ SEATS, REPAIRS, Seat - front.
4.Connect battery leads, earth lead last.
Airbag module - drivers
$% 76.74.01
WARNING: It is imperative that before any work
is undertaken on the SRS system the appropriate
information is read thoroughly.
WARNING: Always disconnect both battery leads
before beginning work on the SRS system.
Disconnect the negative battery lead first. Never
reverse connect the battery.
Remove
1.Remove the key from the starter switch.
Disconnect both battery leads, negative lead
first. Wait ten minutes before starting work.
2.Remove 2 Torx bolts securing airbag module to
steering wheel.
3.Release airbag module from steering wheel.
CAUTION: Do not allow the airbag module
to hang by the airbag harness.
4.Disconnect multiplug from airbag module.
Page 1114 of 1672
RESTRAINT SYSTEMS
REPAIRS 75-19
5.Remove airbag module.
WARNING: Store the airbag module with the
deployment side uppermost. If it is stored
deployment side down, accidental
deployment will propel the airbag module
with enough force to cause serious injury.
WARNING: Store the airbag module or seat
belt pre-tensioner in a designated storage
area. If there is no designated storage area
available, store in the locked luggage
compartment/loadspace of the vehicle and
inform the workshop supervisor.
Refit
NOTE: If the airbag module is to be replaced,
the bar code of the new module must be
recorded.
1.Position airbag module and connect multiplug.
2.Fit airbag module to steering wheel and tighten
Torx bolts to 9 Nm (7 lbf.ft).
3.Connect battery leads, earth lead last.
Airbag module - passenger
$% 76.74.02
WARNING: It is imperative that before any work
is undertaken on the SRS system the appropriate
information is read thoroughly.
WARNING: Always disconnect both battery leads
before beginning work on the SRS system.
Disconnect the negative battery lead first. Never
reverse connect the battery.
Remove
1.Remove the key from the starter switch.
Disconnect both battery leads, negative lead
first. Wait ten minutes before starting work.
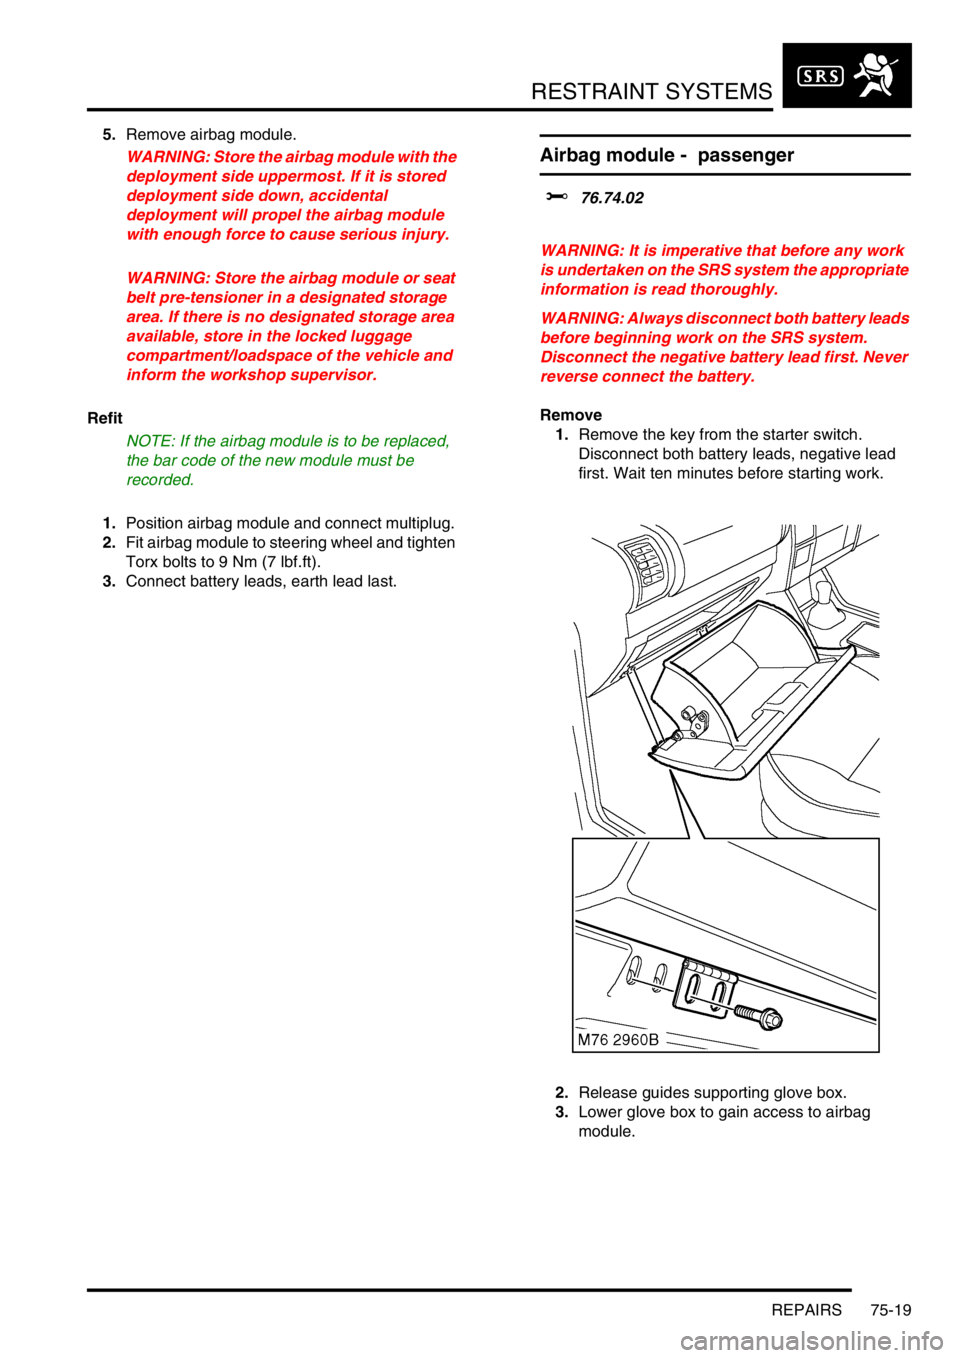
2.Release guides supporting glove box.
3.Lower glove box to gain access to airbag
module.
Page 1115 of 1672
RESTRAINT SYSTEMS
75-20 REPAIRS
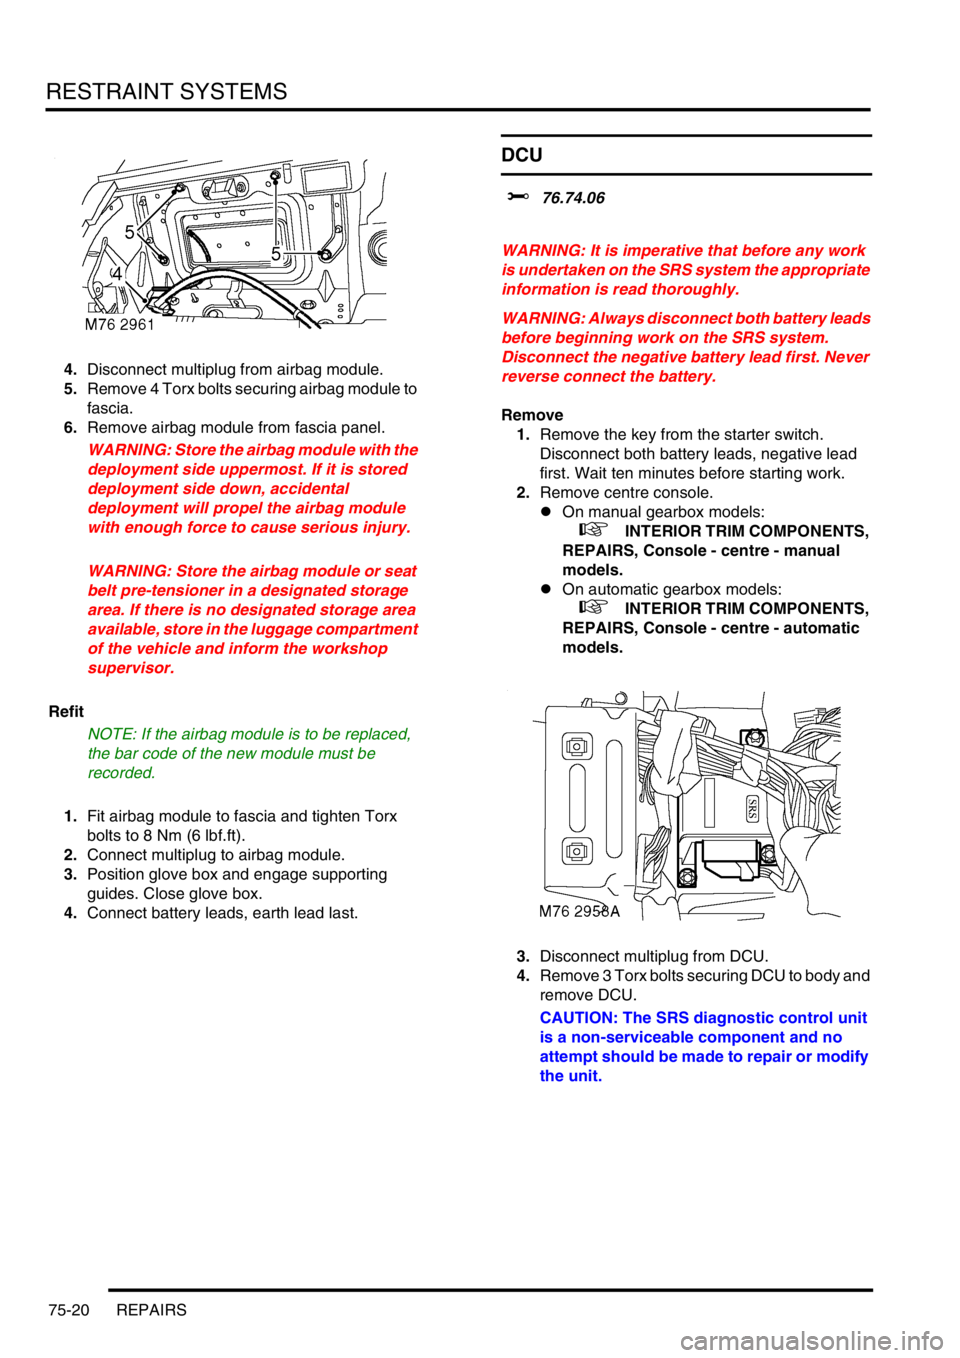
4.Disconnect multiplug from airbag module.
5.Remove 4 Torx bolts securing airbag module to
fascia.
6.Remove airbag module from fascia panel.
WARNING: Store the airbag module with the
deployment side uppermost. If it is stored
deployment side down, accidental
deployment will propel the airbag module
with enough force to cause serious injury.
WARNING: Store the airbag module or seat
belt pre-tensioner in a designated storage
area. If there is no designated storage area
available, store in the luggage compartment
of the vehicle and inform the workshop
supervisor.
Refit
NOTE: If the airbag module is to be replaced,
the bar code of the new module must be
recorded.
1.Fit airbag module to fascia and tighten Torx
bolts to 8 Nm (6 lbf.ft).
2.Connect multiplug to airbag module.
3.Position glove box and engage supporting
guides. Close glove box.
4.Connect battery leads, earth lead last.
DCU
$% 76.74.06
WARNING: It is imperative that before any work
is undertaken on the SRS system the appropriate
information is read thoroughly.
WARNING: Always disconnect both battery leads
before beginning work on the SRS system.
Disconnect the negative battery lead first. Never
reverse connect the battery.
Remove
1.Remove the key from the starter switch.
Disconnect both battery leads, negative lead
first. Wait ten minutes before starting work.
2.Remove centre console.
lOn manual gearbox models:
+ INTERIOR TRIM COMPONENTS,
REPAIRS, Console - centre - manual
models.
lOn automatic gearbox models:
+ INTERIOR TRIM COMPONENTS,
REPAIRS, Console - centre - automatic
models.
3.Disconnect multiplug from DCU.
4.Remove 3 Torx bolts securing DCU to body and
remove DCU.
CAUTION: The SRS diagnostic control unit
is a non-serviceable component and no
attempt should be made to repair or modify
the unit.
Page 1155 of 1672
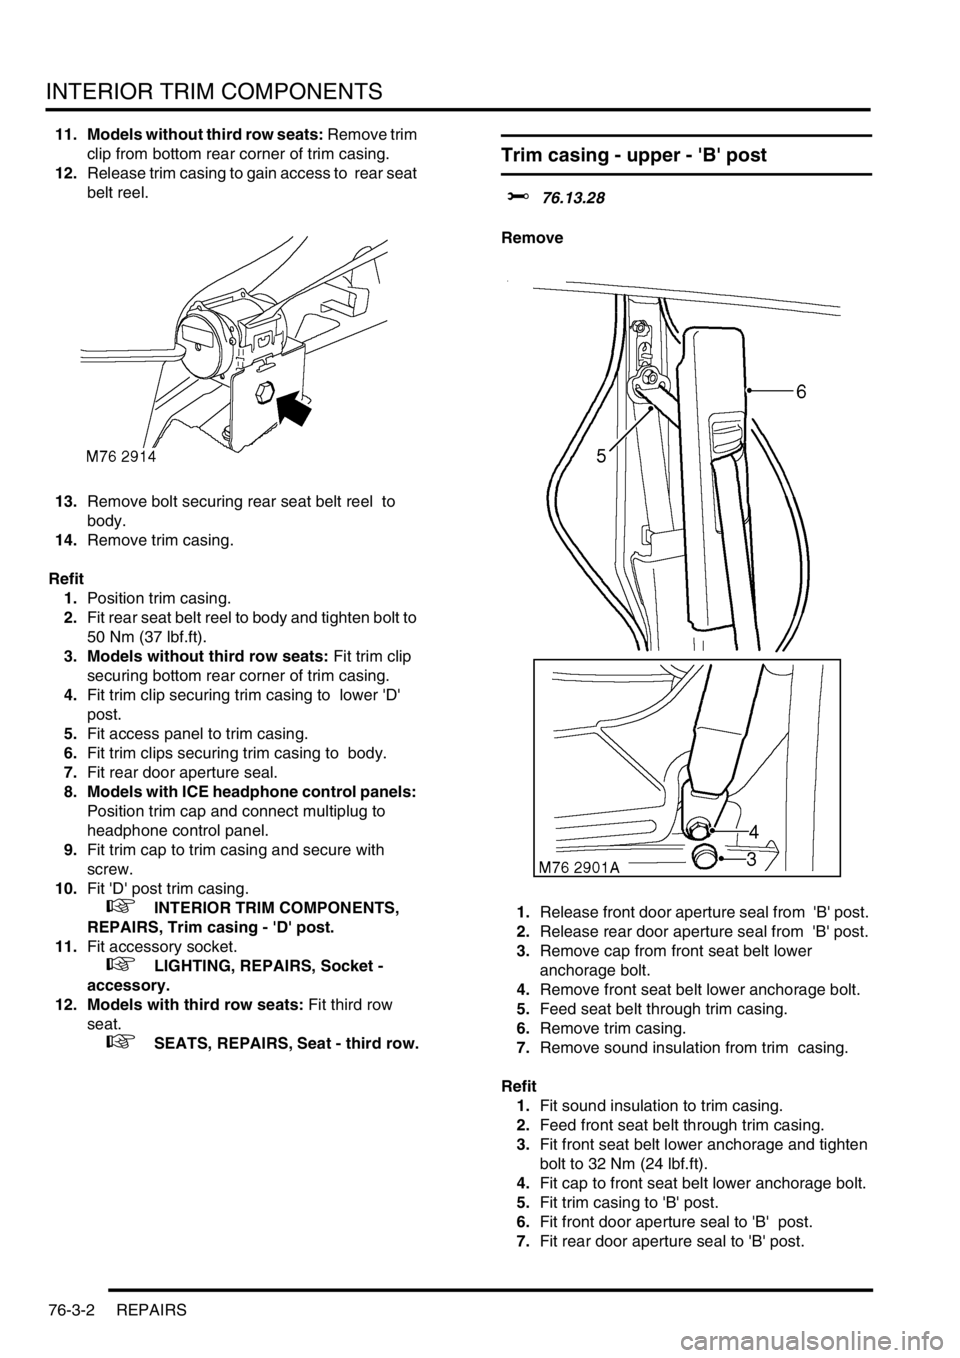
INTERIOR TRIM COMPONENTS
76-3-2 REPAIRS
11. Models without third row seats: Remove trim
clip from bottom rear corner of trim casing.
12.Release trim casing to gain access to rear seat
belt reel.
13.Remove bolt securing rear seat belt reel to
body.
14.Remove trim casing.
Refit
1.Position trim casing.
2.Fit rear seat belt reel to body and tighten bolt to
50 Nm (37 lbf.ft).
3. Models without third row seats: Fit trim clip
securing bottom rear corner of trim casing.
4.Fit trim clip securing trim casing to lower 'D'
post.
5.Fit access panel to trim casing.
6.Fit trim clips securing trim casing to body.
7.Fit rear door aperture seal.
8. Models with ICE headphone control panels:
Position trim cap and connect multiplug to
headphone control panel.
9.Fit trim cap to trim casing and secure with
screw.
10.Fit 'D' post trim casing.
+ INTERIOR TRIM COMPONENTS,
REPAIRS, Trim casing - 'D' post.
11.Fit accessory socket.
+ LIGHTING, REPAIRS, Socket -
accessory.
12. Models with third row seats: Fit third row
seat.
+ SEATS, REPAIRS, Seat - third row.
Trim casing - upper - 'B' post
$% 76.13.28
Remove
1.Release front door aperture seal from 'B' post.
2.Release rear door aperture seal from 'B' post.
3.Remove cap from front seat belt lower
anchorage bolt.
4.Remove front seat belt lower anchorage bolt.
5.Feed seat belt through trim casing.
6.Remove trim casing.
7.Remove sound insulation from trim casing.
Refit
1.Fit sound insulation to trim casing.
2.Feed front seat belt through trim casing.
3.Fit front seat belt lower anchorage and tighten
bolt to 32 Nm (24 lbf.ft).
4.Fit cap to front seat belt lower anchorage bolt.
5.Fit trim casing to 'B' post.
6.Fit front door aperture seal to 'B' post.
7.Fit rear door aperture seal to 'B' post.
Page 1156 of 1672
INTERIOR TRIM COMPONENTS
REPAIRS 76-3-3
Trim casing - lower - 'B' post
$% 76.13.29
Remove
1.Release front door aperture seal from 'B' post.
2.Release rear door aperture seal from 'B' post.
3.Move 'B' post upper trim casing aside.
4.Release 3 clips securing lower trim casing to
'B' post.
5.Remove lower trim casing.
Refit
1.Fit lower trim casing to 'B' post and secure with
clips.
2.Position 'B' post upper trim casing to 'B' post.
3.Fit front door aperture seal to 'B' post.
4.Fit rear door aperture seal to 'B' post.
Trim casing - 'D' post
$% 76.13.73
Remove
1.Fold rear seat forward.
2.Remove tail door aperture upper trim casing.
3.Release caps from end of grab handle.
4.Remove 2 bolts securing grab handle to body.
5.Remove grab handle and collect two spacers.
6.Remove 8 trim clips securing trim casing to
body.
7. Models with third row seats:
aRemove third row seat belt escutcheon.
bRemove cap from lower anchorage of third
row seat belt.
cRemove lower anchorage bolt.