Page 1979 of 2100

EXTERIOR/INTERIOR TRIM8J±1
AXIOM
BODY AND ACCESSORIES
EXTERIOR / INTERIOR TRIM
CONTENTS
Service Precaution 8J±2. . . . . . . . . . . . . . . . . . . . . .
Consoles 8J±3. . . . . . . . . . . . . . . . . . . . . . . . . . . . . . .
Consoles and Associated Parts 8J±3. . . . . . . . .
Removal 8J±3. . . . . . . . . . . . . . . . . . . . . . . . . . . . .
Installation 8J±4. . . . . . . . . . . . . . . . . . . . . . . . . . . .
Front Door Trim Panel 8J±4. . . . . . . . . . . . . . . . . . .
Front Door Trim Panel and Associated
Parts 8J±4. . . . . . . . . . . . . . . . . . . . . . . . . . . . . . . .
Removal 8J±5. . . . . . . . . . . . . . . . . . . . . . . . . . . . .
Installation 8J±5. . . . . . . . . . . . . . . . . . . . . . . . . . . .
Rear Door Trim Panel 8J±6. . . . . . . . . . . . . . . . . . . .
Rear Door Trim Panel and Associated
Parts 8J±6. . . . . . . . . . . . . . . . . . . . . . . . . . . . . . . .
Removal 8J±7. . . . . . . . . . . . . . . . . . . . . . . . . . . . .
Installation 8J±7. . . . . . . . . . . . . . . . . . . . . . . . . . . .
Door Mirror Assembly 8J±8. . . . . . . . . . . . . . . . . . . .
Removal 8J±8. . . . . . . . . . . . . . . . . . . . . . . . . . . . .
Installation 8J±8. . . . . . . . . . . . . . . . . . . . . . . . . . . .
Interior Mirror Assembly 8J±8. . . . . . . . . . . . . . . . . .
Removal 8J±8. . . . . . . . . . . . . . . . . . . . . . . . . . . . .
Installation 8J±8. . . . . . . . . . . . . . . . . . . . . . . . . . . .
Interior Trim Panels 8J±9. . . . . . . . . . . . . . . . . . . . . .
Interior Trim Panels and Associated Parts 8J±9
Removal 8J±9. . . . . . . . . . . . . . . . . . . . . . . . . . . . .
Installation 8J±11. . . . . . . . . . . . . . . . . . . . . . . . . . . .
Headlining 8J±12. . . . . . . . . . . . . . . . . . . . . . . . . . . . . .
Parts Location 8J±12. . . . . . . . . . . . . . . . . . . . . . . .
Removal 8J±12. . . . . . . . . . . . . . . . . . . . . . . . . . . . .
Installation 8J±13. . . . . . . . . . . . . . . . . . . . . . . . . . . .
Overhead Console 8J±14. . . . . . . . . . . . . . . . . . . . . . Parts Location (W/O Sunroof) 8J±14. . . . . . . . . . .
Removal 8J±14. . . . . . . . . . . . . . . . . . . . . . . . . . . . .
Installation 8J±14. . . . . . . . . . . . . . . . . . . . . . . . . . . .
Parts Location (W/ Sunroof) 8J±15. . . . . . . . . . . . .
Removal 8J±15. . . . . . . . . . . . . . . . . . . . . . . . . . . . .
Installation 8J±15. . . . . . . . . . . . . . . . . . . . . . . . . . . .
Wheel Arch Cover 8J±16. . . . . . . . . . . . . . . . . . . . . . .
Wheel Arch Cover and Associated Parts 8J±16. .
Removal 8J±16. . . . . . . . . . . . . . . . . . . . . . . . . . . . .
Installation 8J±16. . . . . . . . . . . . . . . . . . . . . . . . . . . .
Locker Cover 8J±17. . . . . . . . . . . . . . . . . . . . . . . . . . .
Locker Cover and Associated Parts 8J±17. . . . . .
Removal 8J±17. . . . . . . . . . . . . . . . . . . . . . . . . . . . .
Installation 8J±17. . . . . . . . . . . . . . . . . . . . . . . . . . . .
Fuel Filler Door 8J±18. . . . . . . . . . . . . . . . . . . . . . . . .
Parts Location 8J±18. . . . . . . . . . . . . . . . . . . . . . . .
Removal 8J±18. . . . . . . . . . . . . . . . . . . . . . . . . . . . .
Installation 8J±18. . . . . . . . . . . . . . . . . . . . . . . . . . . .
Roof Moulding 8J±19. . . . . . . . . . . . . . . . . . . . . . . . . .
Parts Location 8J±19. . . . . . . . . . . . . . . . . . . . . . . .
Removal 8J±19. . . . . . . . . . . . . . . . . . . . . . . . . . . . .
Installation 8J±19. . . . . . . . . . . . . . . . . . . . . . . . . . . .
Power Door Mirror System 8J±20. . . . . . . . . . . . . . .
General Description 8J±20. . . . . . . . . . . . . . . . . . . . .
Door Mirror Switch 8J±20. . . . . . . . . . . . . . . . . . . . .
Power Window System 8J±21. . . . . . . . . . . . . . . . . .
General Description 8J±21. . . . . . . . . . . . . . . . . . . . .
Power Window Switch Driver Seat Side 8J±21. .
Power Window Motor 8J±22. . . . . . . . . . . . . . . . . .
Main Data and Specifications 8J±23. . . . . . . . . . . . .
Page 1982 of 2100
8J±4EXTERIOR/INTERIOR TRIM
7. Remove the CD changer.
�Remove the four fixing bolts and the connector.Installation
To install, follow the removal steps in the reverse order.
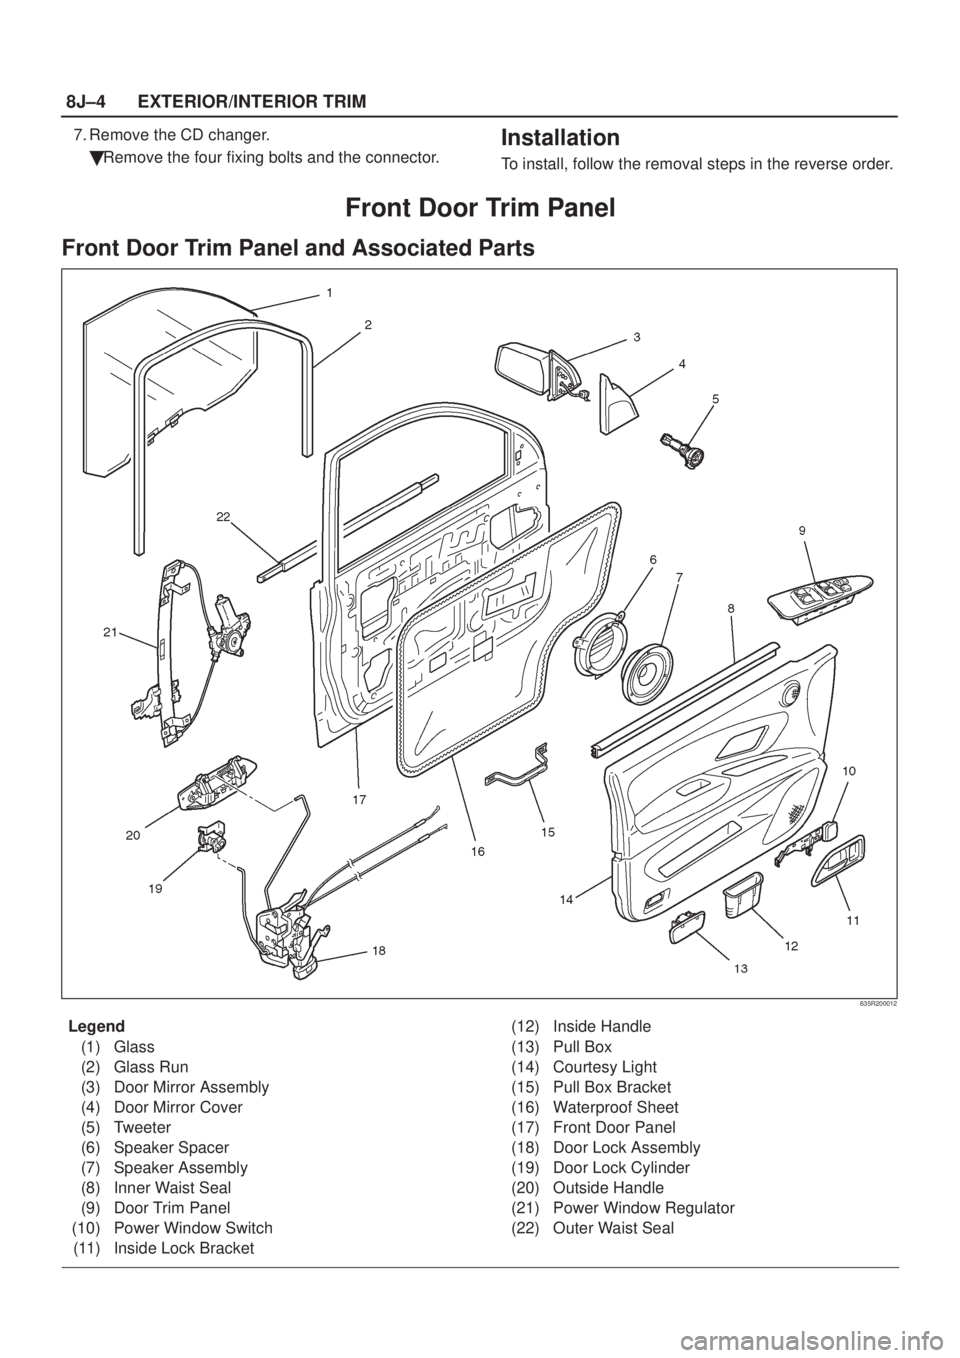
Front Door Trim Panel
Front Door Trim Panel and Associated Parts
635R200012
Legend
(1) Glass
(2) Glass Run
(3) Door Mirror Assembly
(4) Door Mirror Cover
(5) Tweeter
(6) Speaker Spacer
(7) Speaker Assembly
(8) Inner Waist Seal
(9) Door Trim Panel
(10) Power Window Switch
(11) Inside Lock Bracket(12) Inside Handle
(13) Pull Box
(14) Courtesy Light
(15) Pull Box Bracket
(16) Waterproof Sheet
(17) Front Door Panel
(18) Door Lock Assembly
(19) Door Lock Cylinder
(20) Outside Handle
(21) Power Window Regulator
(22) Outer Waist Seal
Page 1983 of 2100
EXTERIOR/INTERIOR TRIM8J±5
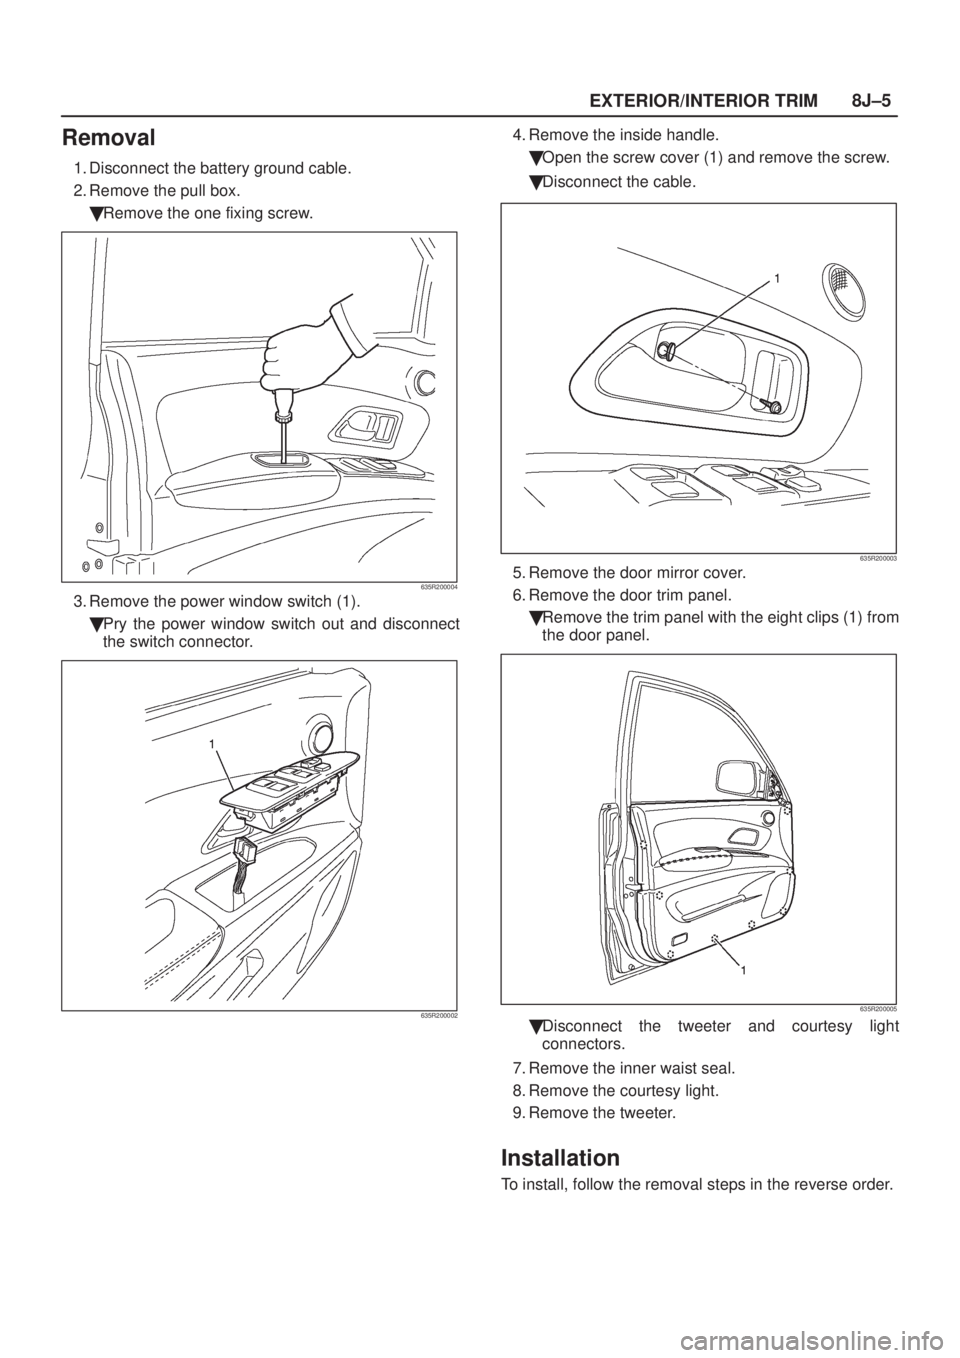
Removal
1. Disconnect the battery ground cable.
2. Remove the pull box.
�Remove the one fixing screw.
635R200004
3. Remove the power window switch (1).
�Pry the power window switch out and disconnect
the switch connector.
635R200002
4. Remove the inside handle.
�Open the screw cover (1) and remove the screw.
�Disconnect the cable.
635R200003
5. Remove the door mirror cover.
6. Remove the door trim panel.
�Remove the trim panel with the eight clips (1) from
the door panel.
635R200005
�Disconnect the tweeter and courtesy light
connectors.
7. Remove the inner waist seal.
8. Remove the courtesy light.
9. Remove the tweeter.
Installation
To install, follow the removal steps in the reverse order.
Page 1986 of 2100
8J±8EXTERIOR/INTERIOR TRIM
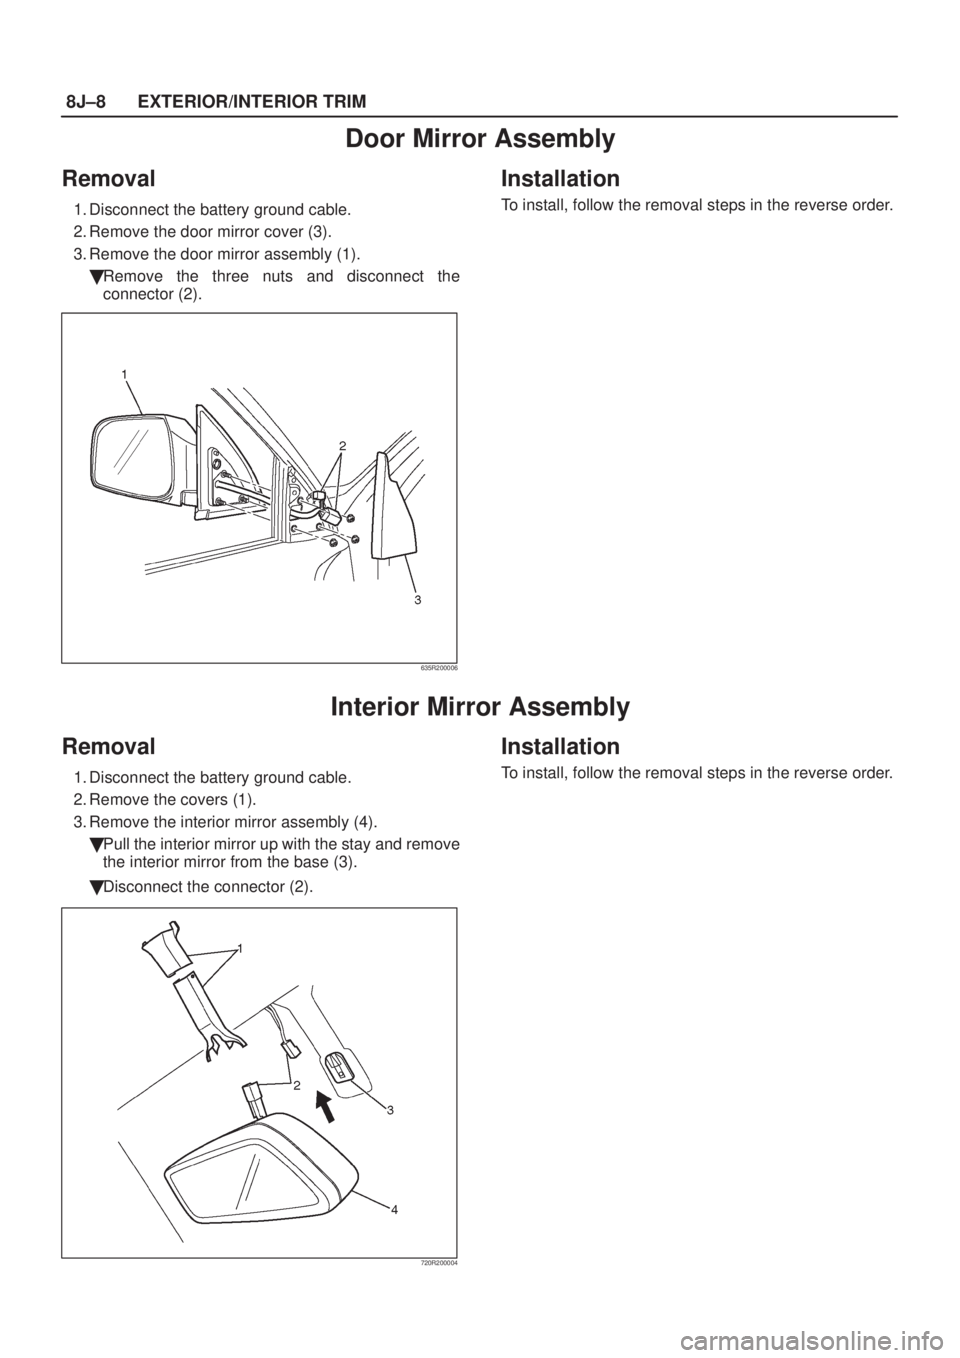
Door Mirror Assembly
Removal
1. Disconnect the battery ground cable.
2. Remove the door mirror cover (3).
3. Remove the door mirror assembly (1).
�Remove the three nuts and disconnect the
connector (2).
635R200006
Installation
To install, follow the removal steps in the reverse order.
Interior Mirror Assembly
Removal
1. Disconnect the battery ground cable.
2. Remove the covers (1).
3. Remove the interior mirror assembly (4).
�Pull the interior mirror up with the stay and remove
the interior mirror from the base (3).
�Disconnect the connector (2).
720R200004
Installation
To install, follow the removal steps in the reverse order.
Page 1991 of 2100
 and the
fixing screw.
�Disconnect the luggage room light connector.
825R200030
5. Remove the over")
EXTERIOR/INTERIOR TRIM8J±13
4. Remove the luggage room light.
�Remove the luggage room light lens (1) and the
fixing screw.
�Disconnect the luggage room light connector.
825R200030
5. Remove the overhead console/sunroof switch (With
sunroof).
�Refer to
Overhead Console in this section.
6. Remove the overhead console (without sunroof).
7. Remove the sunvisors.
�Remove the fixing screws and pull out the sunvisor
holder (1) to remove it.
�Disconnect the vanity mirror illumination connector.
743R200003
8. Remove the sunroof finisher (With sunroof).
9. Remove the headlining.
�Remove the four headlining fixing clips.
Installation
To install, follow the removal steps in the reverse order,
noting the following points.
1. Install the headlining so that the fixing clips will not
come off.
2. To install the sunroof finisher (1), first fit it in at one
place with the headlining (3) close to the sunroof
frame (2), then install the entire finisher tightly by
hitting it with a plastic hammer, not allowing it to move
up.
665RW003
Page 1992 of 2100
8J±14EXTERIOR/INTERIOR TRIM
Overhead Console
Parts Location (W/O Sunroof)
743R200005
Legend
(1) Overhead Console Bracket
(2) Harness Connector
(3) Head Lining(4) Room Mirror
(5) Overhead Console Assembly
(6) Front Door Finisher
(7) Front Assist Grip
Removal
1. Disconnect the battery ground cable.
2. Remove the overhead console assembly.
�Open the lid and remove the two screws.
�Disconnect the harness connector.
3. Remove the sunvisor and sunvisor holder. (right and
left)
4. Remove the front assist grip. (right and left)
5. Remove the front piller trim cover.6. Remove the front door finisher.
�Remove the upper side of door finisher.
7. Remove the interior mirror.
�Refer to
Interior Mirror in this section.
8. Remove the overhead console bracket.
�Remove the two screws.
Installation
To install, follow the removal steps in the reverse order.
Page 1998 of 2100

8J±20EXTERIOR/INTERIOR TRIM
Power Door Mirror System
General Description
The system consists of the starter switch, door mirror
switch, rear defogger/mirror defogger switch and door
mirrors on both sides.
When the door mirror switch is operated with the starter
switch at either ªACCº or ªONº position, the motor in the
door mirror (on either side) rotates to allow the horizontal
and vertical adjustment of mirror angles.
When the rear defogger/mirror defogger switch is turned
ªONº with the starter switch ªONº, the heater of the left
and right mirrors and the tailgate glass are activated.
Door Mirror Switch
Removal
1. Disconnect the battery ground cable.
2. Remove the instrument panel lower cover (2).
Refer to the
Instrument Panel Assembly in Body
Structure section.
3. Remove the door mirror switch (1).
825RW094
Rear Defogger/Mirror Defogger Switch
Refer to the Rear Defogger/Mirror switch removal and
installation steps in Lighting System section.
Door Mirrors
Refer to Door Mirror Assembly in this section.
Page:
< prev 1-8 9-16 17-24

743R200005
Legend
(1) Overhead Console Bracket
(2) Harness Connector
(3) Head Lining(4) Room Mirror
(5) Overhead Console Asse")