Page 1660 of 2100

Reassembly
1. Place third clutch drum and intermediate shaft
assembly upright, using the overdrive internal gear as
a support.
2. Install third clutch spring cu")
7A±76
AUTOMATIC TRANSMISSION (4L30±E)
Reassembly
1. Place third clutch drum and intermediate shaft
assembly upright, using the overdrive internal gear as
a support.
2. Install third clutch spring cushion plate (7), bevel face
down.
3. Install third clutch plates (6) into third clutch drum
assembly (8). Start with the steel clutch plate and
alternate with lined plates.
4. Install thrust washer (5), bearing (4), and retaining
washer (3).
5. Fully engage the hub splines of the input sun gear and
sprag unit assembly (2) into the third clutch inner
tangs.
�Simultaneously rotate the outer sprag race to
engage into the third clutch drum assembly (8).
6. Place J-38450-A blades between the retaining ring
and the third clutch drum apporximately (five)
notches apart, and one blade at each end of the
retaining ring (1). Push down on sprag assembly until
the assembly is seated into the third clutch drum
assembly (8).
7. Remove the tool blades and engage retaining ring
into groove of third clutch drum.
248RX002
Page 1661 of 2100

Third Clutch
Disassembled View
248RS006
Legend
(1) Retaining Ring
(2) Spring Seat(3) Springs
(4) Piston Assembly
(5) Third Clutch Drum
Disassemble
1. Compress s")
7A±77 AUTOMATIC TRANSMISSION (4L30±E)
Third Clutch
Disassembled View
248RS006
Legend
(1) Retaining Ring
(2) Spring Seat(3) Springs
(4) Piston Assembly
(5) Third Clutch Drum
Disassemble
1. Compress spring seat using the J±23075 spring
compressor and J±23075±12 adapter tool.
NOTE: Do not over±stress the springs and seat. This will
cause damage to the spring seat.
�Remove the tool.
�Remove retaining ring (1).
248RS007
2. Release the spring seat (2).
NOTE: Do not let the spring seat catch in the ring groove.
�Remove spring seat (2) and springs (3).
3. Remove piston assembly (4) from third clutch drum
(5).
Inspection And Repair
Visual check:
If any damage, deformation or wear is found, replace the
damaged part.
Operation check:
Shake the piston and listen for check ball movement
indicates proper check ball operation. Replace the piston
if the check ball is missing or falls out.
Reassembly
1. The lip of the piston seal must point toward the front of
the transmission. Lubricate the seal lip with
transmission fluid.
�Install piston assembly (4) into the third clutch drum
(5). Use the J±23084 third clutch piston installer to
protect the outer seal during installation.
�Remove the seal installer.
Page 1662 of 2100
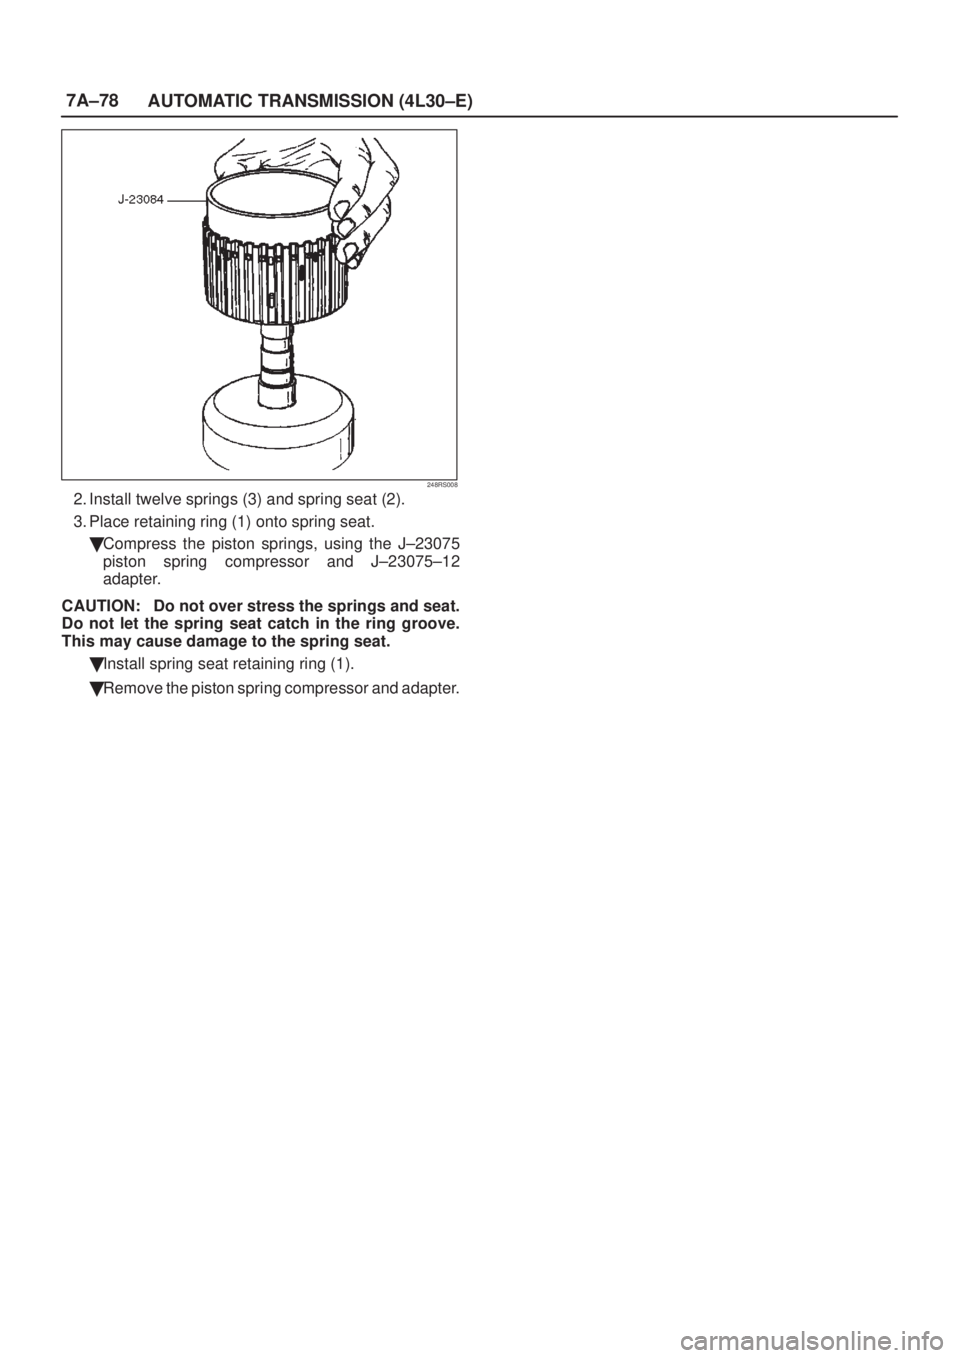
7A±78
AUTOMATIC TRANSMISSION (4L30±E)
248RS008
2. Install twelve springs (3) and spring seat (2).
3. Place retaining ring (1) onto spring seat.
�Compress the piston springs, using the J±23075
piston spring compressor and J±23075±12
adapter.
CAUTION: Do not over stress the springs and seat.
Do not let the spring seat catch in the ring groove.
This may cause damage to the spring seat.
�Install spring seat retaining ring (1).
�Remove the piston spring compressor and adapter.
Page 1663 of 2100

Sprag Unit
Disassembled View
248RS009
Legend
(1) Retaining Ring
(2) Sprag Outer Race
(3) Ring(4) Sprag Assembly
(5) Ring
(6) Third Clutch Hub and Sun Gear Assem")
7A±79 AUTOMATIC TRANSMISSION (4L30±E)
Sprag Unit
Disassembled View
248RS009
Legend
(1) Retaining Ring
(2) Sprag Outer Race
(3) Ring(4) Sprag Assembly
(5) Ring
(6) Third Clutch Hub and Sun Gear Assembly
Disassembly
1. Remove the sprag outer race, retaining ring, and
sprag assembly from the third clutch hub and sun
gear assembly.
2. Remove the rings and sprag assembly from the sprag
outer race.
Inspection And Repair
Visual Check:
If any damage, deformation or wear is found, replace the
damaged part.
Reassembly
NOTE: Flared shoulder of the sprag cage faces the sun
gear. This procedure must be followed exactly to be sure
that the sprag assembly is installed properly.
1. Install rings and sprag assembly onto the third clutch
hub and sun gear.
2. Install sprag outer race and retaining ring assembly
over the sprag cage assembly.
�Place third clutch hub and sun gear assembly on a
flat surface, sun gear facing up. Place sprag outer
race and sprag assembly over the sun gear
assembly, push down and turn the input sun
counterclockwise at the same time. NOTE: Check correct rotation by holding the sun gear in
your left hand and turning the outer race. The outer sprag
race should turn freely towards you and should lock
turning away from you.
248RS010
Page 1664 of 2100
7A±80
AUTOMATIC TRANSMISSION (4L30±E)
Second Clutch
Disassembled View
247RW001
Legend
(1) Retaining Ring
(2) Ring Gear
(3) Retaining Ring
(4) Spacer
(5) Clutch Plates(6) Waved Washer
(7) Retaining Ring
(8) Spring Seat
(9) Springs
(10) Piston Assembly
(11) Second Clutch Drum
Disassembly
1. Remove retaining ring (1) from second clutch drum
(11).
2. Remove ring gear (2), retaining ring (3), and spacer
(4).
3. Remove clutch plates (5) and waved washer (6).
4. Remove retaining ring (7) using J±23327 compressor
to compress the spring seat (8).
5. Remove spring seat (8), springs (9) and piston
assembly (10) from second clutch drum (11).
247RS006
Page 1665 of 2100

Inspection And Repair
Visual Check:
If any damage, deformation or wear is found, replace the
damaged part.
Operation Check:
Shake the piston and listen for che")
7A±81 AUTOMATIC TRANSMISSION (4L30±E)
Inspection And Repair
Visual Check:
If any damage, deformation or wear is found, replace the
damaged part.
Operation Check:
Shake the piston and listen for check ball movement.
Movement indicates proper check ball operation.
Replace the piston if the check ball is missing or falls out.
Reassembly
1. Install piston assembly (10) into the second clutch
drum (11).
�Lubricate the lip seal with transmission fluid. Use
the J±23080±A second clutch piston installer to
protect the outer piston lip seal.
NOTE: L ip o f t h e seal should point toward front of
transmission.
�Remove the installer.
247RS007
2. Install twenty±two piston springs (9) and spring seat
(8) on the second clutch piston (10). Place retaining
ring (7) onto spring seat.
�Use the J±23327 compressor to compress the
piston springs.
NOTE: Do not let spring seat catch in ring groove.
�Remove the compressor.
3. Install waved plate (6) and clutch plates (5). Start with
a steel plate and alternate with lined plates.
�Align second clutch inner tangs.
4. Install spacer (4), with the fluted end toward clutch
plates.
5. Install retaining ring (3), ring gear (2) and retaining
ring (1).
Page 1666 of 2100
7A±82
AUTOMATIC TRANSMISSION (4L30±E)
3±4 Accumulator Piston
Disassembled View
244RS005
Legend
(1) Snap Ring
(2) Cover(3) Spring
(4) Piston Assembly
Disassembly
1. Install the J±38559±A cover compressor on adapter
case.
�Compress piston cover then remove snap ring.
242RS007
2. Install the J±41096 cover remover and J±38584
adapter to center hole of cover.
�Use the J±23907 slide hammer to remove cover.
3. Remove spring and piston assembly.
242RW001
Page 1667 of 2100
7A±83 AUTOMATIC TRANSMISSION (4L30±E)
Inspection And Repair
Visual Check:
If any damage, deformation or wear is found, replace the
damaged part.
Reassembly
1. Place the J±38553 piston fitter into adaptor case and
push the piston into position, using suitable diameter
tube.
�Remove the piston fitter.
244RS006
2. Install spring and cover.
3. Install snap ring, using the J±38559±A compressor
tool.
�Install snap ring in groove.
�Remove the compressor tool.
242RS007

Second Clutch
Disassembled View
247RW001
Legend
(1) Retaining Ring
(2) Ring Gear
(3) Retaining Ring
(4) Spacer
(5) Clutch Plates(6) Waved Washer
(7) Retaining R")

3±4 Accumulator Piston
Disassembled View
244RS005
Legend
(1) Snap Ring
(2) Cover(3) Spring
(4) Piston Assembly
Disassembly
1. Install the J±38559±A cover com")

Inspection And Repair
Visual Check:
If any damage, deformation or wear is found, replace the
damaged part.
Reassembly
1. Place the J±38553 piston fitter into a")