Page 97 of 249
DO-IT-YOURSELF MAINTENANCE
DO-IT-YOURSELF MAINTENANCE DO-IT-YOURSELF MAINTENANCE
DO-IT-YOURSELF MAINTENANCE
DO-IT-YOURSELF MAINTENANCE
6-1
G010A02X-GATENGINE COMPARTMENT (For Multiport Fuel Injection)
ENGINE COMPARTMENT (For Multiport Fuel Injection) ENGINE COMPARTMENT (For Multiport Fuel Injection)
ENGINE COMPARTMENT (For Multiport Fuel Injection)
ENGINE COMPARTMENT (For Multiport Fuel Injection)
1. Engine oil level dipstick
2. Air cleaner
3. Engine oil filler cap
4. Brake booster
5. Brake fluid reservoir 6. Windshield washer fluid reservoir cap
7. Power steering fluid reservoir
8. Spark plug
9. Automatic transaxle fluid level dipstick
(Automatic T/A only) 10. Radiator cap
11. Battery
12. Relay box
13. Engine coolant reservoir
6.6.
6.6.
6.
DO-IT
DO-IT DO-IT
DO-IT
DO-IT
-Y
-Y -Y
-Y
-Y
OURSELF MAINTENANCE
OURSELF MAINTENANCE OURSELF MAINTENANCE
OURSELF MAINTENANCE
OURSELF MAINTENANCE
12 4 5 6
HNVOM113
81 011 13
12
79 3
66
66
6
Page 98 of 249

DO-IT-YOURSELF MAINTENANCE
DO-IT-YOURSELF MAINTENANCE DO-IT-YOURSELF MAINTENANCE
DO-IT-YOURSELF MAINTENANCE
DO-IT-YOURSELF MAINTENANCE
6-2 G020A01A-AAT
GENERAL CHECKS
GENERAL CHECKS GENERAL CHECKS
GENERAL CHECKS
GENERAL CHECKS
Engine Compartment
Engine Compartment Engine Compartment
Engine Compartment
Engine Compartment The following should be checked regularly:
o Engine oil level and condition
o Transaxle fluid level and condition
o Brake fluid level
o Clutch fluid level
o Engine coolant level
o Windshield washer fluid level
o Accessory drive belt condition
o Engine coolant hose condition
o Fluid leaks (on or below components)
o Power steering fluid level
o Battery Condition G020C01X-GAT
Vehicle Interior
Vehicle Interior Vehicle Interior
Vehicle Interior
Vehicle Interior
The following should be checked each time
when the vehicle is driven:
o Lights operation
o Windshield wipers operation
o Horn operation
o Defroster, heating system operation (and air conditioning, if installed)
o Steering operation and condition
o Mirror condition and operation
o Turn signal operation
o Accelerator pedal operation
o Brake operation, including parking brake
o Manual transaxle operation, including clutch operation
o Automatic transaxle operation, including "Park" mechanism operation
o Seat control condition and operation
o Seat belt condition and operation
o Sunvisor operation
If you notice anything that does not operate
correctly or appears to be functioning in cor-rectly, inspect it carefully and seek assistancefrom your Hyundai dealer if service is needed. G030A01A-AAT
CHECKING THE ENGINE OIL
CHECKING THE ENGINE OIL CHECKING THE ENGINE OIL
CHECKING THE ENGINE OIL
CHECKING THE ENGINE OIL
Engine oil is essential to the performance andservice of the engine. It is suggested that youcheck the oil level at least once a week innormal use and more often if you are on a tripor driving in severe conditions. G030B01A-GAT
Recommended Oil
Recommended Oil Recommended Oil
Recommended Oil
Recommended Oil
SSA6030B°C °F -25-13 20W-40 20W-50
15W-40 15W-50
10W-30
10W-40 10W-50
5W-40
5W-30
5W-2040 104
2068
1050
032
-15 5 -10-14
SH, SG or SG/CD (API) multi-grade and fuel efficient oil is recommended.
NOTE:
NOTE: NOTE:
NOTE:
NOTE:
SAE 5W-20 is not recommended for sus-
SAE 5W-20 is not recommended for sus- SAE 5W-20 is not recommended for sus-
SAE 5W-20 is not recommended for sus-
SAE 5W-20 is not recommended for sus-
tained high speed vehicle operation.
tained high speed vehicle operation. tained high speed vehicle operation.
tained high speed vehicle operation.
tained high speed vehicle operation.
G020B01A-AAT
Vehicle Exterior
Vehicle Exterior Vehicle Exterior
Vehicle Exterior
Vehicle Exterior The following should be checked monthly:
o Overall appearance and condition
o Wheel condition and wheel nut torque
o Exhaust system condition
o Light condition and operation
o Windshield glass condition
o Wiper blade condition
o Paint condition and body corrosion
o Fluid leaks
o Door and hood lock condition
o Tire pressure and condition
(including spare tire)
o Air filter condition
Page 99 of 249

DO-IT-YOURSELF MAINTENANCE
DO-IT-YOURSELF MAINTENANCE DO-IT-YOURSELF MAINTENANCE
DO-IT-YOURSELF MAINTENANCE
DO-IT-YOURSELF MAINTENANCE
6-3
G030C01A-AAT
To Check the Oil Level
To Check the Oil Level To Check the Oil Level
To Check the Oil Level
To Check the Oil Level G030D01A-GAT
Adding Oil
Adding Oil Adding Oil
Adding Oil
Adding Oil
AS60050A
L
F
Before checking the oil, warm up the engine to
the normal operating temperature and be sure your car is parked on level ground. Turn theengine off.
Wait a minute, then remove the dipstick, wipe it
off, fully reinsert the dipstick and withdraw itagain. Then note the highest level the oil hasreached on the dipstick. It should be betweenthe upper ("FULL") and lower ("LOW") range. If the oil level is close to or below the "L" mark,add oil until it reaches the "F" mark. To add oil:
1. Remove the oil filler cap by turning it counter-
clockwise.
2. Add oil, then check the level again. Do not overfill.
3. Replace the cap by turning it clockwise. The distance between the "F" and "L" marks is equal to about 1 liter of oil. G350A01A-GAT
ENGINE OIL CONSUMPTION
ENGINE OIL CONSUMPTION ENGINE OIL CONSUMPTION
ENGINE OIL CONSUMPTION
ENGINE OIL CONSUMPTION
Function of Engine Oil
Function of Engine Oil Function of Engine Oil
Function of Engine Oil
Function of Engine Oil
Engine oil has the primary function of lubricat-
ing and cooling the inside of the engine.
Engine oil consumption
Engine oil consumption Engine oil consumption
Engine oil consumption
Engine oil consumption
It is normal that an engine should consume
some engine oil while normal driving. The causeof oil consumption in a normal engine are asfollows;
o Engine oil is used to lubricate pistons, piston rings and cylinders. A thin film of oil is left on the cylinder wall when a piston moves downwards in thecylinder. High negative pressure generated
during engine operation sucks some of theoil into the combustion chamber. This oil with some oil of the cylinder wall is
burned by the high temperature combustiongases during the combustion process.
o The engine oil consumption is strongly ef- fected by the viscosity and quality of oil,engine rpm and driving condition etc. Theengine oil is more consumed under severedriving conditions such as high speeds and
frequent acceleration and deceleration thannormal driving condition.
G030D01A
Page 100 of 249

DO-IT-YOURSELF MAINTENANCE
DO-IT-YOURSELF MAINTENANCE DO-IT-YOURSELF MAINTENANCE
DO-IT-YOURSELF MAINTENANCE
DO-IT-YOURSELF MAINTENANCE
6-4 G040A03X-GAT
CHANGING THE OIL AND FILTER
CHANGING THE OIL AND FILTER CHANGING THE OIL AND FILTER
CHANGING THE OIL AND FILTER
CHANGING THE OIL AND FILTER 3. Slide underneath the car and loosen the
drain plug by turning it counterclockwise with a wrench of the proper size. Be surethat a drain pan is in position to catch the oilas it drains out, then remove the drain plug.
WARNING:
WARNING: WARNING:
WARNING:
WARNING:
Be very careful when draining the engine oil
Be very careful when draining the engine oil Be very careful when draining the engine oil
Be very careful when draining the engine oil
Be very careful when draining the engine oil
as it may be hot
as it may be hot as it may be hot
as it may be hot
as it may be hot enough to burn you!
enough to burn you! enough to burn you!
enough to burn you!
enough to burn you!
4. When the oil has stopped draining, replace the drain plug using a new washer andretighten by turning it clockwise. 6. First, remove the vehicle number plate. Un-
screw the tapping screws (4EA) and re-move the front bumper grille.
Oil filler cap
Oil filter
Drain plug
The engine oil and filter should be changed at
those intervals specified in the maintenance schedule in Section 5. If the car is being driven
in severe conditions, more frequent oil and filter
changes are required.
The procedure for changing the oil and filter is
as follows:
1. Park the car on level ground and set the parking brake. Start the engine and let it warm up until the needle on the coolanttemperature gauge moves above the lowest
mark. Turn the engine off and place the gearselector lever in "P" (automatic transaxle) orreverse gear (manual transaxle).
2. Open the hood and remove the engine oil filler cap.
G040A01X
G040A02X
SST (09263-02000)
5. Before removing the oil filter, prepare the special tool (oil filter wrench), extension bar and ratchet handle.
G040A03X
SST (09263-02000)
G040A04X
Extension bar
7. Using the special tool (09263-02000), re- move the oil filter through the bumper hole.
Page 101 of 249

DO-IT-YOURSELF MAINTENANCE
DO-IT-YOURSELF MAINTENANCE DO-IT-YOURSELF MAINTENANCE
DO-IT-YOURSELF MAINTENANCE
DO-IT-YOURSELF MAINTENANCE
6-5
G050A01A-AAT
CHECKING AND CHANGING THE EN-
CHECKING AND CHANGING THE EN- CHECKING AND CHANGING THE EN-
CHECKING AND CHANGING THE EN-
CHECKING AND CHANGING THE EN-
GINE COOLANT
GINE COOLANT GINE COOLANT
GINE COOLANT
GINE COOLANT
WARNING:
WARNING: WARNING:
WARNING:
WARNING:
Do not remove the radiator cap when the
Do not remove the radiator cap when the Do not remove the radiator cap when the
Do not remove the radiator cap when the
Do not remove the radiator cap when the engine is hot. When the engine is hot, the
engine is hot. When the engine is hot, the engine is hot. When the engine is hot, the
engine is hot. When the engine is hot, the
engine is hot. When the engine is hot, the
engine coolant is under pressure and may
engine coolant is under pressure and may engine coolant is under pressure and may
engine coolant is under pressure and may
engine coolant is under pressure and may
erupt through the opening if the cap is
erupt through the opening if the cap is erupt through the opening if the cap is
erupt through the opening if the cap is
erupt through the opening if the cap is
removed. You could be seriously burned if
removed. You could be seriously burned if removed. You could be seriously burned if
removed. You could be seriously burned if
removed. You could be seriously burned if
you do not observe this precaution. Do not
you do not observe this precaution. Do not you do not observe this precaution. Do not
you do not observe this precaution. Do not
you do not observe this precaution. Do not
remove the radiator cap until the radiator is
remove the radiator cap until the radiator is remove the radiator cap until the radiator is
remove the radiator cap until the radiator is
remove the radiator cap until the radiator is
cool to the touch.
cool to the touch. cool to the touch.
cool to the touch.
cool to the touch.
8. Before installing the new oil filter on the
engine, apply clean engine oil to the surface of the rubber gasket. Temporarily tighten the oil filter by hand.
G040A05X
G040A06X
9. Using the special tool (09263-02000) andtorque wrench, tighten the oil filter to the specified torque. Tightening torque .............. 12-16 Nm
(120-160 kg.cm, 9-12 lb.ft)
SST (09263-02000)
G040A04X
Extension bar
NOTE:
NOTE: NOTE:
NOTE:
NOTE:
oo
oo
o Be careful not to drop the engine oil on
Be careful not to drop the engine oil on Be careful not to drop the engine oil on
Be careful not to drop the engine oil on
Be careful not to drop the engine oil on
the rubber
the rubber the rubber
the rubber
the rubber
parts of the engine mounting
parts of the engine mounting parts of the engine mounting
parts of the engine mounting
parts of the engine mounting
insulator.
insulator. insulator.
insulator.
insulator.
oo
oo
o You can purchase the SST from your
You can purchase the SST from your You can purchase the SST from your
You can purchase the SST from your
You can purchase the SST from your
Hyundai dealer.
Hyundai dealer. Hyundai dealer.
Hyundai dealer.
Hyundai dealer.
oo
oo
o If you aren't sure how to use, consult
If you aren't sure how to use, consult If you aren't sure how to use, consult
If you aren't sure how to use, consult
If you aren't sure how to use, consult
your Hyundai dealer.
your Hyundai dealer. your Hyundai dealer.
your Hyundai dealer.
your Hyundai dealer.
10. Refill the crankcase with the recommended engine oil. Refer to the specification in chap- ter 9 for engine oil capacity.
11. Start the engine and check to be sure no oil is leaking from the drain plug or oil filter.
12. Shut off the engine and recheck the oil level. NOTE:
NOTE: NOTE:
NOTE:
NOTE:
Always dispose of used engine oil in an
Always dispose of used engine oil in an Always dispose of used engine oil in an
Always dispose of used engine oil in an
Always dispose of used engine oil in an environmentally acceptable
environmentally acceptable environmentally acceptable
environmentally acceptable
environmentally acceptable
manner. It is sug-
manner. It is sug- manner. It is sug-
manner. It is sug-
manner. It is sug-
gested that it be placed in a sealed container
gested that it be placed in a sealed container gested that it be placed in a sealed container
gested that it be placed in a sealed container
gested that it be placed in a sealed container
and taken
and taken and taken
and taken
and taken
to a service station for reclama-
to a service station for reclama- to a service station for reclama-
to a service station for reclama-
to a service station for reclama-
tion. Do not pour the oil on the ground or
tion. Do not pour the oil on the ground or tion. Do not pour the oil on the ground or
tion. Do not pour the oil on the ground or
tion. Do not pour the oil on the ground or
put it into the household trash.
put it into the household trash. put it into the household trash.
put it into the household trash.
put it into the household trash.
WARNING:
WARNING: WARNING:
WARNING:
WARNING:
Used motor oil may cause irritation or can-
Used motor oil may cause irritation or can- Used motor oil may cause irritation or can-
Used motor oil may cause irritation or can-
Used motor oil may cause irritation or can-cer of the skin if
cer of the skin if cer of the skin if
cer of the skin if
cer of the skin if left in contact with the skin
left in contact with the skin left in contact with the skin
left in contact with the skin
left in contact with the skin
for prolonged periods of time. Wash your
for prolonged periods of time. Wash your for prolonged periods of time. Wash your
for prolonged periods of time. Wash your
for prolonged periods of time. Wash your
hands
hands hands
hands
hands thoroughly with soap and warm wa-
thoroughly with soap and warm wa- thoroughly with soap and warm wa-
thoroughly with soap and warm wa-
thoroughly with soap and warm wa-
ter as soon as possible after handling used
ter as soon as possible after handling used ter as soon as possible after handling used
ter as soon as possible after handling used
ter as soon as possible after handling used
oil.oil.
oil.oil.
oil.
Page 102 of 249

-25 (-13) -35 (-31)-45 (-49)
G050B01A-AAT
Recommended")
DO-IT-YOURSELF MAINTENANCE
DO-IT-YOURSELF MAINTENANCE DO-IT-YOURSELF MAINTENANCE
DO-IT-YOURSELF MAINTENANCE
DO-IT-YOURSELF MAINTENANCE
6-6 -15 (5)
-25 (-13) -35 (-31)-45 (-49)
G050B01A-AAT
Recommended Engine Coolant
Recommended Engine Coolant Recommended Engine Coolant
Recommended Engine Coolant
Recommended Engine Coolant
Use a high quality ethylene-glycol coolant in a
50/50 mix with water. The engine coolant should be compatible with aluminum engine parts. Ad-ditional corrosion inhibitors or additives shouldnot be used. The cooling system must be main-tained with the correct concentration and typeof engine coolant to prevent freezing and corro-sion. Never allow the concentration of antifreeze to exceed the 60% level or go below the 35% levelor damage to the coolant system may result. Forproper concentration when adding or replacingthe coolant, refer to the following table.
35% 40%50%60% G050C01A-AAT
To Check the Coolant Level
To Check the Coolant Level To Check the Coolant Level
To Check the Coolant Level
To Check the Coolant Level
The coolant level can be seen on the side of the plastic coolant reservoir. The level of the cool-ant should be between the "LOW" and "FULL"lines on the reservoir when the engine is cold.If the level is below the "LOW" mark, addengine coolant to bring it up between "LOW"and "FULL". If the level is low, inspect forcoolant leaks and recheck the fluid level fre-quently. If the level drops again, visit yourHyundai dealer for an inspection and diagnosisof the reason. G050D02A-AAT
To Change the Engine Coolant
To Change the Engine Coolant To Change the Engine Coolant
To Change the Engine Coolant
To Change the Engine Coolant
The engine coolant should be changed at thoseintervals specified in the vehicle maintenanceschedule in Section 5.
CAUTION:
CAUTION: CAUTION:
CAUTION:
CAUTION:
Engine coolant can damage the finish of
Engine coolant can damage the finish of Engine coolant can damage the finish of
Engine coolant can damage the finish of
Engine coolant can damage the finish of
your car. If you spill engine coolant on the
your car. If you spill engine coolant on the your car. If you spill engine coolant on the
your car. If you spill engine coolant on the
your car. If you spill engine coolant on the
car, wash it off thoroughly with clean water.
car, wash it off thoroughly with clean water. car, wash it off thoroughly with clean water.
car, wash it off thoroughly with clean water.
car, wash it off thoroughly with clean water.
1. Park the car on level ground, set the parking brake and remove the radiator cap whencool.
2. Be sure your drain receptacle is in place. Open the drain cock on the radiator. Allowall the engine coolant to drain from thecooling system, then securely close the draincock.
3. Check Section 9 for the capacity of the cooling system in your car. Then, followingthe manufacturer's directions on the enginecoolant container, add the appropriate quan-tity of engine coolant to the radiator.
G050C01A
65% 60%50%40%
Water
Antifreeze
solution
Ambient
temperature °C ( °F) Engine coolant concentration
Page 103 of 249

DO-IT-YOURSELF MAINTENANCE
DO-IT-YOURSELF MAINTENANCE DO-IT-YOURSELF MAINTENANCE
DO-IT-YOURSELF MAINTENANCE
DO-IT-YOURSELF MAINTENANCE
6-7
4. Turn the radiator cap counterclockwise with-out pressing down on it, until it stops. This relieves any pressure remaining in the cool-ing system. And remove the radiator cap bypushing down and turning counterclockwise. Now fill the radiator with clean demineral- ized or distilled water. Continue to add cleandemineralized or distilled water in small quan-tities until the fluid level stays up in theradiator neck.SSA6060A
Unleaded: 1.0 ~ 1.1 mm (0.039 ~ 0.043 in.) Leaded: 0.8 ~ 0.9 mm (0.031 ~ 0.035 in.)
G060B02A-GAT
REPLACING THE SPARK PLUGS
REPLACING THE SPARK PLUGS REPLACING THE SPARK PLUGS
REPLACING THE SPARK PLUGS
REPLACING THE SPARK PLUGS
The spark plugs should be changed at the
intervals specified in the vehicle maintenance schedule in Section 5 or whenever engine per-formance indicates they should be changed.Symptoms that suggest poor spark plug perfor-mance include engine misfiring under load, lossof fuel economy, poor acceleration, etc. Whenspark plugs are replaced, always use sparkplugs recommended by Hyundai. The use ofother spark plugs can result in loss of perfor-mance, radio interference or engine damage.
NOTE:
NOTE: NOTE:
NOTE:
NOTE:
When replacing the spark plug, always use
When replacing the spark plug, always use When replacing the spark plug, always use
When replacing the spark plug, always use
When replacing the spark plug, always use the genuine parts recommended.
the genuine parts recommended. the genuine parts recommended.
the genuine parts recommended.
the genuine parts recommended.
G050D02X
5. Start the engine, top off the radiator with
water and then add engine coolant to the reservoir until the level is between "LOW"and "FULL".
6. Replace the radiator and reservoir caps and check to be sure the drain cocks are fullyclosed and not leaking.
WARNING:
WARNING: WARNING:
WARNING:
WARNING:
The cooling fan is controlled by engine cool-
The cooling fan is controlled by engine cool- The cooling fan is controlled by engine cool-
The cooling fan is controlled by engine cool-
The cooling fan is controlled by engine cool- ant temperature and may sometimes oper-
ant temperature and may sometimes oper- ant temperature and may sometimes oper-
ant temperature and may sometimes oper-
ant temperature and may sometimes oper-
ate even when the engine is not running.
ate even when the engine is not running. ate even when the engine is not running.
ate even when the engine is not running.
ate even when the engine is not running.
Use extreme caution when working near the
Use extreme caution when working near the Use extreme caution when working near the
Use extreme caution when working near the
Use extreme caution when working near the
blades of the cooling fan so that you are not
blades of the cooling fan so that you are not blades of the cooling fan so that you are not
blades of the cooling fan so that you are not
blades of the cooling fan so that you are not
injured by a rotating fan blade. As the en-
injured by a rotating fan blade. As the en- injured by a rotating fan blade. As the en-
injured by a rotating fan blade. As the en-
injured by a rotating fan blade. As the en-
gine coolant temperature decreases, the fan
gine coolant temperature decreases, the fan gine coolant temperature decreases, the fan
gine coolant temperature decreases, the fan
gine coolant temperature decreases, the fan
will automatically shut off. This is a normal
will automatically shut off. This is a normal will automatically shut off. This is a normal
will automatically shut off. This is a normal
will automatically shut off. This is a normal
condition.
condition. condition.
condition.
condition.
G050B01A
Page 104 of 249

DO-IT-YOURSELF MAINTENANCE
DO-IT-YOURSELF MAINTENANCE DO-IT-YOURSELF MAINTENANCE
DO-IT-YOURSELF MAINTENANCE
DO-IT-YOURSELF MAINTENANCE
6-8 NOTE:
NOTE: NOTE:
NOTE:
NOTE:
Spark plugs should be tightened firmly. Over-
Spark plugs should be tightened firmly. Over- Spark plugs should be tightened firmly. Over-
Spark plugs should be tightened firmly. Over-
Spark plugs should be tightened firmly. Over-
tightening can damage
tightening can damage tightening can damage
tightening can damage
tightening can damage the threads in the
the threads in the the threads in the
the threads in the
the threads in the
aluminum cylinder head. Also, leaving them
aluminum cylinder head. Also, leaving them aluminum cylinder head. Also, leaving them
aluminum cylinder head. Also, leaving them
aluminum cylinder head. Also, leaving them
too loose can
too loose can too loose can
too loose can
too loose can cause the spark plug to get
cause the spark plug to get cause the spark plug to get
cause the spark plug to get
cause the spark plug to get
very hot and possibly result in damage to
very hot and possibly result in damage to very hot and possibly result in damage to
very hot and possibly result in damage to
very hot and possibly result in damage to
the the
the the
the engine.
engine. engine.
engine.
engine.
6. Replace the cable by pushing the insulated connector directly down onto the electrode. Check to be sure it has snapped into placeand can't fall off.
G060C03A
G060C02A-AAT
Changing the Spark Plugs
Changing the Spark Plugs Changing the Spark Plugs
Changing the Spark Plugs
Changing the Spark Plugs
Unleaded
RC9YC4
RC10YC4
BKR5ES-11
NGK Leaded
RC9YC
RC10YC BKR5ES
CHAMPION
G060C01A
You will find it easier to change spark plugs if
the engine is cold. Always change one spark
plug at a time. This helps avoid getting the wiresmixed up.
1. Using a clean cloth, remove any dirt that has accumulated around the base of the spark plug so it cannot fall into the cylinder whenthe spark plug is removed. WARNING:
WARNING: WARNING:
WARNING:
WARNING:
It is recommended that the engine be cool
It is recommended that the engine be cool It is recommended that the engine be cool
It is recommended that the engine be cool
It is recommended that the engine be cool or cold when changing
or cold when changing or cold when changing
or cold when changing
or cold when changing the spark plugs. If
the spark plugs. If the spark plugs. If
the spark plugs. If
the spark plugs. If
the engine is hot, you could burn yourself
the engine is hot, you could burn yourself the engine is hot, you could burn yourself
the engine is hot, you could burn yourself
the engine is hot, you could burn yourself
on the insulated
on the insulated on the insulated
on the insulated
on the insulated connector, the spark plug
connector, the spark plug connector, the spark plug
connector, the spark plug
connector, the spark plug
or the engine itself.
or the engine itself. or the engine itself.
or the engine itself.
or the engine itself.
3. When preparing to remove the old spark
plug, guide the socket down over the spark plug, being careful not to damage the ce-ramic insulator.
4. To remove the old spark plug, turn the wrench handle in a counterclockwise direc-tion.
5. To install the new spark plug, guide the socket down over the spark plug, beingcareful not to damage the ceramic insulator.
G060C02A
Recommended Spark Plugs:
Recommended Spark Plugs: Recommended Spark Plugs:
Recommended Spark Plugs:
Recommended Spark Plugs: 2. To remove the spark plug cable, pull straight
up on the insulated connector, not the cable. Pulling on the cable may damage the carboncore conductor.
 1
1 2
2 3
3 4
4 5
5 6
6 7
7 8
8 9
9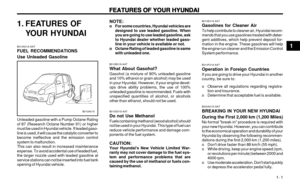 10
10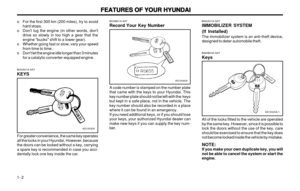 11
11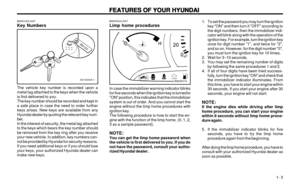 12
12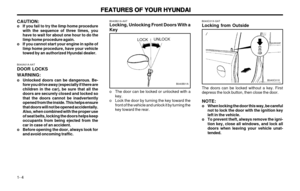 13
13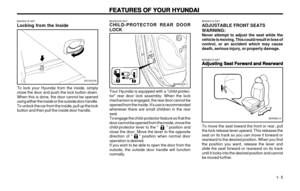 14
14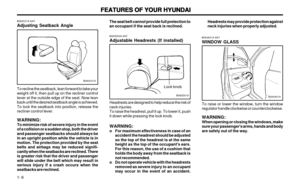 15
15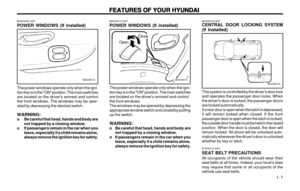 16
16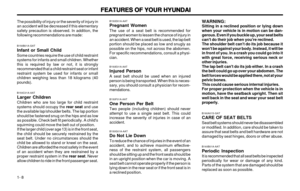 17
17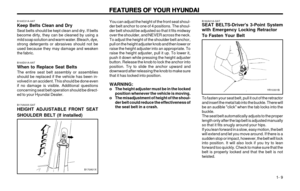 18
18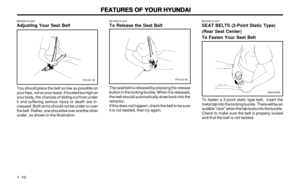 19
19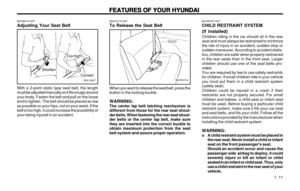 20
20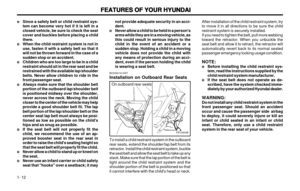 21
21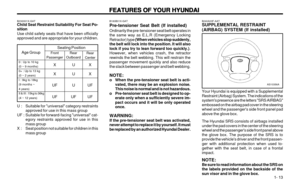 22
22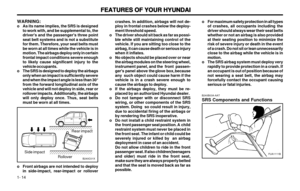 23
23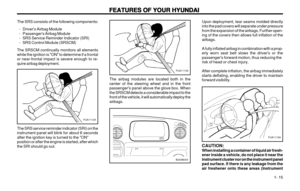 24
24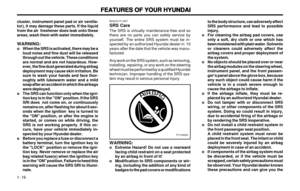 25
25 26
26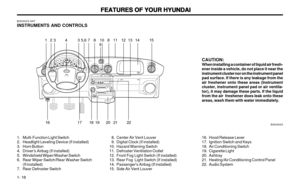 27
27 28
28 29
29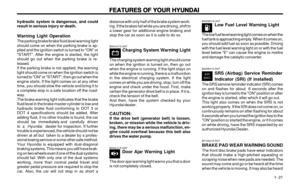 30
30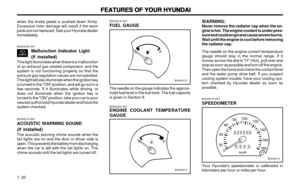 31
31 32
32 33
33 34
34 35
35 36
36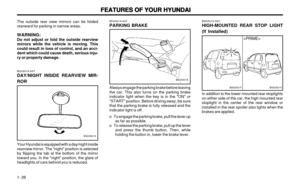 37
37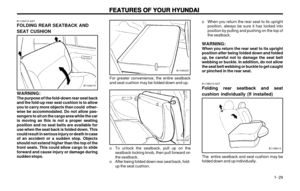 38
38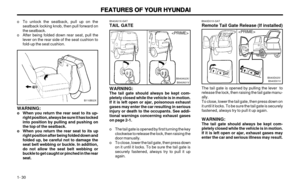 39
39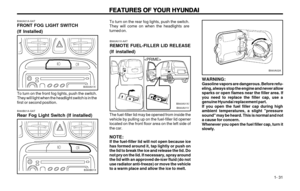 40
40 41
41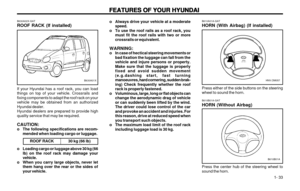 42
42 43
43 44
44 45
45 46
46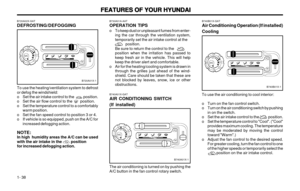 47
47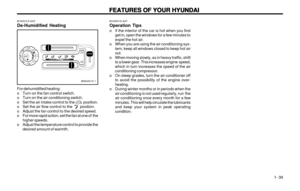 48
48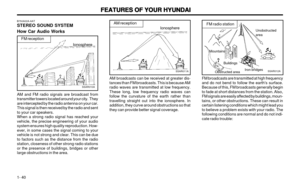 49
49 50
50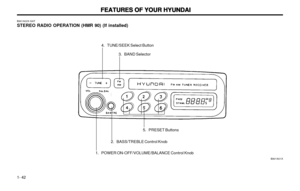 51
51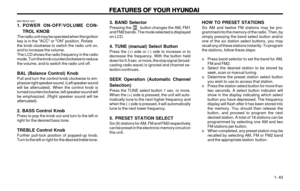 52
52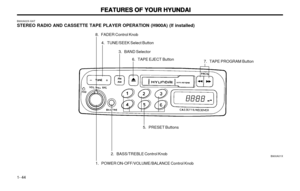 53
53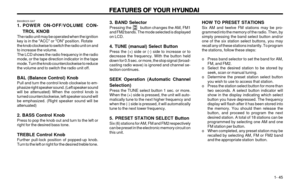 54
54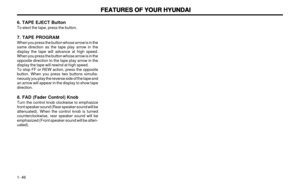 55
55 56
56 57
57 58
58 59
59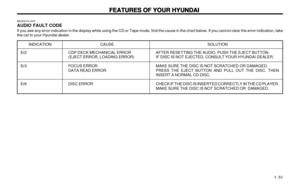 60
60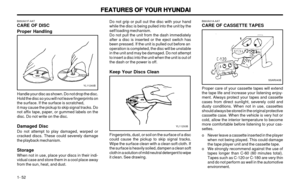 61
61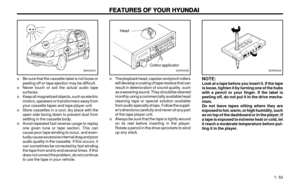 62
62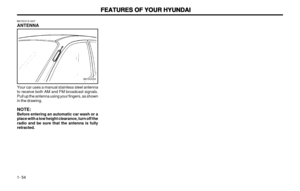 63
63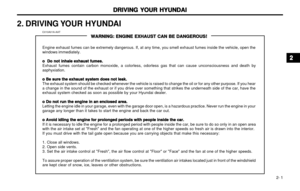 64
64 65
65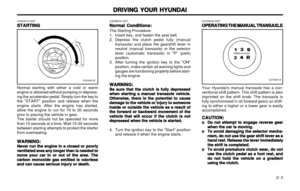 66
66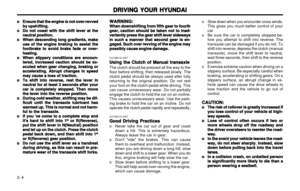 67
67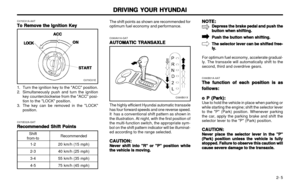 68
68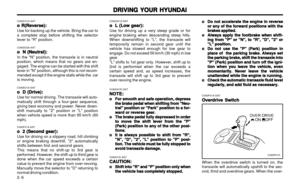 69
69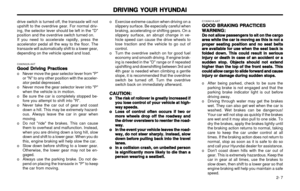 70
70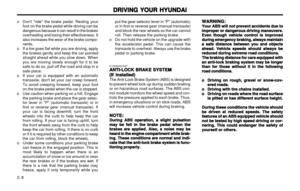 71
71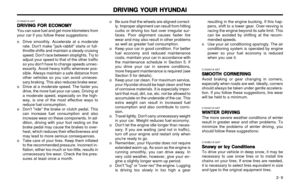 72
72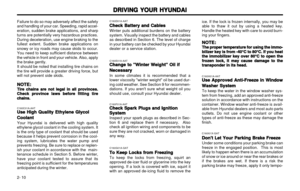 73
73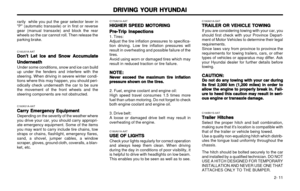 74
74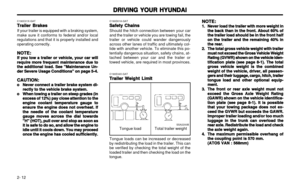 75
75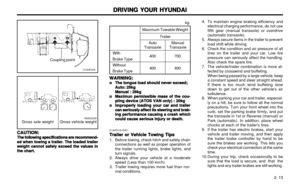 76
76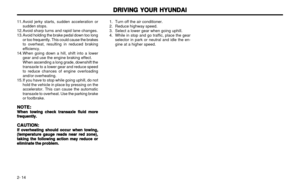 77
77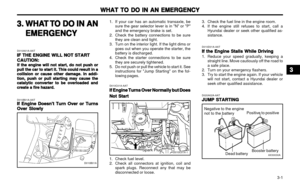 78
78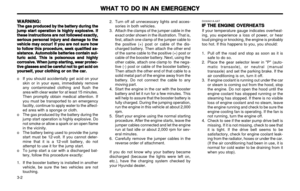 79
79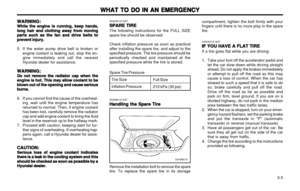 80
80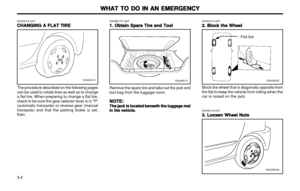 81
81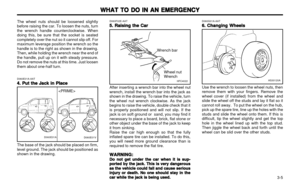 82
82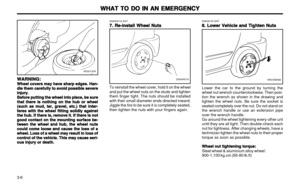 83
83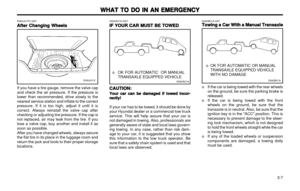 84
84 85
85 86
86 87
87 88
88 89
89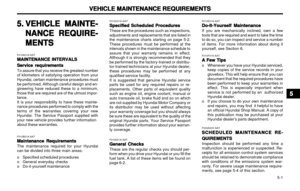 90
90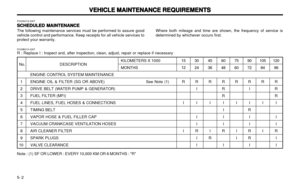 91
91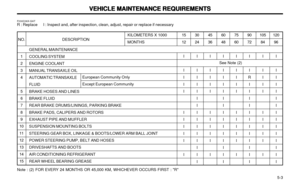 92
92 93
93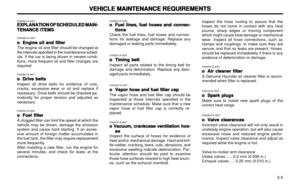 94
94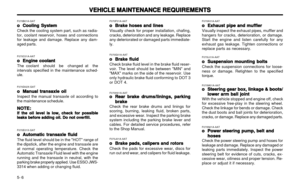 95
95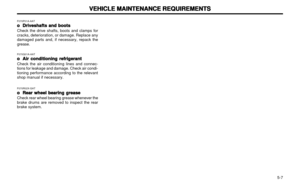 96
96 97
97 98
98 99
99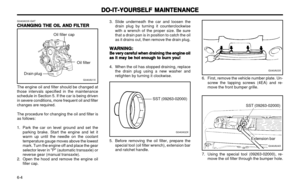 100
100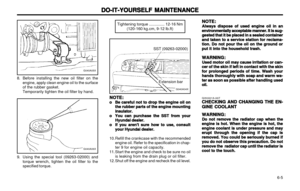 101
101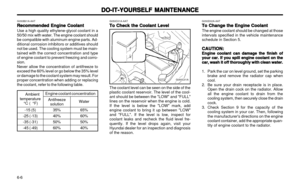 102
102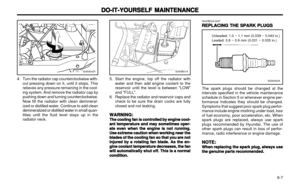 103
103 104
104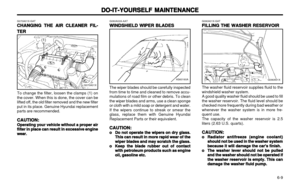 105
105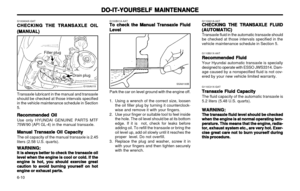 106
106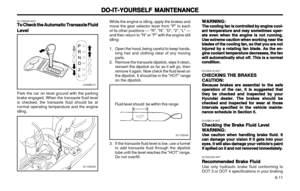 107
107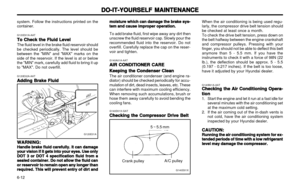 108
108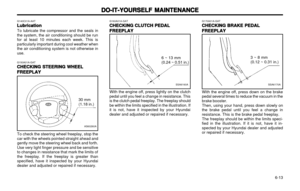 109
109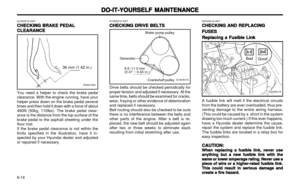 110
110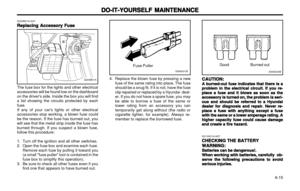 111
111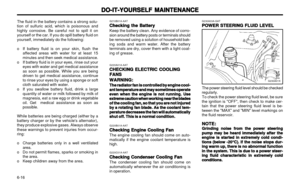 112
112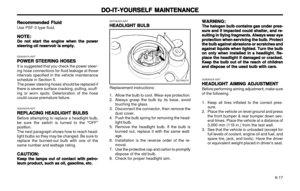 113
113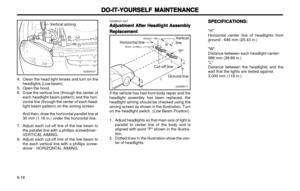 114
114 115
115 116
116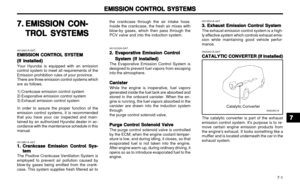 117
117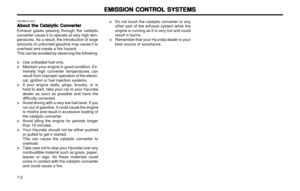 118
118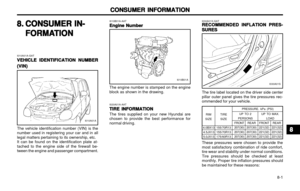 119
119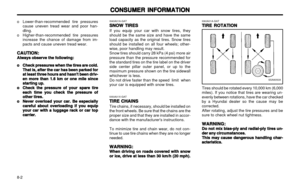 120
120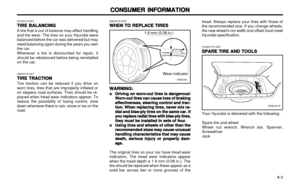 121
121 122
122 123
123 124
124 125
125 126
126 127
127 128
128 129
129 130
130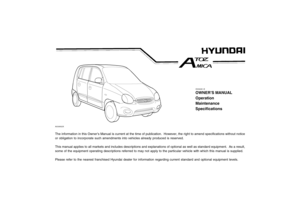 131
131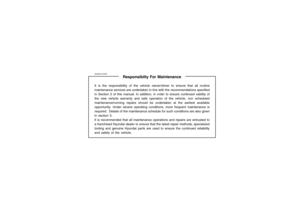 132
132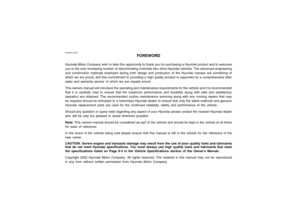 133
133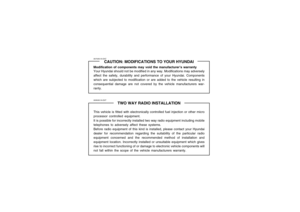 134
134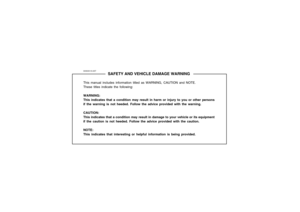 135
135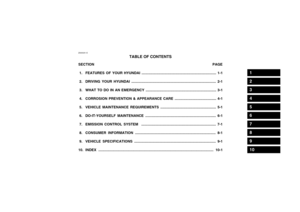 136
136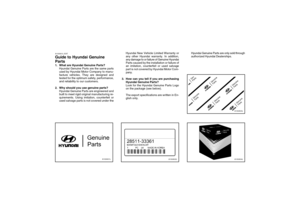 137
137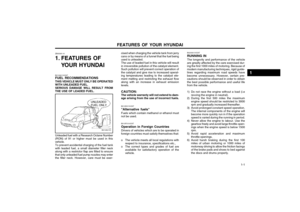 138
138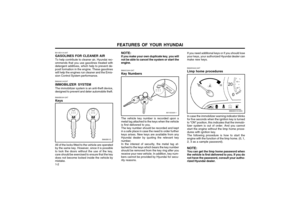 139
139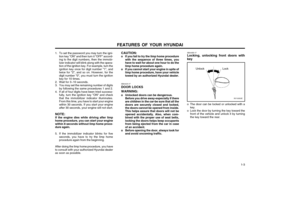 140
140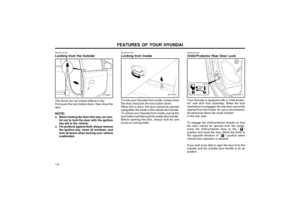 141
141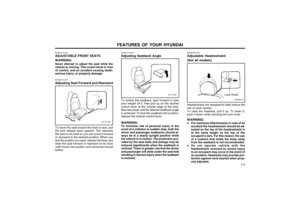 142
142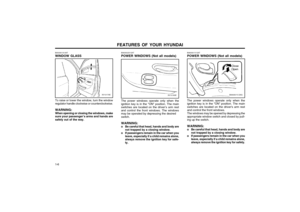 143
143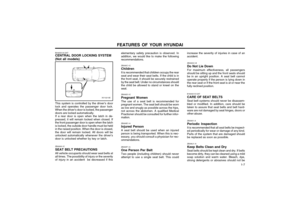 144
144 145
145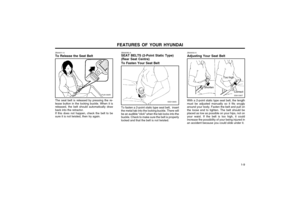 146
146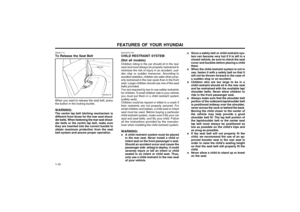 147
147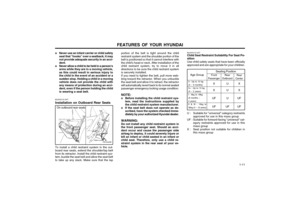 148
148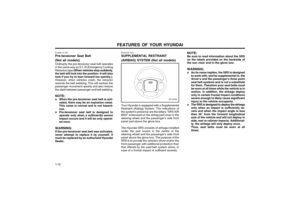 149
149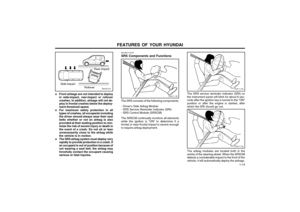 150
150 151
151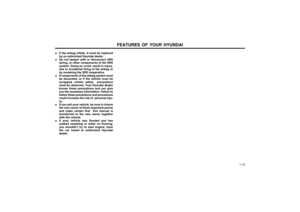 152
152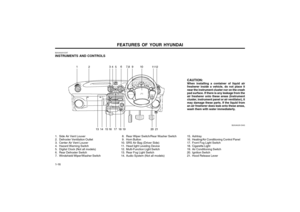 153
153 154
154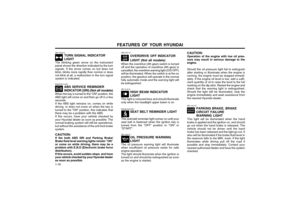 155
155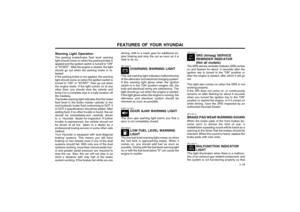 156
156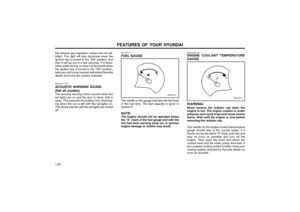 157
157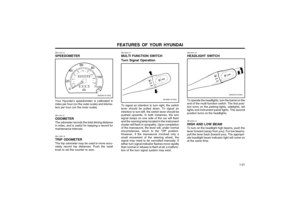 158
158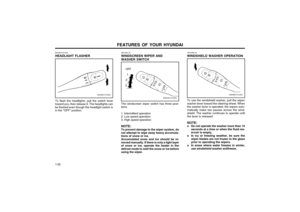 159
159 160
160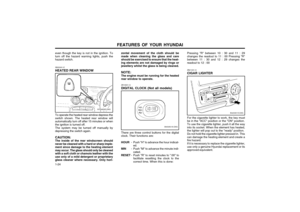 161
161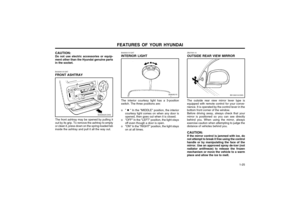 162
162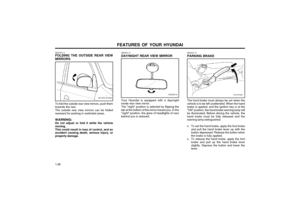 163
163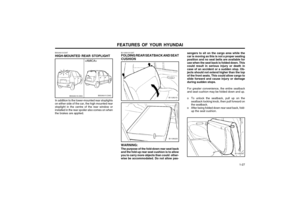 164
164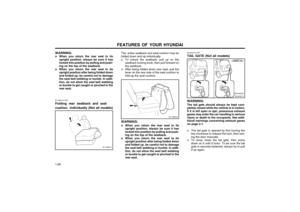 165
165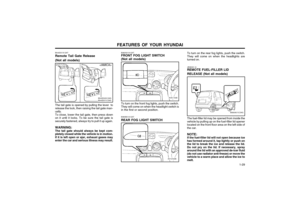 166
166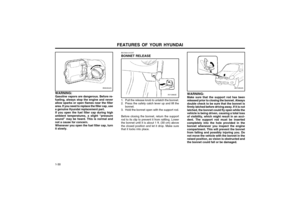 167
167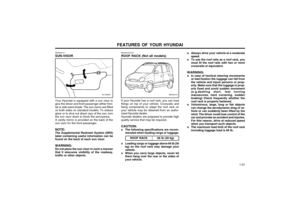 168
168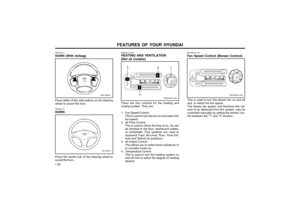 169
169 170
170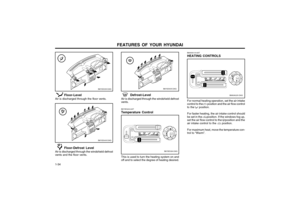 171
171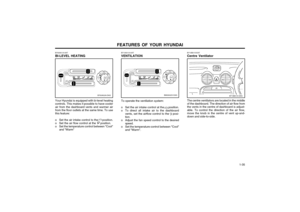 172
172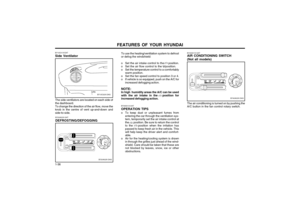 173
173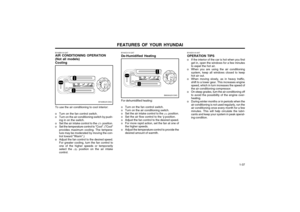 174
174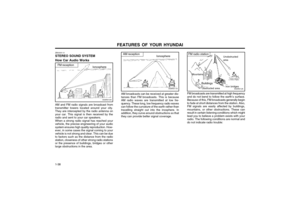 175
175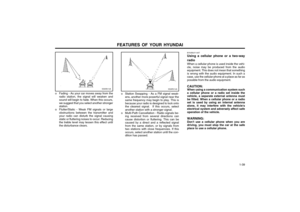 176
176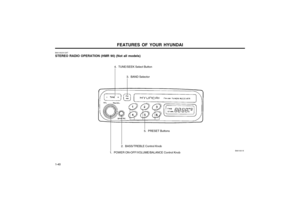 177
177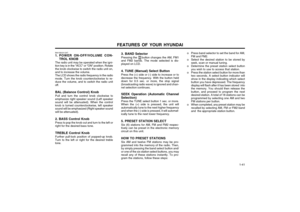 178
178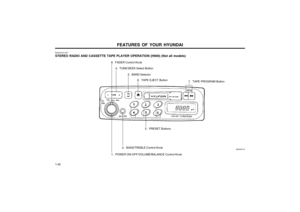 179
179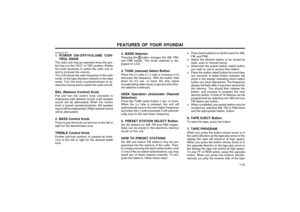 180
180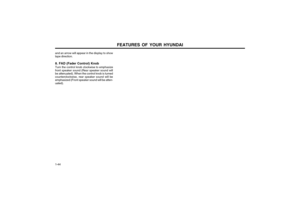 181
181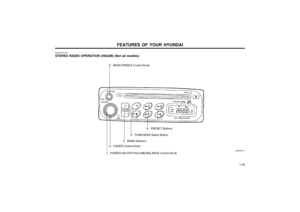 182
182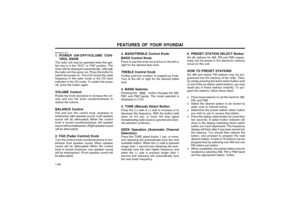 183
183 184
184 185
185 186
186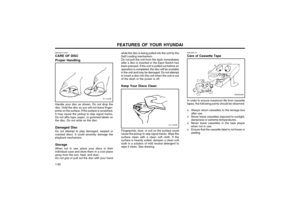 187
187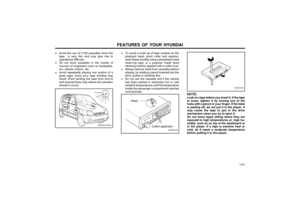 188
188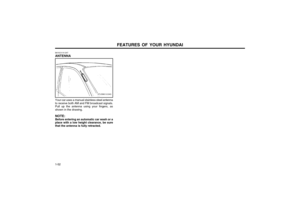 189
189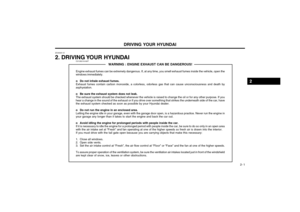 190
190 191
191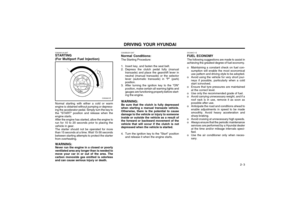 192
192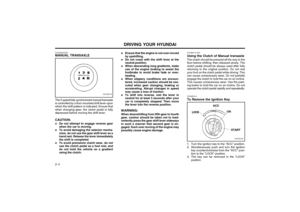 193
193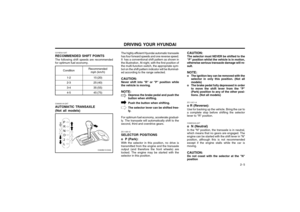 194
194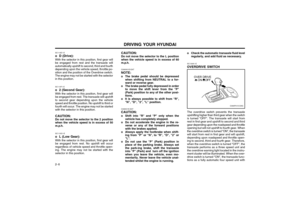 195
195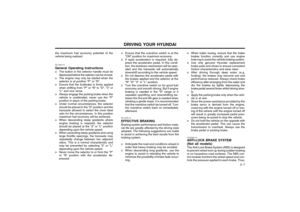 196
196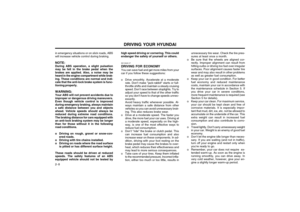 197
197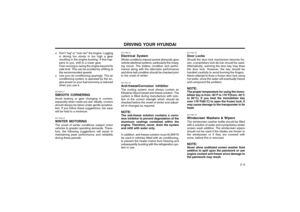 198
198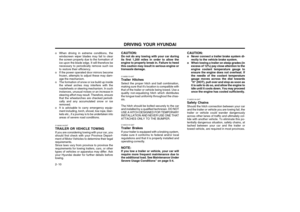 199
199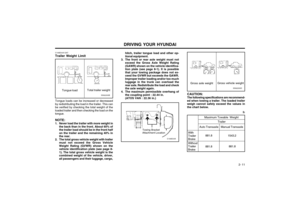 200
200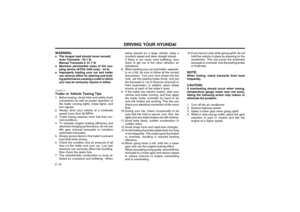 201
201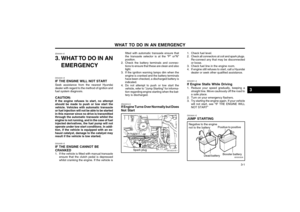 202
202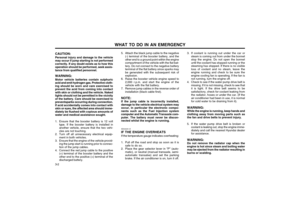 203
203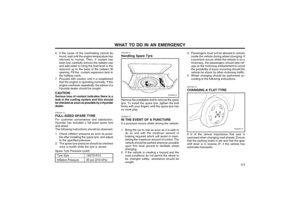 204
204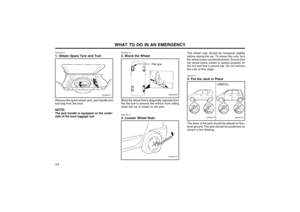 205
205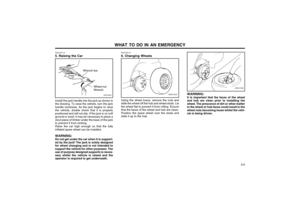 206
206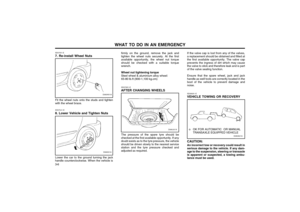 207
207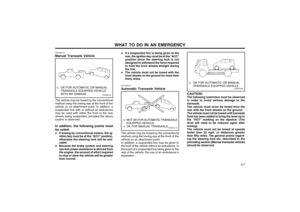 208
208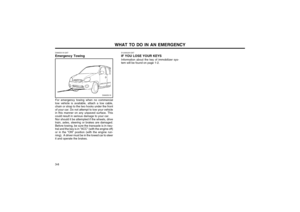 209
209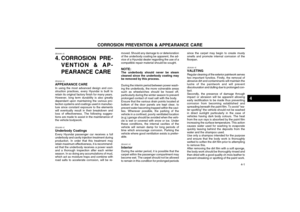 210
210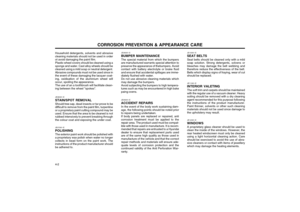 211
211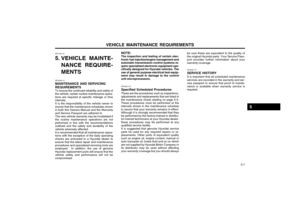 212
212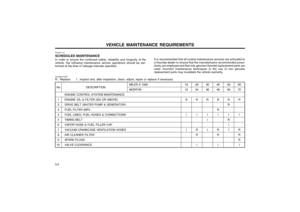 213
213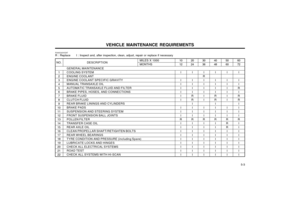 214
214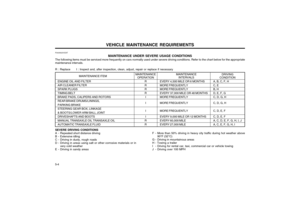 215
215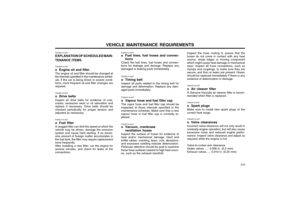 216
216 217
217 218
218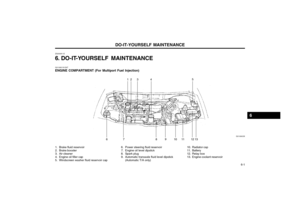 219
219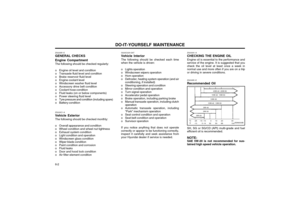 220
220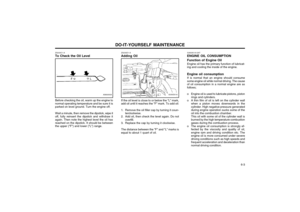 221
221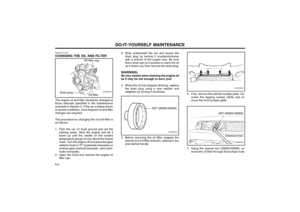 222
222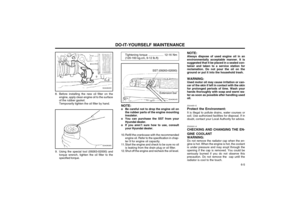 223
223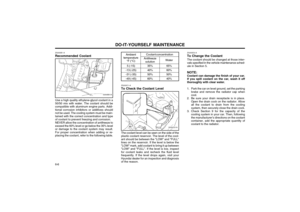 224
224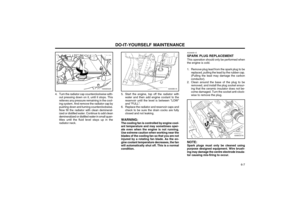 225
225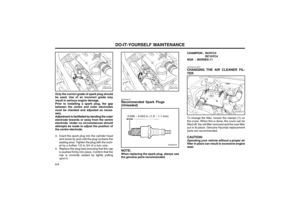 226
226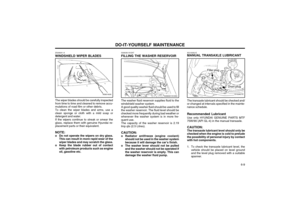 227
227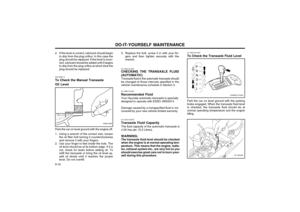 228
228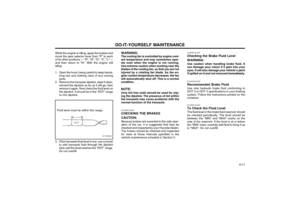 229
229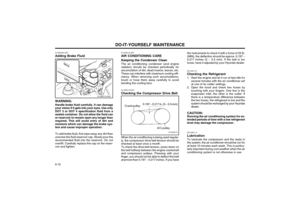 230
230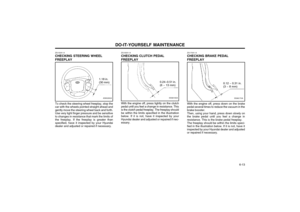 231
231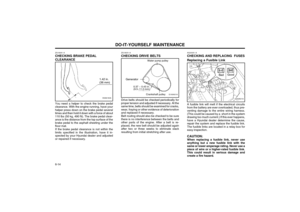 232
232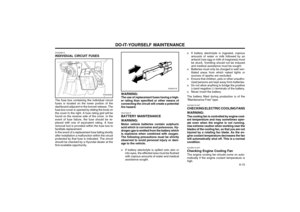 233
233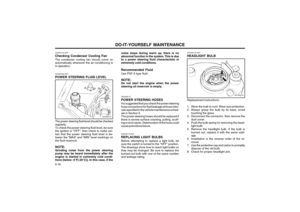 234
234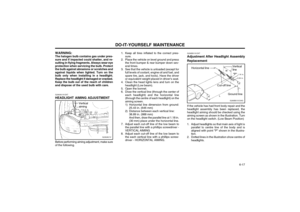 235
235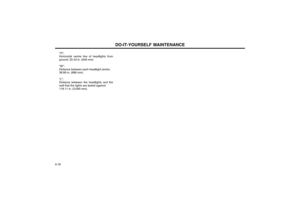 236
236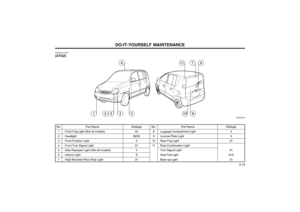 237
237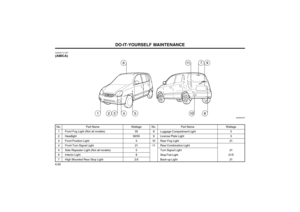 238
238 239
239 240
240 241
241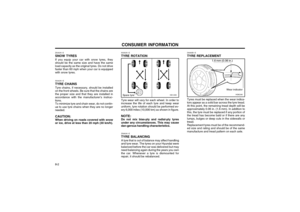 242
242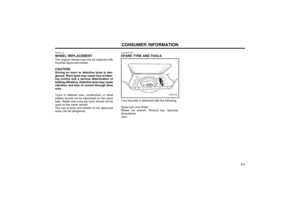 243
243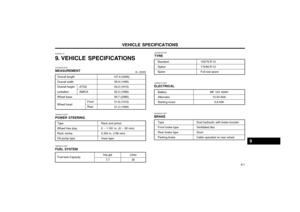 244
244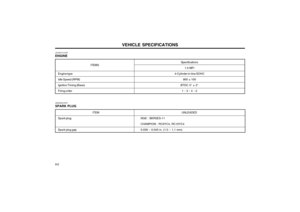 245
245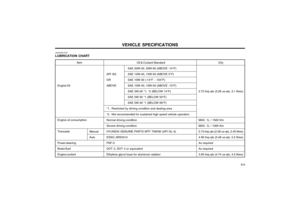 246
246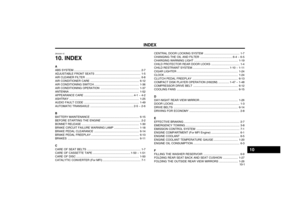 247
247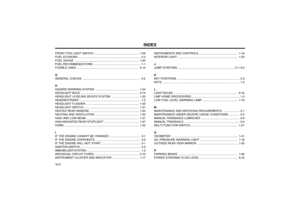 248
248