Page 2 of 184
Seating and Safety Restraints 55
Seating 55
Safety restraints 60
Air bags 70
Child restraints 77
Driving 86
Starting 86
Brakes 90
Transmission operation 93
Roadside Emergencies 111
Getting roadside assistance 111
Fuses and relays 113
Changing tires 120
Jump starting 125
Wrecker towing 127
Customer Assistance 128
The dispute settlement board 131
Utilizing the mediation/arbitration 134
Getting assistance outside the U.S. and Canada 134
Ordering additional owner’s literature 135
Reporting safety defects (U.S. only) 136
Cleaning 137
Table of Contents
2
Page 5 of 184

Warning symbols on your vehicle
When you see this symbol, it is
imperative that you consult the relevant
section of this guide before touching or
attempting adjustment of any kind.
Protecting the environment
We must all play our part in protecting the
environment. Correct vehicle usage and the
authorized disposal of waste cleaning and
lubrication materials are significant steps
towards this aim. Information in this respect
is highlighted in this guide with the tree symbol.
SPECIAL NOTICES
Special instructions
For your added safety, your vehicle is fitted with sophisticated electronic
controls.
By operating other electronic equipment (e.g. mobile telephone
without exterior aerial) electromagnetic fields can occur which
can cause malfunctions of the vehicle electronics. Therefore you should
observe the instructions of the equipment manufacturers.
Please read the sectionAir bagin theSeating and safety
restraintschapter. Failure to follow the specific warnings and
instructions could result in personal injury.
Front seat mounted rear-facing child or infant seats should
NEVERbe used in front of a passenger side air bag.
MIDDLE EAST/NORTH AFRICA VEHICLE SPECIFIC INFORMATION
For your particular global region, your vehicle may be equipped with
features and options that are different from the ones that are described
in this Owner Guide; therefore, a supplement has been supplied that
complements this book. By referring to the pages in the provided
supplement, you can properly identify those features, recommendations
and specifications that are unique to your vehicle.Refer to this Owner
Guide for all other required information and warnings.
Introduction
5
Page 23 of 184
To aid in side window defogging/demisting in cold weather:
1. Select
2. Select A/C
3. Modulate the temperature control to maintain comfort.
4. Set the fan speed to HI
5. Direct the outer instrument panel vents towards the side windows
To increase airflow to the outer instrument panel vents, close the vents
located in the middle of the instrument panel.
Do not place objects on top of the instrument panel as these
objects may become projectiles in a collision or sudden stop.
Rear window defroster
The rear defroster control is located
on the instrument panel. The
ignition switch must be in the ON
position to operate the rear
defroster.
Press the control to turn the defroster ON/OFF. A small LED will
illuminate when the rear defroster is ON.
Climate Controls
23
Page 25 of 184
High beams
Push the lever toward the
instrument panel to activate. Pull
the lever towards you to deactivate.
Flash to pass
Pull the lever toward you to
activate. Release the lever to
deactivate.
PANEL DIMMER CONTROL
Move the control up and down to
adjust the intensity of the panel
lighting. Operates only when the
exterior lights are switched on.
Move the control to the full upright
position (past detent) to turn on the
interior lamps.
Move the control to the full down
position (past detent) to prevent interior lamps from illuminating when
the doors are opened.
AIMING THE HEADLAMPS
The headlamps on your vehicle are properly aimed before leaving the
assembly plant. If your vehicle is involved in an accident or if you have
problems fixing the alignment of your headlamps, have them checked by
a qualified service technician.
DIM
Lights
25
Page 32 of 184
MULTI-FUNCTION LEVER
Windshield wiper:rotate the end
of the control away from you to
increase the speed of the wipers;
rotate towards you to decrease the
speed of the wipers.
Speed dependent wipers:when
the wiper control is on, the speed of
the wipers will automatically adjust
with the vehicle speed. The faster your vehicle is travelling the faster the
wipers will go.
Windshield washer:push the end
of the stalk:
•briefly: causes a single swipe of
the wipers without washer fluid.
•a quick push and hold: the wipers
will swipe three times with
washer fluid.
•a long push and hold: the wipers and washer fluid will be activated for
up to ten seconds.
Rear window wiper and washer
•Turn the control to the desired
interval position.
•Press to activate the rear washer
fluid.
Opening the liftgate will not interrupt the rear wiper function.
PUSH
OFFR.WIPE
HI
Driver Controls
32
Page 33 of 184
Changing the wiper blades
1. Pull the wiper arm away from the
vehicle. Turn the blade at an angle
from the wiper arm. Push the lock
pin manually to release the blade
and pull the wiper blade down
toward the windshield to remove it
from the arm.
2. Attach the new wiper to the
wiper arm and press it into place
until a click is heard.
3. Replace wiper blades every 6 months for optimum performance.
TILT STEERING WHEEL (IF EQUIPPED)
To adjust the steering wheel:
1. Pull and hold the steering wheel
release control toward you.
2. Move the steering wheel up or
down until you find the desired
location.
3. Release the steering wheel
release control. This will lock the
steering wheel in position.
Never adjust the steering wheel when the vehicle is moving.
Driver Controls
33
Page 35 of 184

Install a garage door opener (if equipped)
The storage compartment can be used to hold a variety of aftermarket
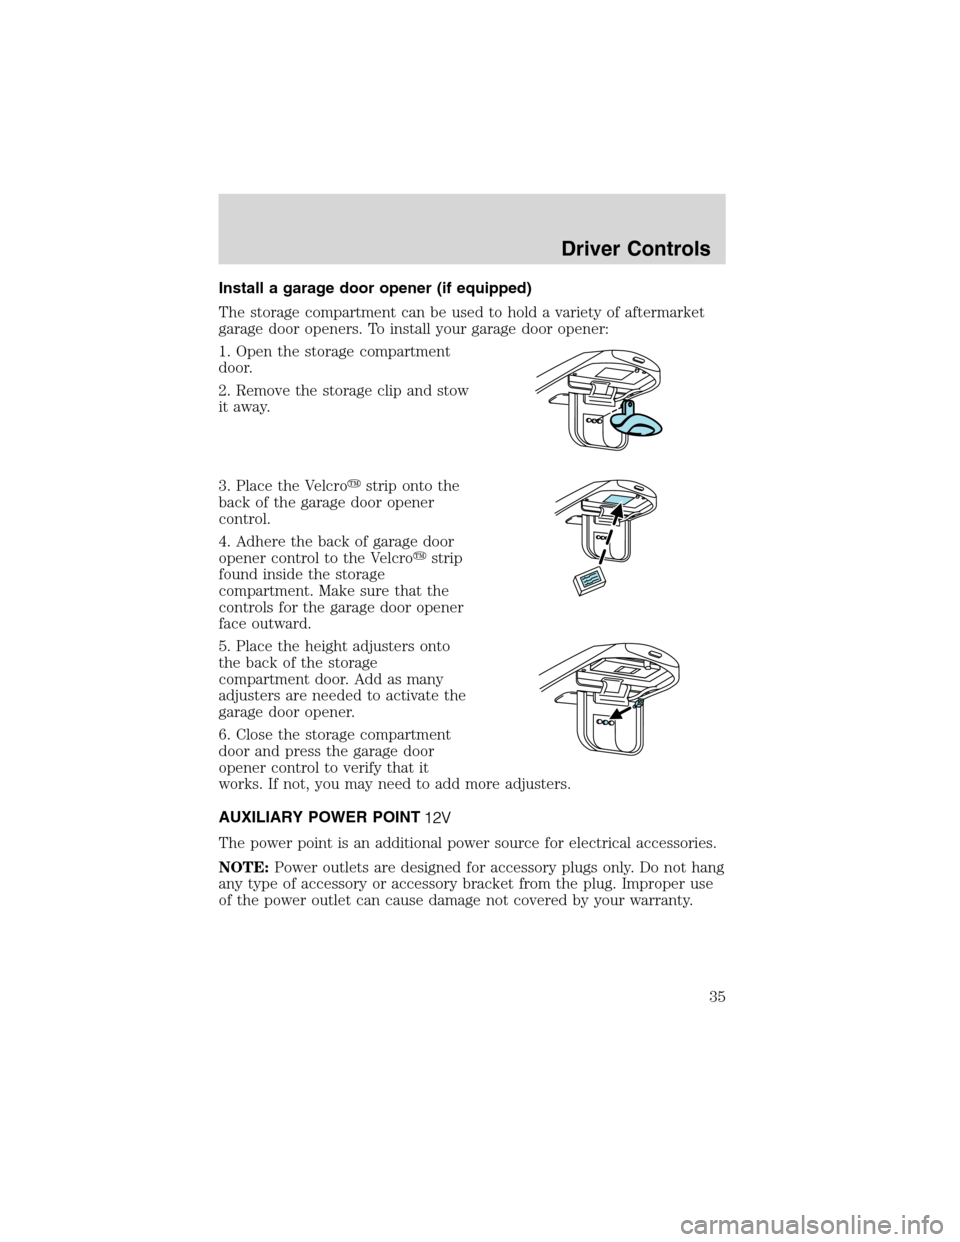
garage door openers. To install your garage door opener:
1. Open the storage compartment
door.
2. Remove the storage clip and stow
it away.
3. Place the Velcro�strip onto the
back of the garage door opener
control.
4. Adhere the back of garage door
opener control to the Velcro�strip
found inside the storage
compartment. Make sure that the
controls for the garage door opener
face outward.
5. Place the height adjusters onto
the back of the storage
compartment door. Add as many
adjusters are needed to activate the
garage door opener.
6. Close the storage compartment
door and press the garage door
opener control to verify that it
works. If not, you may need to add more adjusters.
AUXILIARY POWER POINT
The power point is an additional power source for electrical accessories.
NOTE:Power outlets are designed for accessory plugs only. Do not hang
any type of accessory or accessory bracket from the plug. Improper use
of the power outlet can cause damage not covered by your warranty.
Driver Controls
35
Page 45 of 184

Rewinding the shade
With extended use, the cargo shade may lose its spring tension. If this
occurs, the shade must be manually rewind. This is a two-person
operation.
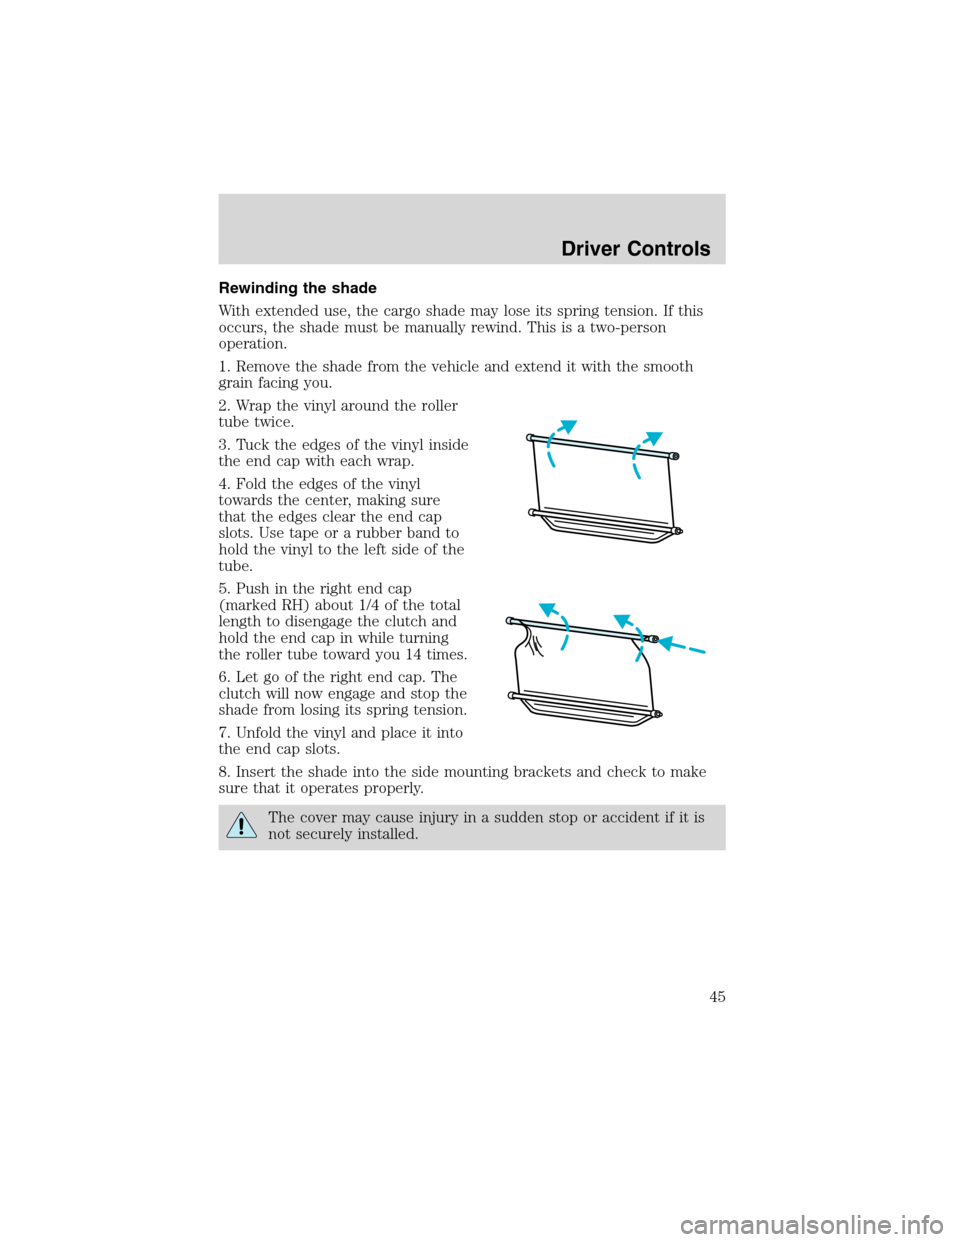
1. Remove the shade from the vehicle and extend it with the smooth
grain facing you.
2. Wrap the vinyl around the roller
tube twice.
3. Tuck the edges of the vinyl inside
the end cap with each wrap.
4. Fold the edges of the vinyl
towards the center, making sure
that the edges clear the end cap
slots. Use tape or a rubber band to
hold the vinyl to the left side of the
tube.
5. Push in the right end cap
(marked RH) about 1/4 of the total
length to disengage the clutch and
hold the end cap in while turning
the roller tube toward you 14 times.
6. Let go of the right end cap. The
clutch will now engage and stop the
shade from losing its spring tension.
7. Unfold the vinyl and place it into
the end cap slots.
8. Insert the shade into the side mounting brackets and check to make
sure that it operates properly.
The cover may cause injury in a sudden stop or accident if it is
not securely installed.
Driver Controls
45