2002 FIAT DUCATO 244 key
[x] Cancel search: keyPage 37 of 246

CONNECT Nav
36
“PTY-PROG. TYPE”
FUNCTION (CHOOSING A
TYPE OF PROGRAMME)
The “PTY-PROG. TYPE”, function,
when present, makes it possible to
give priority to broadcasters trans-
mitting programmes classified accord-
ing to the type of PTY. PTY pro-
grammes may concern emergency an-
nouncements or various subjects (e.g.
music, news). To access the list of PTY
programmes, choose and confirm
“PTY-PROG. TYPE” with the knob 22-
fig. 1 from the main audio menu
fig. 21; the display will show the
screen with the list of PTY pro-
grammes and the subject of the last
station heard (e.g “NEWS”). To scroll
the list of PTY programmes, turn the
knob 22-fig. 1. To choose a type of
programme, press the knob after
choosing the required type of pro-
gramme.
IMPORTANTThe PTY function
can only be turned on in the FM band.The list of PTY programmes is the
following:
–
NO PTY
– NEWS
– AFFAIRS
– INFO
– SPORT
– EDUCATE
– DRAMA
– CULTURE
– SCIENCE
– MISC
– POP M
– ROCK M
– EASY M
– LIGHT M
– CLASSICS M
– OTHER M
– WEATHER
– FINANCE
– CHILDREN
– SOCIAL
– RELIGION
– PHONE IN
– TRAVEL
– LEISURE
– JAZZ
– COUNTRY
– NATION M
– OLDIES
– FOLK M
– DOCUMENT
– TEST
– ALARM.
To store the station tuned, press one
of the 6 multifunction keys 1 ÷ 6-
fig. 1for over two seconds.
To seek a station with this pro-
gramme, follow the instructions giv-
en in the “AUTOMATIC TUNING”
paragraph.
If no station is available with this type
of programme, the station selected
previously is returned. Select “NO
PTY” if you do not wish to set a pro-
gramme type.
Page 38 of 246
37
CONNECT Nav
“AUTOSTORE” FUNCTION
(AUTOMATIC STATION
STORAGE)
After selecting the AMST or FMST
band, to turn on the Autostore func-
tion (automatic station storage), select
and confirm “AUTOSTORE” with the
knob 22-fig. 1.
When this function is on, the radio
automatically stores the stations with
the strongest signal:
– 6 FM stations in the FMST band or
– 6 AM stations in the AMST band.
Stations will be stored automatically
on the multifunction keys 1 ÷ 6-fig. 1.
After storage, the radio tunes auto-
matically to the first station of the
FMAST band, corresponding to the fre-
quency stored on the multifunction key
1-fig. 1.Every station is stored only once, ex-
cept in the case of regional pro-
grammes which in certain cases might
be stored twice.
The behaviour of the set during Au-
tostore is as follows:
– at the beginning of the Autostore
function all the other functions are dis-
abled
– any change in volume is not shown
on the display
– pressing one of the multifunction
keys 1 ÷ 6-fig. 1the automatic stor-
age process is interrupted and the sta-
tion stored with that key is tuned
– selecting and activating a radio
function (e.g. PTY) the automatic stor-
age process is interrupted, the last sta-
tion heard before tuning on Autostore
is tuned and the function associated
with the key pressed is run– selecting and activating one or both
TA/AF functions during the automat-
ic storage process, automatic storage
will be interrupted, the TA (traffic in-
formation) and AF (alternative fre-
quencies) functions will be turned
on/off and a new automatic storage
process will be started
– changing the audio source (Radio,
CD) during the automatic storage
process, the Autostore function is in-
terrupted.
IMPORTANTIt may occur that
the Autostore function is unable to
find 6 stations with a strong signal; in
this case only the stations found are
stored.
IMPORTANTActivating the “Au-
tostore” function cancels the stations
stored previously in the FMST or
AMST band.
Page 41 of 246
CONNECT Nav
40
“NEWS” FUNCTION
This function shortly enables or not
the PTY code News.
To turn this function on/off, select
and confirm “NEWS” with the knob
22-fig. 1.
Select “ENABLED” or “DISABLED”
rotating and pressing the knob 22-
fig. 1to confirm.
This function is only available on FM
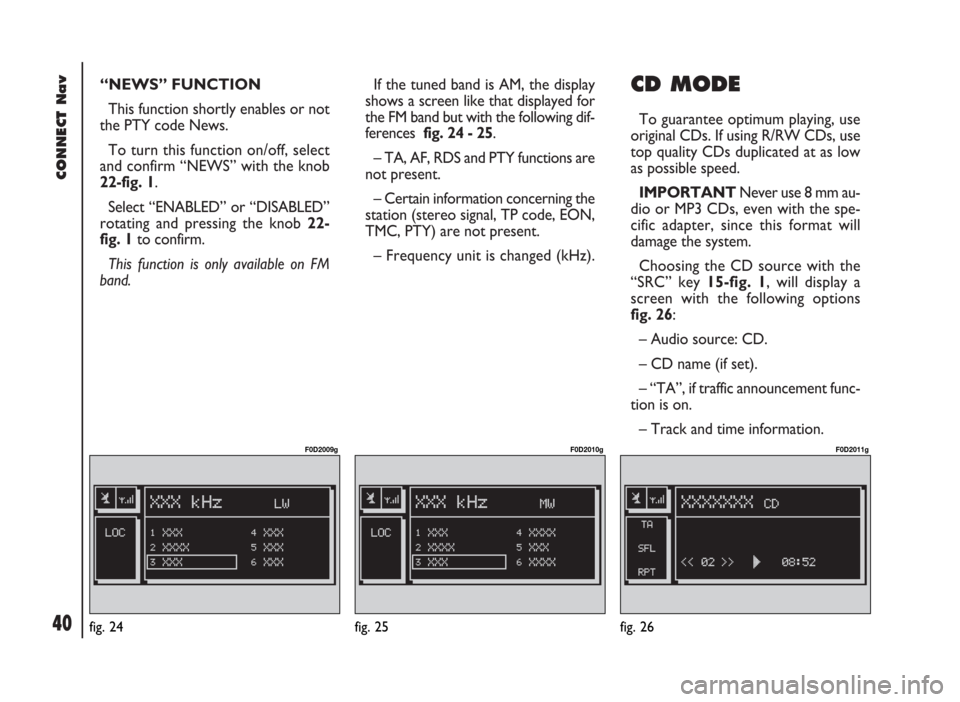
band. If the tuned band is AM, the display
shows a screen like that displayed for
the FM band but with the following dif-
ferences fig. 24 - 25.
– TA, AF, RDS and PTY functions are
not present.
– Certain information concerning the
station (stereo signal, TP code, EON,
TMC, PTY) are not present.
– Frequency unit is changed (kHz). CD MODE
To guarantee optimum playing, use
original CDs. If using R/RW CDs, use
top quality CDs duplicated at as low
as possible speed.
IMPORTANTNever use 8 mm au-
dio or MP3 CDs, even with the spe-
cific adapter, since this format will
damage the system.
Choosing the CD source with the
“SRC” key 15-fig. 1, will display a
screen with the following options
fig. 26:
– Audio source: CD.
– CD name (if set).
– “TA”, if traffic announcement func-
tion is on.
– Track and time information.
fig. 24
F0D2009g
fig. 25
F0D2010g
fig. 26
F0D2011g
Page 42 of 246
41
CONNECT Nav
– Current status of CD (play ˙,
pause II, stop ~).
– CD time information. If the CD is
not inserted, the display will show the
message “NO CD” “NO CD-DA” and
all CD options are disabled.
– SCAN, if the SCAN function is on.
– SFL, if the SHUFFLE function is on.
– RPT ONE /REPEAT ALL, if the rel-
evant functions are on.
– PROG, if the PROG function is on.
The front panel keys are the follow-
ing:
÷11/ ˜12: to select previous
or next CD track;
II˙10(short push): to play or stop
the CD;
II˙10(long push): to pause the CD.Press the knob 22-fig. 1to display
the following options:
– CD SHUFFLE
– CD TA
– CD REPEAT
– CD PROG
– CD SCAN
– CD COMPRESSION
– CD SETUP
– AUDIO SETUP.
“CD SHUFFLE” FUNCTION
(RANDOM PLAYING)
To turn the “SHUFFLE” function
on/off, press the knob 22-fig. 1, after
selecting “SHUFFLE” with the knob.
Select and confirm “YES” or “NO” by
rotating and pressing the knob 22-
fig. 1. When the Shuffle function is on,
the display shows “SFL”.
With this function on, the CD tracks
are played in random sequence. To
turn off this function select “NO” with
the same above described procedure.“CD TA” FUNCTION
(TRAFFIC INFORMATION)
To turn the TA function (Traffic An-
nouncement) on/off while listening to
a CD, select and confirm “CD TA”
with the knob 22-fig. 1.
When the “TA” function is on, the
main screen displays “TA”.
For the description of the function,
refer to the corresponding paragraph
in the “RADIO MODE” chapter.
Page 44 of 246
43
CONNECT Nav
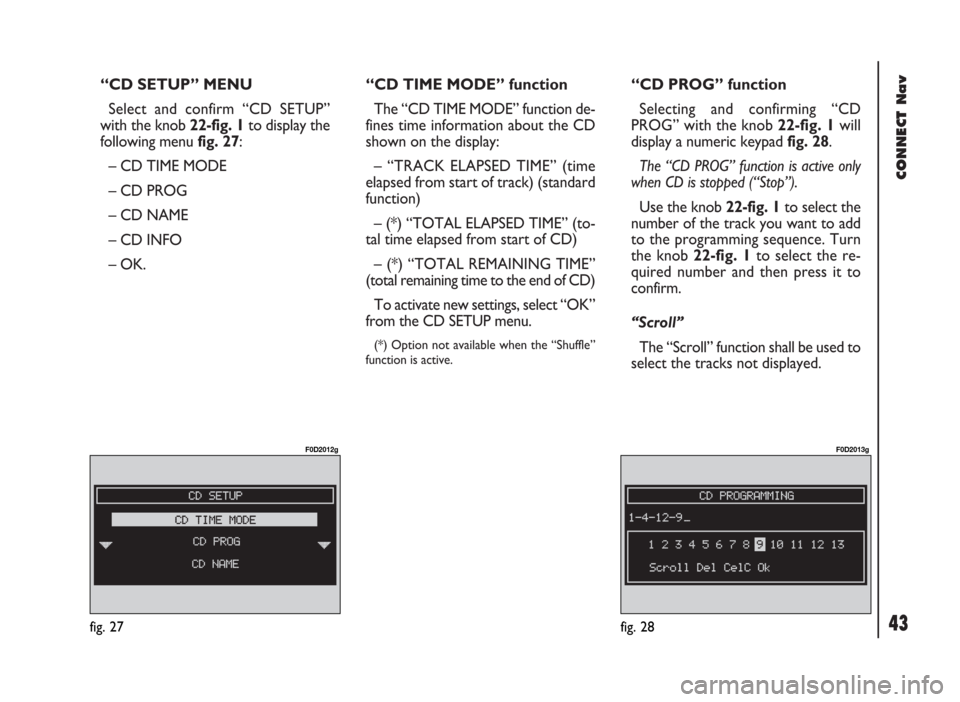
“CD SETUP” MENU
Select and confirm “CD SETUP”
with the knob 22-fig. 1to display the
following menu fig. 27:
– CD TIME MODE
– CD PROG
– CD NAME
– CD INFO
– OK.“CD TIME MODE” function
The “CD TIME MODE” function de-
fines time information about the CD
shown on the display:
– “TRACK ELAPSED TIME” (time
elapsed from start of track) (standard
function)
– (*) “TOTAL ELAPSED TIME” (to-
tal time elapsed from start of CD)
– (*) “TOTAL REMAINING TIME”
(total remaining time to the end of CD)
To activate new settings, select “OK”
from the CD SETUP menu.
(*) Option not available when the “Shuffle”
function is active.
“CD PROG” function
Selecting and confirming “CD
PROG” with the knob 22-fig. 1will
display a numeric keypad fig. 28.
The “CD PROG” function is active only
when CD is stopped (“Stop”).
Use the knob 22-fig. 1to select the
number of the track you want to add
to the programming sequence. Turn
the knob 22-fig. 1to select the re-
quired number and then press it to
confirm.
“Scroll”
The “Scroll” function shall be used to
select the tracks not displayed.
fig. 27
F0D2012g
fig. 28
F0D2013g
Page 52 of 246
51
CONNECT Nav
– turn and press the knob 22-fig. 1
to select and confirm “BALANCE”,
the function that changes the sound
distribution in the passenger com-
partment between the right and left
speakers, the display will show the
screen in fig. 36.
– turn the knob 22-fig. 1to change
the sound distribution in the passenger
compartment between the right and
left speakers (cursor moving along the
horizontal axis), then press the knob
to confirm.
In the same way, choose and confirm
the “FADER” function to change the
sound distribution between the front
and rear speakers (cursor moving
along the vertical axis).
After adjustment, select “OK” with
the knob 22-fig. 1and then press it to
confirm the setting and to go back to
the previous screen.
If “ESC” 23-fig. 1is pressedyou go
back to the previous screen with the
settings stored previously.AUTOCLIP DETECT
(dynamic distortion limiter)
With the “AUTOCLIP DETECT”
function the radio output level is re-
duced automatically when excessive
distortion level (that could damage the
speakers) is detected.
To turn this function on and off, se-
lect “AUTOCLIP DETECT” with the
knob 22-fig. 1, then press it to con-
firm. The function status (on or off) is
shown on the display by wording
“YES” or “NO”.MAX. VOL. AT ON
The “MAX. VOL. AT ON” function
clips radio volume (at level 10) at pow-
er on. If the radio was switched off
with a volume setting higher than 10,
when activating this function (ignition
key at STOP, at power on the vol-
ume is reset to the above limit.
To turn this function on and off, se-
lect and confirm “MAX. VOL. AT
ON” rotating and pressing the knob
22-fig. 1.
“OK”
At the end, select “OK” with the
knob 22-fig. 1and then press it to
confirm and go back to the main “AU-
DIO SETUP” menu.
Page 57 of 246

CONNECT Nav
56
“REPEAT” FUNCTION
To turn this function on/off, select
and confirm “REPEAT” rotating and
pressing the knob 22-fig. 1. The dis-
play shows the following icon keys:
“NO REPEAT”, “REPEAT ONE” and
“REPEAT ALL”, fig. 41.
- “NO REPEAT”: repeat function off;
- “REPEAT ONE”: repeat one MP3
CD or playlist track;
- “REPEAT ALL”: repeat all MP3 CD
or playlist tracks.
When this function is on, the display
shows “RPT”.
Select and confirm the required item
by turning and pressing the knob 22-
fig. 1.PLAYING THE PLAYLIST
Inserting a MP3 CD with associated
playlist starts sequence playing auto-
matically.
“DEFINE PLAYLIST”, “PLAYLIST” and
”VIEW PLAYLIST” functions are active on-
ly when MP3 CD is stopped (“Stop”).
At “Stop” (stop playing by pressing
“II
˙” 10-fig. 1, the user can modify
the playlist through the “DEFINE
PLAYLIST” function or can set a
playlist. Press “II
˙” 10-fig. 1(“Play”)
to restart MP3 CD playback.PLAYING MP3 CD
Inserting a MP3 CD when no playlist
is found, the CONNECT system dis-
plays for 5 seconds the name of the
first “not empty” folder. Playing starts
automatically from the first track of
the first folder of the MP3 CD, going
on in sequence. When actual folder
tracks are all played, the sequence
continues with the next MP3 CD fold-
er tracks. Before starting to play the
first track of the new folder, the dis-
play shows for five seconds the new
folder name.
The main screen shows the follow-
ing information fig. 39:
– audio source (MP3);
– when available, author and song
name, or file name;
– current track number;
fig. 41
F0D2025g
Page 61 of 246

CONNECT Nav
60
– manual number dialling
– DTMF setting (Dual Tone Multi
Frequency) to repeat dialling and in-
hibit the own identification number
transmission
– selection of network provider
– setting ringer volume and tone
– display of remaining credit in case
of prepaid SIM card (if available by net-
work provider)
– display of signal field intensity and
other status warnings with symbols
and words.PRELIMINARY
OPERATIONS
ENTERING AND EXITING
THE TELEPHONE MODE
To enter the telephone mode
proceed as follows:
– short push on ”TEL” button 19-
fig. 1on front panel.
(If the Connect is off, switch it on by
turning the ignition key to MAR).
The display shows the telephone
mode “main screen”fig. 46that pro-
vides the following information:
– Phone number box.
– GSM field strength. GSM signal
strength is shown even if no SIM card
is inserted.– Active GSM provider. If a SIM card
is inserted and validated by PIN and no
provider is available, the display will
show “FIND….”.
If telephone mode is “switched off”
the display shows “TEL OFF”.
– An envelope-shaped symbol to in-
dicate unread SMS message/s.
– An arrow-shaped symbol to indi-
cate active call forward.
– A box to enter the telephone num-
ber with the string “Enter No.”.
When telephone mode is on, the
TEL led is on.
fig. 46
F0D2030g