Page 1424 of 2255
INSTALLATION
(1) Install the gear shift lever into the steering col-
umn assembly. Align the pin holes in the gear shift
lever and the steering column assembly.
CAUTION: The pin must be installed in the original
direction.
(2) Carefully Install the pin into the steering col-
umn assembly and through the shift lever. If the pin
binds check the alignment on the holes. Be sure pin
is fully installed into the steering column assembly.
(3) Connect over drive switch wiring.
(4) Lower the steering column to install the sec-
ondary shrouds.
(5) Install the steering column mounting nuts.
Tighten the nuts to 12 N´m (105 in. lbs.).
(6) Install the steering column opening cover
(Refer to 23 - BODY/INSTRUMENT PANEL/STEER-ING COLUMN OPENING COVER - INSTALLA-
TION).
(7) Install the upper and lower shrouds.
(8) Install the tilt lever.
STEERING WHEEL
REMOVAL
For steering wheel removal procedure,(Refer to 8 -
ELECTRICAL/RESTRAINTS/CLOCKSPRING -
REMOVAL).
INSTALLATION
For steering wheel installation procedure,(Refer to
8 - ELECTRICAL/RESTRAINTS/CLOCKSPRING -
INSTALLATION).
BR/BECOLUMN 19 - 15
GEAR SHIFT LEVER (Continued)
Page 1428 of 2255
WORM THRUST BEARING PRELOAD
(1) Mount the gear carefully into a vise.
CAUTION: Do not overtighten the vise on the gear
case. This may affect the adjustment
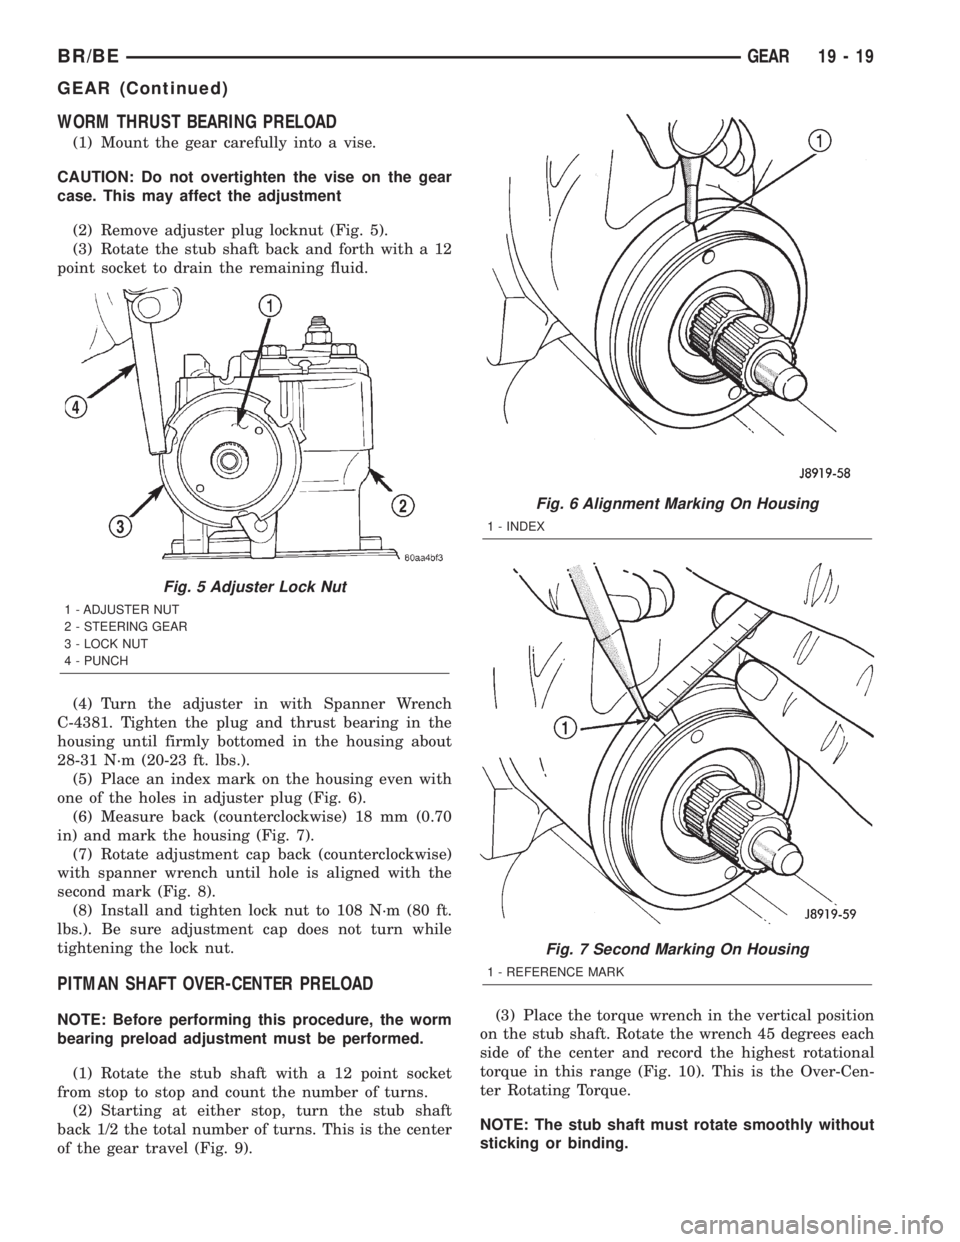
(2) Remove adjuster plug locknut (Fig. 5).
(3) Rotate the stub shaft back and forth with a 12
point socket to drain the remaining fluid.
(4) Turn the adjuster in with Spanner Wrench
C-4381. Tighten the plug and thrust bearing in the
housing until firmly bottomed in the housing about
28-31 N´m (20-23 ft. lbs.).
(5) Place an index mark on the housing even with
one of the holes in adjuster plug (Fig. 6).
(6) Measure back (counterclockwise) 18 mm (0.70
in) and mark the housing (Fig. 7).
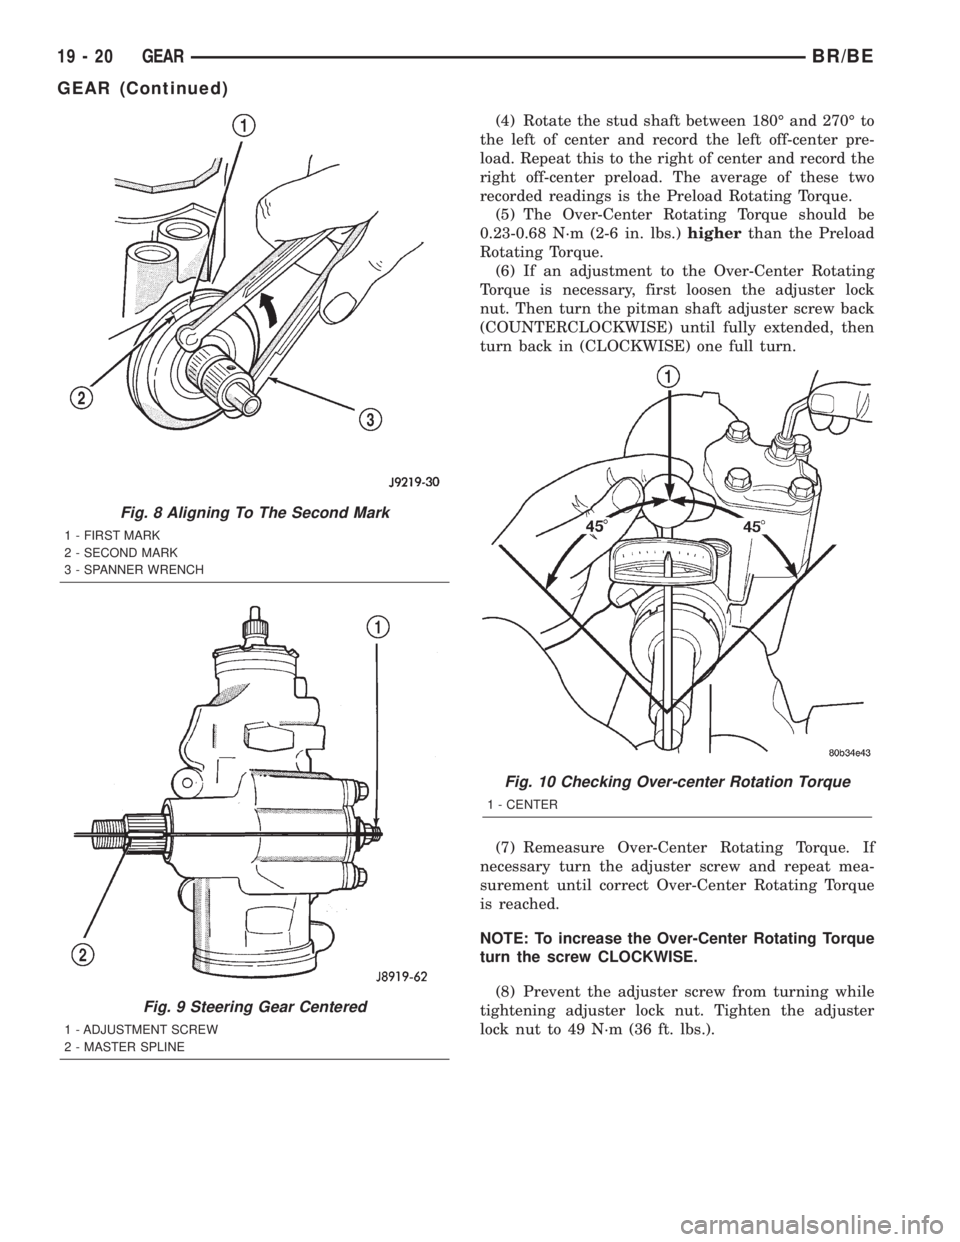
(7) Rotate adjustment cap back (counterclockwise)
with spanner wrench until hole is aligned with the
second mark (Fig. 8).
(8) Install and tighten lock nut to 108 N´m (80 ft.
lbs.). Be sure adjustment cap does not turn while
tightening the lock nut.
PITMAN SHAFT OVER-CENTER PRELOAD
NOTE: Before performing this procedure, the worm
bearing preload adjustment must be performed.
(1) Rotate the stub shaft with a 12 point socket
from stop to stop and count the number of turns.
(2) Starting at either stop, turn the stub shaft
back 1/2 the total number of turns. This is the center
of the gear travel (Fig. 9).(3) Place the torque wrench in the vertical position
on the stub shaft. Rotate the wrench 45 degrees each
side of the center and record the highest rotational
torque in this range (Fig. 10). This is the Over-Cen-
ter Rotating Torque.
NOTE: The stub shaft must rotate smoothly without
sticking or binding.
Fig. 5 Adjuster Lock Nut
1 - ADJUSTER NUT
2 - STEERING GEAR
3 - LOCK NUT
4 - PUNCH
Fig. 6 Alignment Marking On Housing
1 - INDEX
Fig. 7 Second Marking On Housing
1 - REFERENCE MARK
BR/BEGEAR 19 - 19
GEAR (Continued)
Page 1429 of 2255
(4) Rotate the stud shaft between 180É and 270É to
the left of center and record the left off-center pre-
load. Repeat this to the right of center and record the
right off-center preload. The average of these two
recorded readings is the Preload Rotating Torque.
(5) The Over-Center Rotating Torque should be
0.23-0.68 N´m (2-6 in. lbs.)higherthan the Preload
Rotating Torque.
(6) If an adjustment to the Over-Center Rotating
Torque is necessary, first loosen the adjuster lock
nut. Then turn the pitman shaft adjuster screw back
(COUNTERCLOCKWISE) until fully extended, then
turn back in (CLOCKWISE) one full turn.
(7) Remeasure Over-Center Rotating Torque. If
necessary turn the adjuster screw and repeat mea-
surement until correct Over-Center Rotating Torque
is reached.
NOTE: To increase the Over-Center Rotating Torque
turn the screw CLOCKWISE.
(8) Prevent the adjuster screw from turning while
tightening adjuster lock nut. Tighten the adjuster
lock nut to 49 N´m (36 ft. lbs.).
Fig. 8 Aligning To The Second Mark
1 - FIRST MARK
2 - SECOND MARK
3 - SPANNER WRENCH
Fig. 9 Steering Gear Centered
1 - ADJUSTMENT SCREW
2 - MASTER SPLINE
Fig. 10 Checking Over-center Rotation Torque
1 - CENTER
19 - 20 GEARBR/BE
GEAR (Continued)
Page 1430 of 2255
SPECIFICATIONS
POWER STEERING GEAR
SPECIFICATIONS
DESCRIPTION SPECIFICATION
Steering Gear
TypeRecirculating Ball
DESCRIPTION SPECIFICATION
Gear Code & Ratio
AM17.5:1
Gear Code & Ratio
HC/FW14:1
Gear Code & Ratio
JZ16-13:1
TORQUE SPECIFICATIONS
DESCRIPTION N´m Ft. Lbs. In. Lbs.
Wormshaft Bearing
Preload0.85-1.64 Ð 7.5-14.5
Pitman Shaft Overcenter Drag
New Gear (under 400 miles)0.23-0.68 Ð 2-6
+ Wormshaft Preload
TORQUE CHART
TORQUE SPECIFICATIONS
DESCRIPTION N´m Ft. Lbs. In. Lbs.
Steering Gear Mounting
Frame Bolts176 130 Ð
Line Fittings
Pressure31 23 Ð
Line Fittings
Return31 23 Ð
Steering Gear
Adjustment Cap Locknut108 80 Ð
Steering Gear
Adjustment Screw Locknut49 36 Ð
Steering Gear
Pitman Shaft Nut251 185 Ð
Steering Gear
Rack Piston Plug150 111 Ð
Steering Gear
Side Cover Bolts60 44 Ð
Steering Gear
Return Guide Clamp Bolt4.8 Ð 43
BR/BEGEAR 19 - 21
GEAR (Continued)
Page 1435 of 2255
INSTALLATION
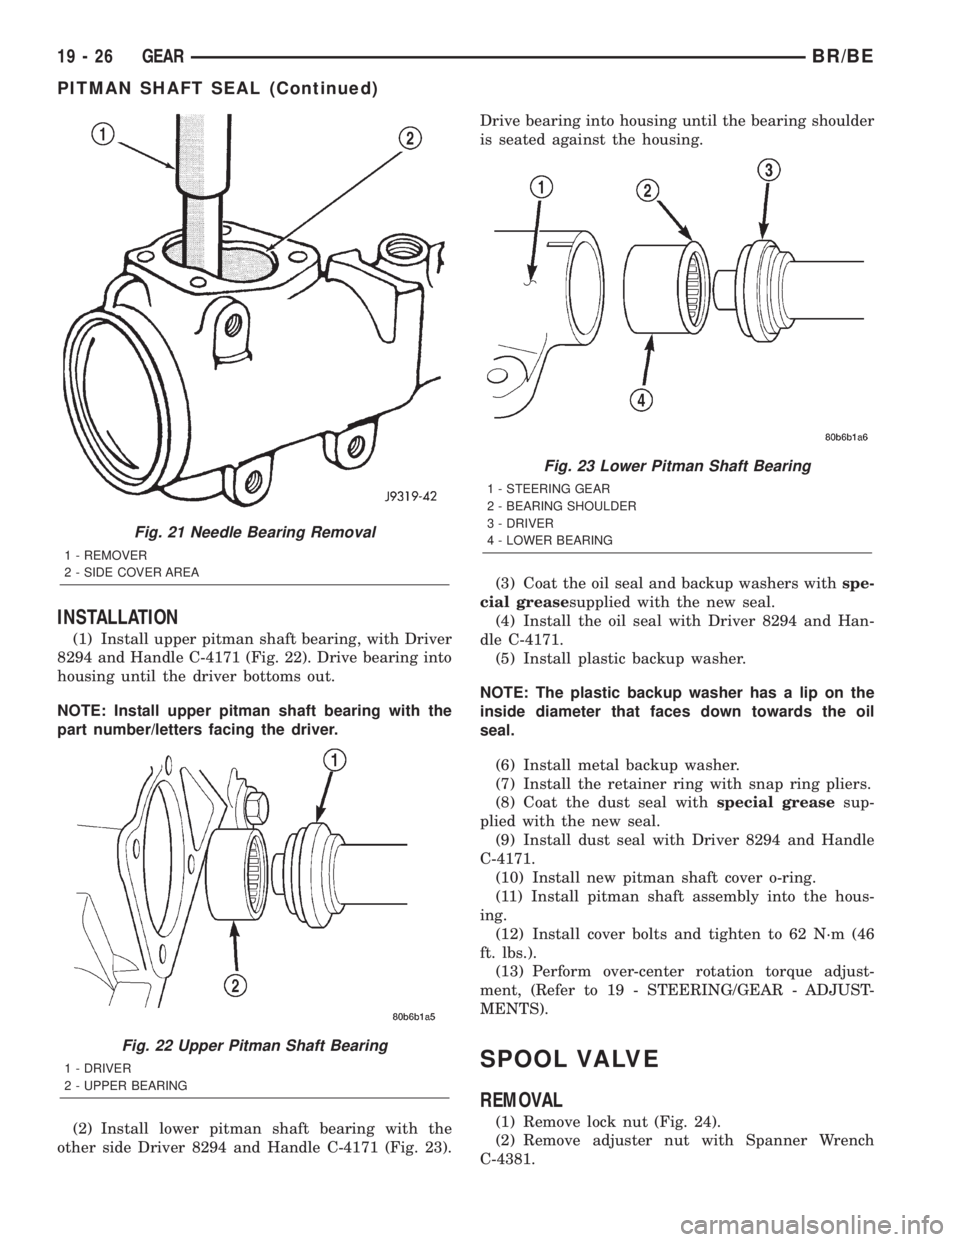
(1) Install upper pitman shaft bearing, with Driver
8294 and Handle C-4171 (Fig. 22). Drive bearing into
housing until the driver bottoms out.
NOTE: Install upper pitman shaft bearing with the
part number/letters facing the driver.
(2) Install lower pitman shaft bearing with the
other side Driver 8294 and Handle C-4171 (Fig. 23).Drive bearing into housing until the bearing shoulder
is seated against the housing.
(3) Coat the oil seal and backup washers withspe-
cial greasesupplied with the new seal.
(4) Install the oil seal with Driver 8294 and Han-
dle C-4171.
(5) Install plastic backup washer.
NOTE: The plastic backup washer has a lip on the
inside diameter that faces down towards the oil
seal.
(6) Install metal backup washer.
(7) Install the retainer ring with snap ring pliers.
(8) Coat the dust seal withspecial greasesup-
plied with the new seal.
(9) Install dust seal with Driver 8294 and Handle
C-4171.
(10) Install new pitman shaft cover o-ring.
(11) Install pitman shaft assembly into the hous-
ing.
(12) Install cover bolts and tighten to 62 N´m (46
ft. lbs.).
(13) Perform over-center rotation torque adjust-
ment, (Refer to 19 - STEERING/GEAR - ADJUST-
MENTS).
SPOOL VALVE
REMOVAL
(1) Remove lock nut (Fig. 24).
(2) Remove adjuster nut with Spanner Wrench
C-4381.
Fig. 21 Needle Bearing Removal
1 - REMOVER
2 - SIDE COVER AREA
Fig. 22 Upper Pitman Shaft Bearing
1 - DRIVER
2 - UPPER BEARING
Fig. 23 Lower Pitman Shaft Bearing
1 - STEERING GEAR
2 - BEARING SHOULDER
3 - DRIVER
4 - LOWER BEARING
19 - 26 GEARBR/BE
PITMAN SHAFT SEAL (Continued)
Page 1436 of 2255
(3) Remove thrust support assembly out of the
housing (Fig. 25).
(4) Pull stub shaft and valve assembly from the
housing (Fig. 26).
(5) Remove stub shaft from valve assembly by
lightly tapping shaft on a block of wood to loosen
shaft. Then disengage stub shaft pin from hole in
spool valve and separate the valve assembly from
stub shaft (Fig. 27).
(6) Remove spool valve from valve body by pulling
and rotating the spool valve from the valve body (Fig.
28).
Fig. 24 Lock Nut and Adjuster Nut
1 - ADJUSTER NUT
2 - STEERING GEAR
3 - LOCK NUT
4 - PUNCH
Fig. 25 Thrust Support Assembly
1 - STUB SHAFT
2 - HOUSING
3 - THRUST SUPPORT ASSEMBLY
Fig. 26 Valve Assembly With Stub Shaft
1 - GEAR
2 - THRUST SUPPORT
3 - LOCK NUT
4 - ADJUSTER NUT
5 - STUB SHAFT
6 - VALVE ASSEMBLY
Fig. 27 Stub Shaft
1 - STUB SHAFT
2 - VALVE BODY
3 - HOLE IN SPOOL
4 - SHAFT PIN
5 - 6mm (1/49)
BR/BEGEAR 19 - 27
SPOOL VALVE (Continued)
Page 1438 of 2255
(8) Install adjuster nut and lock nut.
(9) Adjust Thrust Bearing Preload and Over-Cen-
ter Rotating Torque, (Refer to 19 - STEERING/GEAR
- ADJUSTMENTS).
STEERING GEAR HOUSING
PLUG
REMOVAL
(1) Unseat and remove retaining ring from groove
with a punch through the hole in the end of the
housing (Fig. 32).
(2) Slowly rotate stub shaft with 12 point socket
COUNTER-CLOCKWISE to force the end plug out
from housing.
CAUTION: Do not turn stub shaft any further than
necessary. The rack piston balls will drop out of the
rack piston circuit if the stub shaft is turned too far.
(3) Remove O-ring from the housing (Fig. 33).
Fig. 31 Stub Shaft Cap O-Ring
1 - VALVE BODY
2 - STUB SHAFT CAP
3 - O-RING
Fig. 32 End Plug Retaining Ring
1 - RETAINING RING
Fig. 33 End Plug Components
1 - HOUSING ASSEMBLY
2 - HOUSING END PLUG O-RING SEAL
3 - HOUSING END PLUG
4 - RETAINING RING
BR/BEGEAR 19 - 29
SPOOL VALVE (Continued)
Page 1439 of 2255
INSTALLATION
(1) Lubricate O-ring with power steering fluid and
install into the housing.
(2) Install end plug by tapping the plug lightly
with a plastic mallet into the housing.
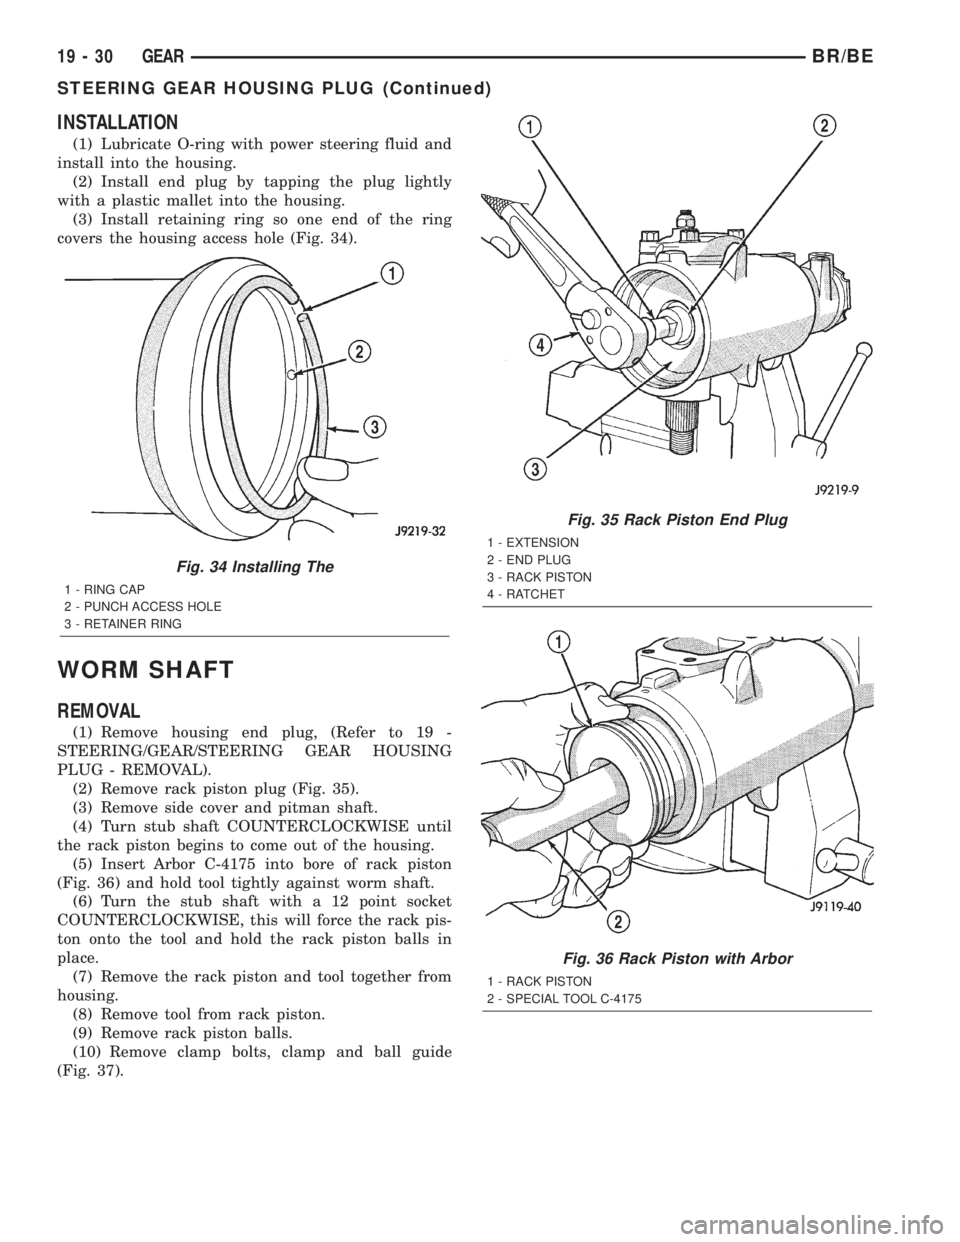
(3) Install retaining ring so one end of the ring
covers the housing access hole (Fig. 34).
WORM SHAFT
REMOVAL
(1) Remove housing end plug, (Refer to 19 -
STEERING/GEAR/STEERING GEAR HOUSING
PLUG - REMOVAL).
(2) Remove rack piston plug (Fig. 35).
(3) Remove side cover and pitman shaft.
(4) Turn stub shaft COUNTERCLOCKWISE until
the rack piston begins to come out of the housing.
(5) Insert Arbor C-4175 into bore of rack piston
(Fig. 36) and hold tool tightly against worm shaft.
(6) Turn the stub shaft with a 12 point socket
COUNTERCLOCKWISE, this will force the rack pis-
ton onto the tool and hold the rack piston balls in
place.
(7) Remove the rack piston and tool together from
housing.
(8) Remove tool from rack piston.
(9) Remove rack piston balls.
(10) Remove clamp bolts, clamp and ball guide
(Fig. 37).
Fig. 34 Installing The
1 - RING CAP
2 - PUNCH ACCESS HOLE
3 - RETAINER RING
Fig. 35 Rack Piston End Plug
1 - EXTENSION
2 - END PLUG
3 - RACK PISTON
4 - RATCHET
Fig. 36 Rack Piston with Arbor
1 - RACK PISTON
2 - SPECIAL TOOL C-4175
19 - 30 GEARBR/BE
STEERING GEAR HOUSING PLUG (Continued)