2002 DODGE RAM lock
[x] Cancel search: lockPage 1486 of 2255
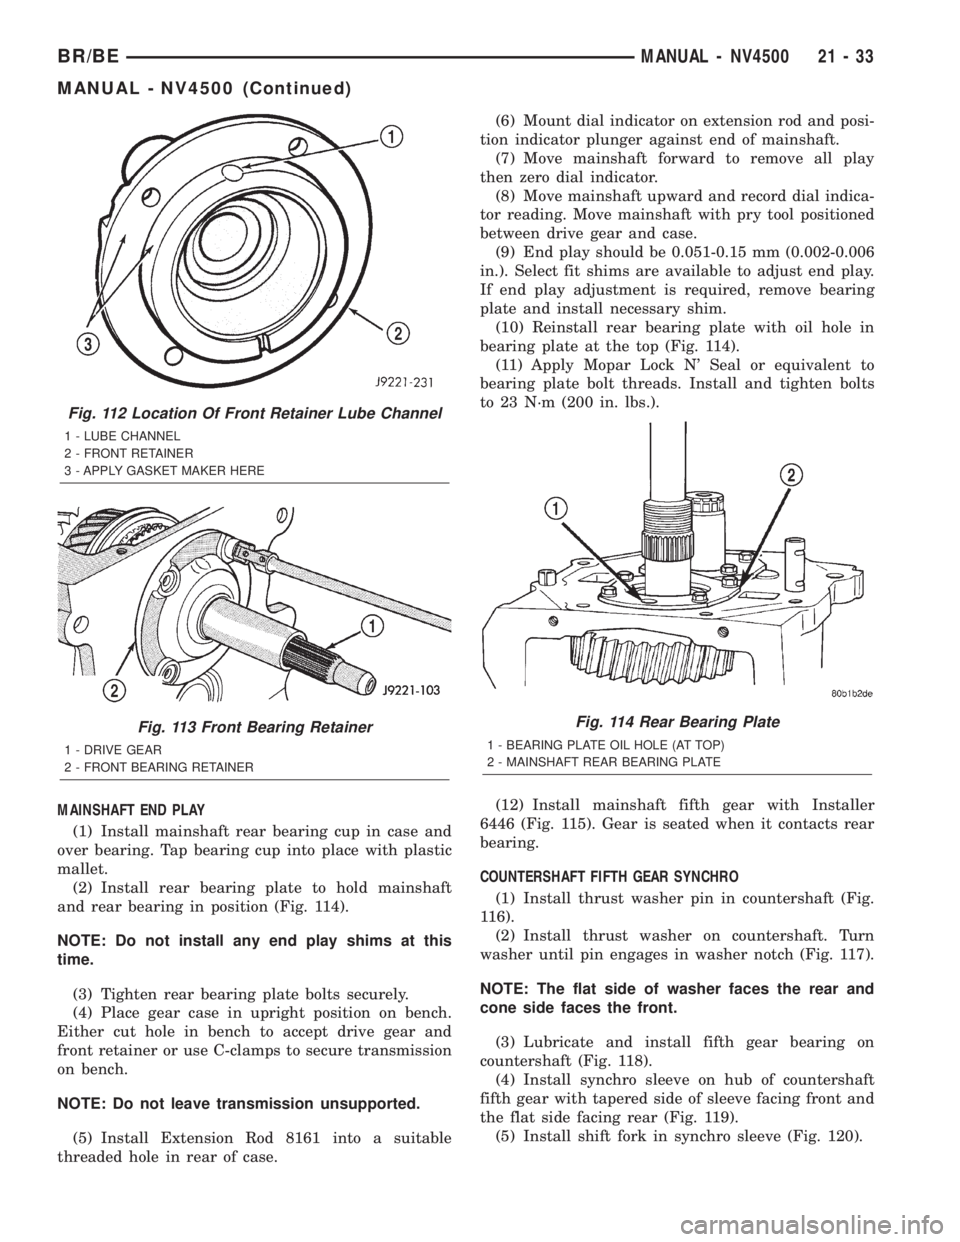
MAINSHAFT END PLAY
(1) Install mainshaft rear bearing cup in case and
over bearing. Tap bearing cup into place with plastic
mallet.
(2) Install rear bearing plate to hold mainshaft
and rear bearing in position (Fig. 114).
NOTE: Do not install any end play shims at this
time.
(3) Tighten rear bearing plate bolts securely.
(4) Place gear case in upright position on bench.
Either cut hole in bench to accept drive gear and
front retainer or use C-clamps to secure transmission
on bench.
NOTE: Do not leave transmission unsupported.
(5) Install Extension Rod 8161 into a suitable
threaded hole in rear of case.(6) Mount dial indicator on extension rod and posi-
tion indicator plunger against end of mainshaft.
(7) Move mainshaft forward to remove all play
then zero dial indicator.
(8) Move mainshaft upward and record dial indica-
tor reading. Move mainshaft with pry tool positioned
between drive gear and case.
(9) End play should be 0.051-0.15 mm (0.002-0.006
in.). Select fit shims are available to adjust end play.
If end play adjustment is required, remove bearing
plate and install necessary shim.
(10) Reinstall rear bearing plate with oil hole in
bearing plate at the top (Fig. 114).
(11) Apply Mopar Lock N' Seal or equivalent to
bearing plate bolt threads. Install and tighten bolts
to 23 N´m (200 in. lbs.).
(12) Install mainshaft fifth gear with Installer
6446 (Fig. 115). Gear is seated when it contacts rear
bearing.
COUNTERSHAFT FIFTH GEAR SYNCHRO
(1) Install thrust washer pin in countershaft (Fig.
116).
(2) Install thrust washer on countershaft. Turn
washer until pin engages in washer notch (Fig. 117).
NOTE: The flat side of washer faces the rear and
cone side faces the front.
(3) Lubricate and install fifth gear bearing on
countershaft (Fig. 118).
(4) Install synchro sleeve on hub of countershaft
fifth gear with tapered side of sleeve facing front and
the flat side facing rear (Fig. 119).
(5) Install shift fork in synchro sleeve (Fig. 120).
Fig. 112 Location Of Front Retainer Lube Channel
1 - LUBE CHANNEL
2 - FRONT RETAINER
3 - APPLY GASKET MAKER HERE
Fig. 113 Front Bearing Retainer
1 - DRIVE GEAR
2 - FRONT BEARING RETAINER
Fig. 114 Rear Bearing Plate
1 - BEARING PLATE OIL HOLE (AT TOP)
2 - MAINSHAFT REAR BEARING PLATE
BR/BEMANUAL - NV4500 21 - 33
MANUAL - NV4500 (Continued)
Page 1489 of 2255
(7) Hold mainshaft Socket 6993 4X2 or Socket
6984 4X4 while installing the fifth gear nut.
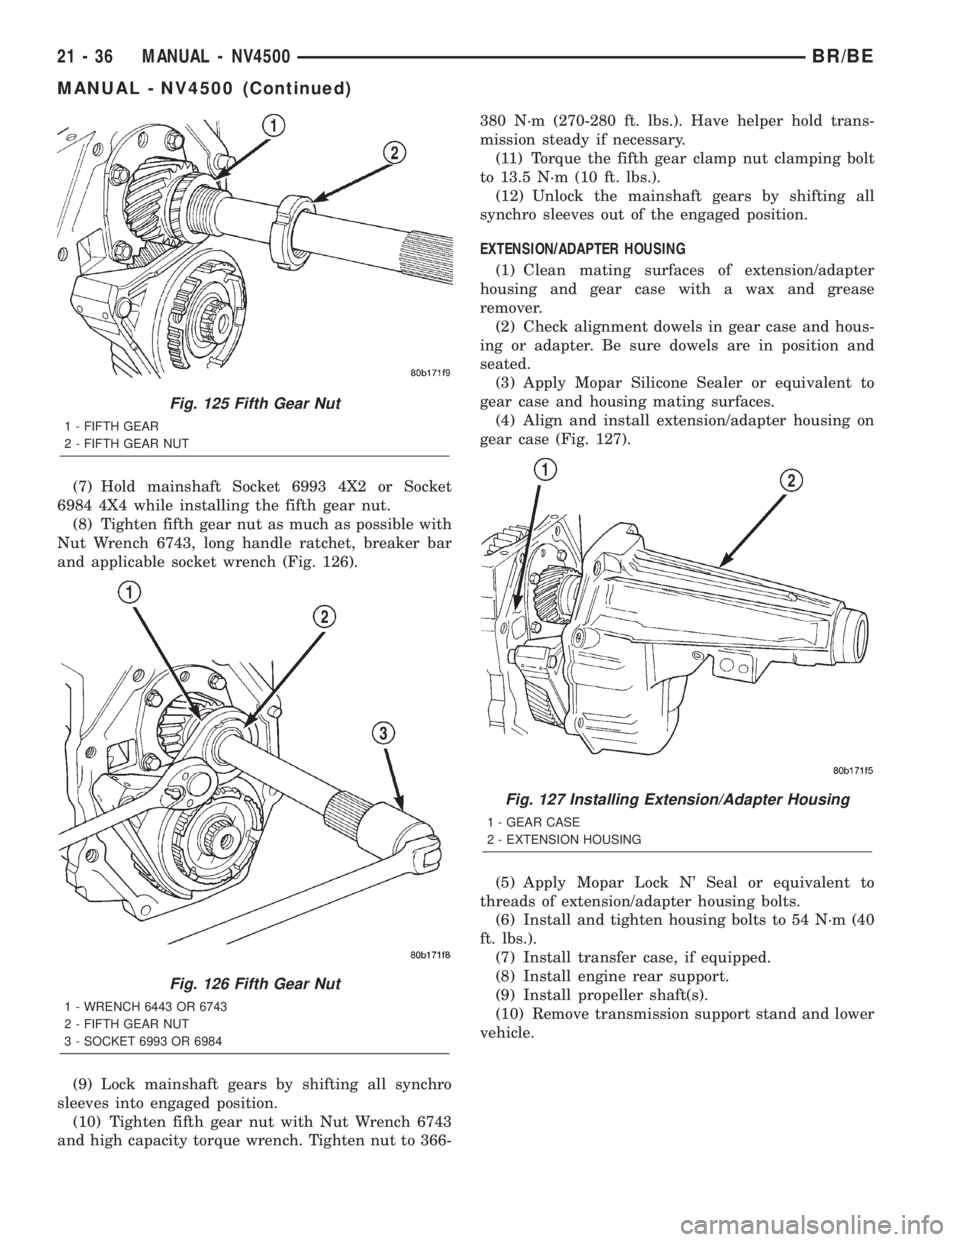
(8) Tighten fifth gear nut as much as possible with
Nut Wrench 6743, long handle ratchet, breaker bar
and applicable socket wrench (Fig. 126).
(9) Lock mainshaft gears by shifting all synchro
sleeves into engaged position.
(10) Tighten fifth gear nut with Nut Wrench 6743
and high capacity torque wrench. Tighten nut to 366-380 N´m (270-280 ft. lbs.). Have helper hold trans-
mission steady if necessary.
(11) Torque the fifth gear clamp nut clamping bolt
to 13.5 N´m (10 ft. lbs.).
(12) Unlock the mainshaft gears by shifting all
synchro sleeves out of the engaged position.
EXTENSION/ADAPTER HOUSING
(1) Clean mating surfaces of extension/adapter
housing and gear case with a wax and grease
remover.
(2) Check alignment dowels in gear case and hous-
ing or adapter. Be sure dowels are in position and
seated.
(3) Apply Mopar Silicone Sealer or equivalent to
gear case and housing mating surfaces.
(4) Align and install extension/adapter housing on
gear case (Fig. 127).
(5) Apply Mopar Lock N' Seal or equivalent to
threads of extension/adapter housing bolts.
(6) Install and tighten housing bolts to 54 N´m (40
ft. lbs.).
(7) Install transfer case, if equipped.
(8) Install engine rear support.
(9) Install propeller shaft(s).
(10) Remove transmission support stand and lower
vehicle.
Fig. 125 Fifth Gear Nut
1 - FIFTH GEAR
2 - FIFTH GEAR NUT
Fig. 126 Fifth Gear Nut
1 - WRENCH 6443 OR 6743
2 - FIFTH GEAR NUT
3 - SOCKET 6993 OR 6984
Fig. 127 Installing Extension/Adapter Housing
1 - GEAR CASE
2 - EXTENSION HOUSING
21 - 36 MANUAL - NV4500BR/BE
MANUAL - NV4500 (Continued)
Page 1497 of 2255
(3) Clean all chips from shift cover and plug bores.
Then clean plug bores with solvent and dry with
clean shop towel.
INSTALLATION
EXPANSION PLUG
(1) Apply small bead of Mopar silicone sealer or
equivalent to outer edge of each new plug.
(2) Position each plug in bore and tap into place
with hammer and punch or socket.
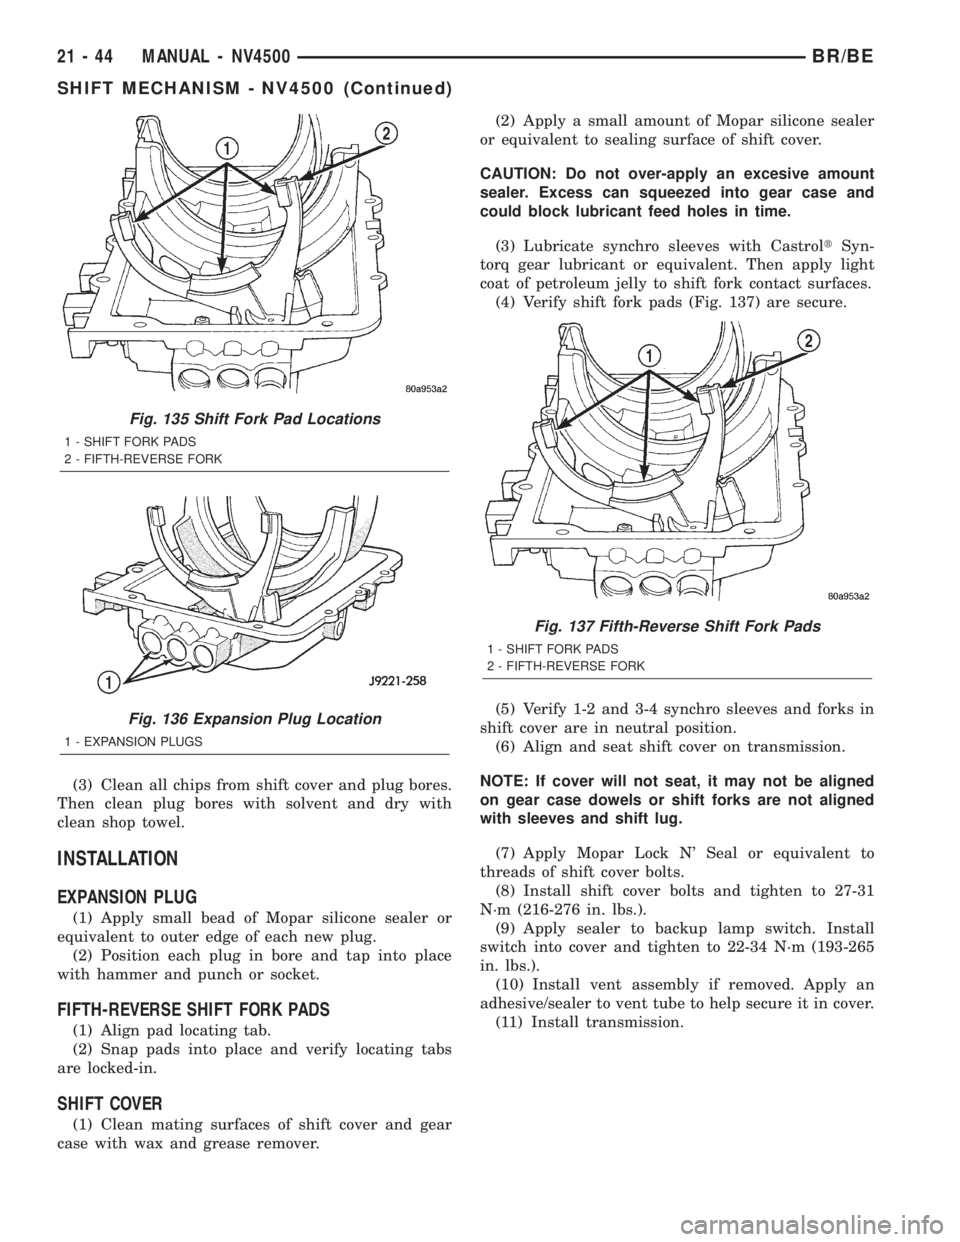
FIFTH-REVERSE SHIFT FORK PADS
(1) Align pad locating tab.
(2) Snap pads into place and verify locating tabs
are locked-in.
SHIFT COVER
(1) Clean mating surfaces of shift cover and gear
case with wax and grease remover.(2) Apply a small amount of Mopar silicone sealer
or equivalent to sealing surface of shift cover.
CAUTION: Do not over-apply an excesive amount
sealer. Excess can squeezed into gear case and
could block lubricant feed holes in time.
(3) Lubricate synchro sleeves with CastroltSyn-
torq gear lubricant or equivalent. Then apply light
coat of petroleum jelly to shift fork contact surfaces.
(4) Verify shift fork pads (Fig. 137) are secure.
(5) Verify 1-2 and 3-4 synchro sleeves and forks in
shift cover are in neutral position.
(6) Align and seat shift cover on transmission.
NOTE: If cover will not seat, it may not be aligned
on gear case dowels or shift forks are not aligned
with sleeves and shift lug.
(7) Apply Mopar Lock N' Seal or equivalent to
threads of shift cover bolts.
(8) Install shift cover bolts and tighten to 27-31
N´m (216-276 in. lbs.).
(9) Apply sealer to backup lamp switch. Install
switch into cover and tighten to 22-34 N´m (193-265
in. lbs.).
(10) Install vent assembly if removed. Apply an
adhesive/sealer to vent tube to help secure it in cover.
(11) Install transmission.
Fig. 135 Shift Fork Pad Locations
1 - SHIFT FORK PADS
2 - FIFTH-REVERSE FORK
Fig. 136 Expansion Plug Location
1 - EXPANSION PLUGS
Fig. 137 Fifth-Reverse Shift Fork Pads
1 - SHIFT FORK PADS
2 - FIFTH-REVERSE FORK
21 - 44 MANUAL - NV4500BR/BE
SHIFT MECHANISM - NV4500 (Continued)
Page 1501 of 2255
OPERATION
The driver selects a particular gear by moving the
shift lever to the desired gear position. As the shift
lever moves the selected shift rail, the shift fork
attached to that rail begins to move. The fork is posi-
tioned in a groove in the outer circumference of the
synchronizer sleeve. As the shift fork moves the syn-
chronizer sleeve, the synchronizer begins to speed-up
or slow down the selected gear (depending on
whether we are up-shifting or down-shifting). The
synchronizer does this by having the synchronizer
hub splined to the mainshaft or the countershaft in
some cases, and moving the blocker ring into contact
with the gear's friction cone. As the blocker ring and
friction cone come together, the gear speed is brought
up or down to the speed of the synchronizer. As the
two speeds match, the splines on the inside of the
synchronizer sleeve become aligned with the teeth on
the blocker ring and friction cone and eventually willslide over the teeth, locking the gear to the main-
shaft or countershaft through the synchronizer.
DIAGNOSIS AND TESTING
LOW LUBRICANT LEVEL
A low transmission lubricant level is generally the
result of a leak, inadequate lubricant fill or an incor-
rect lubricant level check. A correct lubricant level
check can only be made when the vehicle is level.
Also allow the lubricant to settle for a minute or so
before checking. These recommendations will ensure
an accurate check and avoid an underfill or overfill
condition. Always check the lubricant level after any
addition of fluid to avoid an incorrect lubricant level
condition.
Leaks can occur at the mating surfaces of the gear
case, adaptor or extension housing, or from the front/
rear seals. A suspected leak could also be the result
of an overfill condition. Leaks at the rear of the
extension or adapter housing will be from the hous-
ing oil seals. Leaks at component mating surfaces
will probably be the result of inadequate sealer, gaps
in the sealer, incorrect bolt tightening or use of a
non-recommended sealer. A leak at the front of the
transmission will be from either the front bearing
retainer or retainer seal. Lubricant may be seen drip-
ping from the clutch housing after extended opera-
tion. If the leak is severe, it may also contaminate
the clutch disc causing the disc to slip, grab and or
chatter.
HARD SHIFTING
Hard shifting is usually caused by a low lubricant
level, improper or contaminated lubricants. The con-
sequence of using non-recommended lubricants is
noise, excessive wear, internal bind and hard shift-
ing. Substantial lubricant leaks can result in gear,
shift rail, synchro, and bearing damage. If a leak
goes undetected for an extended period, the first indi-
cations of component damage are usually hard shift-
ing and noise.
Component damage, incorrect clutch adjustment or
damaged clutch pressure plate or disc are additional
probable causes of increased shift effort. Incorrect
adjustment or a worn/damaged pressure plate or disc
can cause incorrect release. If clutch problem is
advanced, gear clash during shifts can result. Worn
or damaged synchro rings can cause gear clash when
shifting into any forward gear. In some new or
rebuilt transmissions, new synchro rings may tend to
stick slightly causing hard or noisy shifts. In most
cases this condition will decline as the rings wear-in.
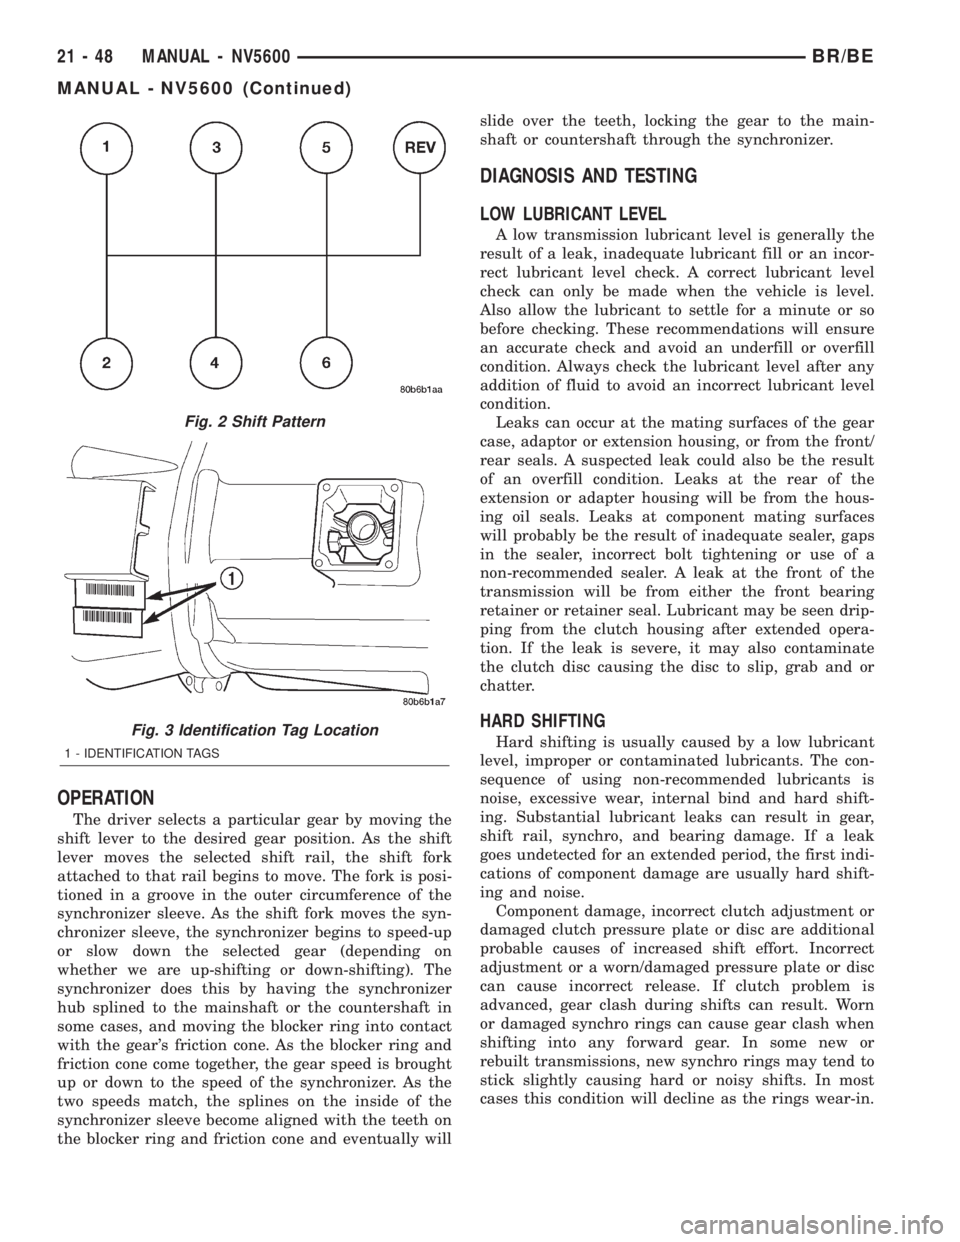
Fig. 2 Shift Pattern
Fig. 3 Identification Tag Location
1 - IDENTIFICATION TAGS
21 - 48 MANUAL - NV5600BR/BE
MANUAL - NV5600 (Continued)
Page 1502 of 2255
TRANSMISSION NOISE
Most manual transmissions make some noise dur-
ing normal operation. Rotating gears generate a mild
whine that is audible, but generally only at extreme
speeds. Severe highly audible transmission noise is
generally the initial indicator of a lubricant problem.
Insufficient, improper or contaminated lubricant
will promote rapid wear of gears, synchros, shift
rails, forks and bearings. The overheating caused by
a lubricant problem, can also lead to gear breakage.
REMOVAL
NOTE: Use a heavy duty scissors style transmis-
sion jack for remove of the transmission.
(1) Disconnect battery negative cable.
(2) Shift transmission into Neutral.
(3) Remove screws attaching shift boot to floorpan.
Then slide boot upward on the shift lever.
(4) Remove the bolts holding the shift tower to the
isolator plate and transmission gear case.
(5) Remove the shift tower and isolator plate from
the transmission gear case.
(6) Raise and support vehicle.
(7) Remove skid plate, if equipped.
(8) Mark propeller shaft/shafts and axle yokes for
installation reference.
(9) Remove propeller shaft.
(10) Disconnect and remove exhaust system as
necessary.
(11) Disconnect wires at backup light switch.
(12) Support engine with adjustable safety stand
and wood block.
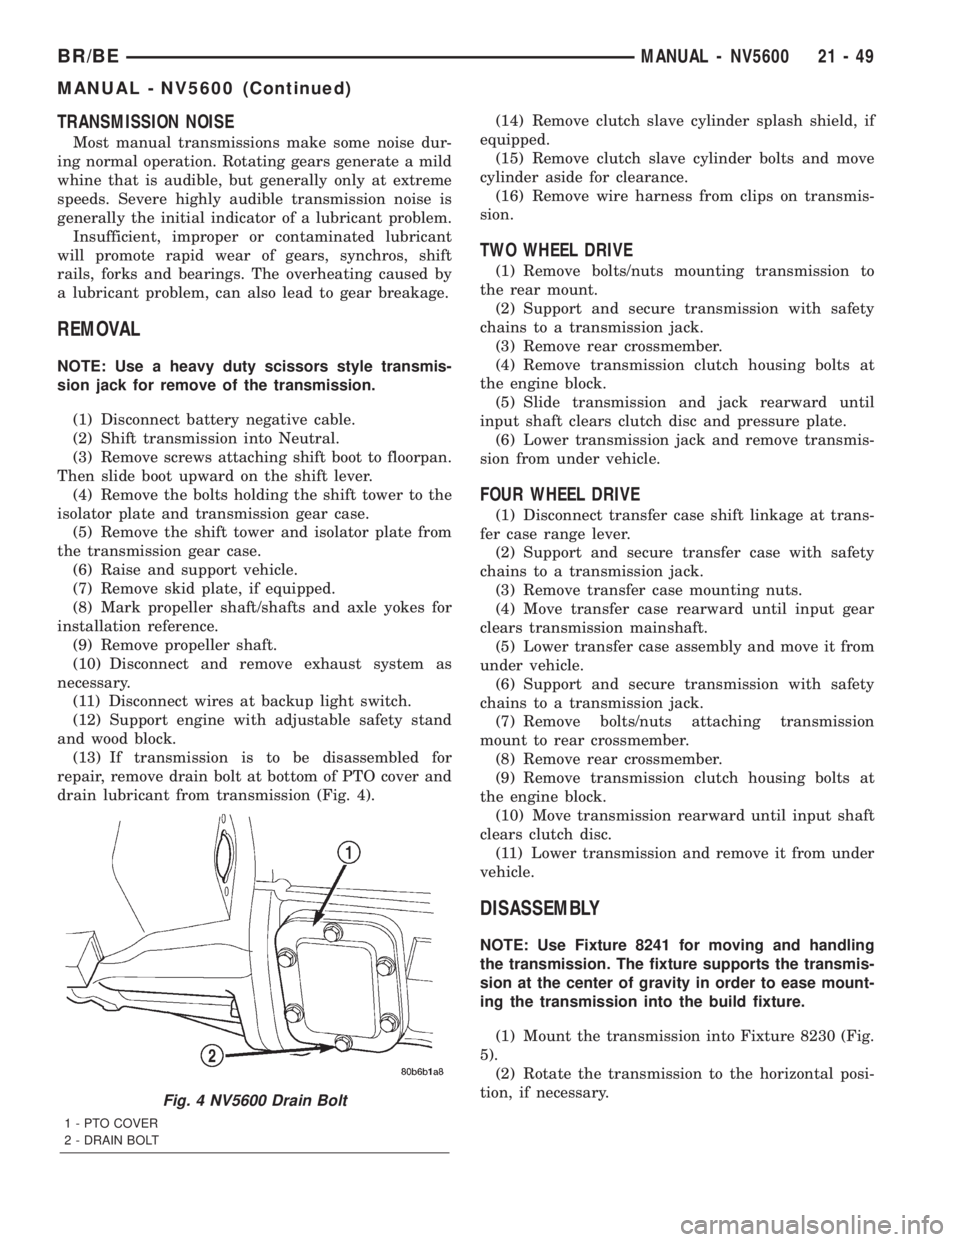
(13) If transmission is to be disassembled for
repair, remove drain bolt at bottom of PTO cover and
drain lubricant from transmission (Fig. 4).(14) Remove clutch slave cylinder splash shield, if
equipped.
(15) Remove clutch slave cylinder bolts and move
cylinder aside for clearance.
(16) Remove wire harness from clips on transmis-
sion.
TWO WHEEL DRIVE
(1) Remove bolts/nuts mounting transmission to
the rear mount.
(2) Support and secure transmission with safety
chains to a transmission jack.
(3) Remove rear crossmember.
(4) Remove transmission clutch housing bolts at
the engine block.
(5) Slide transmission and jack rearward until
input shaft clears clutch disc and pressure plate.
(6) Lower transmission jack and remove transmis-
sion from under vehicle.
FOUR WHEEL DRIVE
(1) Disconnect transfer case shift linkage at trans-
fer case range lever.
(2) Support and secure transfer case with safety
chains to a transmission jack.
(3) Remove transfer case mounting nuts.
(4) Move transfer case rearward until input gear
clears transmission mainshaft.
(5) Lower transfer case assembly and move it from
under vehicle.
(6) Support and secure transmission with safety
chains to a transmission jack.
(7) Remove bolts/nuts attaching transmission
mount to rear crossmember.
(8) Remove rear crossmember.
(9) Remove transmission clutch housing bolts at
the engine block.
(10) Move transmission rearward until input shaft
clears clutch disc.
(11) Lower transmission and remove it from under
vehicle.
DISASSEMBLY
NOTE: Use Fixture 8241 for moving and handling
the transmission. The fixture supports the transmis-
sion at the center of gravity in order to ease mount-
ing the transmission into the build fixture.
(1) Mount the transmission into Fixture 8230 (Fig.
5).
(2) Rotate the transmission to the horizontal posi-
tion, if necessary.
Fig. 4 NV5600 Drain Bolt
1 - PTO COVER
2 - DRAIN BOLT
BR/BEMANUAL - NV5600 21 - 49
MANUAL - NV5600 (Continued)
Page 1504 of 2255
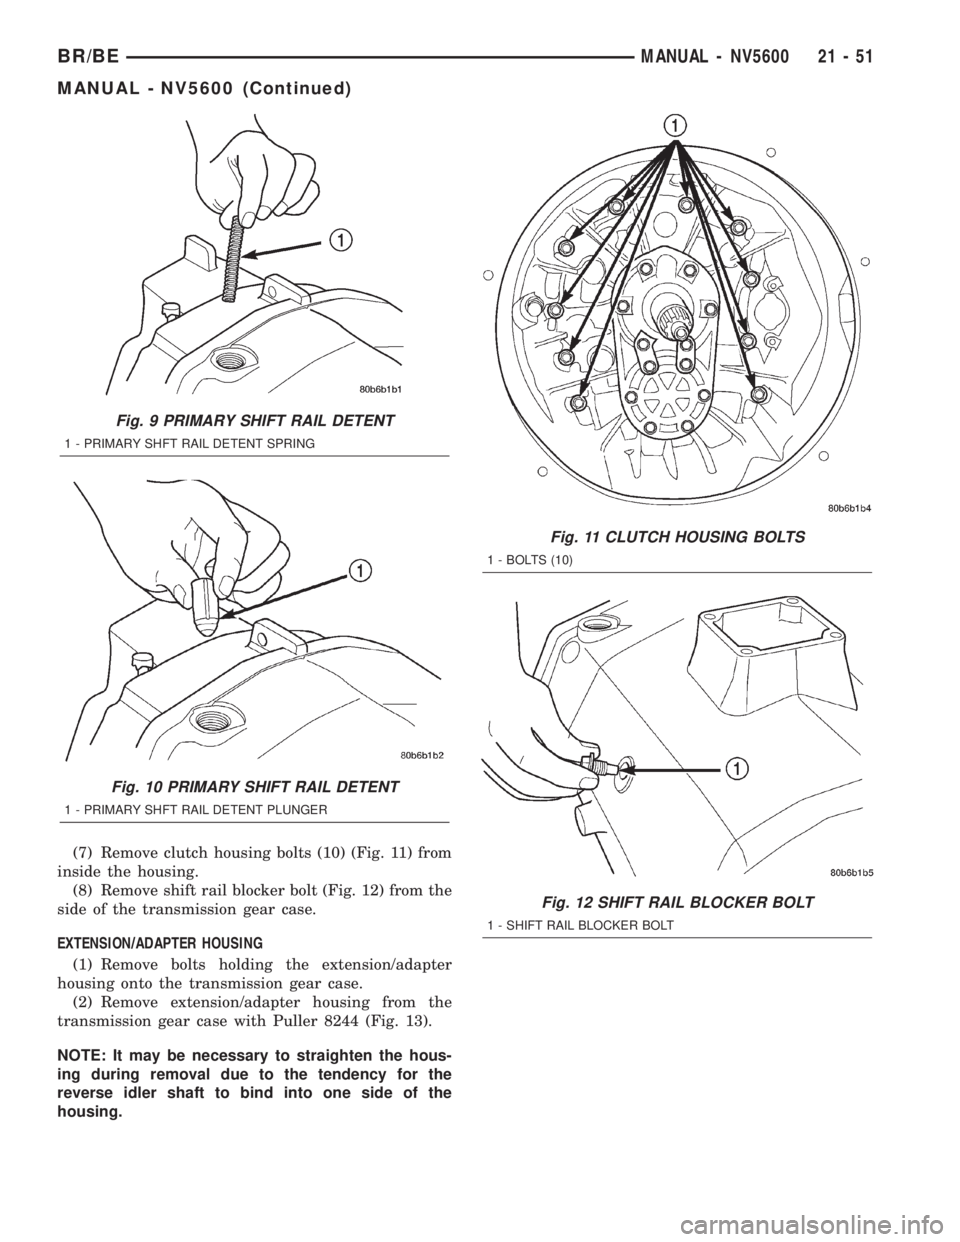
(7) Remove clutch housing bolts (10) (Fig. 11) from
inside the housing.
(8) Remove shift rail blocker bolt (Fig. 12) from the
side of the transmission gear case.
EXTENSION/ADAPTER HOUSING
(1) Remove bolts holding the extension/adapter
housing onto the transmission gear case.
(2) Remove extension/adapter housing from the
transmission gear case with Puller 8244 (Fig. 13).
NOTE: It may be necessary to straighten the hous-
ing during removal due to the tendency for the
reverse idler shaft to bind into one side of the
housing.
Fig. 9 PRIMARY SHIFT RAIL DETENT
1 - PRIMARY SHFT RAIL DETENT SPRING
Fig. 10 PRIMARY SHIFT RAIL DETENT
1 - PRIMARY SHFT RAIL DETENT PLUNGER
Fig. 11 CLUTCH HOUSING BOLTS
1 - BOLTS (10)
Fig. 12 SHIFT RAIL BLOCKER BOLT
1 - SHIFT RAIL BLOCKER BOLT
BR/BEMANUAL - NV5600 21 - 51
MANUAL - NV5600 (Continued)
Page 1506 of 2255
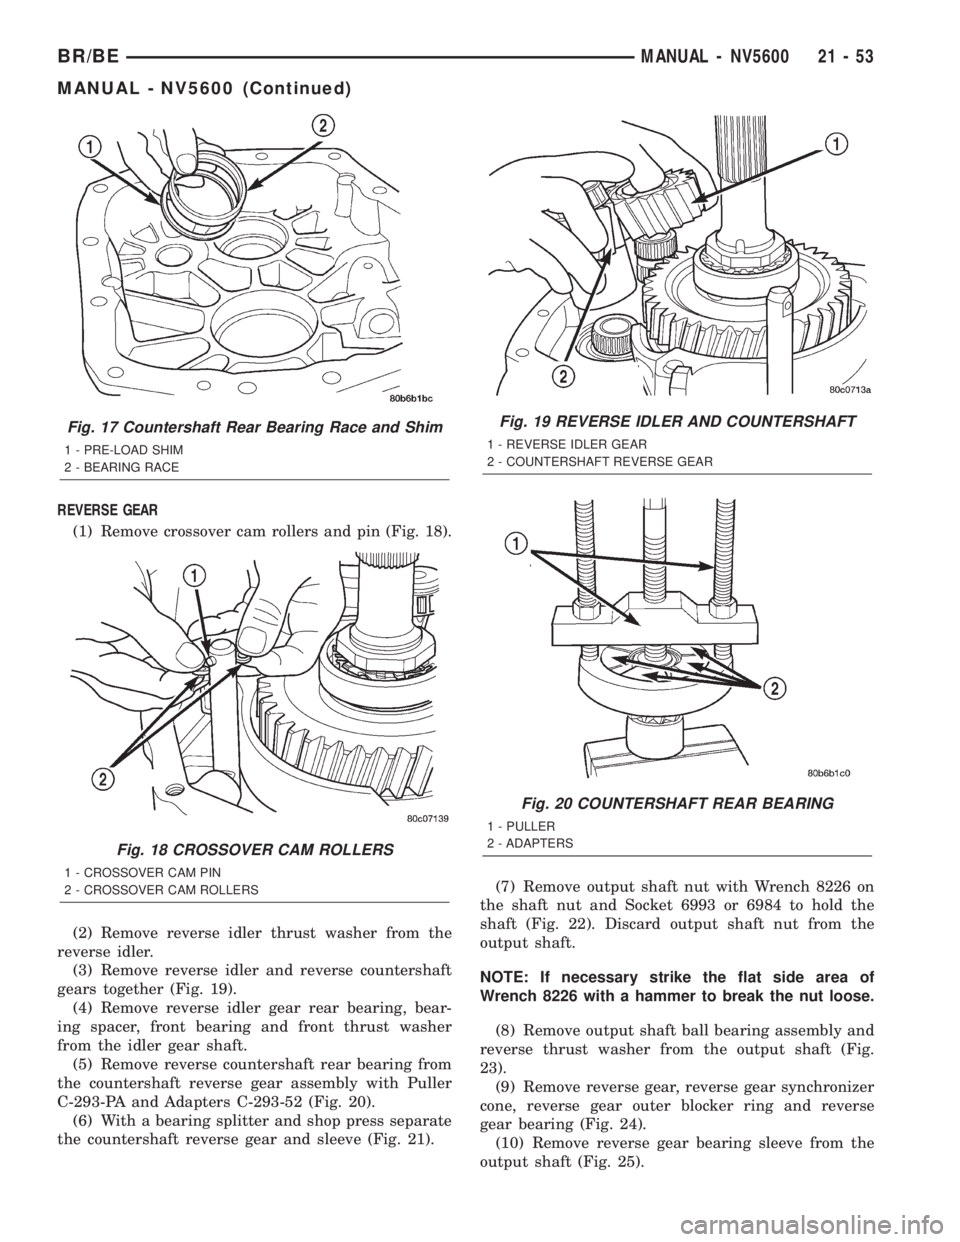
REVERSE GEAR
(1) Remove crossover cam rollers and pin (Fig. 18).
(2) Remove reverse idler thrust washer from the
reverse idler.
(3) Remove reverse idler and reverse countershaft
gears together (Fig. 19).
(4) Remove reverse idler gear rear bearing, bear-
ing spacer, front bearing and front thrust washer
from the idler gear shaft.
(5) Remove reverse countershaft rear bearing from
the countershaft reverse gear assembly with Puller
C-293-PA and Adapters C-293-52 (Fig. 20).
(6) With a bearing splitter and shop press separate
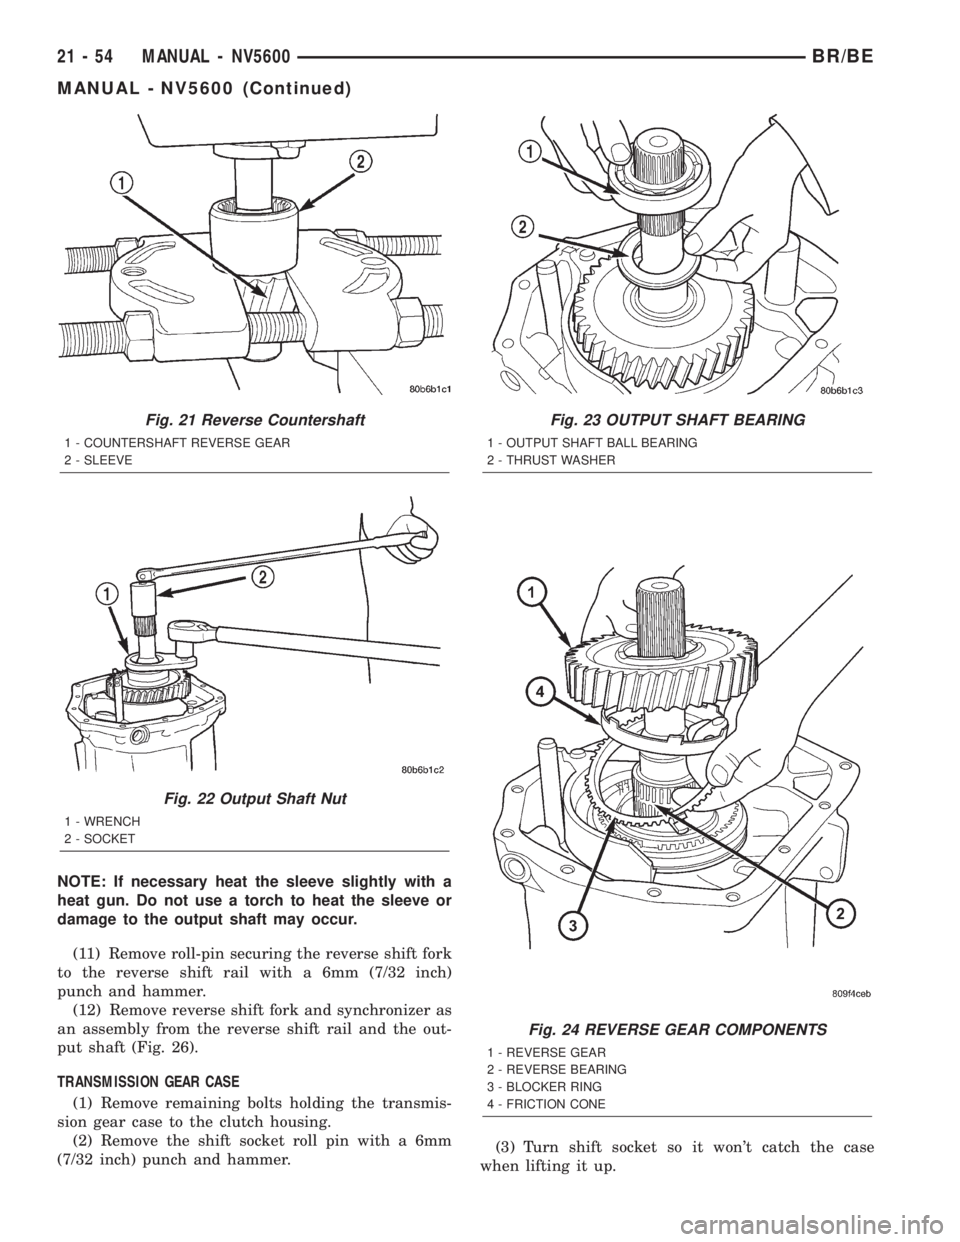
the countershaft reverse gear and sleeve (Fig. 21).(7) Remove output shaft nut with Wrench 8226 on
the shaft nut and Socket 6993 or 6984 to hold the
shaft (Fig. 22). Discard output shaft nut from the
output shaft.
NOTE: If necessary strike the flat side area of
Wrench 8226 with a hammer to break the nut loose.
(8) Remove output shaft ball bearing assembly and
reverse thrust washer from the output shaft (Fig.
23).
(9) Remove reverse gear, reverse gear synchronizer
cone, reverse gear outer blocker ring and reverse
gear bearing (Fig. 24).
(10) Remove reverse gear bearing sleeve from the
output shaft (Fig. 25).
Fig. 17 Countershaft Rear Bearing Race and Shim
1 - PRE-LOAD SHIM
2 - BEARING RACE
Fig. 18 CROSSOVER CAM ROLLERS
1 - CROSSOVER CAM PIN
2 - CROSSOVER CAM ROLLERS
Fig. 19 REVERSE IDLER AND COUNTERSHAFT
1 - REVERSE IDLER GEAR
2 - COUNTERSHAFT REVERSE GEAR
Fig. 20 COUNTERSHAFT REAR BEARING
1 - PULLER
2 - ADAPTERS
BR/BEMANUAL - NV5600 21 - 53
MANUAL - NV5600 (Continued)
Page 1507 of 2255
NOTE: If necessary heat the sleeve slightly with a
heat gun. Do not use a torch to heat the sleeve or
damage to the output shaft may occur.
(11) Remove roll-pin securing the reverse shift fork
to the reverse shift rail with a 6mm (7/32 inch)
punch and hammer.
(12) Remove reverse shift fork and synchronizer as
an assembly from the reverse shift rail and the out-
put shaft (Fig. 26).
TRANSMISSION GEAR CASE
(1) Remove remaining bolts holding the transmis-
sion gear case to the clutch housing.
(2) Remove the shift socket roll pin with a 6mm
(7/32 inch) punch and hammer.(3) Turn shift socket so it won't catch the case
when lifting it up.
Fig. 21 Reverse Countershaft
1 - COUNTERSHAFT REVERSE GEAR
2 - SLEEVE
Fig. 22 Output Shaft Nut
1 - WRENCH
2 - SOCKET
Fig. 23 OUTPUT SHAFT BEARING
1 - OUTPUT SHAFT BALL BEARING
2 - THRUST WASHER
Fig. 24 REVERSE GEAR COMPONENTS
1 - REVERSE GEAR
2 - REVERSE BEARING
3 - BLOCKER RING
4 - FRICTION CONE
21 - 54 MANUAL - NV5600BR/BE
MANUAL - NV5600 (Continued)