2002 BMW Z3 maintenance
[x] Cancel search: maintenancePage 53 of 187

53n
IndexDataTechnologyRepairsMaintenanceControlsOverview
Safety belts
Comply with the following instruc-
tions for wearing safety belts. If
you do not, maximum personal protec-
tion will not be provided and the safety
function of the belt is limited. These
instructions also apply for vehicle
passengers:
Never allow more than one person to
wear a single safety belt. Never allow
infants or small children to ride in a
passenger's lap.
Avoid twisting the belt while routing it
firmly across your pelvis and shoulder.
Do not route the belt across hard or
fragile objects. Do not route the belt
across your neck, or run it across sharp
edges. Be sure that the belt does not
become caught or jammed.
Avoid wearing bulky clothing which will
prevent proper belt fit. Pull the safety
belt across your shoulders frequently to
retension it. In the event of a frontal
impact, a loose lap belt could slide over
your hips, leading to abdominal injury.
In addition, the safety belt's restraint
effectiveness is reduced if the belt is
worn loosely.
Expectant mothers should also wear
their safety belt at all times, taking care
to ensure that the lap belt fits against
the lower hips and does not exert pres-
sure on the abdominal area.<
For care and cleaning, refer to the
"Caring for your vehicle" manual.
If the safety belt system has been
stressed as a result of an accident
or if it has been damaged in any other
way: have the belt system, including the
safety belt tensioner replaced by a
BMW center. In addition, have your
BMW center inspect the safety belt
anchors.
If a child-restraint system was in your
vehicle during an accident, consult the
manufacturer's instructions regarding
replacement.<
Page 55 of 187
55n
IndexDataTechnologyRepairsMaintenanceControlsOverview
AirbagsSitting correctly with airbags
For your safety, comply with the
following instructions for the
airbags. If you do not, the airbags may
not be able to provide their maximum
protection. All passengers in the vehicle
should be aware of and comply with this
information:
The airbags are supplemental restraint
devices designed to provide extra
protection; they are not a substitute for
safety belts. Wear your safety belt at
all times.
Adjust your seat to a position that is
comfortable for you, allowing unre-
stricted vehicle operation, and is not
closer to the steering wheel than neces-
sary.
Always grasp the steering wheel by the
steering wheel rim, keeping your hands
at the "9-o'clock" and "3-o'clock" posi-
tions in order to minimize any risk of
injury to hands or arms if the airbag does
deploy.
There should not be any other persons,
animals or objects between the airbag
and the passenger in that seat.
Do not use the cover panel for the front
airbag on the passenger side as a
storage area.
Do not apply adhesive materials to the
cover panels of the airbags, cover them
or modify them in any other way.
If you use a child-restraint system, read
carefully and comply with the instruc-
tions on page 56.
Be sure that child-restraint systems are
installed correctly and with the greatest
possible distance from the airbag in the
side trim panel. Do not allow children to
lean out of the child-restraint system in
the direction of the side trim panel.
Otherwise, serious injuries could occur
if the airbag is triggered.<
Even when you have complied with all
of these guidelines, there is still a small
residual risk of minor facial, hand and
arm injuries from airbag deployment
occurring in isolated instances.
The ignition and inflation noise may
cause a mild temporary hearing loss in
extremely sensitive individuals.
Corresponding airbag safety precau-
tions are provided on both sun visors
and the instrument panel (US models).
For additional information concerning
the airbag system, refer to pages 130
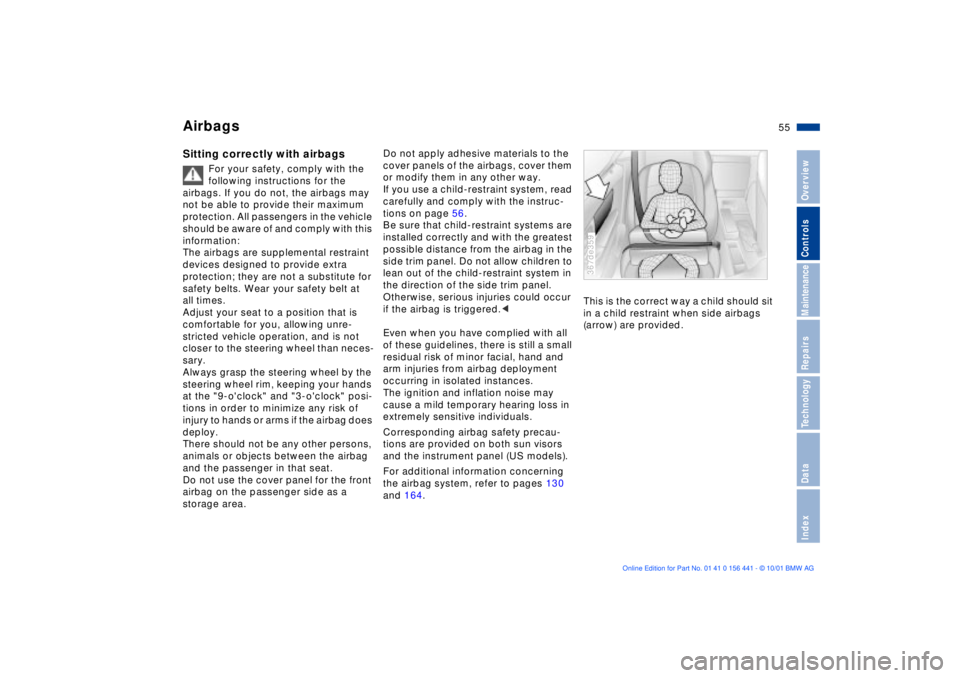
and 164.This is the correct way a child should sit
in a child restraint when side airbags
(arrow) are provided.
367de359
Page 57 of 187
57n
IndexDataTechnologyRepairsMaintenanceControlsOverview
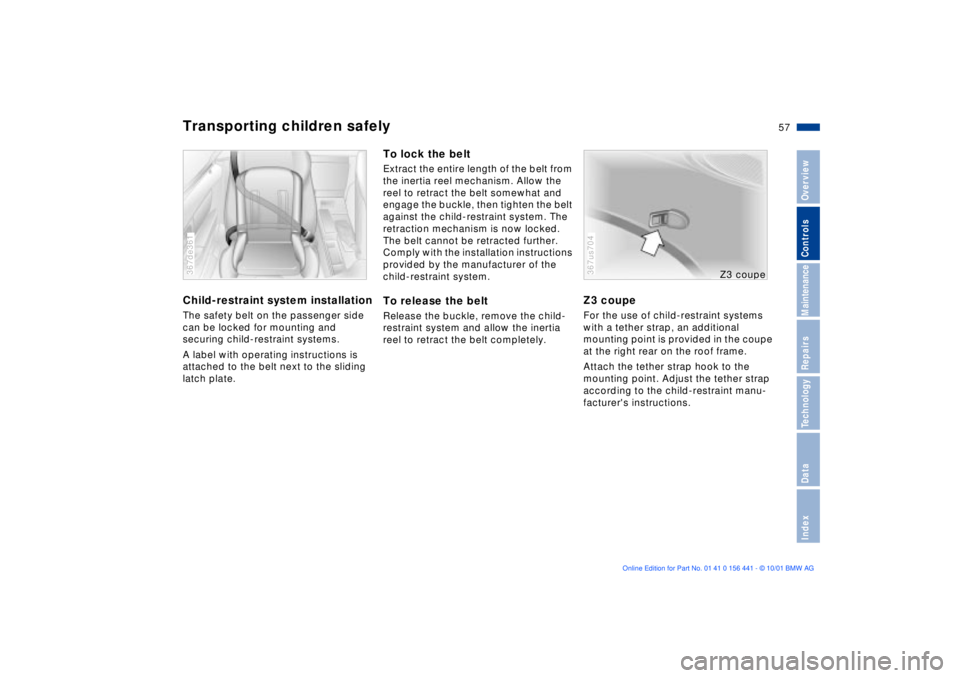
Transporting children safelyChild-restraint system installationThe safety belt on the passenger side
can be locked for mounting and
securing child-restraint systems.
A label with operating instructions is
attached to the belt next to the sliding
latch plate.367de361
To lock the beltExtract the entire length of the belt from
the inertia reel mechanism. Allow the
reel to retract the belt somewhat and
engage the buckle, then tighten the belt
against the child-restraint system. The
retraction mechanism is now locked.
The belt cannot be retracted further.
Comply with the installation instructions
provided by the manufacturer of the
child-restraint system.To release the beltRelease the buckle, remove the child-
restraint system and allow the inertia
reel to retract the belt completely.
Z3 coupeFor the use of child-restraint systems
with a tether strap, an additional
mounting point is provided in the coupe
at the right rear on the roof frame.
Attach the tether strap hook to the
mounting point. Adjust the tether strap
according to the child-restraint manu-
facturer's instructions.367us704
Z3 coupe
Page 59 of 187
59n
IndexDataTechnologyRepairsMaintenanceControlsOverview
Starting the engineBefore starting>Engage the parking brake
>Be sure that the gearshift lever is in
"Neutral" (or the selector lever in "P"
if the vehicle is equipped with auto-
matic transmission)
>Depress the clutch pedal.
Do not run the engine in enclosed
spaces. The exhaust gases
contain carbon monoxide, an odorless
and colorless, but highly toxic gas.
Breathing the exhaust gases poses an
extreme health risk, and can lead to
unconsciousness and death.
Do not leave the vehicle unattended
with the engine running. An unattended
vehicle with a running engine repre-
sents a potential safety hazard.<
Starting the engine>Do not press the accelerator pedal
while starting the engine.
Do not actuate the starter for too
short a time. Do not turn it for
more than approx. 20 seconds. Release
the ignition key immediately after the
engine starts.
Do not allow the engine to warm up
by leaving it running while the vehicle
remains stationary. Instead, begin to
drive immediately at a moderate engine
speed.<
Should the engine fail to start on the
first attempt (if it is very hot or cold, for
instance):
>Press the accelerator pedal halfway
down while engaging the starter.
Cold starts at very low temperatures,
from approx. +5 7 (Ð15 6) and at
altitudes above approx. 3,300 ft
(1,000 m):
>On the first start attempt, engage the
starter for a longer period (approx.
10 seconds).
If these temperature conditions are
anticipated for a longer period, have the
engine oil changed to a special oil, refer
to page 124. Please contact your BMW
center for additional information.
Usually, it is not necessary to depress
the accelerator pedal. However, at high
altitudes or in very hot or very cold
weather, depress the pedal halfway
down when starting the engine.
Engine idle speed is controlled by the
engine computer system. Increased
speeds at start-up are normal and
should decrease as the engine warms
up. If engine speed does not decrease,
service is required.
To prevent the battery from
discharging, always switch off any
accessories which are not required.
Switch off the ignition when the vehicle
is not being driven.
Page 61 of 187
61n
IndexDataTechnologyRepairsMaintenanceControlsOverview
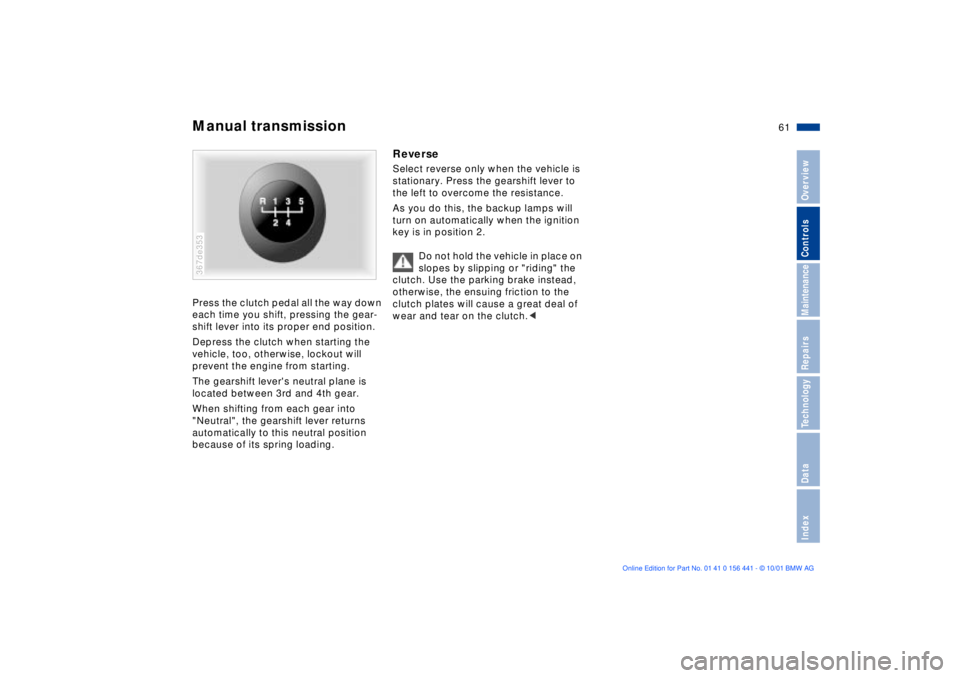
Manual transmissionPress the clutch pedal all the way down
each time you shift, pressing the gear-
shift lever into its proper end position.
Depress the clutch when starting the
vehicle, too, otherwise, lockout will
prevent the engine from starting.
The gearshift lever's neutral plane is
located between 3rd and 4th gear.
When shifting from each gear into
"Neutral", the gearshift lever returns
automatically to this neutral position
because of its spring loading.367de353
ReverseSelect reverse only when the vehicle is
stationary. Press the gearshift lever to
the left to overcome the resistance.
As you do this, the backup lamps will
turn on automatically when the ignition
key is in position 2.
Do not hold the vehicle in place on
slopes by slipping or "riding" the
clutch. Use the parking brake instead,
otherwise, the ensuing friction to the
clutch plates will cause a great deal of
wear and tear on the clutch.<
Page 63 of 187

63n
IndexDataTechnologyRepairsMaintenanceControlsOverview
Automatic transmission with Steptronic
*
P Ñ Park Select only when the vehicle is
stationary. The transmission locks to
prevent the rear wheels from turning.R Ñ Reverse Select only when the vehicle is
stationary. N Ñ Neutral Select only if your journey is interrupted
for a longer period. D Ñ Drive
(automatic shift program) This position is designed for driving
under all normal operating conditions.
All forward gears are available. Kickdown In the kickdown mode, you achieve
maximum performance and in
position D, you reach maximum speed.
Depress the accelerator pedal past the
increased resistance point at the full-
throttle position.
M/S Ð manual mode and
Sport Program When you change from D to M/S, the
Sport Program is activated. This is
indicated by "S" in the gear selection
display. The M/S mode is recom-
mended for performance-oriented
driving.
With the first brief touch, the automatic
transmission shifts from the Sport
Program to the manual mode. When
you tab the selector lever in the "+"
direction, the transmission shifts up.
When the lever is tabbed in the
"Ð" direction, the transmission shifts
down. M1 to M5 is indicated in the
transmission range display.
Upshifts or downshifts will only be
carried out by the ATC at appropriate
engine speeds and road speeds. If the 367de704
engine speed is too high, for instance,
the downshift will not be executed. The
gear selected will appear briefly in the
instrument cluster followed by the
current gear.
If you are driving in the manual
mode and wish to accelerate
rapidly Ð to pass another vehicle, for
example Ð shift down manually or with
the "Kickdown" function.<
You can only change from M/S to
selector lever positions "P", "R" and "N"
via the "D" position.
In the following situations, the Steptronic
"thinks" for you in the manual mode:
>In order to prevent engine over-
speeding, the transmission shifts
automatically to the next higher gear
shortly before the engine speed
cutoff point
>At low speeds, the transmission
shifts down automatically Ð you do
not have to act
>In the kickdown mode, the transmis-
sion shifts down to the lowest possible
gear based on the engine speed
>Depending on the situation Ð when
driving in adverse winter conditions,
for example Ð the transmission may
also start out in 2nd or 3rd gear.
Page 65 of 187
65n
IndexDataTechnologyRepairsMaintenanceControlsOverview
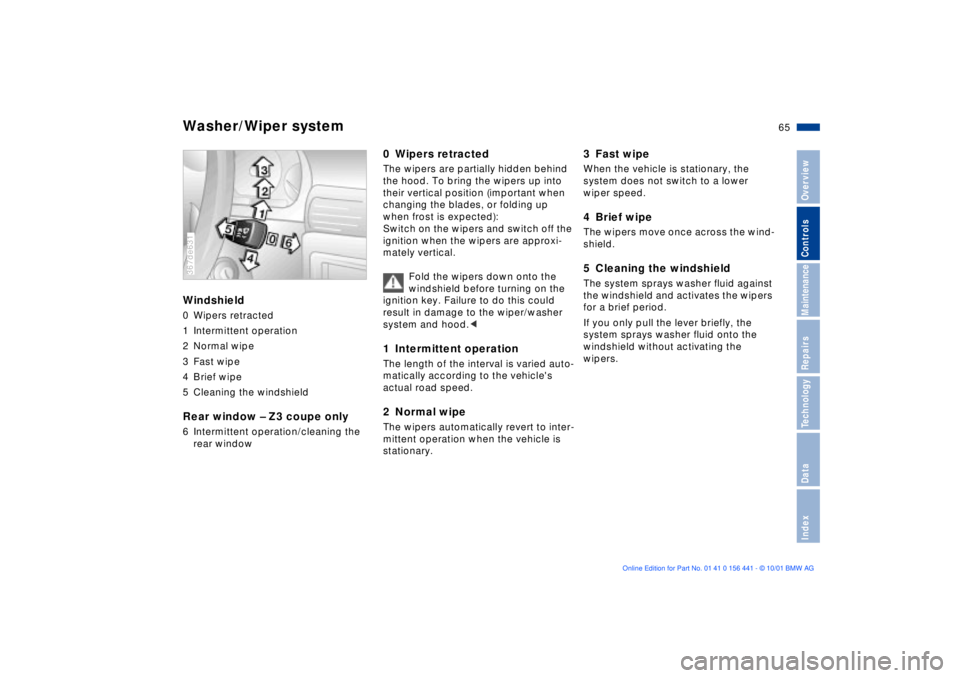
Washer/Wiper systemWindshield0 Wipers retracted
1 Intermittent operation
2 Normal wipe
3 Fast wipe
4 Brief wipe
5 Cleaning the windshieldRear window Ð Z3 coupe only6 Intermittent operation/cleaning the
rear window367de631
0 Wipers retractedThe wipers are partially hidden behind
the hood. To bring the wipers up into
their vertical position (important when
changing the blades, or folding up
when frost is expected):
Switch on the wipers and switch off the
ignition when the wipers are approxi-
mately vertical.
Fold the wipers down onto the
windshield before turning on the
ignition key. Failure to do this could
result in damage to the wiper/washer
system and hood.< 1 Intermittent operationThe length of the interval is varied auto-
matically according to the vehicle's
actual road speed.2 Normal wipeThe wipers automatically revert to inter-
mittent operation when the vehicle is
stationary.
3 Fast wipeWhen the vehicle is stationary, the
system does not switch to a lower
wiper speed.4 Brief wipeThe wipers move once across the wind-
shield.5 Cleaning the windshieldThe system sprays washer fluid against
the windshield and activates the wipers
for a brief period.
If you only pull the lever briefly, the
system sprays washer fluid onto the
windshield without activating the
wipers.
Page 67 of 187
67n
IndexDataTechnologyRepairsMaintenanceControlsOverview
Cruise control
*
You can maintain and store any desired
vehicle speed above approx. 25 mph
(40 km/h).
The system is switched off and the
stored speed deleted from its memory
when you turn the ignition key to posi-
tion 0.
Do not use the cruise control on
winding roads, when high traffic
density prevents driving at a constant
speed, when the road surface is slick
(snow, rain, ice) or when the road
surface is loose (rocks or gravel,
sand).< 365us059
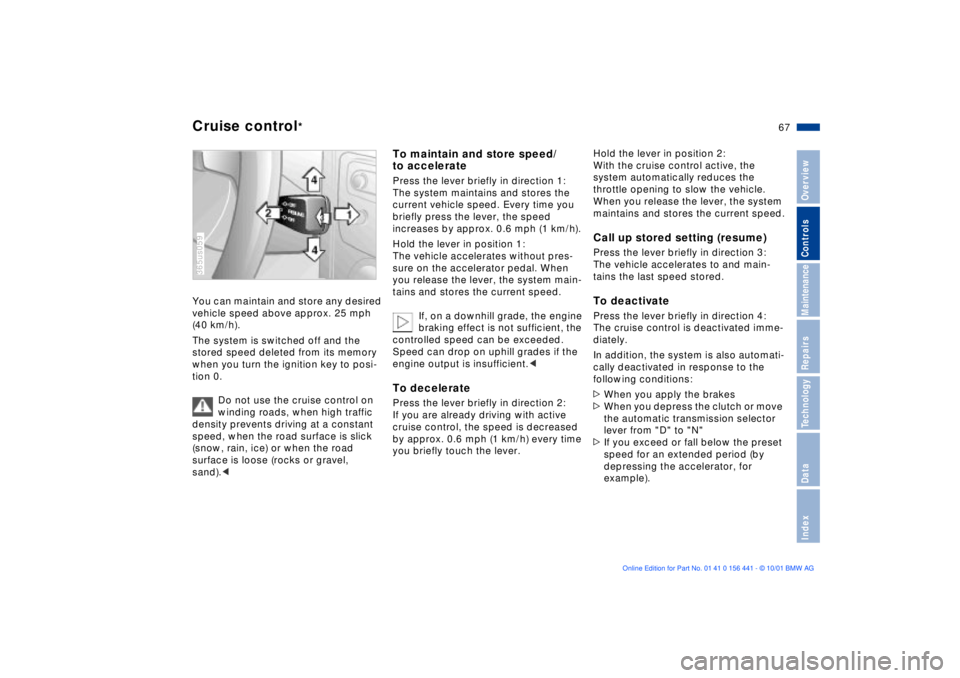
To maintain and store speed/
to acceleratePress the lever briefly in direction 1:
The system maintains and stores the
current vehicle speed. Every time you
briefly press the lever, the speed
increases by approx. 0.6 mph (1 km/h).
Hold the lever in position 1:
The vehicle accelerates without pres-
sure on the accelerator pedal. When
you release the lever, the system main-
tains and stores the current speed.
If, on a downhill grade, the engine
braking effect is not sufficient, the
controlled speed can be exceeded.
Speed can drop on uphill grades if the
engine output is insufficient.< To deceleratePress the lever briefly in direction 2:
If you are already driving with active
cruise control, the speed is decreased
by approx. 0.6 mph (1 km/h) every time
you briefly touch the lever.
Hold the lever in position 2:
With the cruise control active, the
system automatically reduces the
throttle opening to slow the vehicle.
When you release the lever, the system
maintains and stores the current speed.Call up stored setting (resume)Press the lever briefly in direction 3:
The vehicle accelerates to and main-
tains the last speed stored.To deactivatePress the lever briefly in direction 4:
The cruise control is deactivated imme-
diately.
In addition, the system is also automati-
cally deactivated in response to the
following conditions:
>When you apply the brakes
>When you depress the clutch or move
the automatic transmission selector
lever from "D" to "N"
>If you exceed or fall below the preset
speed for an extended period (by
depressing the accelerator, for
example).